In the lead up to our next Game Jam, commencing September 16, participants from our June Hackathon will be taking over the Decentraland blog and revealing their design and building secrets. This week’s guest blogger is Brent Greyling from the collective Design Quarter...
Hi all. I’m a serial 3D experimentalist, qualified product designer, full-stack web developer – specialising in 3D, VR and WebXR applications – graphic designer, 360 virtual and stereo photographer and 3D modeller.
So as you can imagine, maintaining a full-time commitment to Decentraland has its challenges. But still, my dream job would be something like piloting our group’s Cyber Junk concept across the virtual world one day.
The group I speak of is called Design Quarter and we formed in 2017 to inspire and present a vibey hub/hive/lab/gallery for collaboration in matters related to 3D, design, arts and other related disciplines. We’re evolving into a one-stop shop that delivers design originals.
From initial concept to final product, however big or small the project, our aim is to profitably create, build and grow economically – for others and ourselves – within Decentraland.
Design Quarter hits the Hackathon
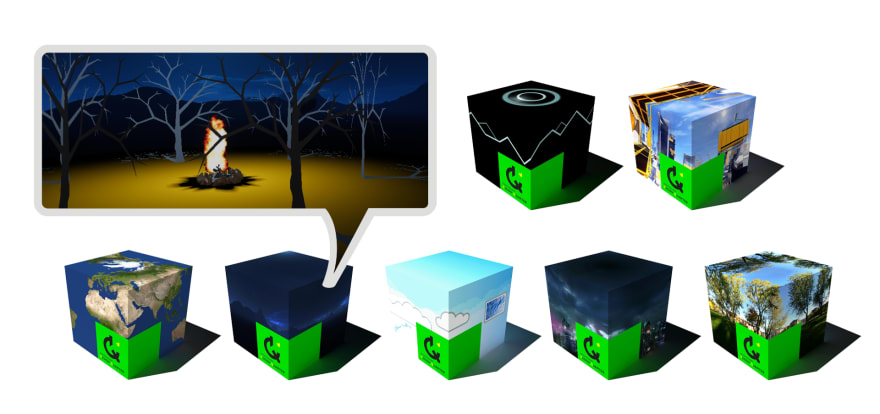
In the June Decentraland Hackathon, part of the Design Quarter entry was a scene featuring a 2D sprite-based fire.

As animated gifs for textures are not supported natively in the Decentraland SDK, we decided to use sprite animation. I am happy to share with you my basic understanding of this technique – a feature of video games since the late 1970s.
The code reflected here can certainly be improved upon, but I have chosen to reflect it exactly as it was used at the time.
The scene, exactly as entered, can be viewed at https://brent-ooaissvdra.now.sh
Our original source files are also available for download from https://drive.google.com/file/d/10r6vnytLCgc_r7Vb-9p2eWDFx3W9VL36/view
Sprite Animation
A Spritesheet adds texture to a flat planar surface while cycling sequentially through the various still images present on it. The illusion of animated movement or the appearance of three-dimensionality is then perceived, much like our flames growing and rising to the sky.

For economy of resources, a spritesheet is a single image file that combines multiple slightly differing images, known as frames, sequentially in ordered rows and columns. Multiple images prevent having to load a whole new texture file for each frame of animation; instead the spritesheet is re-positioned over the surface for each new render.
Complex spritesheets may contain a series of character actions from different views, each action starting on a specific frame and playing out over a certain number of frames.
A film reel can be viewed as a good example of the spritesheet concept that has a single column with many rows. As the film ‘scrolls’ the rows through the projector, the illusion of smooth movement is created on a planar big screen.
If a .png image is used for sprites, it may contain levels of transparency to better reveal and blend in with the background.
Okay, so now that we have an idea of what a sprite is. How do we actually map this spritesheet to a surface?
UV mapping
When you apply a UV map to a surface, you are assigning a texture image to XYZ coordinates of your object using a new 3D space specific to that surface. This is comprised of three vertices that make up that surface triangle, which we also call a polygon.
The relative co-ordinate values of this UV space are named UVW in order to distinguish them from the object-world XYZ. Since texturing requires only two dimensions on a flat surface, we use the UV coordinate axes and ignore the W.
Tip: By simply reversing the order of the same UV point set of a polygon we can reverse the direction in which the surface faces. This is called polygon ‘winding’ and the surface to face normal is a direct result of clockwise or anti-clockwise winding.
Square or rectangular surfaces, i.e. plane shapes, actually comprise two triangles that lie on the same plane and share one common side and thus also two vertices from each triangle. In describing a plane, instead of stating the three UVs for one triangle and another three UVs for the other – which would then contain two duplicates – we can state the four distinct points as a kind of shorthand.
Detective Work
In the comprehensive and ever-growing set of Decentraland Development Documentation, there is a section on Materials which contains the following example of UV mapping:
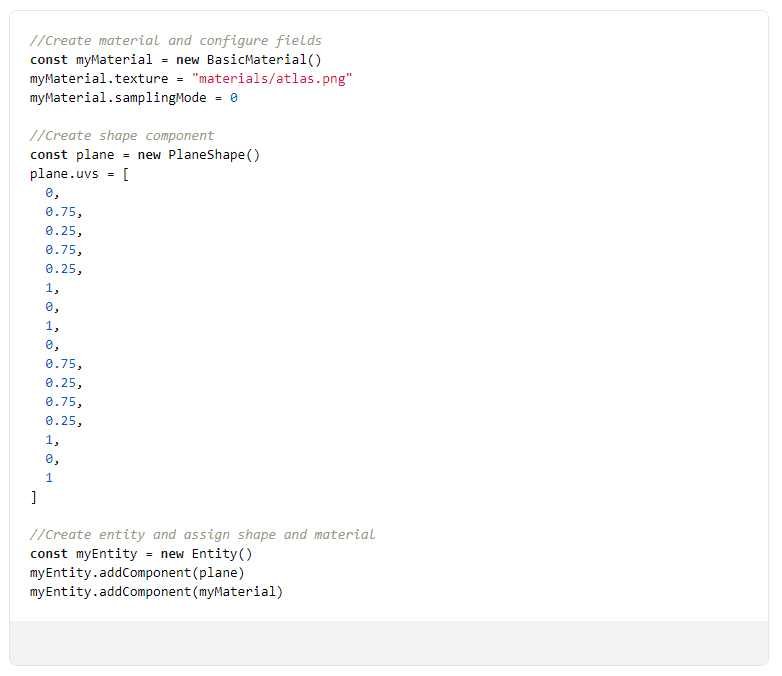
Although the example given above is correct for the spritemap originally used, I quickly got confused as to how it actually works. After all, my fire spritesheet is a different size, has a different number of rows and columns and the surface it is projected on has different proportions.
Simply replacing the atlas.png image with another did not work.
So I started altering the numbers, observing what they would do with my texture image as they changed. After skewing, scaling, repeating and even completely losing and then having to re-find the texture, a pattern began to emerge.
A consistent pattern, which along with the concepts above, was starting to look useful. My rough findings are annotated below to give you a basic idea of what I discovered.
plane.uvs = [
    // ONE FACE
    0.33,  // (B) Horizontal width right end position
    0,  // (C) Vertical height bottom start position
    0,  // (A) Horizontal width left start position
    0,  // (C) Vertical height bottom start position

    0,  // (A) Horizontal width left start position
    0.33,  // (D) Vertical top height end position
    0.33,  // (B) Horizontal width right end position
    0.33,  // (D) Vertical top height end position

    // OTHER FACE
    0.66,  // (B) Horizontal width right end position
    0.0,  // (C) Vertical height bottom start position
    0.33,  // (A) Horizontal width left start position
    0.0,  // (C) Vertical height bottom start position


    0.33,  // (A) Horizontal width left start position
    0.33,  // (D) Vertical top height end position
    0.66,  // (B) Horizontal width right end position
    0.33  // (D) Vertical top height end position
]
I noticed that, for the image not to be misaligned or skewed, I had to use the values in identical pairs in certain places. Please note, A, B, C and D are just my commented markers solely to indicate the matching pairs. Each value itself, between 0 and 1, expressing a dimension between 0 and 100% relating to my texture, be it the left, width, top, height, start or end.
After some more fiddling I discovered precisely what these needed to do to make the above practical.
Stepping through commented code will give you a clear and useful idea of the result.
Note how I kept the spriteRow and spriteCol variables flexible as they are unique to the image used.
Also, don’t get thrown by the dynamic calculations of the spritePlane.uvs. They are like this so that any User-defined variables are applied automatically without you having to worry.
Commented Code follows:
// User defined variables
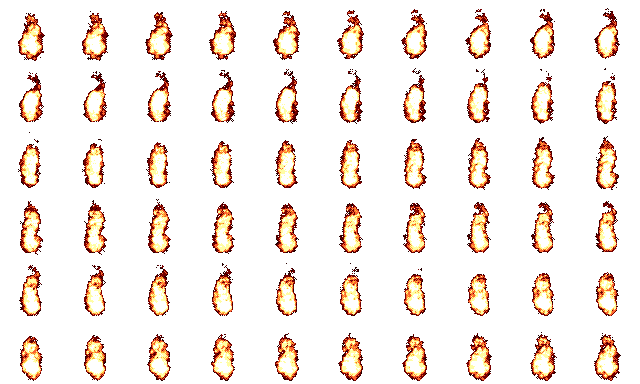
let spriteCols = 10 // number of columns
let spriteRows = 6 // number of rows
let timer = 0.1 // timer speed
let currSpriteCel = 1 // starting position
// Calculated variables
let spriteCels = spriteCols * spriteRows
let colFactor = 1/spriteCols
let rowFactor = 1/spriteRows
// Create material
const spriteMaterial = new BasicMaterial()
spriteMaterial.texture = new Texture("materials/fire.png")
// Create shape component
const spritePlane = new PlaneShape()
// Set the starting UV's
let currRowStart = spriteRows - Math.floor((currSpriteCel-1)/spriteCols)
let currColStart = ((currSpriteCel-1)%spriteCols)
spritePlane.uvs = [
(currColStart+1)*colFactor, (currRowStart-1)*rowFactor,
currColStart*colFactor, (currRowStart-1)*rowFactor,
currColStart*colFactor, currRowStart*rowFactor,
(currColStart+1)*colFactor, currRowStart*rowFactor,
(currColStart+1)*colFactor, (currRowStart-1)*rowFactor,
currColStart*colFactor, (currRowStart-1)*rowFactor,
currColStart*colFactor, currRowStart*rowFactor,
(currColStart+1)*colFactor, currRowStart*rowFactor
]
// Create sprite entity and assign shape and initially mapped sprite material
const spriteFire = new Entity()
spriteFire.addComponent(spritePlane)
spriteFire.addComponent(new Transform({
position: new Vector3(16, 7.3, 16),
rotation: Quaternion.Euler(0, 0, 0),
scale: new Vector3(2,2,2)
}))
spriteFire.addComponent(spriteMaterial)
engine.addEntity(spriteFire)
// Define system to update sprite on every frame
export class spriteAnimate {
update(dt: number) {
if (timer > 0) {
timer -= dt
} else {
timer = 0.1
currSpriteCel += 1
if (currSpriteCel == spriteCels) { currSpriteCel = 1 }
else { currSpriteCel = currSpriteCel + 1 }
let currRowStart = spriteRows - Math.floor((currSpriteCel-1)/spriteCols)
let currColStart = ((currSpriteCel-1)%spriteCols)
spritePlane.uvs = [
(currColStart+1)*colFactor, (currRowStart-1)*rowFactor,
currColStart*colFactor, (currRowStart-1)*rowFactor,
currColStart*colFactor, currRowStart*rowFactor,
(currColStart+1)*colFactor, currRowStart*rowFactor,
(currColStart+1)*colFactor, (currRowStart-1)*rowFactor,
currColStart*colFactor, (currRowStart-1)*rowFactor,
currColStart*colFactor, currRowStart*rowFactor,
(currColStart+1)*colFactor, currRowStart*rowFactor
]
}
}
}
// Add instance of the system to the scene
let animationSystem = engine.addSystem(new spriteAnimate())
Adding billboard functionality
Our next step toward rounding off would be to make the plane always face you.
Thankfully, Decentraland have made that part simple by supplying you with a Billboard component that takes care of that automatically. We just need to add this component to the entity that holds our sprite.
spriteFire.addComponent(new Billboard(false, true, false))
You’ll notice that there are three arguments we’re passing here, each enables or disables the billboard mode on the x, y, and z axis of rotation. Here our billboard only rotates in the Y axis, which means it will follow the player’s movements at ground level, but will keep its upwards direction fixed.
You can read more about billboards in Decentraland in the documentation site. Also, although beyond the scope of this article, to understand the math behind the Billboard a little better you are welcome to contact me.
In summary
We have now covered a few fundamentals, as well as hopefully animated a texture on a plane. We did so using a generic approach that should work correctly for various individual texture images according to how many rows and columns they contain.
Feel free to reach out in general, you'll find me hanging around Design Quarter or on Discord.
Have fun and be sure to sign up for the Game Jam, coming soon on September 16! Design Quarter plans to be there. In the meantime, I will be sharing more of my discoveries as I continue to learn and understand.
[The original fire.png is attached] This and more examples of fire can be found at: https://opengameart.org/content/animated-fire

Top comments (0)