
Welcome back, future serverless security heroes! In the previous instalment of our 'From Zero to Serverless Hero' series, we embarked on a theoretical exploration of API security in serverless GraphQL APIs. We've discussed the critical importance of API security and unveiled various strategic considerations that need to be taken into account.
Today, we shift gears from theory to practice. This time, we're getting our hands dirty, delving deep into the practical elements of API security and actually implementing the strategies we've previously discussed. The main goal? Transforming our knowledge into actionable intelligence, and, consequently, securing our serverless GraphQL API.
In this session, we will be focusing on two vital topics: AWS Cognito, a robust service for user authentication, and setting up authorization for secured data access. We will understand why AWS Cognito can be the perfect tool in our arsenal for handling user authentication and how we can successfully set it up. We will also unravel the mysteries of setting up authorization, thereby ensuring that data access is tightly controlled and only accessible to the appropriate users.
By the end of this post, we will be one step closer to our target of becoming not just serverless enthusiasts, but true serverless security heroes. Roll up your sleeves and prepare to dive into the technical deep-end of serverless GraphQL API security. The serverless journey continues, and this time, it’s all about the practicalities. Let's get started!
Table of Contents
- AWS Cognito: The Perfect Tool for User Authentication and Setting It Up
- Setting Up Authorization for Secured Data Access
- Conclusion
AWS Cognito: The Perfect Tool for User Authentication and Setting It Up
As we've discussed, user authentication is an integral part of API security. After exploring various solutions, AWS Cognito emerges as our choice for managing this crucial aspect. AWS Cognito is a comprehensive user identity and access management service that scales to millions of users, offers seamless integration with social identity providers, and comes with the robust support of Amazon's infrastructure.
In this section, we'll walk through a step-by-step guide on setting up AWS Cognito, detailing how to effectively leverage its features to secure our serverless GraphQL API.
Let's start with creating a cognito user pool, we will need the @aws-sdk/client-cognito-identity-provider library, first we will create a construct in src/construct/user-authentication.construct.ts to have clearly seperated functionalities, which increases code reusability:
import { CfnOutput, RemovalPolicy, Stack, custom_resources } from 'aws-cdk-lib';
import {
  AccountRecovery,
  StringAttribute,
  UserPool,
  UserPoolClient,
  UserPoolDomain,
} from 'aws-cdk-lib/aws-cognito';
import { Construct } from 'constructs';
import { getWorkspaceRoot } from '../utils/workspace';
import { lambda } from '../utils/lambda';
import { ITable } from 'aws-cdk-lib/aws-dynamodb';
import { Effect, Policy, PolicyStatement } from 'aws-cdk-lib/aws-iam';

import { join } from 'path';

interface UserAuthenticationProps {
  userTable: ITable;
}

export class UserAuthentication extends Construct {
  userPool: UserPool;
  webClient: UserPoolClient;

  constructor(scope: Construct, id: string, props: UserAuthenticationProps) {
    super(scope, id);

    this.userPool = new UserPool(this, 'user-pool', {
      standardAttributes: { email: { required: true, mutable: true } },
      customAttributes: {
        authChallenge: new StringAttribute({ mutable: true }),
      },
      passwordPolicy: {
        requireDigits: false,
        requireUppercase: false,
        requireSymbols: false,
      },
      accountRecovery: AccountRecovery.NONE,
      selfSignUpEnabled: true,
      signInAliases: { email: true },
      removalPolicy: RemovalPolicy.DESTROY,
    });
    new UserPoolDomain(this, 'Domain', {
      userPool: this.userPool,
      cognitoDomain: {
        domainPrefix: 'serverless-hero', // Here you define your domain prefix
      },
    });

    const postConfirmationHandler = lambda(
      this,
      'post-auth',
      join(
        getWorkspaceRoot(),
        'dist/packages/serverless-api/post-auth',
        'handler.zip'
      ),
      {
        environment: {
          REGION: Stack.of(this).region,
          COGNITO_USER_POOL_ID: this.userPool.userPoolId,
        },
      }
    );

    // For being able to add the lambda triggers https://github.com/aws/aws-cdk/issues/10002 we can not add it directly with addTrigger, because of the userPoolId reference which would result in a circular dependency
    new custom_resources.AwsCustomResource(this, 'UpdateUserPool', {
      logRetention: 30,
      resourceType: 'Custom::UpdateUserPool',
      // https://docs.aws.amazon.com/cognito-user-identity-pools/latest/APIReference/API_UpdateUserPool.html#CognitoUserPools-UpdateUserPool-request-EmailConfiguration
      // https://docs.aws.amazon.com/cdk/api/v2/docs/aws-cdk-lib.custom_resources.AwsCustomResource.html
      onUpdate: {
        region: Stack.of(this).region,
        service: 'CognitoIdentityServiceProvider',
        action: 'updateUserPool',
        parameters: {
          UserPoolId: this.userPool.userPoolId,
          AutoVerifiedAttributes: ['email'],
          LambdaConfig: {
            PostConfirmation: postConfirmationHandler.functionArn,
          },
          Policies: {
            PasswordPolicy: {
              MinimumLength: 8,
              RequireLowercase: false,
              RequireNumbers: true,
              RequireSymbols: true,
              RequireUppercase: false,
            },
          },
        },
        physicalResourceId: custom_resources.PhysicalResourceId.of(
          this.userPool.userPoolId
        ),
      },
      policy: custom_resources.AwsCustomResourcePolicy.fromSdkCalls({
        resources: custom_resources.AwsCustomResourcePolicy.ANY_RESOURCE,
      }),
    });

    props.userTable.grantReadWriteData(postConfirmationHandler);
    this.userPool.addDomain('CognitoDomain', {
      cognitoDomain: {
        domainPrefix: 'serverless-hero',
      },
    });

    this.webClient = this.userPool.addClient('web-client', {
      authFlows: { custom: true },
    });
    // Using inline policy as a workaround to fix: https://github.com/aws/aws-cdk/issues/7016
    postConfirmationHandler.role?.attachInlinePolicy(
      new Policy(this, 'allow-update-user', {
        statements: [
          new PolicyStatement({
            effect: Effect.ALLOW,
            actions: ['cognito-idp:AdminUpdateUserAttributes'],
            resources: [this.userPool.userPoolArn],
          }),
        ],
      })
    );
    // You do not need this, it is only for logging the information in the end of the deployment process.
    new CfnOutput(this, 'user-pool-id', {
      value: this.userPool.userPoolId,
      description: 'User Pool ID',
    });

    new CfnOutput(this, 'client-id', {
      value: this.webClient.userPoolClientId,
      description: 'User Pool Client ID',
    });
  }
}
This looks a bit complicated and to some extend it is, because there are some tweaks required to get around some problems with the constructs which are used.
I added some comments directly in the code so you can understand why some parts are required.
What we are doing is creating a cognito pool, adding a custom domain prefix it. Then we are adding a lambda function which will do some processing once the user is signed up. Then we are adding a cognito client app, which we will need for doing a sign up/sign in. And in the end we are providing the required rights for the lambda function.
So, we have the cdk construct now, but what we are missing is the code implementing our logic. Let's do this now. We will start with the PostConfirmation lambda which gets called after the signup of a user and which allows us to do some processing on the data of the signed-up user. Here is the handler/post-auth.ts code:
import { CfnOutput, RemovalPolicy, Stack, custom_resources } from 'aws-cdk-lib';
import {
  AccountRecovery,
  StringAttribute,
  UserPool,
  UserPoolClient,
  UserPoolDomain,
} from 'aws-cdk-lib/aws-cognito';
import { Construct } from 'constructs';
import { getWorkspaceRoot } from '../utils/workspace';
import { lambda } from '../utils/lambda';
import { ITable } from 'aws-cdk-lib/aws-dynamodb';
import {
  Effect,
  Policy,
  PolicyStatement,
  ServicePrincipal,
} from 'aws-cdk-lib/aws-iam';

import { join } from 'path';

interface UserAuthenticationProps {
  userTable: ITable;
}

export class UserAuthentication extends Construct {
  userPool: UserPool;
  webClient: UserPoolClient;

  constructor(scope: Construct, id: string, props: UserAuthenticationProps) {
    super(scope, id);

    this.userPool = new UserPool(this, 'user-pool', {
      standardAttributes: { email: { required: true, mutable: true } },
      customAttributes: {
        authChallenge: new StringAttribute({ mutable: true }),
      },
      passwordPolicy: {
        requireDigits: false,
        requireUppercase: false,
        requireSymbols: false,
      },
      accountRecovery: AccountRecovery.NONE,
      selfSignUpEnabled: true,
      signInAliases: { email: true },
      removalPolicy: RemovalPolicy.DESTROY,
    });
    new UserPoolDomain(this, 'Domain', {
      userPool: this.userPool,
      cognitoDomain: {
        domainPrefix: 'serverless-hero', // Here you define your domain prefix
      },
    });

    const postConfirmationHandler = lambda(
      this,
      'post-auth',
      join(
        getWorkspaceRoot(),
        'dist/packages/serverless-api/post-auth',
        'handler.zip'
      ),
      {
        environment: {
          REGION: Stack.of(this).region,
          COGNITO_USER_POOL_ID: this.userPool.userPoolId,
        },
      }
    );

    // For being able to add the lambda triggers https://github.com/aws/aws-cdk/issues/10002 we can not add it directly with addTrigger, because of the userPoolId reference which would result in a circular dependency
    new custom_resources.AwsCustomResource(this, 'update-user-pool', {
      logRetention: 30,
      resourceType: 'Custom::UpdateUserPool',
      // https://docs.aws.amazon.com/cognito-user-identity-pools/latest/APIReference/API_UpdateUserPool.html#CognitoUserPools-UpdateUserPool-request-EmailConfiguration
      // https://docs.aws.amazon.com/cdk/api/v2/docs/aws-cdk-lib.custom_resources.AwsCustomResource.html
      onUpdate: {
        region: Stack.of(this).region,
        service: 'CognitoIdentityServiceProvider',
        action: 'updateUserPool',
        parameters: {
          UserPoolId: this.userPool.userPoolId,
          AutoVerifiedAttributes: ['email'],
          LambdaConfig: {
            PostConfirmation: postConfirmationHandler.functionArn,
          },
          Policies: {
            PasswordPolicy: {
              MinimumLength: 8,
              RequireLowercase: false,
              RequireNumbers: true,
              RequireSymbols: true,
              RequireUppercase: false,
            },
          },
        },
        physicalResourceId: custom_resources.PhysicalResourceId.of(
          this.userPool.userPoolId
        ),
      },
      policy: custom_resources.AwsCustomResourcePolicy.fromSdkCalls({
        resources: custom_resources.AwsCustomResourcePolicy.ANY_RESOURCE,
      }),
    });
    const invokeCognitoTriggerPermission = {
      principal: new ServicePrincipal('cognito-idp.amazonaws.com'),
      sourceArn: this.userPool.userPoolArn,
    };

    postConfirmationHandler.addPermission(
      'InvokePostConfirmationHandlerPermission',
      invokeCognitoTriggerPermission
    );

    props.userTable.grantReadWriteData(postConfirmationHandler);
    this.userPool.addDomain('CognitoDomain', {
      cognitoDomain: {
        domainPrefix: 'serverless-hero',
      },
    });

    this.webClient = this.userPool.addClient('web-client', {
      authFlows: { custom: true },
    });
    // Using inline policy as a workaround to fix: https://github.com/aws/aws-cdk/issues/7016
    postConfirmationHandler.role?.attachInlinePolicy(
      new Policy(this, 'allow-update-user', {
        statements: [
          new PolicyStatement({
            effect: Effect.ALLOW,
            actions: ['cognito-idp:AdminUpdateUserAttributes'],
            resources: [this.userPool.userPoolArn],
          }),
        ],
      })
    );
    // You do not need this, it is only for logging the information in the end of the deployment process.
    new CfnOutput(this, 'user-pool-id', {
      value: this.userPool.userPoolId,
      description: 'User Pool ID',
    });

    new CfnOutput(this, 'client-id', {
      value: this.webClient.userPoolClientId,
      description: 'User Pool Client ID',
    });
  }
}
This code does two specific things:
- It creates a user in DynamoDB, this way we will be able to store additional information for our user and are able to easily access this information later.
- It checks if the login mail is lower case and if not it will correct the email to be lower case. Having a user sign up with a email containing uppercases letters might be a problem later so we apply this fix. But you are free to remove this part of the code.
As you can see the code uses a repository called UserRepository, as we did not create this one so far let's continue adding this code:
import Container, { Service } from 'typedi';

import {
  AdminUpdateUserAttributesCommand,
  CognitoIdentityProviderClient,
  CognitoIdentityProviderClientConfig,
} from '@aws-sdk/client-cognito-identity-provider';
import { DynamoDB } from '@aws-sdk/client-dynamodb';
import { DynamoStore } from '@cubesoft/dynamo-easy';

import { UserModel } from '../model/user.model';
import { COGNITO_USER_POOL_ID } from '../token/cognito';
import { REGION } from '../token/env';

@Service()
export class UserRepository {
  private dynamoDb = new DynamoDB({ region: Container.get(REGION) });
  private cognitoUserPoolId = Container.get(COGNITO_USER_POOL_ID);
  private readonly userStore: DynamoStore<UserModel>;

  constructor() {
    this.userStore = new DynamoStore(UserModel, this.dynamoDb);
  }

  /**
   * Create a new user in cognito
   *
   * @param id Unique id of the user can be used for anonymised usage e.g in logs
   * @param email Email address of the user to create
   * @returns The created UserType
   */
  async createUser(id: string, email: string): Promise<UserModel> {
    const user = new UserModel();
    user.id = id;
    user.email = email;
    await this.userStore.put(user).exec();
    return user;
  }

  /**
   * Update a user in cognito
   *
   * @param email Email address of the user to update
   */
  async updateCognitoUserMail(
    userId: string,
    email: string,
    provider: CognitoIdentityProviderClientConfig = {}
  ): Promise<void> {
    const client = new CognitoIdentityProviderClient(provider);
    const command = new AdminUpdateUserAttributesCommand({
      Username: userId,
      UserPoolId: this.cognitoUserPoolId,
      UserAttributes: [
        {
          Name: 'email',
          Value: email,
        },
        {
          Name: 'email_verified',
          Value: 'true',
        },
      ],
    });
    const response = await client.send(command);
    if (response.$metadata.httpStatusCode !== 200) {
      throw new Error('Failed to create user');
    }
  }
}
For our userRepository to be able to store the user data in the database we need to create a UserModel:
import { v4 } from 'uuid';

import { Model, PartitionKey } from '@cubesoft/dynamo-easy';

@Model({ tableName: 'user_table' })
export class UserModel {
  @PartitionKey()
  id: string;

  email: string;

  createdAt: number;
  updatedAt: number;

  constructor() {
    this.createdAt = Date.now();
    this.updatedAt = this.createdAt;
  }
}
So let's recap: We created the construct for setting up cognito and provided the code for adding user data into our database. But we are not yet at the finish line, so far this will have no effect on our deployment. For the changes to take effect, we will need to add our construct into our stack, additionally we also need to create a table for storing information about our users later. For this we need to extend our lib/serverless-stack.ts with the following code snippet:
    const userTable = new Table(this, 'user-table', {
      tableName: `user_table`,
      billingMode: BillingMode.PAY_PER_REQUEST,
      removalPolicy: RemovalPolicy.DESTROY,
      partitionKey: { name: 'id', type: AttributeType.STRING },
    });

    new UserAuthentication(this, 'user-authentication', { userTable });
And we also need to add the function to our handler functions:
{
  "entrypoints": {
    "serverless-api": "src/handler/serverless-api",
    "post-auth": "src/handler/post-auth"
  }
}
Now we can deploy the code with our known command nx build serverless-api && nx deploy serverless-cdk --profile serverless-hero.
Once we have deployed this changes we will be able to visit the Hosted Cognito UI for signing up or signing in a user.
The Hosted UI will look like this:
https://<your_domain>/login?response_type=token&client_id=<your_app_client_id>&redirect_uri=<your_callback_url>
Where to find the required information?
-
your_domain: In the AWS Console go to Cognito > User Pools, select your newly created user pool. Go to the App Integration Tab, there you will find the Cognito Domain, but basically it is has the following structurehttps://<configured_prefix>.auth.<aws-region>.amazoncognito.com -
your_app_client_id>: On the same page like your domain, scroll down to the App client list and you will find your Client ID -
your_callback_url: In the same section as the Client ID click on the App client name, in the new page you will find all allowed callback URLs in the Hosted UI section. For a proper login process you will need to configure a callback URL which will redirect you to your website, however as we do not implement a UI in this blog post we do not care about the callback URL, we just need to make sure we provide one which is configured, if not Cognito will reject the login attempt.
If you provided all the correct variables you will be redirected to a UI similar like this.

After a successful signup you will be redirected to a url with the following structure:
<your_callback_url>/#id_token=<token>&expires_in=3600&token_type=Bearer
We are interested in the <token>. We will need it later for authenticating ourself to our api.
Setting Up Authorization for Secured Data Access
Now that we have all prerequits, we can extend our API to make sure only authenticated users will have access to specific routes.
We want to make sure only authenticated people are able to add new plants to our database. This for example allows us to track who made a change and in case we have some questions we would know who to contact. To apply this change we need to decorate our Mutation with the @Authorized() decorator:
  @Authorized()
  @Mutation(() => PlantType, {
    description: 'Add a new plant to the library.',
  })
  async addPlant(
    @Arg('name', () => String) name: string,
    @Arg('description', () => String) description: string
  ): Promise<PlantType> {
    const plant = new PlantModel();
    plant.name = name;
    plant.description = description;

    return this.plantRepository.createOrUpdatePlant(plant);
  }
Now the server knows it needs to check for the authorization of a user, but it does not yet know how to do this. For this we need to provide a helper function auth.checker.ts. For this function we need to install two packages npm i jwk-to-pem jsonwebtoken:
import { AuthChecker } from 'type-graphql';
import { Context } from '../model/context.model';
import { GraphQLError } from 'graphql';
import { Token } from '../interface/token.interface';
import jwkToPem from 'jwk-to-pem';
import { TokenExpiredError, decode, verify } from 'jsonwebtoken';

const keysCache = {};
const userPoolUrl = `https://cognito-idp.${process.env.REGION}.amazonaws.com/${process.env.COGNITO_USER_POOL_ID}`;

export const customAuthChecker: AuthChecker<Context, string> = async ({
  context,
}) => {
  if (!context.authToken) {
    throw new GraphQLError('No valid Token', {
      extensions: { code: 'FORBIDDEN' },
    });
  }
  checkTokenAndUpdateUserId(context);
  return true;
};

export async function checkTokenAndUpdateUserId(context: Partial<Context>) {
  let token: Token;
  try {
    const tokenParts = context.authToken.split('Bearer ');
    const authToken = tokenParts[tokenParts.length - 1];
    token = await verifyToken(authToken);
  } catch (err) {
    if (err instanceof TokenExpiredError) {
      throw new GraphQLError('Token is expired', {
        extensions: { code: 'FORBIDDEN' },
      });
    } else {
      throw new GraphQLError(err.message, {
        extensions: { code: 'FORBIDDEN' },
      });
    }
  }
  console.log(token);
  if (!token?.sub) {
    throw new GraphQLError('Token is not valid', {
      extensions: { code: 'FORBIDDEN' },
    });
  }
  context.userId = token.sub;
}
export async function verifyToken(
  rawToken: string
): Promise<Token | undefined> {
  const decodedToken = decode(rawToken, { complete: true });
  if (!decodedToken) {
    return undefined;
  }
  let pem = keysCache[decodedToken.header.kid];
  // this is a fallback to load a new set of keys
  // according to the documentation, this should be done in case of rotation
  if (!pem) {
    try {
      await loadKeys(userPoolUrl);
      pem = keysCache[decodedToken.header.kid];
    } catch (err) {
      console.error('Failed loading JWKS keys: ', err);
      return undefined;
    }
  }
  // if pem is still not found, the requestor is maybe using a wrong key (from other stage or forged)
  if (!pem) {
    throw new GraphQLError('Token is not supported', {
      extensions: { code: 'FORBIDDEN' },
    });
  }

  return verify(rawToken, pem, {
    issuer: userPoolUrl,
  }) as Token;
}

async function loadKeys(userPoolUrl: string): Promise<void> {
  const respones = await fetch(`${userPoolUrl}/.well-known/jwks.json`);
  const data = await respones.json();
  const keys = data.keys;
  for (const key of keys) {
    const pem = jwkToPem(key);
    keysCache[key.kid] = pem;
  }
  return;
}
This function does several things:
- It checks if an authToken is provided
- It verifies if the provided token is valid by loading the well-known jwks from cognito and using those for checking the validity of the token.
- We take the userId from the encrypted token and add it to the context, so that it will be available during the mutation or query execution if required.
We used two unknown classes in this code, the contextModel:
export class Context {
  clientId: string;
  clientIp: string;
  authToken: string;
  // from auth.checker.ts
  userId?: string;
}
and the token interface:
export interface Token {
  sub: string;
  event_id: string;
  token_use: 'access';
  scope: string;
  auth_time: number;
  iss: string;
  exp: number;
  iat: number;
  jti: string;
  client_id: string;
  username: string;
  'cognito:groups': string[];
}
Now we need to make sure or server is able to perform the authorization check. For this we need to add the authChecker into the buildSchemaSync function and need to make sure the accessToken is properly added to our context:
const schema = buildSchemaSync({
  resolvers: [PlantLibraryResolver],
  container: Container,
  validate: { forbidUnknownValues: false },
  dateScalarMode: 'timestamp',
  authChecker: customAuthChecker,
});
const server = new ApolloServer({
  schema: schema,
  introspection: true,
  csrfPrevention: true,
});
export const handler = startServerAndCreateLambdaHandler(
  server,
  handlers.createAPIGatewayProxyEventV2RequestHandler(),
  {
    context: async ({ event }) => {
      const apiKey = getHeader('x-api-key', event.headers);
      if (!apiKey || !API_KEYS.includes(apiKey)) {
        throw new GraphQLError(
          'You are not authorized to perform this action.',
          {
            extensions: { code: 'FORBIDDEN' },
          }
        );
      }
      const authToken = getHeader('authorization', event.headers);
      const clientIp = event.requestContext.http.sourceIp;

      return {
        authToken,
        apiKey,
        clientIp,
      };
    },
  }
);
Additionaly, you might have seen that we are using two environment variables, COGNITO_USER_POOL_ID and REGION we need to make sure that those are available in our handler for this we need to add them during the function creation in our serverless.stack.ts.
    const lambda = new Function(this, 'api-handler', {
      runtime: Runtime.NODEJS_18_X,
      handler: 'serverless-api.handler',
      functionName: 'serverless-api',
      code: Code.fromAsset(
        join(
          getWorkspaceRoot(),
          'dist/packages/serverless-api/serverless-api',
          'handler.zip'
        )
      ),
      memorySize: Size.gibibytes(1).toMebibytes(),
      architecture: Architecture.ARM_64,
      logRetention: RetentionDays.ONE_DAY,
      timeout: Duration.seconds(5),
      environment: {
        COGNITO_USER_POOL_ID: userAuthentication.userPool.userPoolId,
        REGION: Stack.of(this).region,
      },
    });
Let's deploy the changes with nx build serverless-api && nx deploy serverless-cdk --profile serverless-hero and see what effect it has.
If we now run our addPlant mutation from last time we will get a GraphQL Error with the message No valid Token. So it works, without the authorization header, we are no longer able to add a new plant. Let's to the check if it works with a correct token. For this we need to get the cognito token from section one and add this token in the header section in the Apollo Server Playground:
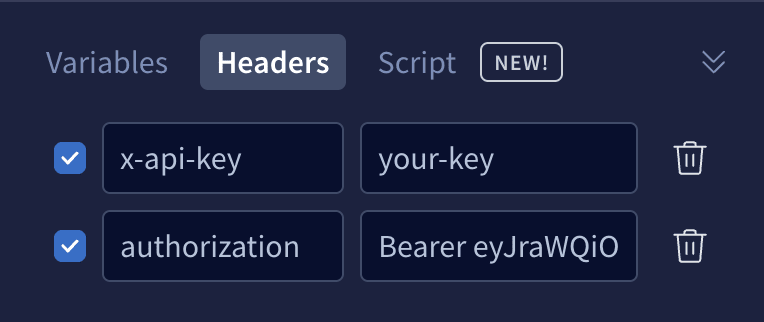
With this you should again get the expected output from your newly created plant.
Conclusion
We've now established AWS Cognito as a key tool in our serverless hero arsenal, leveraging its power to handle user authentication with finesse. Furthermore, we've successfully set up authorization to ensure our data access remains secure and uncompromised.
But remember, the journey to becoming a serverless security hero is one of continuous learning and constant improvement. Security is a dynamic field that demands consistent attention and updates. The work we've done today, though essential, represents only one facet of the broader API security landscape.
In the next session of our 'From Zero to Serverless Hero' series, we will delve deeper into the realm of authorization. We will explore how to tailor different levels of access based on the permissions granted to individual users. Managing user permissions adds an additional layer of security, enabling more granular control over who can access what within your serverless GraphQL API.
Stay tuned for our next adventure where we will take one more step closer to becoming full-fledged serverless security heroes. Remember, every piece of knowledge, every step we take, brings us closer to our goal. Until next time, keep learning, keep experimenting, and keep secure!’
Hey there, dear readers! Just a quick heads-up: we're code whisperers, not Shakespearean poets, so we've enlisted the help of a snazzy AI buddy to jazz up our written word a bit. Don't fret, the information is top-notch, but if any phrases seem to twinkle with literary brilliance, credit our bot. Remember, behind every great blog post is a sleep-deprived developer and their trusty AI sidekick.

Top comments (0)