Welcome to CodeCast - the ultimate live-streaming service for developers. CodeCast lets you stream, record, view, and engage in coding projects from anywhere. Live stream your code with an audience, allowing them to follow along and interact with your code as you write it. Our interface helpfully shows any changes so your audience (and yourself) can stay up to date with everything happening, as it’s happening. Later, your audience can rewatch your streams after you've ended them by publicly sharing your previous casts.
So How Do You Get Started?
To get started with CodeCast, download the Studio App, being sure to install the correct version for your operating system. We currently support Mac, with our Linux and Windows versions coming soon! To use the CodeCast, you must sign up for a CodeCast account. Once you've done all of this, and are logged into your account on the Studio App, you're ready to make your first cast.
Uploading Your Project
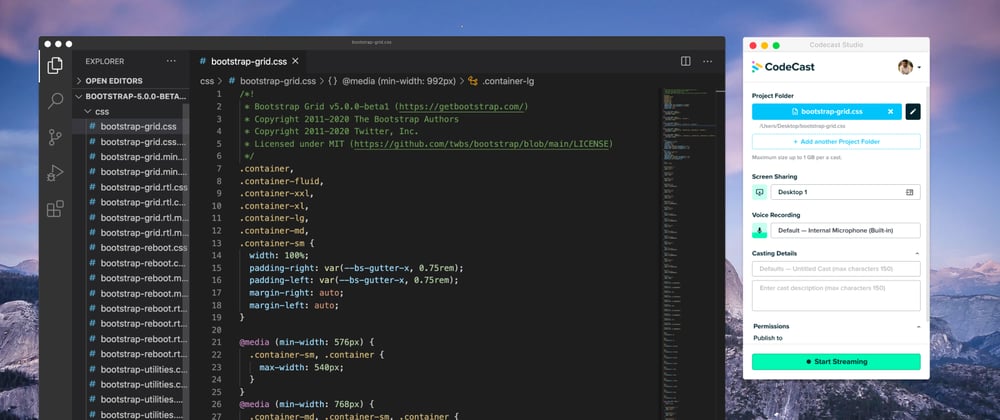
When you go to start your cast, you must upload the project folder where your code is stored. Simply click the upload icon to begin uploading your coding project. Once your project is uploaded, you can rename the project folder by clicking the pencil icon. The name of the folder will be viewable on the web player. Editing this here changes how it will look in the player, but does not change it on your local machine.
If you desire, you can upload more than one project folder to a cast.
Screen and Audio Sharing
You can easily toggle on and off screen-sharing by clicking the monitor icon. If desired, you can choose a different display window for your screen sharing. Your audio defaults to your device's default microphone. If you wish to use a different device, you can easily select which device’s microphone you wish to use.
Casting Details and Permissions
You will be asked to give the cast a title and a description before starting the cast. You will want to provide a clear title and description so your viewers have clear context as to what they will be viewing. You do have the option of updating this information in your account at a later time, but it’s best to do it before starting the live cast.
The permission allows you to control where you can publish your cast, and if you want it to be displayed in any organizations you belong to. It also allows you to control whether you want your cast to be private or public.
Starting Your Cast
Once you have completed the steps above, you’re now ready to start your cast. Hit “Start Streaming” to start your live cast. Casts will always start as a live-streaming video. Once it begins, you are still able to upload any folders. Screen and audio sharing can be switched on and off, and you maintain your ability to switch screen or audio devices.
The casting URL is where your cast is broadcasted and where your viewers can access it. The link will open a new window to codecast.io. To end your recording session, press “End Streaming” and confirm again to finish.
Cast Summary Page
This is your chance to edit anything before your cast is converted into a video and published. Here, you can modify the title, description, and permissions. If you change your mind, you can always edit these later by checking out the cast on your profile. The summary screen gives you the total recorded time of your cast. The number of total new viewers who visited your cast will also be shown, if applicable.
You’ve done it. You’ve officially created your first cast! You can continue to make more casts and use CodeCast to grow and help your audience.
Originally published at codecast.io by Amy Oulton


Top comments (0)