
At this point basically everything is set up but you probably can't access anything yet or your may only be able to see a landing page with no useful information on it. This is because the Apache HTTP Server doesn't know how to communicate with the Ruby API. 
See, for a dynamic application like a Rails API there needs to be some kind of Rack-Compatible Server to handle the incoming requests that the HTTP server isn't able to process. This is where an Application Server, like Phusion Passenger or Apache Tomcat, or a Rack-compatible web server, like Puma, are needed to process the dynamic content requests got the HTTP server.
Because I had built a Rack specific application there are, like always, a few ways you could set this up.
- You could set up Apache with a reverse proxy for a stand alone Rack-specific web server, like Puma or Unicorn.
- You could use an Apache module, like Phusion Passenger, to manage the processes and any needed reverse proxying.
Though I was originally using Puma as a stand alone server, and because it's Heroku's Recommended Ruby Webserver, this section will be about my process of changing over to the Application Server, Passenger, to help handle the Ruby on Rails routing and how I dealt with CORS for my API. That being said, if you created your own Rails API from scratch for this you might not want to use Passenger and use a straight PHP interface or Puma instead.
Table Of Contents
Step 1: Adding in an Application Server
Step 2: Setting Apache Passenger configuration
Step 3: Accessing Rails Routes
Step 1: Adding in an Application Server
First thing first is to add Passenger into the server to be used.
- Navigate to the applications "backend" folder, if not there already, with
cd /var/www/etcpasswdapp/backend. - Run
sudo nano Gemfileto edit the Gemfile. - If it's there, "comment out" the Puma gem in the Gemfile by placing a
#at the beginning of the Puma gem line. - Now add
gem "passenger", ">= 5.0.25", require: "phusion_passenger/rack_handler"(the Passenger gem) below the commented out Puma gem.
- Save and close the file.
-
Add the Passenger packages into Ubuntu with the following
sudocommands.
Install our PGP key and add HTTPS support for APT with:
    sudo apt-get install -y dirmngr gnupg
    sudo apt-key adv --keyserver hkp://keyserver.ubuntu.com:80 --recv-keys 561F9B9CAC40B2F7
    sudo apt-get install -y apt-transport-https ca-certificates
Add our APT repository with:
    sudo sh -c 'echo deb https://oss-binaries.phusionpassenger.com/apt/passenger focal main > /etc/apt/sources.list.d/passenger.list'
     sudo apt-get update
Install Passenger with:
    sudo apt-get install -y passenger
Run
bundle installto ensure that all the gem dependencies are up to date and the passenger gem in installed.Run
passenger-install-apache2-moduleto run the Passenger Apache module installer.-
Check the package was installed correctly with
sudo /usr/bin/passenger-config validate-install.- It might give you an option to check the path or the install like mine did below. Use the up and down arrows to select one and press "enter" to select it. I recommend running it twice to check both have a valid install.

- It might give you an option to check the path or the install like mine did below. Use the up and down arrows to select one and press "enter" to select it. I recommend running it twice to check both have a valid install.
Now run
sudo a2enmod passengerto enable the Passenger Apache module.
Because I am using Ubuntu 20.04 for this project got stuck here and found out that I needed to also configure my main Apache "conf" file. If you are not using Ubuntu 20.04 you might skip the next step for setting up the Apache Passenger Configuration, but you might want to read it over if something applies to you.
{Back to the Table Of Contents}
Step 2: Setting Apache Passenger configuration
When I ran the the command sudo a2enmod passenger to enable the Passenger Apache module in the previous step, it returned some information about a "passenger.load" file and a "passenger.conf" file. 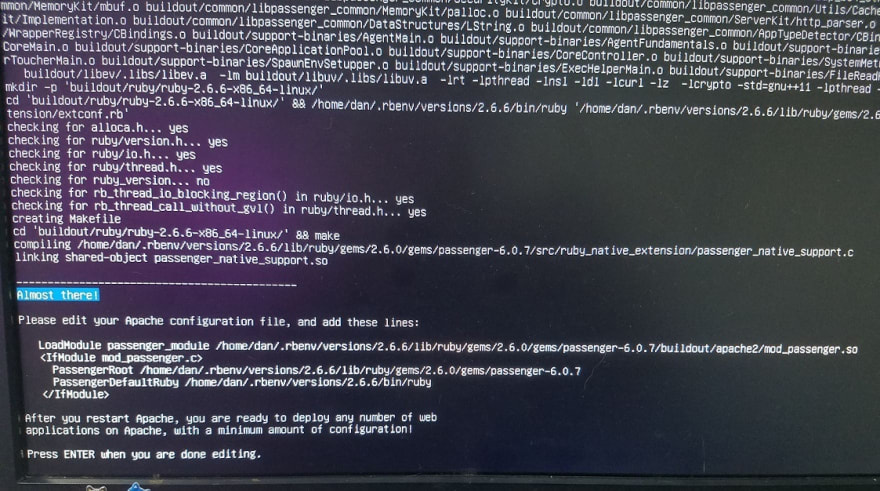 At the time I didn't understand it but after some research it turns out that for Apache 20.04 some additional configurations need to be added to the Apache "conf" file to specify the location of the passenger files. Refer to this tutorial if something doesn't make since. 4
- Navigate into the "mods-enabled" folder with
cd /etc/apache2/mods-enabled. - Run
sudo nano passenger.loadto edit the passenger file. - Add the "LoadModule" that was output and comment out the current "LoadModule" location.
- See pic in part 6 for what it should look like.
- Save the file and exit the editor.
- Now run
sudo nano passenger.confto edit the passenger conf file. - Add the "
<IfModule mod_passenger.c>" that was output and comment out any other informaiton in the file.- Both your "passenger.load" file and a "passenger.conf" file should look like this:

- Note: Because my files were previously created on the first module install attempt I only needed to modify them. If for some reason the files are not already created you will probably need to create the
/etc/apache2/mods-available/passenger.loadfile and add the "LoadModule" directive that passenger-install-apache2-module outputs and create the/etc/apache2/mods-available/passenger.conffile and paste the "PassengerRoot" and other Passenger options that were output by the module.
- Both your "passenger.load" file and a "passenger.conf" file should look like this:
- Enable the module again by running
sudo a2enmod passenger.- If this doesn't work hopefully you typed in something wrong and it's an easy fix. If not try checking out the Passenger TroubleShooting pages or the logs and see what it's telling you.
- Now navigate into the "sites-enabled" folder with
cd /etc/apache2/sites-enabled. - Run
sudo nano etcpasswdapi.confto edit the file. - Add the Passender specific configuration for "Development" and the "PassengerRuby".
- For example,

- For example,
- Restart Apache with
sudo apache2ctl restart - Check that it worked by navigating to the site that your API is at on your client computer.
- Because my API doesn't have an
index.htmllanding page I needed to create a temporaryindex.htmlfile in the "public" folder to ensure general connectivity.
- Because my API doesn't have an
{Back to the Table Of Contents}
Step 3: Accessing Rails Routes
At this point you will probably be able to see the index page (as shown in the previous step) but if you want to access specific API routes to process data, you need to add in some CORS specifications to allow access to secure content. See, although the frontend and backend live on the same server they don't have the same origin.  For this to work the Apache headers module will be needed.
The Apache headers module is one that will allow for control over the responses from the server. They can, and should, be set specific to each application on it.
In my case I am using HTTPS for both the frontend and backend of my application so I need to set up both conf files.
- To enable the headers module run
sudo a2enmod headers. - Navigate to the Apache2 folder with
cd /etc/apache2/sites-enabled. - Edit the frontends "conf" file with
sudo nano etcpasswdapp.conf. - With the editor open add
Header set Access-Control-Allow_Origin "*"to the<Directory>section. - Save and close the file.
- Now open the 'conf' file for the backend with
sudo nano etcpasswdapi.conf - With the editor open add
Header set Access-Control-Allow_Origin "http://etcpasswdapp.com"to the<Directory>section. - Save and close the file.
- Restart apache with
systemctl restart apache2
If all works you should be able to see your frontend 
and use it to interact with your API 
{Back to the Table Of Contents}
DONE!!!!

This last part was not that easy for me and took a few days to figure out and configure. Between all the spelling errors of mine and the lack of documentation for Ubuntu 20.04 I had to piece together things to make it all work for my set up. Feel free to ask questions and I hope I can help.
Now that that's done it's time to harden the server, test the application I built, and fix things.
Happy Hacking

Resources:
1. https://www.phusionpassenger.com/library/walkthroughs/deploy/ruby/ownserver/apache/oss/bionic/install_passenger.html
2. https://www.phusionpassenger.com/docs/advanced_guides/install_and_upgrade/standalone/install/oss/focal.html
3. https://www.phusionpassenger.com/docs/advanced_guides/install_and_upgrade/apache/install/oss/focal.html
4. https://www.phusionpassenger.com/library/install/apache/working_with_the_apache_config_file.html
5. https://www.phusionpassenger.com/library/walkthroughs/deploy/ruby/ownserver/apache/oss/rubygems_norvm/install_passenger.html#step-2:-run-the-passenger-apache-module-installer
6. https://medium.com/@thorntonbrenden/rails-and-the-legendary-master-key-15c8be7799f1
7. https://linuxize.com/post/how-to-install-ruby-on-ubuntu-20-04/
8. https://www.phusionpassenger.com/docs/advanced_guides/install_and_upgrade/apache/working_with_the_apache_config_file.html
9. https://www.phusionpassenger.com/docs/tutorials/deploy_to_production/deploying_your_app/oss/aws/ruby/apache/#rails_configure-database-yml-and-secrets-yml
10. https://www.phusionpassenger.com/library/walkthroughs/start/ruby.html
11. https://www.digitalocean.com/community/tutorials/how-to-use-postgresql-with-your-ruby-on-rails-application-on-ubuntu-18-04
12. https://www.digitalocean.com/community/tutorials/how-to-set-up-a-ruby-on-rails-project-with-a-react-frontend
13. https://www.phusionpassenger.com/library/config/apache/intro.html

Top comments (0)