
What is an array?
An array is like a box with compartments, where you can store a set number of items of the same kind.
Arrays play a crucial role in Kotlin , helping us hold many items together. They allow us to send multiple values to a function easily, or make various changes to the data.
There are various different forms of arrays in Kotlin, including the object-type array, represented by something called the array class. If you’re new to Android development, you may not have encountered these forms before, but fear not. In this article, we’ll examine them in detail for you.
Specifically, we’ll examine what we can do with Arrays. We’ll also look at various built-in ways to work with arrays, illustrated with examples.
Complimentary to diving into Kotlin Arrays, consider exploring our insightful article on Kotlin Collections. It’s a perfect complement to enhance your understanding of Kotlin’s capabilities.
Leveraging Kotlin Collections in Android Development

Navigate through the following sections to explore the concepts at your own pace:
- Creating arrays in Kotlin
- Size of an array
- Accessing elements of a Kotlin Array
- Modifying elements in a Kotlin Array
- Nested Arrays/Multi-Dimensional Arrays
- Advanced manipulation of Kotlin Arrays
- Searching in Kotlin Arrays
- Filtering in Kotlin arrays
- Map and reduce in Kotlin arrays
- Comparing arrays in Kotlin
- Kotlin Arrays visual guide
Creating arrays in Kotlin
To create an array in Kotlin, we have:
-
functions :
arrayOf(),arrayOfNulls(),emptyArray() -
constructor :
Array()
Now let’s look at examples of each method to create arrays.
Create array using arrayOf()
When we use the arrayOf() function, we create an array with the provided elements.
// Creates an array with values [10, 20, 30, 40]
val sampleArray = arrayOf(10, 20, 30, 40)
println(sampleArray)
Check the output and you’ll find something like this.
[Ljava.lang.Integer;@7699a589

Process finished with exit code 0
But wait, what? Shouldn’t we see the elements instead of some random characters?
The output might look strange, but don’t fret: that’s because the println function is showing the array’s memory address, not its elements.
To see the elements, we need to convert the array into a string. This is where Kotlin’s joinToString() function comes in handy.
Here’s the updated code:
 // creates an array of 10, 20, 30, 40
 val sampleArray = arrayOf(10, 20, 30, 40)
 println(sampleArray.joinToString())

 // output: 10, 20, 30, 40
And here you have a visualization of the array:

Create an array using arrayOfNulls()
Using the function arrayOfNulls() creates an array of a certain size, filled with null elements.
 // create an array of null, null
 val sampleNullArray = arrayOfNulls<Int?>(2)
 println(sampleNullArray.joinToString())

 // output: null, null
Create an array using emptyArray()
Using the function emptyArray() creates exactly what it suggests… an empty array.
// creates an empty array with no elements in it
val sampleEmptyArray = emptyArray<Int>()
println(sampleEmptyArray.joinToString())

// output:
Create an array using the Array Constructor
The Array constructor takes the array size and a function that returns values for array elements, given its index.
// creates a simple array of 1s, where 3 is the size of the array
val simpleArray = Array<Int>(3) { 1 }
println(simpleArray.joinToString())

// output: 1, 1, 1

// creates the modified array of elements, where i is the index,
// so everytime the i gets multiplied by 2, and size is 3
val advancedArray = Array<Int>(3) { i -> i * 2 }
println(advancedArray.joinToString())

// output: 0, 2, 4
In this advanced example:
-
3is the size of the array. -
i -> i * 2is a lambda expression that initializes each element to twice its index value.
Size of an array
In Kotlin, the size of an array size tells you how many items it can hold. This information can be found using the size property.
Once an array is created, its size stays the same. But you can change the items inside it anytime.
// there are total 4 elements in the sampleArray
val sampleArray = arrayOf(10, 20, 30, 40)
println(sampleArray.size)

// output: 4
Accessing elements of a Kotlin Array
To get to the items in an array, we need to use the index access operator []. Each item has a position number, starting from 0.
val sampleArray = arrayOf(10, 20, 30, 40)
println(sampleArray[1])

// output: 20
Iterating over the elements of a Kotlin Array
To iterate over elements in a Kotlin array, you can use a for loop or higher-order functions like forEach. Here are two common methods:
Using a for loop:
val array = arrayOf(1, 2, 3)
for (item in array) {
    println(item)
}
Using the forEach operator:
val array = arrayOf(1, 2, 3)
array.forEach { item ->
    println(item)
}
Iterating a Koltin Array using iterators
Another way to iterate through a Kotlin array is by using the iterator() function, which provides an iterator. This enables traversal of the array with a while loop, offering more control over the iteration process. For example:
val array = arrayOf(1, 2, 3)
val iterator = array.iterator()

while (iterator.hasNext()) {
    val item = iterator.next()
    println(item)
}
Modifying elements in a Kotlin Array
Arrays are flexible, meaning that we can change their items.
To change an array element, just use the index access operator [] and assign a new value.
val sampleArray = arrayOf(10, 20, 30, 40)
sampleArray[1] = 50

println(sampleArray[1])

// output: 50
Here’s graphical representation of the initial array, and the modified one:

Nested Arrays/Multi-Dimensional Arrays
Arrays can be placed inside other arrays to form multi-level arrays.
Two-Level or Two-Dimensional Array
A two-dimensional array is like a table with rows and columns. To create a two-dimensional array, we simply need to nest one Array constructor inside another.
The outer constructor defines the number of rows, and the inner constructor defines the number of columns.
Here’s how we can create a two-dimensional array with Kotlin:
val twoDArray = Array(2) { Array<Int>(2) { 0 } }
println(twoDArray.contentDeepToString())

// Output: [[0, 0], [0, 0]]

// accessing and modifying the 2-dimensional array
twoDArray[0][1] = 1
println(twoDArray.contentDeepToString())

// Output: [[0, 1], [0, 0]]
In this example:
-
Array(2)creates an array with two elements (two rows). - The inner
Array<Int>(2) { 0 }creates an array with two elements (two columns) where each element is initialized to0.

Three-Level or Three-Dimensional Array
A three-dimensional array can be thought of as an array of tables. To create one of these multidimensional arrays, we need to nest Array constructors three levels deep.
Here’s how we can create a three-dimensional array with Kotlin:
val threeDArray = Array(3) { Array(3) { Array<Int>(3) { 0 } } } // Creates a 3x3x3 array filled with zeros
println(threeDArray.contentDeepToString())

// Output: [[[0, 0, 0], [0, 0, 0], [0, 0, 0]], [[0, 0, 0], [0, 0, 0], [0, 0, 0]], [[0, 0, 0], [0, 0, 0], [0, 0, 0]]]

// accessing and modifying the 3-dimensional array
threeDArray[0][1][1] = 1
threeDArray[1][1][1] = 1
threeDArray[2][1][1] = 1
println(threeDArray.contentDeepToString())

// Output: [[[0, 0, 0], [0, 1, 0], [0, 0, 0]], [[0, 0, 0], [0, 1, 0], [0, 0, 0]], [[0, 0, 0], [0, 1, 0], [0, 0, 0]]]
In this example:
-
Array(3)creates an outer array with three elements. - The next
Array(3)creates a middle array, with three elements for each element of the outer array. - The innermost
Array<Int>(3) { 0 }creates an inner array with three elements, where each element is initialized to0, for each element of the middle array.
🤔 We used
contentDeepToString()here instead ofjoinToString(), but why?Answer : The
contentDeepToString()function in Kotlin helps display all the items in multi-level arrays in a clear way. It goes through all the layers of the array and puts them into a string that’s easy to read.
Advanced manipulation of Kotlin Arrays
To manage arrays in Kotlin, we need to grasp a number of advanced operations, from comparing arrays and altering their contents to converting them into collections.
There’s a lot to learn and unpack here, so let’s get into it.
Adding elements to an array
In Kotlin, arrays have a fixed size. Once we create an array, we cannot increase or decrease its size. This means that we cannot add or remove elements to or from an array directly, as we can with a list or other collections. However, there are workarounds here. If you need to create a new array with additional elements, you can do the following:
- Using
plus()function
// Starting with an initial array of integers
val sampleArray = arrayOf(10, 20, 30, 40)
val newArray = sampleArray.plus(50)

println(newArray.joinToString())

// Output: 10, 20, 30, 40, 50
This function plus(50) adds the number 50 to the end of sampleArray and returns a new array that we call newArray.

You can also pass the variable elements in the plus() function, such as list or a particular array.
val sampleArray = arrayOf(10, 20, 30, 40)
// Add a list of elements to the array
val newArrayByAddingList = sampleArray.plus(listOf(50, 60, 70))
// Add another array of elements to the new array
val newArrayByAddingArray = newArrayByAddingList.plus(arrayOf(80,90))

// Print the final combined array
println(newArrayByAddingArray.joinToString())

// Output: 10, 20, 30, 40, 50, 60, 70, 80, 90
-
Add a list of elements : The
plusfunction is used to add a list of integers (50, 60, 70) to asampleArray, resulting in a new arraynewArrayByAddingList. -
Add another array of elements : Once we’ve added the array of integers, another
plusfunction call is made to add an array of integers (80, 90) tonewArrayByAddingList, creatingnewArrayByAddingArray.
Removing element from an array
The fixed size of Kotlin arrays presents a further challenge. Not only is it impossible to add new elements; it’s also impossible to pull out elements directly. So what do we do?
We make a new array and retain only the elements we want, leaving out the ones we don’t. Let’s see how this works:
val originalArray = arrayOf(10, 20, 30, 40)

// Create a new array that filters out the number 30
val newArrayWithout30 = originalArray.filter { it != 30 }.toTypedArray()
println(newArrayWithout30.joinToString())

// Output: 10, 20, 40
In this code, filter { it != 30 } keeps every number except 30, and toTypedArray() turns the filtered values back into an array.
This way, we get a new array without the number 30. It’s as simple as picking out one specific block from a set of building blocks, and not putting it back.

Dropping elements from an array
Sometimes you might want to remove a few items from the start or end of an array in Kotlin. Here’s a quick way to do it:
val sampleArray = arrayOf(10, 20, 30, 40, 50, 60)

// Skip the first 3 numbers and make a new array with the rest
val droppingFirst3Elements = sampleArray.drop(3).toTypedArray()

// Skip the last 3 numbers and make a new array with the ones at the start
val droppingLast3Elements = sampleArray.dropLast(3).toTypedArray()

println(droppingFirst3Elements.joinToString())

// Output: 40, 50, 60

println(droppingLast3Elements.joinToString())

// Output: 10, 20, 30
-
Remove the first few elements :
drop(3)is used to skip the first three elements (10, 20, 30) and keep the rest (40, 50, 60). The result is then converted back into an array withtoTypedArray(). -
Remove the last few elements :
dropLast(3)performs the opposite of the previous function by skipping the last three elements (40, 50, 60) and keeping the first ones (10, 20, 30). This result is also converted into a new array.

Copying and cloning arrays in Kotlin
Kotlin provides a straightforward approach to create a new array from an existing one.
In Kotlin, we can easily make a new copy of an array and change its size with the copyOf() method. Here’s how it works:
-
Truncating the array : If the new size (
newSize) is smaller than the original array’s size, the resulting array is a truncated version of the original, containing only the firstnewSizeelements. For example, if we have an array of 5 numbers and we usecopyOf(3), we’ll get a new array with only the first 3 numbers. -
Making a bigger array: Conversely, if (
newSize) is larger, the new array is an extended version of the original. The additional elements, beyond the original array’s length, are filled with zero values (for numeric types) or nulls (for non-numeric types). So, if we start with three numbers and usecopyOf(5), we’ll get a new array with two extra zeros at the end.
val originalArray = intArrayOf(1, 2, 3)

// Extending the array and padding with zeros
val paddedArray = originalArray.copyOf(5)
println(paddedArray.contentToString())

// Output: [1, 2, 3, 0, 0]

// Truncating the array
val truncatedArray = originalArray.copyOf(2)
println(truncatedArray.contentToString())

// Output: [1, 2]
Sorting arrays in Kotlin
Sorting is an essential operation that organizes the elements of an array into a specific order, typically in ascending or descending order.
Kotlin offers various methods to handle sorting efficiently. Here’s how it works:
Basic Sorting
Using the sort() method: When we sort an array in Kotlin using the sort() method, it rearranges the elements of the array “in-place.” This means that the sorting happens within the original array itself, without creating a new array.
// Before sorting
val numbers = intArrayOf(3, 1, 4, 1, 5, 9)
// sorting the 'numbers' array
numbers.sort()

// After sorting
println(numbers.contentToString())

// Output: [1, 1, 3, 4, 5, 9]

Using sorted() method: If we don’t want to change the original array, we can simply use sorted(). This creates a new array that is…well… sorted.
// Before sorting
val numbers = intArrayOf(3, 1, 4, 1, 5, 9)
// Creating new sorted array 'sortedNumbers'
val sortedNumbers = numbers.sorted()

// After sorting
println(sortedNumbers)

// Output: [1, 1, 3, 4, 5, 9]
Sorting in Descending Order
Using sortDescending() and sortedDescending() methods: Similar to sort() and sorted(), these methods sort the array in descending order.
// Before sorting
val numbers = intArrayOf(3, 1, 4, 1, 5, 9)
numbers.sortDescending()

// After sorting
println(numbers.contentToString())

// Output: [9, 5, 4, 3, 1, 1]

val sortedNumbersDesc = numbers.sortedDescending()

// After sorting
println(sortedNumbersDesc)

// Output: [9, 5, 4, 3, 1, 1]
Ranged Sorting
In Kotlin, we can do more than simply sort the whole array. We can also sort a specific range within it.
We can do this using the sort(fromIndex, toIndex) method. Here’s how it works:

Using sort(fromIndex, toIndex) method: We can specify the start (fromIndex) and end (toIndex) of the range we want to sort. The sorting will only affect this part of the array.
val intArray = intArrayOf(6, 5, 4, 3, 2, 1)

// Before sorting
println(intArray.joinToString())

// Output: 6, 5, 4, 3, 2, 1

// Sorting a range within the array
intArray.sort(0, 3)

// After sorting
println(intArray.joinToString())

// Output: 4, 5, 6, 3, 2, 1
Searching in Kotlin Arrays
In Kotlin, finding elements in an array is straightforward and versatile.
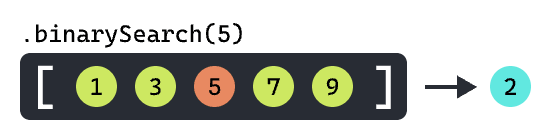
Binary Search method
This searches the list or its range for the provided element using the binary search algorithm. The expected result here is a list sorted into ascending order, according to the comparable natural ordering of its elements. Otherwise, the result is undefined. If the list contains multiple elements equal to the specified element, there is no guaranteeing which one will be found.
The method will return the element’s index, or a negative number if the index is not found.
val sortedNumbers = arrayOf(1, 3, 5, 7, 9)

// searching the number '5' from 'sortedNumbers' array
println(sortedNumbers.binarySearch(5))

// Output: 2
In this example, searching for ‘5’ in a sorted array of [1, 3, 5, 7, 9] will return its index, 2. If we searched for ‘4’, which isn’t in the array, it would return a negative number indicating where ‘4’ would fit in the sorted order.
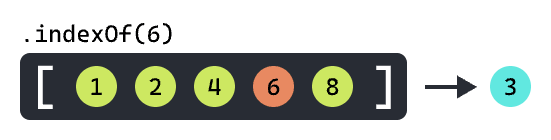
Finding Elements Quickly
Using indexOf() method:
- Finds the first occurrence of an element.
- If the element isn’t there, it returns -1.
val numbers = arrayOf(1, 2, 4, 6, 8)

// Find and print the index of the first occurrence of '6'
println(numbers.indexOf(6))

// Output: 3
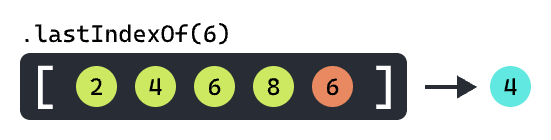
Using lastIndexOf() method: This is similar to indexOf, but finds the last occurrence.
val numbers = arrayOf(2, 4, 6, 8, 6)

// Find and print the index of the last occurrence of '6'
println(numbers.lastIndexOf(6))

// Output: 4
Finding Elements with Condition
Using find() and findLast() method: These methods return the first or last element that matches a given condition, or null if no such element was found.
// Create a list of numbers
val numbers = listOf(1, 2, 3, 4, 5, 6, 7)

// Find the first odd number in the list
val firstOdd = numbers.find { it % 2 != 0 } // 'it % 2 != 0' checks for odd numbers

// Find the last even number in the list
val lastEven = numbers.findLast { it % 2 == 0 } // 'it % 2 == 0' checks for even numbers

// Print the first odd number and the last even number

println(firstOdd)
// Output: 1

println(lastEven)
// Output: 6
Filtering in Kotlin arrays
Filtering is a powerful way to get the specific elements we need from an array, and nothing more. Here’s an easy way to do it in Kotlin:
Using filter() method: This returns a list containing only those elements that match the given condition.
// Initialize an array of numbers
val numbers = arrayOf(1, 2, 3, 4, 5)

// Filter the array to include only even numbers
val evenNumbers = numbers.filter { it % 2 == 0 } // 'it % 2 == 0' checks if a number is even

println(evenNumbers)

// Output: 2, 4
Using filterNot() method: Returns a list containing only those elements that don’t match the given condition.
// Initialize a list of integers
val numbers: List<Int> = listOf(1, 2, 3, 4, 5, 6, 7)

// Filter the list to exclude numbers that are multiples of 3
val notMultiplesOf3 = numbers.filterNot { number -> number % 3 == 0 } // 'number % 3 == 0' checks for multiples of 3

println(notMultiplesOf3)

// Output: 1, 2, 4, 5, 7
Removing Nulls with filterNotNull
If your array has null values and you want to remove them, the method that utilizes filterNotNull() is perfect.
// Array with nullable integers
val nullableNumbers: Array<Int?> = arrayOf(1, null, 3, null, 5)

// Filter out null values
val nonNullNumbers = nullableNumbers.filterNotNull()

println(nonNullNumbers)

// Output: 1, 3, 5
Map and reduce in Kotlin arrays
In the world of Kotlin arrays, map and reduce are like your trusty Swiss Army knives – versatile tools for transforming and combining array elements. Let’s explore how these functions can simplify complex operations:
Transforming a Kotlin array with map
You can think of map as a personal artist for your array elements. It takes each element and transforms it into something new.
Specifically, it returns a list containing the results of applying the given transform function to each element in the original array.
// Initialize a list of numbers
val numbers = listOf(1, 2, 3, 4)

// Use 'map' to transform each number to its square and print the result
println(numbers.map { it * it }) // Each 'it' is squared (it * it)

// Output: 1, 4, 9, 16

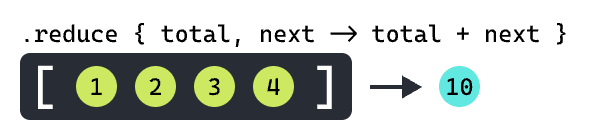
Accumulating with reduce
While map is about transformation, reduce is all about accumulation. It takes your array and reduces it to a single value by combining elements in a specified manner.
It accumulates value by starting with the first element and applying its operation from left to right to both the current accumulator value and each specific element.
Parameters : operation – this function takes the current accumulator value and a specific element, and calculates the next accumulator value from there.
val numbers = arrayOf(1, 2, 3, 4)

// Use 'reduce' to calculate the sum of all elements in the array
val sum = numbers.reduce { total, next -> total + next }
// 'total' is the accumulated sum, 'next' is the current element

println(sum)
// Output: 10
💡 Throws an exception if this array is empty. If the array can be empty in an expected way, please use
reduceOrNullinstead. It returnsnullwhen its receiver is empty.
Comparing arrays in Kotlin
When working with arrays in Kotlin, it’s often necessary to check whether two arrays are identical, not just in size but also in the sequence and equality of their elements.
To compare whether two arrays have the same elements in the same order, we can use the contentEquals() and contentDeepEquals() functions:
// Initialize two arrays with the same elements
val arrayOne= arrayOf(1, 2, 3)
val arrayTwo= arrayOf(1, 2, 3)

// Compare the arrays for equality
println(arrayOne.contentEquals(arrayTwo)) // Outputs: true

// Modify an element in one of the arrays
arrayOne[0] = 4

// Recompare the arrays after modification
println(arrayOne.contentEquals(arrayTwo)) // Outputs: false
Kotlin Arrays visual guide
Explore our easy-to-understand infographic for a fast-track understanding of the vital concepts and methods in Kotlin Arrays. Be sure to share this valuable resource with your team or colleagues for a straightforward, visual summary of Kotlin array methods.

FAQ
What is an array in Kotlin?
An array in Kotlin is a container that holds a fixed number of values of the same type. It’s a fundamental data structure useful for storing and manipulating a collection of items.
How is different a Kotlin array from a Java array?
Kotlin arrays are more type-safe with generics support, are classes with member functions and properties, and offer better null safety, distinguishing between nullable and non-nullable types, unlike Java arrays.
How do I determine the size of an array?
The size property of an array in Kotlin indicates how many items it can hold. Note that the size of an array is fixed once it’s created, but the elements can be changed.
How can I create arrays in Kotlin?
Arrays in Kotlin can be created using functions like arrayOf(), arrayOfNulls(), emptyArray(), or the Array() constructor.
How do you iterate over elements in a Kotlin array?
To iterate over elements in a Kotlin array, you can use a for loop or higher-order functions like forEach. In case you need them, you can also use iterators to traverse the array elements.
Is it possible to modify elements in an array?
Yes, array elements in Kotlin can be modified using the index access operator [] and assigning a new value.
How do map and reduce functions work with Kotlin arrays?
The map function transforms each array element, while reduce combines all elements into a single value.
How can I compare two arrays in Kotlin?
To check if two arrays are identical in both content and order, Kotlin provides functions like contentEquals() and contentDeepEquals().
To sum up
That just about wraps up our journey through the world of Kotlin arrays. I hope this guide has not only been informative but also provided a great starting point for you to confidently utilize array methods in Kotlin.
Remember, as a Kotlin developer, it’s not about memorizing every single syntax detail. What’s truly important is understanding how and when to use these methods effectively. By knowing their applications, you can harness their full potential and apply them skillfully in your projects.
May your coding adventures in Kotlin be productive and enjoyable. Happy coding!

Top comments (0)