GraphQL is a query language and runtime for APIs, developed by Facebook in 2012 and later open-sourced in 2015. And it has changed the way we fetch data from our server.
Typically, most front-end clients – like React, Angular, Vue, or mobile apps like iOS and Android – use REST APIs to fetch data from the server. REST APIs require more HTTP calls than GraphQL, which leads to over and underfetching. Overfetching means the client downloads more data than required: underfetching means a specific endpoint doesn’t return enough data.
With GraphQL, clients can request the data they need and nothing more. This allows for more efficient data-fetching, as clients can avoid overfetching or underfetching of data, which can be a common issue with REST APIs.
Clients use the GraphQL query language to specify the data they need from an API. A GraphQL server then processes these queries, which are sent over HTTP, and returns only the data requested by the client.
Key features and advantages of GraphQL include:
- Hierarchical Structure : GraphQL queries resemble the shape of the response data. This makes it easy for clients to specify precisely what they need.
- Single Endpoint : Unlike REST, which often requires multiple endpoints for different resources, GraphQL typically has a single endpoint for all data queries.
- Reactive Programming: In addition to the query language, GraphQL also supports reactive programming. This lets clients specify how they want updates delivered, including real-time notifications as new information is added or modified.
- Strongly Typed : GraphQL APIs have a strongly typed schema that defines the data types that can be queried, making it more predictable and self-documenting.
- Introspection : Clients can query the schema, allowing automatic documentation and tooling.
- Real-time Data : GraphQL can be used with real-time data updates, harnessing technologies like WebSockets.
- Batching and Caching : Because clients can specify precisely what data they need, it’s easier to implement batching and caching strategies to optimize data fetching.
In this tutorial, we will build two projects. In the first instance, we will create a Node.js app that will give us a GraphQL endpoint, and then we will create an iOS app consuming that endpoint.
If you want to learn more about the differences between a REST vs GraphQL, you can read the following article that enumartes the difference between them and it also provides a more detailed example on how to create a GraphQL Server using NodeJS.
Understanding GraphQL: A Comprehensive Comparison With REST API and Its Implementation in Node.js

Creating a GraphQL API in Node
Let’s begin our journey by creating the GraphQL API using the Node.js framework and Express library. This combination will allow us to build a quick server to later construct our iOS GraphQL app, which will consume this API.
To create a GraphQL server in Node.js with Express, you’ll need to follow these steps:
Set Up Your Project
Create a new directory for your project and initialize a Node.js project using npm or yarn:
mkdir graphql-server

cd graphql-server

npm init -y
Install Dependencies and configure nodemon
Install the necessary dependencies, including express, express-graphql for handling GraphQL requests, and graphql for creating the schema:
npm install express express-graphql graphql --save
We also need the nodemon, which is addressed in the code below:
npm install --save-dev nodemon
And in the package.json we will script the value as follows:
"scripts": {
    "dev": "nodemon server.js"
},
Finally, our package.json looks like:
{
    "name": "bug",
        "version": "1.0.0",
            "description": "",
                "main": "server.js",
                    "scripts": {
        "dev": "nodemon server.js"
    },
    "author": "",
        "license": "ISC",
            "dependencies": {
        "express": "^4.18.2",
            "express-graphql": "^0.12.0",
                "graphql": "^15.8.0"
    },
    "devDependencies": {
        "nodemon": "^3.0.1"
    }
}
Create an Express App
The following code shows how to create the NodeJS app.
In this example our data can be hardcoded for simplicity, although in the real world you’ll probably need to query the data from a database. Furthermore, the GraphQL API created through this exercise only has a method to query all items at once. More advanced projects will have multiple methods and might use Apollo Server to provide a more robust infrastructure.
Nonetheless, this provides a useful example to get you on your way.
const express = require('express')
const expressGraphQL = require('express-graphql').graphqlHTTP
const {
    GraphQLSchema,
    GraphQLObjectType,
    GraphQLString,
    GraphQLList,
    GraphQLInt,
    GraphQLNonNull
} = require('graphql')

const app = express()
const movies = [
    { id: 1, name: 'Matrix', thumb: "<https://upload.wikimedia.org/wikipedia/en/thumb/c/c1/The_Matrix_Poster.jpg/220px-The_Matrix_Poster.jpg>" },
    { id: 2, name: 'Jason Bourne', thumb: "<https://upload.wikimedia.org/wikipedia/en/b/b2/Jason_Bourne_%28film%29.jpg>" },
    { id: 3, name: 'Interstellar', thumb: "<https://upload.wikimedia.org/wikipedia/en/b/bc/Interstellar_film_poster.jpg>" },
    { id: 4, name: 'The International', thumb: "<https://upload.wikimedia.org/wikipedia/en/thumb/4/4c/The_International_poster.jpg/220px-The_International_poster.jpg>" },
    { id: 5, name: 'Star Trek Into Darkness', thumb: "<https://upload.wikimedia.org/wikipedia/en/thumb/5/50/StarTrekIntoDarkness_FinalUSPoster.jpg/220px-StarTrekIntoDarkness_FinalUSPoster.jpg>" },
]

const MovieType = new GraphQLObjectType({
    name: 'Movie',
    description: 'This represents a movie',
    fields: () => ({
        id: { type: GraphQLNonNull(GraphQLInt) },
        name: { type: GraphQLNonNull(GraphQLString) },
        thumb: { type: GraphQLNonNull(GraphQLString) },
    })
})

const RootQueryType = new GraphQLObjectType({
    name: 'Query',
    description: 'Root Query',
    fields: () => ({
        movies: {
            type: new GraphQLList(MovieType),
            description: 'List of All Movies',
            resolve: () => movies
        },
    })
})

const schema = new GraphQLSchema({
    query: RootQueryType
})

app.use('/movie', expressGraphQL({
    schema: schema,
    graphiql: true
}))

app.listen(5000, () => console.log('Server Running'))
Test in a Browser
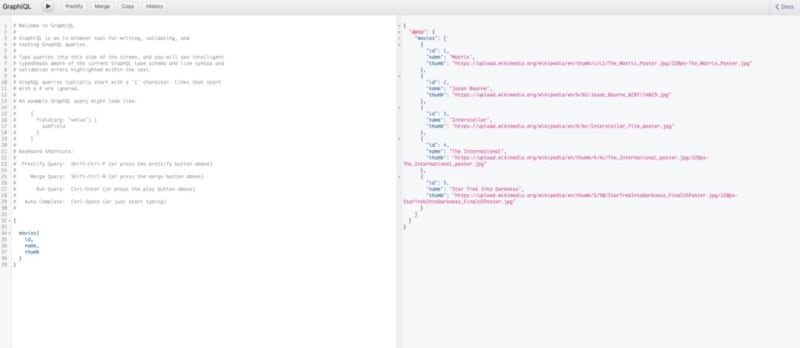
To run a test, simply open a web browser and go to http://localhost:5000/movie to access the GraphQL interface (GraphiQL). You can now execute GraphQL queries and see the results.
Here’s an example Query in GraphiQL query schema:
{

  movies{
    id,
    name,
    thumb
  }
}
This should return:
{
  "data": {
    "movies": [
      {
        "id": 1,
        "name": "Matrix",
        "thumb": "<https://upload.wikimedia.org/wikipedia/en/thumb/c/c1/The_Matrix_Poster.jpg/220px-The_Matrix_Poster.jpg>"
      },
      {
        "id": 2,
        "name": "Jason Bourne",
        "thumb": "<https://upload.wikimedia.org/wikipedia/en/b/b2/Jason_Bourne_%28film%29.jpg>"
      },
      {
        "id": 3,
        "name": "Interstellar",
        "thumb": "<https://upload.wikimedia.org/wikipedia/en/b/bc/Interstellar_film_poster.jpg>"
      },
      {
        "id": 4,
        "name": "The International",
        "thumb": "<https://upload.wikimedia.org/wikipedia/en/thumb/4/4c/The_International_poster.jpg/220px-The_International_poster.jpg>"
      },
      {
        "id": 5,
        "name": "Star Trek Into Darkness",
        "thumb": "<https://upload.wikimedia.org/wikipedia/en/thumb/5/50/StarTrekIntoDarkness_FinalUSPoster.jpg/220px-StarTrekIntoDarkness_FinalUSPoster.jpg>"
      }
    ]
  }
}
That’s it! You’ve now created a basic GraphQL server using Node.js and Express. From here, you can expand your GraphQL schema, add more types and mutations, and integrate with databases or external APIs as needed. Remember to refer to the official documentation of express-graphql and graphql for more advanced usage and best practices.
Building a SwiftUI Application Using iOS Apollo Client
Now let’s take things a stage further by building an iOS app in SwiftUI, utilizing our GraphQL server data.
SwiftUI is a user interface framework developed by Apple for building applications across its various platforms, including iOS, macOS, watchOS, and tvOS. It was introduced at Apple’s 2019 Worldwide Developers Conference (WWDC) and is designed to make it easier for developers to create dynamic and interactive user interfaces.
To effortlessly query the GraphQL API, we will make use of the Apollo framework in conjunction with the Apollo iOS SDK, which will simplify the process of making queries to our GraphQL server. The Apollo framework’s most significant benefit is that it includes code generation tools, which can help you speed up the development of your iOS GraphQL client.
This exercise will give us our complete look at the app. As you see, the app itself is pretty simple, merely displaying our GraphQL movie in the SwiftUI list.

C reate Project on the Xcode
The first step to creating a new Xcode project is to name it whatever you want. In this case, we will name the project MovieList.
Make sure you choose SwiftUI as your interface and Swift as a language.

A pollo iOS SDK Installation
As we have already mentioned, to consume GraphQL APIs, we will use a third-party swift package called Apollo iOS. It’s trendy, and not only that, it’s an open-source library. So the first step is to add the package to our project. For this we will take advantage of Swift Package Manager and install the required dependencies using the standard UI provided in Xcode.
On the Xcode, go to your project and click the Package Dependencies tab. Then click the + button.
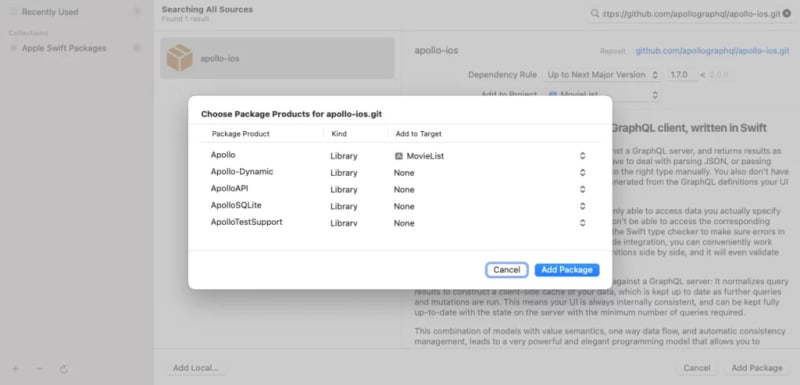
This will open the Add Package dialog. This Add Package screen will list standard Apple packages. But in our case, we need to add a custom package as Apollo iOS package is not in the default this.
On the popup, add this URL: https://github.com/apollographql/apollo-ios.git. When it loads, select the Apollo
package from the Package Product and choose your target.
You can also use CocoaPods to install Apollo iOS (be sure to install CocoaPods if you haven’t done so yet).
gem install cocoapods
And if you love Homebrew like me, just use this command.
brew install cocoapods
Now add pod "Apollo" to your Podfile.
- To include the
ApolloSQLiteframework, also addpod "Apollo/SQLite". - To include the
ApolloWebSocketframework, also addpod "Apollo/WebSocket". - Run
pod install. - Use the
.xcworkspacefile generated by CocoaPods to work on your project.
And there you go. Congratulations!
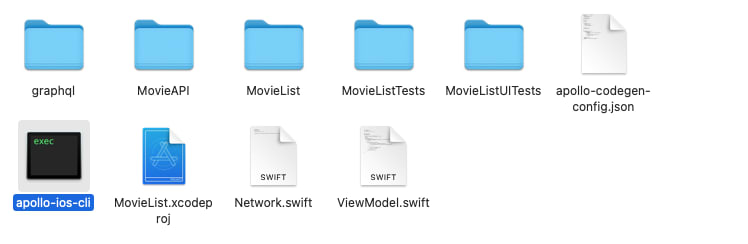
If you’ve successfully installed the Apollo iOS package for GraphQL, the next step is to install its code generation command line tools in the folder of our Xcode project.
Simply right-click on your Xcode Project and click Install CLI. You can also run the below command.
swift package --allow-writing-to-package-directory apollo-cli-install

Click Allow Command to Change Files

This will install a command line tool named “apollo-ios-cli” in your Xcode project directory, as you’ll see in my screenshot.
With this command line tool we will run three commands.
1. Schema Initialization
The first command will run the code generation tool to initialize the schema.
./apollo-ios-cli init --schema-namespace MovieAPI --module-type swiftPackageManager
This will generate a new json file, this file called apollo-codegen-config.json will contain the configuration to query your GraphQL API. It’s important to check that the file contains a download configuration section.
Review the download configuration schema to ensure your endpointURL matches your Node.js app.
"schemaDownloadConfiguration": {
    "downloadMethod": {
        "introspection": {
            "endpointURL": "<http://localhost:5000/movie>",
            "httpMethod": {
                "POST": {}
            },
            "includeDeprecatedInputValues": false,
            "outputFormat": "SDL"
        }
    },
    "downloadTimeout": 60,
    "headers": [],
    "outputPath": "./graphql/schema.graphqls"
}
Here you have the complete the apollo-codegen-config.json file with the download configuration schema added.
{
  "schemaNamespace" : "MovieAPI",
  "input" : {
    "operationSearchPaths" : [
      "**/*.graphql"
    ],
    "schemaSearchPaths" : [
      "**/*.graphqls"
    ]
  },
  "output" : {
    "testMocks" : {
      "none" : {
      }
    },
    "schemaTypes" : {
      "path" : "./MovieAPI",
      "moduleType" : {
        "swiftPackageManager" : {
        }
      }
    },
    "operations" : {
      "inSchemaModule" : {
      }
    }
  },
  "schemaDownloadConfiguration": {
    "downloadMethod": {
        "introspection": {
            "endpointURL": "<http://localhost:5000/movie>",
            "httpMethod": {
                "POST": {}
            },
            "includeDeprecatedInputValues": false,
            "outputFormat": "SDL"
        }
    },
    "downloadTimeout": 60,
    "headers": [],
    "outputPath": "./graphql/schema.graphqls"
    }
}
GraphQL Schema Fetching
The second command fetches the schema from the Node.js server.
./apollo-ios-cli fetch-schema
This will create a new folder called graphql. If you can’t see it in your Xcode project, no worries: just drag the folder into your Xcode.

Now create a file called MovieList.graphql in graphql folder and describe your GrapQL query here.
query MovieList {
  movies {
    id,
    name,
    thumb
  }
}
Swift Package Generation
The third command will generate the swift package. We will add this in the Xcode, creating new files and folders we need to send requests to our Node.js server.
./apollo-ios-cli generate
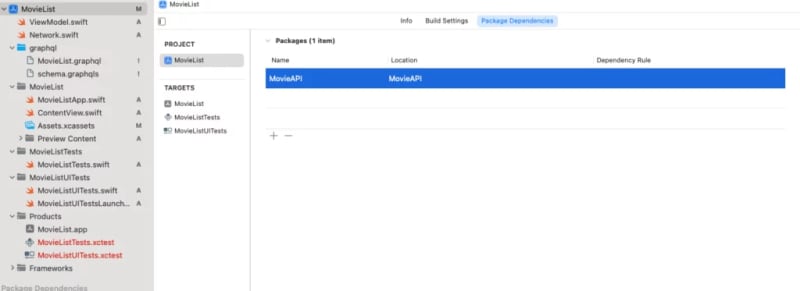
This will create a new folder called MovieAPI. This is a complete Swift package, and now we will add this Swift package to our Xcode.

Go to your project and add a new Swift package dependency. You’ve already done this once: this time it’s the local swift package in our MovieAPI folder.

Now your build should look like this. See the MovieAPI package.

The integration is done, so we’re ready to write some code to get data from our graphql server.
Create a swift class for network calls to our graphql server
This class is simply a wrapper to use the ApolloClient, and it takes an argument from the GraphQL server’s root url.
import Apollo
import Foundation

class Network {
  static let shared = Network()

  private(set) lazy var apollo = ApolloClient(url: URL(string: "<http://localhost:5000/movie>")!)
}
Create a view model
SwiftUI uses MVVM (Model-View-ViewModel) architecture. Here we will create the view-model layer. In the view-model layer, we will grab the data from our GraphQL server and publish it to all interested parties, mainly views.
All view-model classes must conform to the ObservableObject protocol. First, we create an empty array of MovieListQuery.Data.Movie type and make it @Published. Any @Published var can then update all the interested parties.
The function fetchData(), which is marked as @MainActor, will use our Network class and get data from our GraphQL server. If we obtain data successfully, we will add it to the movie array.
The @MainActor is an attribute introduced in Swift 5.5 as part of the concurrency features in the language. It is used to mark a property, method, or function as requiring execution on the main (UI) thread.
import Foundation
import MovieAPI

public class ViewModel: ObservableObject {
  @Published var movies = [MovieListQuery.Data.Movie]()
  @MainActor
  func fetchData() async {
    Network.shared.apollo.fetch(query: MovieListQuery()) { [weak self] result in
      guard let self = self else {
        return
      }
      switch result {
      case .success(let graphQLResult):
        if let launchConnection = graphQLResult.data?.movies {
          self.movies.append(contentsOf: launchConnection.compactMap({ $0 }))
        }
        print(self.movies)
        if let errors = graphQLResult.errors {
          print("error \\(errors)")
        }
      case .failure(let error):
        print("failure \\(error)")
      }
    }
  }
}
Our ContentView
Finally, in our ContentView, we will call our view-model, which relies on a number of elements.
- When we enter the
@StateObjectprivate var viewModel = ViewModel():, this creates a property named viewModel that holds an instance of a class named ViewModel. - The
@StateObjectproperty wrapper is used to manage the state of the view, and it ensures that the ViewModel is preserved across view updates. -
List { ... }: creates a list view, which can display a collection of data. In this case, it will display our favorite movies. - The
ForEach(0..<viewModel.movies.count, id: \\.self) { index in ... }:is a loop that iterates over the indices of theviewModel.moviesarray. For each index, it creates aMovieRowview, introducing the corresponding movie from theviewModel.moviesarray. -
.task { await viewModel.fetchData() }:uses the task modifier introduced in Swift 5.5 to handle asynchronous tasks, and indicates that the enclosed code (in this case,await viewModel.fetchData()) should be executed as a task. -
awaitis used to wait for the asynchronousfetchData()method to complete. Specifically, this method is responsible for fetching movie data.
import MovieAPI
import SwiftUI

struct ContentView: View {
  @StateObject private var viewModel = ViewModel()
  var body: some View {
    NavigationView {
      List {
        ForEach(0..<viewModel.movies.count, id: \\.self) { index in
          MovieRow(movie: viewModel.movies[index])
        }
      }
      .navigationBarTitle(Text("Favorite Movie"))
    }
    .task {
      await viewModel.fetchData()
    }
  }
}
struct MovieRow: View {
  let movie: MovieListQuery.Data.Movie
  var body: some View {
    HStack {
      AsyncImage(url: URL(string: movie.thumb)) { image in
        image
          .resizable()
          .scaledToFill()
      } placeholder: {
        ProgressView()
      }
      .frame(width: 100, height: 100, alignment: .center)
      .background(Color.gray)
      .clipShape(Circle())
      Text(movie.name)
    }
  }
}
You can download the full source (Node.js & iOS) code on Github: https://github.com/bugfender-contrib/ios-grapql-example
To sum up
In this article we have explored the power of GraphQL APIs and its capability to streamline the way front-end clients communicate with servers.
We began by creating a simple project to set up a GraphQL server using NodeJS and Express, defining a schema and resolving queries that align with the exact needs of our client.
Then, in the second part, we built an iOS application that consumes the GraphQL. Using SwiftUI and Apollo iOS, we created a seamless data-fetching experience that retrieves and displays data in real-time.
Now that we’re reaching the end of this article, it is (hopefully) clear that GraphQL offers a significant advantage when developing efficient, flexible, and maintainable APIs. Its ability to query precisely what is needed, its single endpoint architecture, and features like real-time data updates, introspection, and the potential to optimize with batching and caching makes GraphQL an excellent choice for modern app development.
With the knowledge gained from this tutorial, you should be well-equipped to leverage GraphQL in your projects, ensuring that your applications are built on a foundation that is both powerful in the present and sustainable in the future.


Top comments (0)