
A few months ago, I had a chance to do live streaming with Cheese (@seojeeee) about this topic – Part 1 and Part 2 in Korean. I know it's warm and humid in the summer season in Korea. Therefore, I implemented this feature for my air-conditioning system at home, as well as other home appliances that work with remote controllers. However, as I have very little knowledge of Raspberry PI and other hardware, it was really challenging. This is the post to note to future self and others who might be interested in this topic.
- Part 1: Turning Raspberry PI into Remote Controller
- Part 2: Turning on/off Home Appliances Using Raspberry PI, Serverless and Power Platform
The sample codes used in this post can be found at this GitHub repository.
Check Hardware and Software Specs
It might be only me, but I found that Raspberry PI and its extension modules like IR sensor are very version sensitive. I Google'd many relevant articles on the Internet, but they are mostly outdated – not valid information any longer. Of course, this post will also have a high chance to be obsolete. Therefore, to avoid visitors from being disappointed in the future, it would be a great idea that I specify which hardware and software spec I used.
- Hardware
- Software
- Raspberry PI OS LITE: Debian 10 (Buster) base, released on 2020-05-27
- LIRC (Linux Infrared Remote Control): v0.10.1, released on 2017-09-10
LIRC Module Installation
The very first step is to install LIRC after setting up the Raspberry PI OS. Enter the command below to install LIRC.
Your Raspberry PI OS has now been up-to-date and got the LIRC module installed.

LIRC Module Configuration
Let's configure the LIRC module to send and receive the IR signal.
Bootloader Configuration
By updating the bootloader file, when Raspberry PI starts the LIRC module starts at the same time. Open the bootloader file:
Uncomment the following lines and correct the pin number. The default values before being uncommented were 17 for gpio-ir and 18 for gpio-ir-tx. But it should be swapped (line #5-6).
Of course, it might be working without swapping the pin numbers. But it wasn't my case at all. I had to change them to each other.
LIRC Module Hardware Configuration
Let's configure the LIRC module hardware. Open the file below:
Then enter the following:
LIRC Module Options Configuration
Update the LIRC module options. Open the file with the command:
Change both driver and device values (line #3-4).
Once you've completed by now, reboot Raspberry PI to recognise the updated bootloader.
Send this command to check the LIRC module working or not.
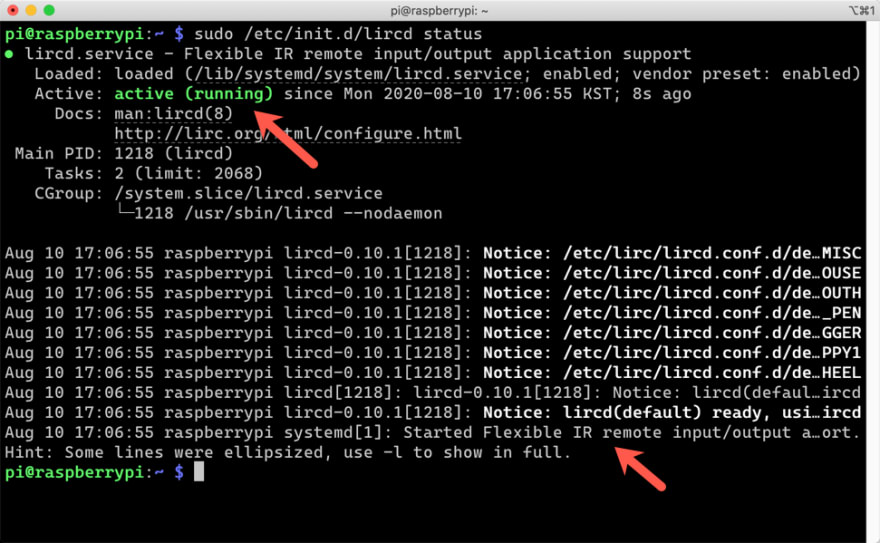
It's now working!
Remote Controller Registration
This is the most important part of all. I have to register the remote controller I'm going to use.
Use Remote Controller Database for Registration
The easiest and promising way to register the remote controller is to visit Remote Controller Database website, search the remote controller and download it. For example, as long as you know the remote controller model name, it can be found on the database. I just searched up any LG air-conditioner.
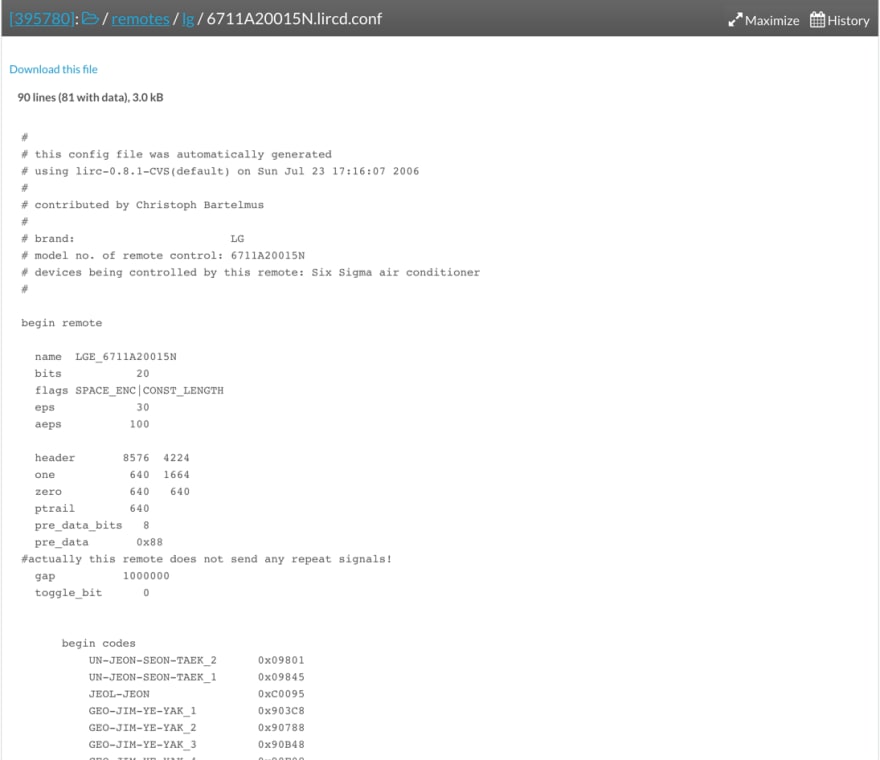
If you can find your remote controller details, download it and copy it to the designated location.
Manual Registration for Remote Controller
Not every remote controller has been registered to this database. If you can't find yours, you should create it by yourself. Winia makes my air-conditioning system, but it doesn't exist on the database. I've got a local branded TV which doesn't exist on the database either. I had to create them. To create the configuration file, Raspberry PI should be double-checked whether the IR sensor on it captures the remote controller signal or not. First of all, stop the LIRC service.

Run the following command to wait for the incoming IR signals.
If you're unlucky, you'll get the following error message. Yeah, it's me.

It's because both the IR sender and receiver are active. At this time, we only need the receiver, which is for capturing the IR signals. Disable the sender part. Open the bootloader.
We used to have both gpio-ir and gpio-ir-tx activated. As we don't need the sender part, for now, update the file like below (line #5-6).
Once completed, reboot Raspberry PI using the command, sudo reboot. Once it's restarted, run the following command so that you can confirm it works.

Now it's waiting for your IR signal input. Locate your remote controller close to Raspberry PI and punch some buttons. You'll find out the remote controller buttons are captured.
We confirm the incoming signals are properly captured. It's time to generate the remote controller file. Enter the following command:
Once running the command above, it gives you instructions to follow. Record your buttons by following the instruction. By the way, the recording application sometimes doesn't work as expected. Yes, I was in the case. I had to use a different approach. Instead of using irrecord, I had to use mode2 to capture the button signals. Run the following command:
Record the button signals. When you open the <remote_controller_name>.lircd.conf file, you'll be able to see some number blocks.
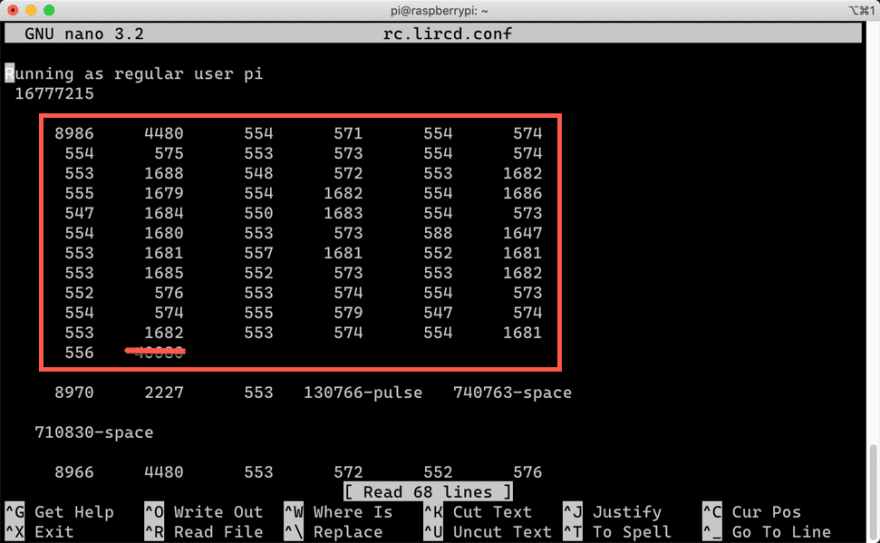
The number blocks in the red rectangle are the set of the controller button. As the last value of the box is an outlier, delete it. And remove all others except the number blocks. Let's add the followings around the number blocks.
- Add
begin remote ... begin raw_codesbefore the fist number block. They are from the random file on the database. I don't know what the exact value might look like. I just copied and pasted them to the file (line #1-13). - Give each number block a name like
name SWITCH_ON. Each button has a different value represented by the number block. Therefore give those names extensively (line #15, 22). - Add the lines at the end of the final number block (line #29-30).
After this update, copy this file to the LIRC directory.
When you go to the directory, you'll be able to find those files. I've got both files registered for an air-conditioner and TV.
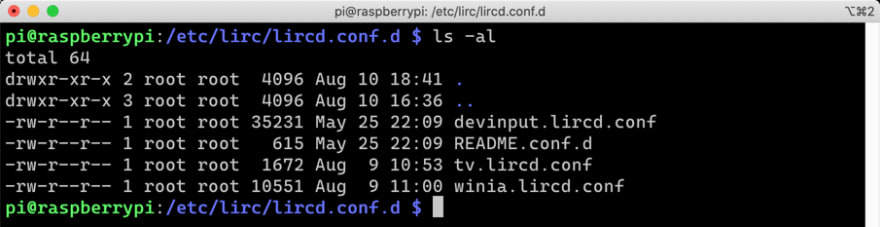
As we don't need devinput.lircd.conf any longer, rename it.
Remote controllers have been registered. Open the bootloader for the update.
Update the IR sender part (line #5-6).
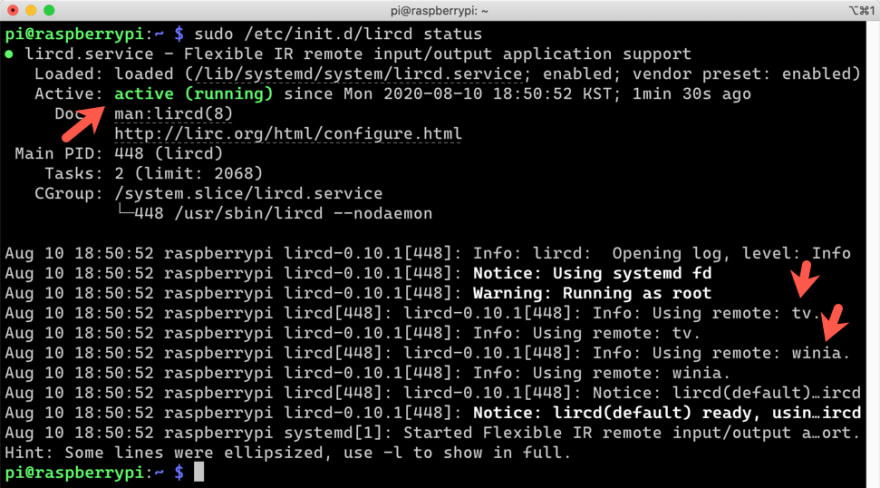
Run sudo reboot to reboot Raspberry PI. Check whether the LIRC module is working or not.
We can confirm that the LIRC module read both air-conditioner and TV configurations and ready for use!
Theoretically, we can register as many remote controllers as we like!
Controlling Air-Conditioner and TV on Raspberry PI
Let's check whether the remote controller on Raspberry PI. Enter the following command to see the list of names that I can execute.
I've registered both air-conditioner (winia) and TV (tv). The following screenshot is the result I've got. Each remote controller has more buttons, but I only need two buttons – on and off. Therefore, I only registered those two buttons.

OK. Let's run the command.
Although the terminal shows nothing, I actually turn on and off the TV.

Can you see the TV being turned on and off?
Unfortunately, I can make my air-conditioner working. I might have incorrectly captured the IR signal for the air-conditioner. But TV works! To me, the air-conditioner was the top priority. I should spend more time to get it working. If I have a more sophisticated device to capture the IR signal, it would be better.
So far, we have walked through how Raspberry PI turns into a remote controller that turns on and off home appliances. In the next post, I'll build a Power App and Power Automate that talks to Azure Functions app to access to the remote controller (Raspberry PI) outside the home network.

Top comments (0)