
Use the Cloud Watch agent to send logging and debugging to Cloud Watch. You can check logs without logging into instances. It's accessible even after the instance is terminated.
Life is far from perfect, and so does Amazon Lightsail instances. It can be frustrating if there is an error and you don't know how to debug it. The server itself and applications installed in it produces log files. And server stats can be helpful in monitoring, logging, and debugging.
Prerequisites
It would help if you had an existing Amazon Lightsail instance. You can create a new instance by following "Deploy WordPress App to Amazon Lightsail" or "Deploy Laravel Application to Amazon Lightsail".
Let's go 🏃♂️
Create an IAM User
- Go to IAM Console.
- Click on the Users menu from the navigation panel and then click on the Add Users button.

- You will be in the Add user screen:
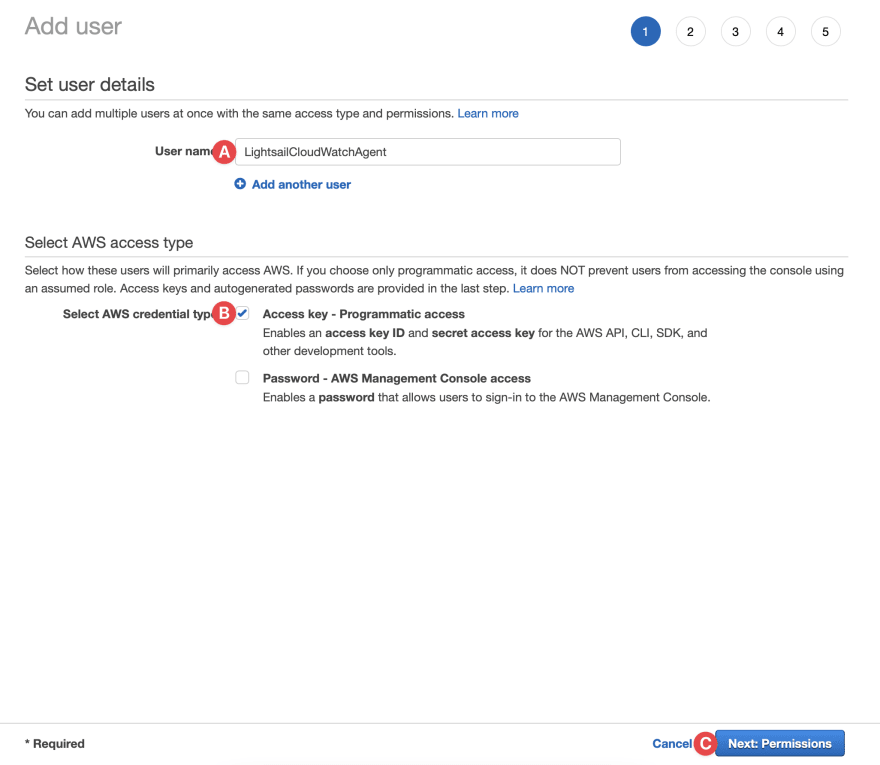
- A. Give it a name. For me, it's LightsailCloudWatchAgent.
- B. Check the Access key - Programmatic access option
- C. Click on the Next: Permissions button.
- You will be in the Set permissions page:

- A. Select the Attach existing policies directly option.
- B. Search for CloudWatchAgentServerPolicy.
- C. Select CloudWatchAgentServerPolicy, and
- D. Click the Next: Tags button.
- Tags are optional. You can choose your tags. Click on the Next: Review after you are done.
- From review page you can check if everything alright and then click the Create user button.
- Your account is created and you will be in this screen:

- A. & B. Copy Access Key ID and Secret access key in somewhere safe, or,
- C. Download the csv file. We will need this access later.
Configure AWS Access
Check if AWS CLI is installed by running
aws --version. You should see the current version. If you get an error, CLI probably is not installed.Ignore this if AWS CLI is already installed. Run this on ubuntu:
curl "https://awscli.amazonaws.com/awscli-exe-linux-x86_64.zip" -o "awscliv2.zip"
unzip awscliv2.zip
sudo ./aws/install
sudo ./aws/install --bin-dir /usr/bin --install-dir /usr/local/aws-cli --update
Follow this instruction to install on other servers.
- Now, we are going to configure the AWS access generated in the last step. Run this
sudo aws configure --profile AmazonCloudWatchAgent
Enter Access Key and Secret Like this:

Install the Cloudwatch Agent
You need to SSH into your instance. Here is how you can SSH into your Amazon Lightsail Instance.
Now, let's install the agent. I'm using ubuntu, you can just run this command
# Download the agent
wget https://s3.amazonaws.com/amazoncloudwatch-agent/ubuntu/amd64/latest/amazon-cloudwatch-agent.deb
# Install the agent
sudo dpkg -i -E ./amazon-cloudwatch-agent.deb
- Now run this command configure the agent.
sudo /opt/aws/amazon-cloudwatch-agent/bin/amazon-cloudwatch-agent-config-wizard
Input your choices as I did. Check the arrow mark. You can choose your own or follow mine.

- Give AWS Access to the Agent. Run this:
sudo vim /opt/aws/amazon-cloudwatch-agent/etc/common-config.toml
Paste this in the bottom of the file:
[credentials]
shared_credential_profile = "AmazonCloudWatchAgent"
Now hit ESC and then :wq!.
- Start the agent:
sudo amazon-cloudwatch-agent-ctl -c file:/opt/aws/amazon-cloudwatch-agent/bin/config.json -a fetch-config -s
- Check the status of the agent by using:
sudo amazon-cloudwatch-agent-ctl -a status
You should see something like this:

Verify metrics on CloudWatch
- Go to the Cloudwatch Console
- On the left navigation panel, choose Metrics.
- Under “Custom Namespaces”, You should see a link for “CWAgent”.
- Choose CWAgent.
- Choose any ImageId, InstanceId, InstanceType.
- Select the checkbox to display metrics on the graph. Here is mine:

Conclusion
Hope you enjoyed this article. This is the last article of the Amazon Lightsail series. You can ask me any Lightsail-related question in the comments or on social media.
You can subscribe to my newsletter to get blog updates every week. Follow me on Twitter, Dev.to, and Hashnode.

Top comments (0)