
Introduction
When you're trying to grow a community, it's easy to get caught up in the day-to-day issues that arise and forget about your overall goals. However, it can be challenging to keep moving forward with your community strategies if you set aside time to focus on what matters most and what sorts of tools to use. This article outlines some ways you can achieve and accelerate community goals while keeping your members engaged, no matter how big or small (or long-term) those goals may be—all by using the absolute power of the Aviyel platform from scratch.
How to accelerate your Community goals?
Before you even start a community, it's essential that you know what your goals are. Always try to ask a question to yourself before setting goals: "What does success look like?", "What does failure look like?" Would your goal be different if there was no such thing as either/or?
It doesn't matter if your goals differ from those of others in your community; what matters is that you are both ambitious and realistic and that you can still collaborate to get things done.
So here are a few things to consider before you set out to achieve your community goals. It makes sense to take some time and think about what they are.
- Smart and ambitious goals: make sure your goals are specific, measurable, achievable, relevant, and time-based.
- Before starting on a solution, define the problem clearly.
- Set realistic goals that are ambitious but achievable within the specified period of time.
Once you've set your goals, it's essential to create a plan for achieving them. Consider what you need to do daily, weekly, and monthly to make progress toward reaching each goal. This may take some time, but it will be worth it when you start moving forward!
How to use Aviyel to accelerate your Community goals?
To overcome community challenges, you need the right tools. And for those to be effective, it's essential to understand who is in your community and what they need. You can learn about your community members' interests, needs, and preferences by using tools that help you collect this kind of information. So to solve this issue, Aviyel was created: it supports open source products, companies, and businesses build communities around their products or services—not only that but building these foundations for business is difficult to track, which is precisely the problem Aviyel is attempting to solve!
Step-by-step guide to using the Aviyel platform
Aviyel aims to create an environment where everyone can benefit from freedom and opportunity. Our platform empowers organizations and individuals to collaborate to build safe communities with only one goal—to create a thriving community!!
Setting up GitHub organization
To get started with Aviyel, you must first create an organization on GitHub. If you are already a member of the organization or have your own, everything should be in place for you to proceed to the next step.

Head over to your organization and copy the link of your project's main repo, then paste it somewhere safe so we can add it and configure it on the Aviyel platform later.

Configuring and setting up your project on Aviyel
It is now time to log in or sign up for Aviyel. If you do not have an account, log in or sign up through Google, Twitter, or GitHub. After clicking the Signup button (as shown below), you'll be prompted with something like this:

Once you have logged into your account, find the Community tab on the navigation bar and click it. This should redirect you to the community page. Once you reach the community page, look for and click on the button that says + Add Your Community.

If you signed up using Github, Aviyel would automatically fetch everything for you, including all your organization information, so you won't have to add the organization info again manually.

And if you've logged in or signed up via Google or Twitter, you need to add the repository link manually. To do this, copy and paste into the popup on your screen, as shown in the screenshot below.
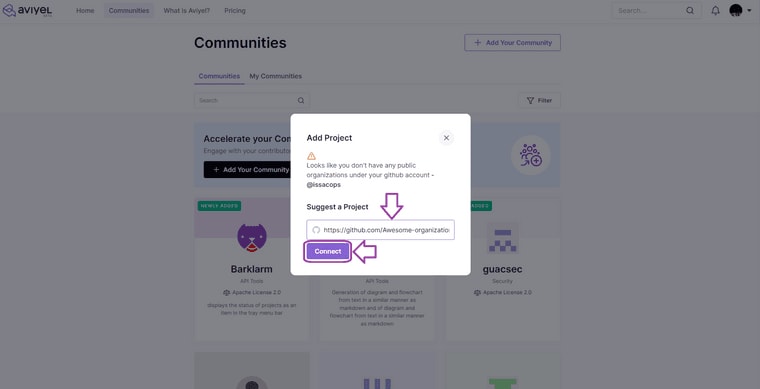
It may take a few seconds for everything to sync with GitHub and Aviyel, so get some coffee in the meantime.
Installing GitHub app to the organization’s repo
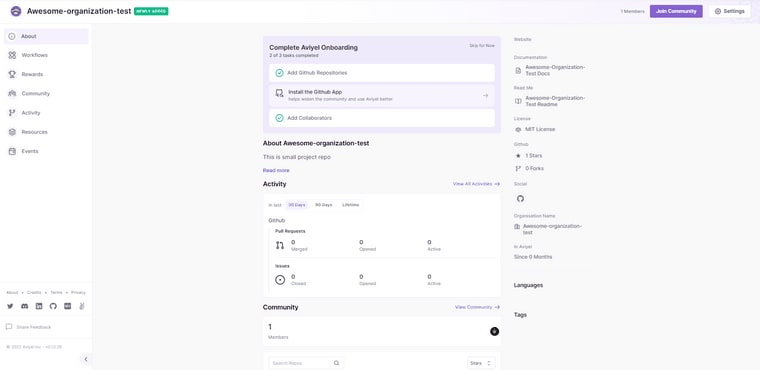
Finally, add Aviyel's Github app to your organization's repository so that it can get all the necessary information (publicly available), help broaden the community, and help Aviyel better understand how we might best serve your specific needs. Not only that, but it will start real-time syncing of data and auto-update your community dashboard, activity dashboard, and rewards configuration—please do so (it's crucial)! Once you have added the app, everything can be easily synced, tracked, and maintained on one single platform. To do so, the first step is to click on Install the Github app, as shown in the screenshot below.
You will be redirected to the GitHub page for final authorization, so authorize your entire repository or pick a specific one; it is entirely up to you. To access the full functionality of the Aviyel platform, select and authorize the entire repository and click on the Save button to authorize it.

To confirm whether the app is installed or not, go to the organization settings page and click on the GitHub apps option; you should see something similar to the app shown in the screenshot below.

An alternative option to install GitHub app to your organization
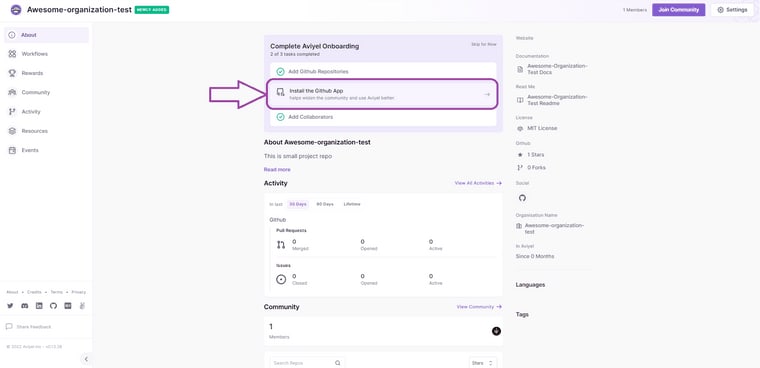
If you do not see the Install the GitHub app button on your community homepage, there is an alternative way to add it: follow these instructions.
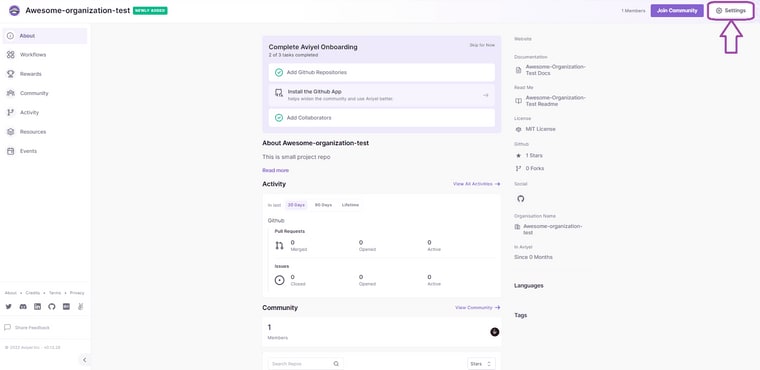
First, head over to the settings page. To get there, click on the settings button, which should appear at the top-left corner of your screen.
Next, click on the GitHub setting option once you are on the settings page. You should see a button called Install GitHub App; if not, there will be instructions for installing manually at the bottom of the page.

Click Install Github App to continue.

As previously stated, you will be redirected to the GitHub page for final authorization; you may authorize your entire repository or select a specific one. To access the full functionality of the Aviyel platform, select and authorize the entire repository before clicking the Save button.
Configuring Slack and Discord to your profile
After you've configured/set up your GitHub org with Aviyel, install the Slack and Discord apps to your community profile. This will allow Aviyel to automatically create profiles for members of your Slack or Discord channel. Not only that, it will also alert you to new messages and notifications as they happen in real-time. This makes everything systematic and streamlined.
Configuring slack to your Aviyel profile
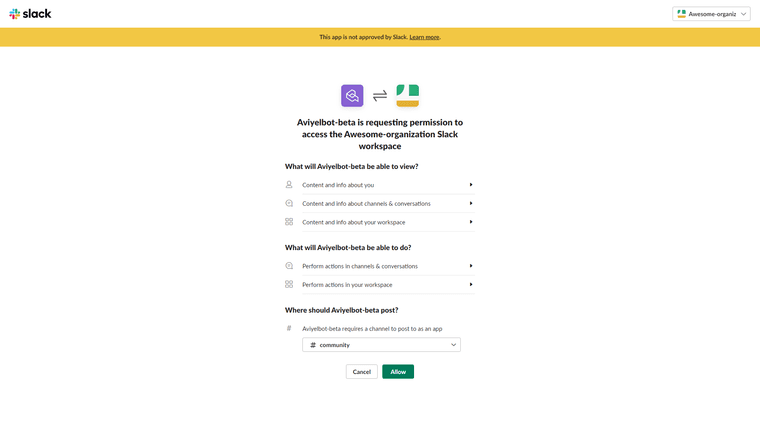
Configuring and attaching your Slack workspace to your profile is very easy. It just takes a few clicks that you all have to make. To install the Slack app, click on the Install Slack App button, as shown in this screenshot. You will be redirected to your Slack workspace authorization page, where you can approve or deny the installation permission of the application.

To complete the authorization process, click on the Allow button to grant permission for the Aviyel bot app to authorize your Slack workspace, and then proceed to the next step.
As you can see, the Aviyel Slack bot app has been successfully installed and configured in your Slack workspace, so you should be able to see your workspace name on Aviyel's Slack settings page, as shown in the screenshot below.

After you have installed the Aviyel Slackbot on your chosen channel, you should be able to see something similar to this:

Configuring Discord to your Aviyel profile
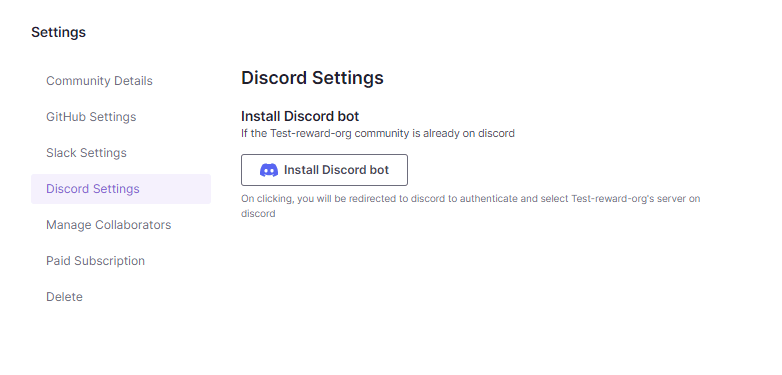
Configuring and connecting your Discord channel to your profile is as simple as we demonstrated in the previous section with Slack. It only takes a few clicks. Click the Install Discord Bot button, as shown in the screenshot below, to install the Discord bot. You will be redirected to your Discord authorization page, where you can approve or deny the application's installation permission.
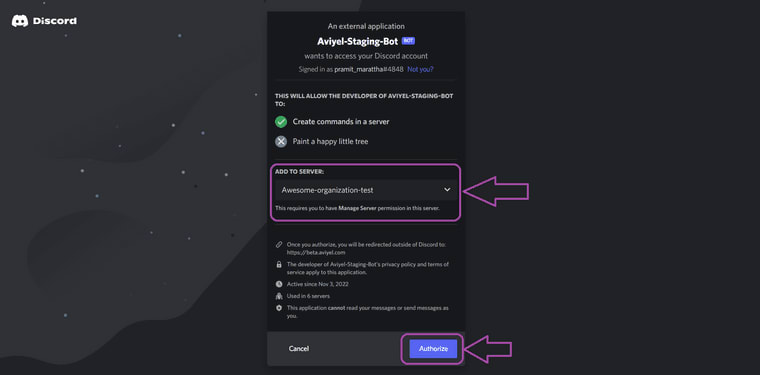
Again, to wrap up the authorization process, click on the Authorize button to grant permission for the Aviyel bot to authorize your Discord server, then proceed to select the server where you want that bot to be installed, and finally move to the next step.
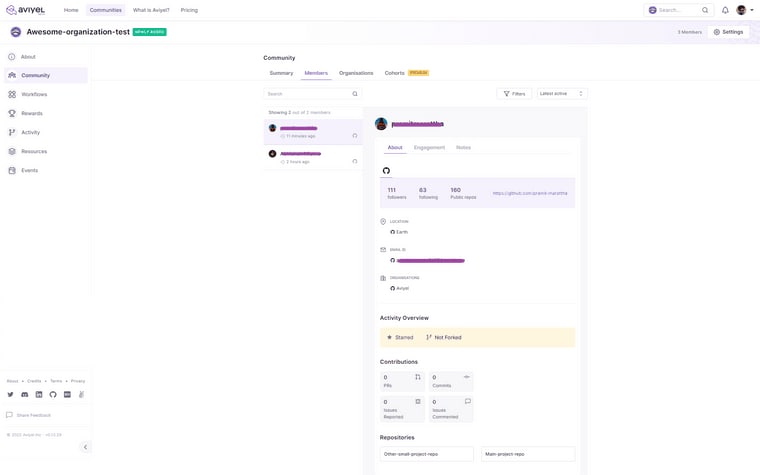
Once you have installed the Aviyel Discord bot on your chosen server, you should be able to see something similar to this:

Upon returning to your Aviyel's Discord settings, you will be able to see that your server has been successfully configured like so:

Setting up and configuring the community dashboard
So, we have successfully configured our GitHub, Slack, and Discord accounts. Now, Aviyel can fetch all the data needed to streamline information related to our community into a single platform/feed.
Community Dashboard
To access the community dashboard, click on community in the sidebar. This will take you to the community dashboard, where you can find various options. So at the top of the page, there is a summary tab. This will give you all the essential information about your organization in one place (we will delve deeper into this section later on). The next tab is the Members tab, which lists all members of that particular organization. The next one is an organization tab—which shows which company each member belongs to—and there is also a cohort tab, which is only accessible for pro users, that allows you to manage and streamline activity in your community easily; you can read more in-depth about it below.
Community dashboard: Summary section
The summary section provides all of the organization's information concisely, from the number of members to the number of active members; not only that, but it separates the top contributor list and then provides a detailed geo-distribution in the map of where that particular member or contributor is from; and finally, there is a "community activity and social platform" section that displays all of the integration of social platforms (such as the ones we made earlier, like for example GitHub, Slack, and Discord).

Community dashboard: Members section
The members section lists all of the members within that organization, along with their activity, and displays all of the necessary information about the members, such as their detailed information about their profile and activity, the contribution they made—and you can not only search for members and view their profiles, but you can also filter the member and view or search their profile accordingly; there are many filter options available.
Community dashboard: Organisations section
Organisations section displays which company each member belongs to, along with their profile and activity summary (where they are from and when they first joined the community). This section also contains a list of that person's interactions with that particular organisation—their most recent activity as well as stats about how many issues have been opened and closed, the number of stars given to that specific organization, the number of PR merged with and opened for that particular organization, and finally, the number of repos that individual member interacted with.

Community dashboard: Cohorts section
Currently, Cohort Section is only available to Pro users. This allows you to manage and streamline activity in your community easily. We will go through each section below—but more cohorts are coming in the upcoming releases!
New Members: 30 days
This cohort defines and assists in identifying members who have joined any platforms within the last 30 days. Newer users' data is merged, and whenever someone joins for the first time, they're added to this group. Older members get removed from it as their membership ages past that point; this keeps your cohorts updated with fresh and new information.

Contributors: Issues on GitHub.
This cohort defines and assists in identifying members who have interacted with at least three issues on GitHub within the last thirty days. Members can be contacted via direct message or email; interaction would include raising, commenting, or reacting on an issue thread.

Contributors: PR on GitHub
This cohort defines and assists in identifying all members who have interacted with at least one GitHub pull request (from any project) within the last 30 days.

Existing Members: Recent to Messaging
This cohort defines and assists in identifying members who have joined or are active on slack/discord channels and other platforms for more than 30 days.

Existing Members: Recent on GitHub
This cohort defines and aids in identifying members who have been active on GitHub within the last 30 days and those who have previously belonged to other platforms for more than 30 days.

Re-Engage with Recently Inactive: GitHub
This cohort identifies members who have interacted on GitHub in the last 90 days and are not active in any community channels within the last 30 days.

Re-Engage with Recently Inactive: Messages
This cohort defines and assists in identifying members who have been active on Slack, Discord, or Aviyel in the last 90 days but have not been engaged in any of the community channels in the previous 30 days.

Activate Sleeping Members: Messages
This cohort identifies and defines members who have joined Slack/ Discord but have never interacted on these channels.

Forked, Warm, and Sellable: Sales
This cohort defines and aids in the identification of members who have an Organization tag available, forked at least one repo of the project, raised at least one issue in the last 60 days, interacted on at least one PR during the previous 60 days, and have been active on Slack, Discord, or Aviyel during the last 30 days.

Setting up and configuring Workflows
Now that we have finished setting everything up and know where we want our community to go, we need to automate each of our time-consuming tasks. To help with this, Aviyel workflows can automate any task, which will help drive and manage the community superbly. By using Aviyel's workflow, which is a helping hand to improve your community journey, you can start automating each of your recurring tasks with the aid of workflows.

Slack thread opener For Discord
This thread opener workflow assists you in opening a thread each time a conversation needs to be started for a comment on any of your Slack channels, ensuring that you never miss another member's comment again! So to enable this workflow, first, you need to click the Thread Opener workflow and create a new one, highlighted as shown in the screenshot below.

To begin, let's configure it with Slack; we'll do it with Discord later in the process, so to configure it with Slack, first, select a platform as Slack for configuring it with Slack, select Slack, and after done, select your Slack workspace and select the channel where you want to send the automated message (or, in simpler terms, where you want the bot to be activated), and once done, click on the select message button and choose from a palette of available templates or create your custom message.

After you have successfully set up your thread opener workflow, it should look something like this:

As you can see now that our thread opener is working perfectly, this thread opener works when someone messages something on the particular channel where you added that bot.

Discord thread opener For Discord
This thread opener workflow allows you to open a thread every time a conversation is being started on any of your Discord servers or channels so that you can see another member's messages again! So to enable this workflow, first, you need to click the Thread Opener workflow and create a new one, highlighted as shown in the screenshot below.

The procedure is the same as when we did it while configuring it with Slack. After you set up all your workflows and save them, you should see a preview of that workflow so you can toggle around to enable or disable it.

As you can see in the screenshot below: It works perfectly, so whenever someone pings the discord channel, it will simply greet that user and reply personally in a thread.

Welcome New Members
This is the second workflow and one of the excellent workflows that greet new community members with a warm welcome message or send them the link to events, articles, or the knowledge base to start seamlessly.

To proceed with the setup, you need to click that workflow option, and then you will get an option to select a platform, select Slack, and then proceed when to send the message. Two options are available: one when new members join the workspace and another when members join that particular channel. Proceed to select either of them, and you should be able to see or choose whom or which channel to send that message to, so proceed to select that option, and finally select the messaging template (or create a custom one), give it a suitable name, and save it.

After you have saved your workflow, it should look like this, as shown in the screenshot below.

For Discord too, the procedure is the same as what we did with Slack: to proceed with the setup, you need to click that workflow option, then you will get an option to select a platform; select the Discord one, and then proceed when to send the message; there are two options available: one when new members join the workspace, and the second when members join that particular channel. Proceed to select either of them, and you should be able to see or choose whom or which channel to send that message to, so proceed to select the messaging template (or custom), give the workflow a suitable name, and save it.

After you have saved your workflow, it should look like this, as shown in the screenshot below.

Send Comment: GitHub
This workflow is highly effective. This workflow is intended to send a word of appreciation or thanks whenever a new pull request is merged, an issue is resolved, or other Github activity occurs.

Click on it to configure it, and you should be able to see the activity options, such as when to trigger the workflow when a specific activity occurs, so start with PR and then select to proceed when to send the message. Please select the appropriate option for you, select the repo on which you want to enable this workflow, and finally, select the messaging template (or create a custom one), give it a suitable name, and save it.

After you have saved your workflow, it should look like this, as shown in the screenshot below.

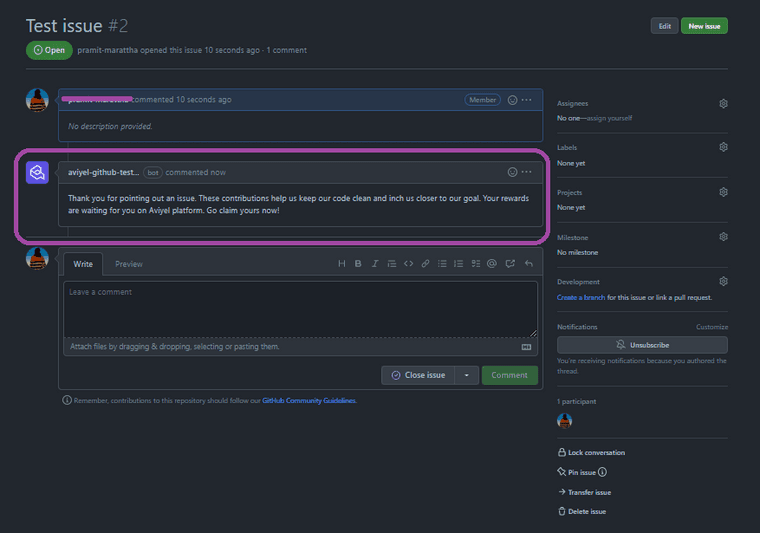
To test it, go to your repo and create a Pull Request; once you've done that, you should see the bot responding as a comment to that particular Pull Request, as shown in the screenshot below.

To configure it with "issues," click on the workflow option again and create a new one, and then you should see the activity option, such as when to trigger the workflow when a specific activity occurs, so let's start with Issues and then select to proceed when to send the message. Please select the appropriate option for you, select the repo on which you want to enable this workflow, and finally, select the messaging template (or create a custom one), give it a suitable name, and save it.

After you have saved your workflow, it should look like this, as shown in the screenshot below.

To test it out, go to your repo and create an issue; once you've done that, you should see the bot responding as a comment to that issue.
Rewards Digest
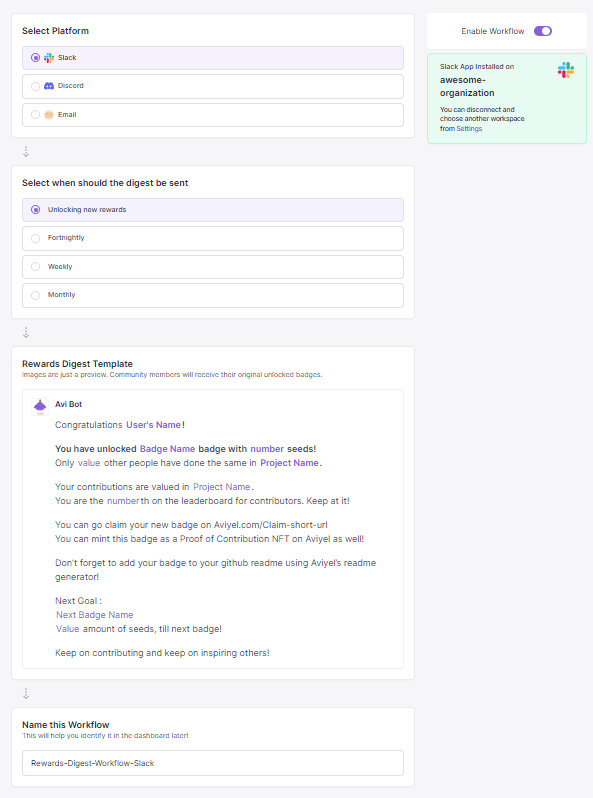
This workflow keeps your community members up to date on the badge and seed rewards they've received in the last month or week. To work with workflow, you must first set up the reward. If you haven't already, go to the previous step of this tutorial and return to this session. Let's start with the configuration; to do so, click on the section highlighted, like in the screenshot below.

Configuring this workflow is very simple; all you have to do is choose the platform to which you want to send the message, then select the time and period when you want to send it, and finally, it will automatically generate a template for you to use, so name the workflow and save it!
Event Invite
This workflow is simple and straightforward; it sends timely invitations to your most recent events to relevant community members. This workflow sends and Prompts them with last-minute reminders to attend your upcoming event.
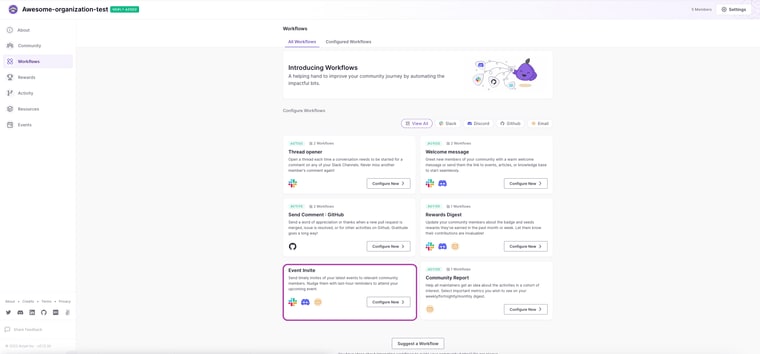
So, to configure it, choose when you want to send the message, choose a medium, then a platform, and finally, choose a message template or create a custom one, whichever you prefer, and then name and save the workflow.

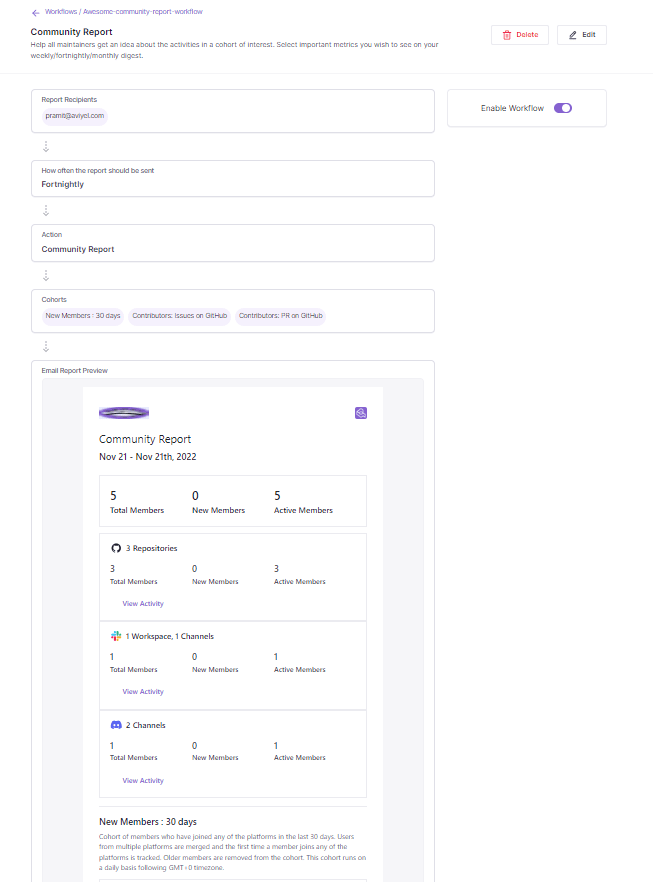
Community Report
This workflow is intended to help all maintainers understand the activities in a cohort of interest. As a result, you can easily select the key metrics you want to see on your weekly, biweekly, or monthly digest.
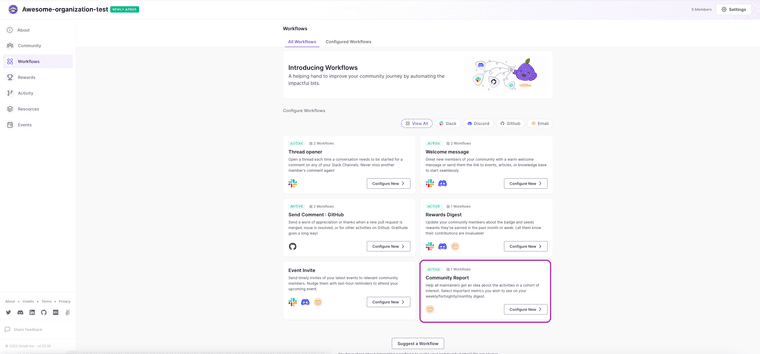
To configure it, first select or add the name of the person to whom you want to send the report, then choose how frequently you want to send the report, such as the time and schedule for that particular report, and finally select the cohort, give the workflow a name, and save it.


After you have saved your workflow, it should look like this, as shown in the screenshot below.
And once you've finished configuring your workflow, you can go to the Configured workflows tab section to see which workflow is currently active and customize and edit your current workflow.

Configuring and setting up Rewards and Badges
The rewards and badge feature is straightforward to set up; it's effortless to set up and configure your badge. We are keeping it simple because we want to give the contributors and maintainers of the projects the best possible user experience.

To configure your Aviyel rewards, follow the steps outlined below.
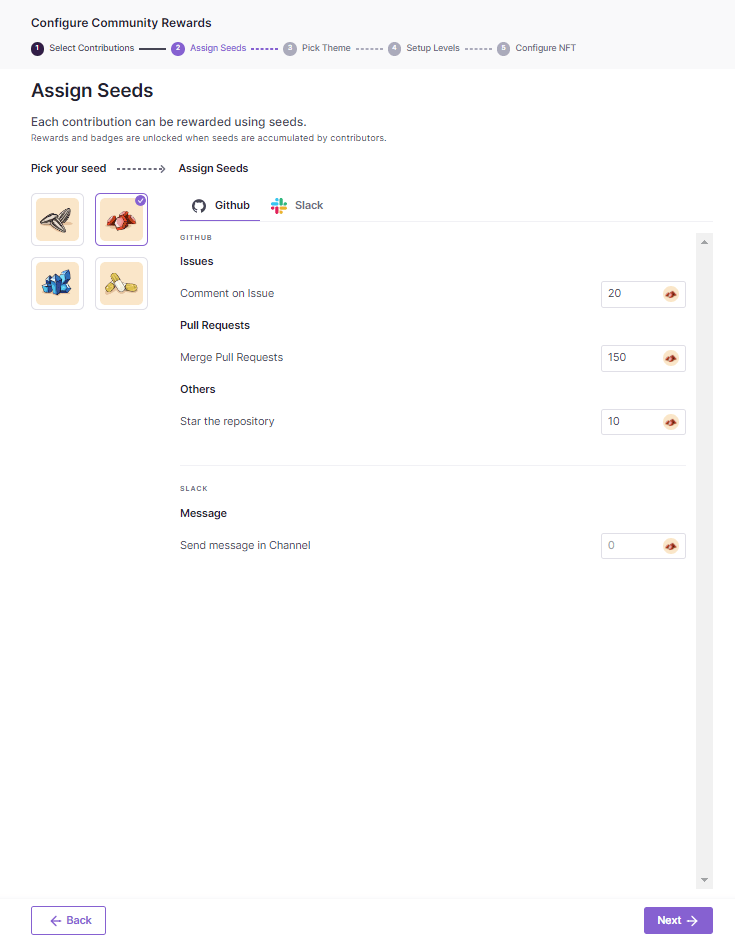
Step 1: First, choose the activities and contributions you want to reward the contributor, keeping in mind that you can always add more later.

Step 2: Points earned by the user can be configured for their activity, and these points are referred to as seeds, so each contribution can be rewarded with seeds, and remember that a collection of seeds unlocks badges and rewards, thus rooting and growing the reputation, so remember that more contributions equal more seeds, which equals more Badges and rewards.
Step 3: Seeds can be used to unlock levels, and each level has a badge linked with it, so you can choose one of the themes to represent or track your contributors in this step. You have many alternative theme options available, so you can go with whichever theme you desire.

Step 4: Seed distribution will get plotted on a graph in this particular phase, which will help to figure out how many seeds we'll need to unlock each level.


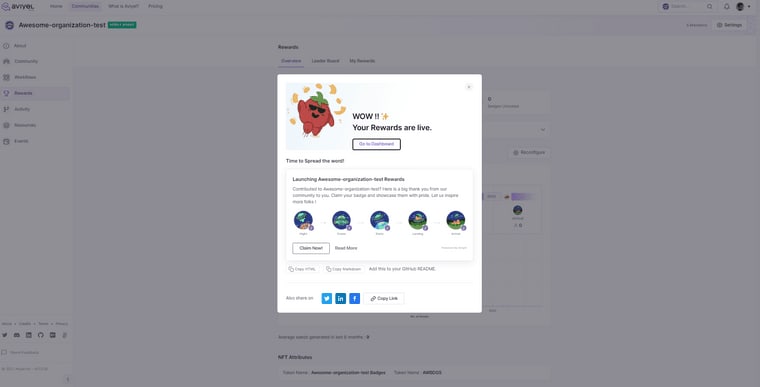
Step 5: You should now be able to publish your badges. Proceed to click on the "Publish" button to post it.

As you can see, you've set up your project's badges and rewards system successfully. Now you can start giving them to your community members.
Conclusion
Crafting and building a thriving community can be very challenging, but Aviyel can help you streamline every aspect of community management, from monitoring member participation and rewarding it to increasing engagement among already-active members. It is an excellent tool that gives you a complete 360 view of what is happening in your community by combining all relevant data from different platforms into one. This helps you better understand your members and decide how to interact with them more efficiently.

Top comments (0)