If you've read the official Vue.js Guide, you've seen how Vue apps are made of components, you can make a Vue app with the new Vue JS constructor, and you can create components with Vue.component. You can do all that with just plain old JavaScript after importing Vue with a <script> tag. In fact, this was what got me hooked on Vue when I started out learning modern frontend; the examples "just worked" without any real setup step or much familiarity with ES6+.
But snoop through some popular Vue projects on GitHub, and you'll find that a lot of them don't organize their components in .js files imported with script tags, but rather in these cool, somewhat-different .vue files. Those files are called single file components, and you set them up using webpack.
My first reaction was "woah where did all that complexity to writing Vue apps like a pro come from?"
Luckily, single-file components build on top of plain Vue, so to add this layer to your app, you're transferring the concepts you already learn from the basics of plain Vue. In this tutorial, I'll take a simple app in plain Vue, and show you how to make it use single-file components.
This tutorial assumes you:
- Have gone through the getting started guide for Vue; everything in SFCs builds on top of plain-Vue principles.
- Know how to make Vue components, and how components communicate using events.
- Know the basics of webpack, namely what an entry point is, and what a loader does. If you're looking for a step-by-step webpack tutorial, I have one here.
And the examples from this tutorial can be found on this GitHub repository.
✌️ A plain Vue app
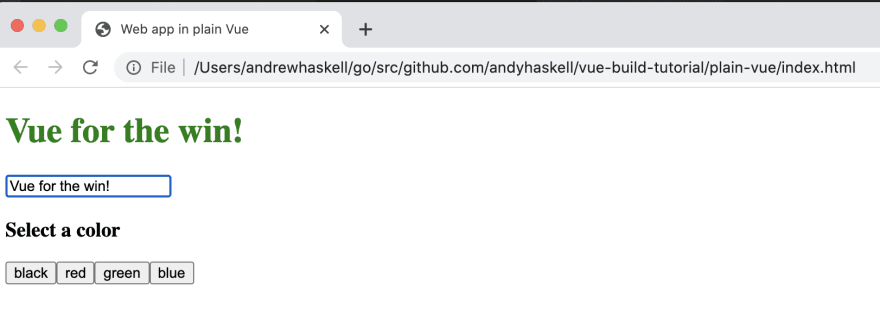
Let's start by building a simple Vue app where we can type a message into a text box to make it display in a <h1> tag, and we can click on buttons to select which color we want to make the <h1>'s text. So the app will look like this:
First, since this is a webpage, let's make our HTML. Make a new folder and copy-paste the code below to a file titled index.html:
<!DOCTYPE html>
<html>
  <head>
    <title>Web app in plain Vue</title>
    <script src="https://cdn.jsdelivr.net/npm/vue/dist/vue.js"></script>
  </head>
  <body>
    <div id="app"></div>
    <script src="app.js" type="text/javascript"></script>
  </body>
</html>
Inside it we import Vue.js from a CDN, we have a <div> named "app" that we'll display our Vue app in, and we have a <script> tag for importing our app's code. So now let's divide this app up into a couple components in app.js.
Let's start by making a color picker component. We have a set of buttons for selecting the color of the text to black, red, green, or blue. And when we click one of the buttons, we indicate what color the big header text should be set to.
const ColorPicker = Vue.component('color-picker', {
  template: `
    <form>
      <h3>Select a color</h3>
      <button
        v-for="color in colors"
        :key="color"
        @click.prevent="selectColor(color)"
      >
        {{ color }}
      </button>
    </form>
  `,

  name: 'ColorPicker',
  props: ['colors'],
  methods: {
    selectColor(color) {
      this.$emit('color-change', color);
    },
  },
});
We have a list of colors as a prop for our component, and make each button using the v-for directive. The @click handler calls a selectColor method, which inputs a custom color-change event.
Now, we could make a component for the big header and a component for the input box, but the input box and header are just plain HTML tags, and I'd like to keep this tutorial focused on organizing just a couple components. So let's just make an outer Vue component for the whole app. This app will use our <color-picker> component.
const App = Vue.component('app', {
  template: `
    <div class="whole-thing">
      <h1 :style="{color: color}">{{ message }}</h1>
      <input type="text" v-model="message" />
      <color-picker
        @color-change="colorChange"
        :colors="['black', 'red', 'green', 'blue']"
      ></color-picker>
    </div>
  `,

  components: {
    'color-picker': ColorPicker,
  },

  data() {
    return {
      color: 'black',
      message: 'write a message',
    };
  },

  methods: {
    colorChange(color) {
      this.color = color;
    },
  },
});
We register the <color-picker> component, and the data we're keeping track of is the color of the text, which we update with the color-picker's color-change events, and the message, which we update from the input box using the v-model directive. The text in the input box is displayed in our <h1> tag.
Finally, we have our Vue instance, so we start up the app by mounting it to the #app div in index.html.
new Vue({
  render: h => h(App),
}).$mount('#app');
Open index.html, and you should see our app! 🎉
Now, let's try using some cool new single-file components!
🚚 Moving our Vue code to single-file components
Single-file components do take some setup with webpack, as you'll see, but components in a .vue file don't look dramatically different from how they looked in a .js file. To start, let's make a copy of the plain-vue folder and name it single-file-components.
Inside single-file-components, instead of getting our Vue.js with a <script> tag, we're getting our Vue code from npm/yarn. So run this line in your terminal:
yarn add vue
to get Vue.js!
Now, let's re-organize our Vue code. First, make a folder titled app and move app.js there. This is where we'll keep all our JavaScript code. So now our app looks like:
|
|-index.html
|-app
  |-app.js
Inside app.js, each of the two components we registered will be its own single-file component, so let's start by making a color picker single-file component. Delete the ColorPicker component from app.js, and add this code to app/ColorPicker.vue:
<template>
  <form>
    <h3>Select a color</h3>
    <button
      v-for="color in colors"
      :key="color"
      @click.prevent="selectColor(color)"
    >
      {{ color }}
    </button>
  </form>
</template>

<script>
export default {
  name: 'ColorPicker',
  props: ['colors'],
  methods: {
    selectColor(color) {
      this.$emit('color-change', color)
    },
  },
}
</script>
Sweet! All the HTML in that big template string before is now in a <template> tag. As for the rest of the Vue component, we export default that as an object inside a <script> tag. The only big difference now with the plain Vue version is that the template isn't part of the JS object for creating a new Vue component. And since the template is inside the <template> tag, another benefit we get is better HTML syntax highlighting for the template in editors!
Now let's see how we turn the App component into its own file. Remove that component from app.js, and add this code to an app/App.vue file:
<template>
  <div class="whole-thing">
    <h1 :style="{color: color}">{{ message }}</h1>
    <input type="text" v-model="message" />
    <color-picker
      @color-change="colorChange"
      :colors="['black', 'red', 'green', 'blue']"
    ></color-picker>
  </div>
</template>

<script>
import ColorPicker from './ColorPicker.vue';

export default {
  name: 'App',
  components: {
    'color-picker': ColorPicker,
  },

  data() {
    return {
      color: 'black',
      message: 'write a message',
    };
  },

  methods: {
    colorChange(color) {
      this.color = color;
    },
  },
}
</script>
Just a little bit more complicated since the App component was bigger, but here's the highlights:
- Inside the App component's
<script>tag, weimportourColorPickercomponent fromColorPicker.vue. - We register it in App.vue as the
color-pickercomponent under thecomponentssection of our app's component object, like we did in the plain Vue version. - And now we can use the
color-pickercomponent in the<template>tag!
In index.html, get rid of the <script> tag for importing Vue.js; since we yarn added that, we can import Vue from our JavaScript file rather than meticulously arranging the order of <script> tags for each dependency we're using. Also, change the script tag to import app.js to importing app/app.js
Now, over in app.js, things are looking bare. We only have the code for initializing a Vue instance that mounts the App component to the #app div. But since we got rid of the Vue import in index.html and our App component is in its own App.vue file, we're gonna need to import it in app.js.
+ import Vue from 'vue';
+ import App from './App.vue';

  new Vue({
    render: h => h(App),
  }).$mount('#app');
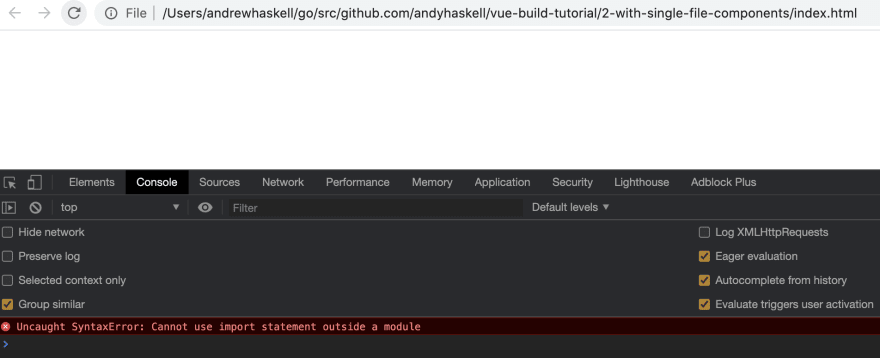
And we've got our Vue app, with our components arranged to have their own files, making for more-organized code. Open index.html in your browser, and you'll see...
🔮 Bringing in webpack
We just organized our code, and with all the import statements, how the code is arranged is pretty human-readable. So why isn't this app working?
Remember the structure of your code in the plain Vue version:
|-index.html
|-app.js
|... Vue.js from the CDN
The code we're running now uses the modern JavaScript import statement, and not only that, but it uses this new .vue format. However, the reason the browser could run the plain Vue version of this app was because it's in the format the browser expects: Plain HTML importing plain JavaScript.
Our index.html file is still plain HTML, but app.js is importing .vue files, and those aren't plain JavaScript; they're Vue single-file components. So what we need is a way to take those single-file components we organized, and turn them into plain JavaScript your browser is made to work with.
This step of converting a programming language into a slightly-different language is called transpiling, and there's a webpack loader made for transpiling Vue SFCs to plain JS: vue-loader, made by the Vue Team themselves! So let's add webpack+vue-loader to our build process.
First thing's first: Let's import webpack and vue-loader to our package.json:
yarn add --dev webpack webpack-cli vue-loader vue-template-compiler
Then in package.json, to make it easier to run our build process, add this line:
"scripts": {
  "build": "webpack"
},
Now, let's set up our webpack config. Put this code in a file titled webpack.config.js:
const VueLoaderPlugin = require('vue-loader/lib/plugin');

module.exports = {
  entry: './app/app.js',
  module: {
    rules: [{
      test: /\.vue$/,
      loader: 'vue-loader',
    }],
  },
  plugins: [ new VueLoaderPlugin() ],
}
Here's what's going on:
- The entry point for our app is
app/app.js, so we build webpack's dependency graph starting there. - We can load JavaScript code out of the box with webpack, but if we import a
.vuefile, we need a webpack rule for how to handle that format. in themodule.rulessection, if webpack across a Vue file in its dependency graph, we pass it throughvue-loader. - There's also this weird
VueLoaderPlugin. We'll take a look at why that's there in the next tutorial, but for now, just know that's required.
Now if you run yarn build, the end result is a transpiled file dist/main.js that's plain JS your browser can read.
Now, index.html import dist/main.js instead of app.js, and your app should now work! 🎊🎊🎊
We now have our Vue code in .vue files, and can have our JavaScript import other JavaScript, both stuff we wrote like our components, and third-party dependencies like Vue itself. The big takeaways are:
- All the knowledge from making Vue files in plain JavaScript transfers over to
.vuefiles, so you're not starting over from scratch! -
.vuefiles aren't plain JavaScript, but you can get some JS your browser can work with by transpiling it. - With webpack in place, now you can use .vue files, and better organize your code for building more complex web apps.
However, a convenient .vue format isn't all vue-loader can do. In fact, we can customize the code our .vue files work with even further! So if you want to see that in action, and hear the scoop on why we have that VueLoaderPlugin, check out part 2 (will be uploaded in a few minutes)!

Top comments (0)