Prerequisites:
- Node version of 16.20.2
- MongoDB URI for database access
- Zookeeper and Kafka. I'm following this post on how to run them at my windows 10 machine.
And now, let's go into the cooking step:
Initialize Node application
- Create a directory dedicated for this project. For me the name is back-end-web-app
- Open command prompt from that directory
-
Run this command:
npm init Input the package name. Mine is the same as the direcotry name
back-end-web-appChoose version of
1.0.0by hit enterInput description as you wish then hit enter
I keep
index.jsas the entry point so I just hit enterI have no test command so I just hit enter
I have no git repository dedicated so again, I just hit enter
I have no keywords so I just hit enter
Type your name as the author then hit enter
I have no preferred lisence so I just hit enter
The command prompt will show you somekind of summary of your project, type
yesif it is correct already then hit enterYou will see
package.jsonat your directory.
Install npm packages
-
Installing
dotenv. This package will be use to read variables from env file
npm install dotenv -
Installing
express
npm install express -
Installing
kafkajs
npm install kafkajs -
Installing
mongoose
npm install mongoose
Creating .env
This is how my .env lookslike. Don't forget ti change the MONGODB_URI into your own URI and makesure that the port you will use is not being use by another process.
PORT = 3006
HOST = localhost:3006
MONGODB_URI = mongodb+srv://<username>:<password>@cluster0.cluster.mongodb.net/
Creating project directory structure
Below is project directory structure that I use:
*src
    - models
    - utils
*.env
*index.js
*package.json
Creating models
To ease the process I choose to use mongoose. Mongoose take most of the work to communicate with MongoDB. The model that I create in this service is actually the same as I made in previous service.
import mongoose from "mongoose";

const lokomotifSchema = new mongoose.Schema({
    kodeLoko: String,
    namaLoko: String,
    dimensiLoko: String,
    status: String,
    createdDate: String,
});

export const Lokomotif = mongoose.model('Lokomotif', lokomotifSchema);
Make service acts as kafka consumer
I actually not sure where to put configuration of this kafka configuration so I put it inside utils directory.
import { Kafka } from "kafkajs";
import { Lokomotif } from "../models/lokomotifSchema.js";

const kafka = new Kafka({
    clientId: 'lokomotif-data',
    brokers: ['127.0.0.1:9092', '127.0.0.1:9092']
})

const consumer = kafka.consumer({ groupId: 'loko-group' });

export const run = async () => {

    await consumer.connect();
    await consumer.subscribe({ topic: 'lokomotifdata', fromBeginning: true }); // it has to be the same as the topic we've created in previous service

    await consumer.run({
        eachMessage: async ({ topic, partition, message }) => {
            const parsedMessage = JSON.parse(message.value.toString());

            const data = new Lokomotif({
                kodeLoko: parsedMessage.kodeLoko,
                namaLoko: parsedMessage.namaLoko,
                dimensiLoko: parsedMessage.dimensiLoko,
                status: parsedMessage.status,
                createdDate: parsedMessage.createdDate
            })

            try {
                await data.save();
                console.log("THIS IS DATA", data);
            } catch (error) {
                console.log(error);
            }
        }
    })

}
As you may see, I don't do much thing to save the message I got from Kafka to the database since it is being taken care by mongoose
Running the application
- Makesure zookeeper and kafka application is run.
- Make sure Spring Boot: Scheduler Info service is run.
-
Open command prompt from the project directory and run this command:
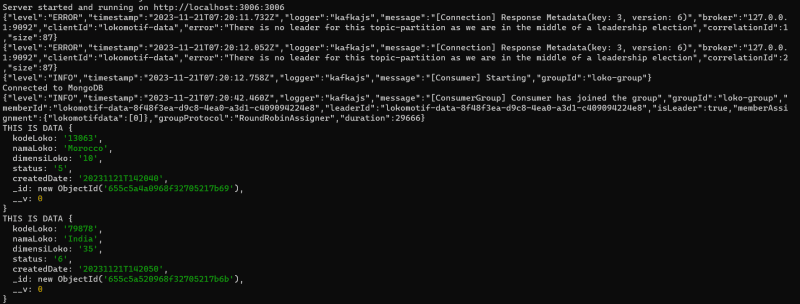
node index.js If the project runs correctly, you will see this kind of log in your node terminal (command prompt where node is run) and the data being saved at your MongoDB

I think that's all for this service. The working code can be find at my github repository.


Top comments (0)