
Hello there! Here we will continue when we left off in the previous part. So right now we have our shiny static actions all set up; now, in this post, we will scaffold the FastApi project and write the code needed to query FaunaDB.
Setting up our project
Ok so first I will assume you have both Python 3.8.2 and virtualenv in your system; if not, please set them up according to your operating system before continuing.
Next, let's create a folder and a virtual environment for our project; for the remaining of this article I will assume a UNIX-based system:
mkdir our-awesome-api && cd our-awesome-api
virtualenv venv
source venv/bin/activate
Now, we will install the packages we need, and what do we need? Just FastApi and Fauna! Well no, we'll need also a couple more:
pip install uvicorn fastapi faunadb python-dotenv
Ok, the two in the middle we recognize, but what are the other two? Well, python-dotenv it's a package FastApi (or more precisely, Pydantic) uses to parse .env files; just like Javascript's dotenv.
On the other hand, uvicorn it's an ASGI server; remember those? It's the layer that allows FastApi to talk to HTTP servers like Nginx or Apache, it also has a nice dev server built-in along with hot reload when the code changes.
The file structure
Now, let's create a nice file structure for our project:
└───src
    ├───core
    ├───models
    └───app.py
What do we have here?
-
srcit's the source root of our project - In
corelives all the code that's critical for the start of our application - In
modelsare all the data models (like users, for example) - In
app.pyis where we create our application instance
Now that we have our packages installed and our file structure all set up, let's figure out what we need first.
Querying FaunaDB
The core of this project is, basically, storing and retrieving users. For that, we need to query our database; now, how do we do that? First, let's see how Fauna stores data: the records fauna stores are called documents (like in MongoDB), and documents are stored into collections. Like I mentioned in the previous article, Fauna does not enforce any type of data schema at the database level, and because of that, we can find inconsistencies between documents in the same collection. Nevertheless, all the documents have two common properties:
-
ref, which is a unique identifier given automatically to all documents (like an old fashioned id) -
ts, which is a timestamp that changes every time an event occurs to this particular document (like creation or update). Fauna automatically stores the events in the lifetime of an object, and you can query it, but that is beyond the scope of this post. -
data, this is a dictionary containing all the data we store for the object. So, for example, is this was a users collection this would contain information like the username or email of our users.
Cool, now that we know how the data is stored, we need to know how to query it. Because no data schema is enforced at the database level, Fauna does not know out of the box how to query our data (we can't for example, query by username like we would do in a relational database); to tell Fauna how to query our data, we need to create an index. Indexes are a set of instructions, associated with a particular collection, that tells fauna how to query that collection; at the same time, we can tell indexes what data we need to be retrieved. So, for example, maybe we need to list all our users, this list will only show their username and the date they signed up; it would be a waste of bandwidth to fetch all the additional data we won't show in the list. So, for this, we can create an index that does exactly this: paginate through all the users and retrieve only their username and the document creation date.
Ok, enough theoretical talking, let's recall our flowchart from the last post and see what indexes we need:
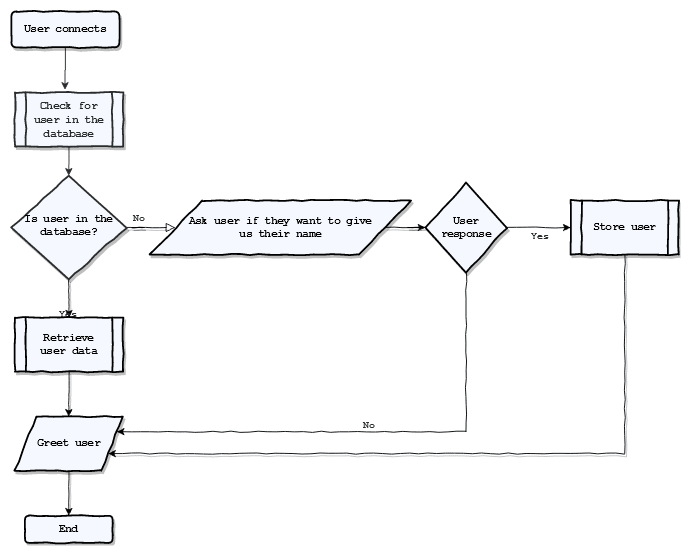
Now, we see that we need to check if the user already exists. For that, we'll need an index that queries our collection via a unique index. What property of our users is unique? That's right, their phone number! So, let's go to the Fauna website.
Creating an index
Well, that title is a bit misleading. We can't create an index for a collection that does not exist and we cannot create a collection for a database that does not exist. So let's go to FaunaDB and sign up using our GitHub credentials.
Then, in the dashboard, let's click in "New Database" and create our shiny new instance:

Next, let's create our collection, I named mine users for the sake of originality:

Now, with the database and collection created, we can finally make our index:

Ok, we have several things going on here:
- First of all, we need to select to which collection this index belongs. We say that this is for querying our users collection.
- Then, the index name. Pretty self-explanatory.
- Now we have this thing called "terms", what's this? Well, indexes can be used to paginate over a collection (that is, to list a collection) or they can be used to query a collection using a special field (for example, via the phone number, as we have here). Terms are exactly that: the terms that this index will use to query our data against. We write
phone_numberhere and we see the dashboard formats this todata.phone_number, that is because all non-standard fields are considered to be inside of the data dict I mentioned before. By standard fields, I mean fields that Fauna generated, likerefandts. - The
valuesare all those fields we want the index to fetch, in this case, we want to fetch thename, thecountry, and theref. Notice how the dashboard putrefand nodata.ref.
Cool! Now let's click save and leave the dashboard for now.
Querying Fauna from Python
Ok, now we need to write code in order to query our database from python. For that, I adopted an OOP approach, kinda like a traditional ORM:
# src/models/user_document.py
from typing import Optional, Any

from pydantic import BaseModel

from faunadb import query as q
from faunadb.objects import Ref

class User(BaseModel):
  ref: Optional[Ref]
  ts: Optional[str]
  phone_number: str
  name: str
  country: str

  class Config:
    arbitrary_types_allowed = True

  def __init__(self, **data: Any):
    super().__init__(**data)

 @classmethod
  def get_by_phone(cls, phone_number: str):
      result = session().query(
          q.paginate(q.match(q.index("get_by_phone_number"), phone_number))
      )
      if len(result["data"]) == 0:
          return None
      # The result is a list with the values ordered as the index we defined
      ref, name, country = result["data"][0]

      return User(
          ref=ref,
          name=name,
          country=country,
          phone_number=phone_number,
      )
Now, what the heck do we have here? First of all, what is BaseModel parent class? Well, FastApi uses Pydantic under the hood. Pydantic it's a validation library that uses the type hints introduced in Python 3.6 for doing its validation. For a class to be validated with Pydantic, we have to do two things:
- Inherit from the
BaseModelclass - Defined our class attributes with type hints
And that's what we have done here:
-
refandtsits Fauna's reference type as discussed above, the Python driver comes with its own type hints for the former, so we use those; fortss we useint, because it is just a UNIX timestamp. You'll see why are they marked asOptionalin a moment. - We add the same attributes we defined in our index, so the phone number, the country, and the name.
After that, we have just defined a constructor to init the base class.
Now, we come to the heart of this class, the get_by_phone static method:
- First, we create a query using the FaunaDB client (we will define the
sessionobject in a moment)- Inside the
querywe pass apaginateobject - Then we say we want to
matchagainst andindex, in this case, is the"get_by_phone_number"index we created above - As a param to that index, we pass the
phone_numberparameter passed to the function
- Inside the
- If the query returns an empty list, we say that we did not find the user, so we return
None - If not, then we create an instance of
Userwith the first element of the list the query returned. Notice that this is a static method, because of that we useUserdirectly instead ofself
Cool, now two things:
- The order in which the document's properties are returned is the same order that we defined in our index
- The returned data is a list, why is that? Well, remember that Fauna does not make any assumptions about our data. It does not know that the
phone_numbermust be unique, that is for us to enforce at the application level. So for all Fauna knows, there could be a thousand documents with the same number, what we're doing here is a very educated guess; so we need to be careful to not allow duplicate phone numbers at the application level.
Populating that core folder
You noticed above that I imported a magical session object, you also probably guessed that was the Fauna client initialized somewhere. If you did, you are correct; let's write that initialization code now:
For this, we need to first write a model to hold the configuration of our app.
# src/models/config.py
from typing import Optional

from pydantic import BaseSettings, AnyHttpUrl, validator, HttpUrl
from pydantic.types import SecretStr

class Config(BaseSettings):
  DEBUG: bool = False
  FAUNA_SERVER_KEY: SecretStr = "your_server_key_here"
  FAKE_NUMBER: str = "+15555555"
  TWILIO_AUTH_TOKEN: Optional[str]

  def __init__(self, **kwargs):
        super().__init__(**kwargs)

  @validator("TWILIO_AUTH_TOKEN")
  def check_for_twilio_token(cls, v, values, field):
    if (
        "DEBUG" in values
        and not values["DEBUG"]
        and v is None
    ):
        raise RuntimeError("{f} must be set".format(f=field))
    return v
Now, what's this? Well, Pydantic comes with a very handy class to handle settings (and validation of those settings) for your application. Let's explain what's going on here:
- First, the base class is
BaseSettingsinstead ofBaseModel - Then, we defined the configuration variables our application will need:
-
DEBUGa handy flag to, well, enable debug mode. Defaults toFalse -
FAUNA_SERVER_KEY, the API key four our database. It is of typeSecretStr, which is a helper type to avoid printing the value tostdout: it will print a bunch of asterisks instead of the real value -
FAKE_NUMBER, more about that later ;) -
TWILIO_AUTH_TOKENour Twilio API Token, we'll need it later.
-
- After that, there is a Pydantic decorator, this function acts as a custom validator for the property that was passed as a parameter to the decorator. In this case, if we are running in debug mode, we don't care if the Twilio API key is not present so we jus return; on the other hand, if
DEBUGis set to false, we need to check that the Twilio API key is present, otherwise the application would raise an exception
Great, now let's put this model into use:
# src/core/config.py
import sys
from os import environ

from src.models.config import Config

if environ.get("DEBUG", True):
    config = Config(_env_file=".env")
else:
    config = Config()
Not much going on here: we are just checking if DEBUG is set. If it is, we populate our config via a .env file; if not the config will be taken from environment variables.
Now, the Pydantic base setting has an order of priority to load variables:
- Higher priority goes to environment variables
- The next higher priority goes to the
.envfile, so if the same variable is defined in the file and in the environment, the one in the environment will take precedence. - Defaults defined in the model
So if an attribute not marked as Optional which does not have a default and is not defined either in the .env nor in the environment, will cause Pydantic to throw an error.
Next, the misterious session object:
# src/core/engine.py
from faunadb.client import FaunaClient

_session = None


def session():
    """
    Helper function to get faunadb session, if there is one already it just returns
    """
    from .config import config

    global _session
    if _session is None:
        _session = FaunaClient(secret=config.FAUNA_SERVER_KEY.get_secret_value())
    return _session
Nothing crazy here (and sorry for the global), we are just checking if Fauna client is initialized: if it is, we just return it, if it is not, then we initialize it with the key loaded from our configuration. Check that we are calling the get_secret_value method, remember that helper class from Pydantic? Well, we have to call this method in order to get the real value, otherwise, we would get a bunch of asterisks.
Our first endpoint
Now finally! Let's write our first endpoint. What does this endpoint do? Well, according to our flowchart, it will be responsible to check if our user is in the database and will react accordingly. Let's create a routes folder inside our source root:
mkdir src/routes
Inside this is of course our __init__.py and our new greet.py file which will contain our routes. Next, let's first modify our bot's schema to redirect to our endpoint when the user greets:
"uniqueName": "greeting",
"actions": {
  "actions": [
    {
      "redirect": {
        "method": "POST",
        "uri": "our_super_yet_to_be_endpoint/greeting"
      }
    }
  ]
},
// Other stuff down here
Here, we just changed our default action to be a redirect instead of a say action. Also, we said the Autopilot should send this as a POST request.
Now, in order to write our endpoint, we need to take a look at the Autopilot request reference. There, we learn that autopilot sends the data using the application/x-www-form-urlencoded encoding. For FastApi to parse that, we need yet to add another library:
pip install python-multipart
Now, finally, our endpoint:
# src/routes/greet.py
from fastapi import APIRouter, HTTPException, Form

from src.models import User

user_greeting = APIRouter()

@user_greeting.post("/greeting")
def greet_user(UserIdentifier: str = Form(...)):
    """
    User greet endpoint
    :param: UserIdentifier: user's phone number from Twilio
    """

    user = User.get_by_phone(phone_number=UserIdentifier)

   # Greeting the user since already exists
    if user is not None:
        return {
            "actions": [
                {"remember": {"name": user.name, "country": user.country}},
                {"say": "Hi there {name}! Welcome back, how are things in {c}?".format(name=user.name, c=user.country)},
            ]
        }

    return {
        "actions": [
            {
                "say": "Hello there!"
            },
            {"redirect": "task://can-have-name"},
        ]
    }
Not much going on here, if you've worked with Python web frameworks this will be pretty familiar to you. Let's see what's going on:
- First we create a router, this is what FastApi uses to bundle routes together. It helps organize code in self-contained routes.
- Next, we use that object to create a
POSTendpoint using it as a decorator, FastApi has decorator for all the HTTP verbs. We pass the endpoint's URI as a parameter. - Next, the function name, it can be anything
Now, what's with the function parameters? Well, FastApi also takes advantage of Python type hints in order to validate our requests. So if, for example, we pass something like: email: str as a parameter, FastApi will look for a parameter called email of type str in the query parameter string of the request. Similarly for all types of request parameters (Body, path parameters, etc). The name of the function parameter needs to be the exactly the parameter we're expecting; otherwise, FastApi will respond with a 422 Unprocessable Entity error.
So, in this case, we're expecting a parameter called UserIdentifier (as per the Twilio docs), which is a string. We also pass Form as a default value: that way we tell FastApi that we are expecting an application/x-www-form-urlencoded request. The ellipsis (the three ...) inside the Form constructor is just telling that this form has no dependencies (dependencies are another FastApi feature beyond the scope of this post). But, after all, what's a UserIdentifier? Well, depends on the channel Autopilot is using to communicate with the user, in Whatsapp and SMS channel it will be the user's phone number.
After that it's all pretty self-explanatory:
- We use the Fauna index we created before to check if the user exists.
- If it exists, we return a personalized greeting
- If not, we redirect to the action that will ask the user for their name; using the task's
uniqueNamewe created in our previous post
By default, if we return a Python dict from a FastApi endpoint, it will be encoded as application/json; which is just what we need. Also, check that we are adhering to Autopilot's Action Schema. We already know about the say and redirect, but what is this remember thingy? Well, Autopilot bots have the concept of "session": sessions are a time frame on which a conversation between the bot and a user is considered active. While the session is active, all data interchanged between the bot and the user will be store and the bot is able to send messages to the user without having to wait for their input; the time the session is considered active varies between channels, for Whatsapp is 24 hours. Now, the bot also has a memory that lasts the whole session; with the remember action; we are telling the bot to store those values in memory. That way, if we need to refer to the user's name or country, we don't have to hit the database again.
Wrapping up
So that's all for this post folks! Initially, this was to be a two-post series, but it overextended a bit. So for the sake of not boring the heck out of you, I decided to make this into a three-post series. In the next post, we'll implement the endpoint to store the name, deploy this thing live and a few more tricks ;)

Top comments (0)