
TLDR;
Colab Notebook
What will you build!

In this post we will make 3 levels of Food Classification models :
- Classify input image as Food vs Non Food
- Classify an input image of Food into 11 super categories
- Classify an input image of Food as one of 101 dishes
And finally combine the 3 projects into one Food Classification application.
Let’s begin!
Setup
We start by setting up Monk and it’s dependencies on colab. For further setup instructions on different platforms check out the DOCS.
$ git clone https://github.com/Tessellate-Imaging/monk_v1
$ cd monk_v1/installation && pip install -r requirements_cu10.txt
$ cd ../..
Setup the dependencies based on the platform you are working with. Monk is compatible with Ubuntu, MacOS, Windows and online Jupyter environments like Kaggle and Colab.
Project 1 : Food vs Non Food Classification
Let’s create our first project for classifying an input image into food or non food categories. The goal of this project is solely to determine if a food item is present in the input image and can be further classified into a super and sub category.
Start Experiment 1
Import monk library
import os
import sys
sys.path.append("./monk_v1/monk/");
import psutil
from pytorch_prototype import prototype
and create a new experiment
ptf = prototype(verbose=1);
ptf.Prototype(“food_nonfood”, “exp1”);
Dataset
For this project we are using the Food-5k dataset.
“This dataset contains 2500 food and 2500 non-food images, for the task of food/non-food classification from the paper “Food/Non-food Image Classification and Food Categorisation using Pre-Trained GoogLeNet Model”. The whole dataset is divided in three parts: training, validation and evaluation. The naming convention is as follows:
{ClassID}_{ImageID}.jpg
ClassID: 0 or 1; 0 means non-food and 1 means food.”
For our project we will combine the training, validation and evaluation sets into one.
from glob import glob
import os
import shutil
from tqdm import tqdmfolders = glob("./food-5k/*")food_dir = './food-5k/food'
non_food_dir = './food-5k/non-food'
if not os.path.exists(food_dir):
    os.makedirs(food_dir)
if not os.path.exists(non_food_dir):
    os.makedirs(non_food_dir)c = 1
n_c = 1
for i in folders:
    imageList = glob(i + '/*.jpg')
    print(len(imageList))
    for j in tqdm(imageList):
        imgName = j.split('/')[-1]
        label = imgName.split('_')[0]
        if label == '0':
            outPath = non_food_dir + '/' + str(n_c) + '.jpg'
            n_c += 1
        elif label == '1':
            outPath = food_dir + '/' + str(c) + '.jpg'
            c += 1
        shutil.move(j,outPath)
Now we can load our dataset, select our CNN architecture to train and set the number of epochs.
ptf.Default(dataset_path="./food-5k/", model_name="resnet18", freeze_base_network=True, num_epochs=5)
And begin training :
ptf.Train()
After training is finished we can observe the loss and accuracy plots stored inside workspace>”project_name”>”exp_name”>output>logs
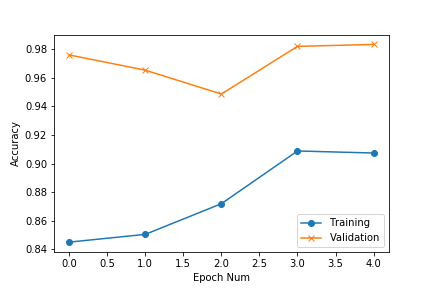 accuracy plot for food_nonfood experiment 1
Let’s create a new experiment with a different CNN architecture and see if we can achieve better performance.
Start Experiment 2
ptf = prototype(verbose=1);
ptf.Prototype(“food_nonfood”, “exp2”);
We can check the available models using :
ptf.List_Models()
Our experiment 1 was created using ‘resnet18’. For experiment 2 we will select ‘resnet101’.
By using residual networks, many problems can be solved such as:
- ResNets are easy to optimize, but the “plain” networks (that simply stack layers) shows higher training error when the depth increases.
- ResNets can easily gain accuracy from greatly increased depth, producing results which are better than previous networks.
To know more about ResNet architectures check out this post.
ptf.Default(dataset_path=”./food-5k/”,
            model_name=”resnet101",
            freeze_base_network=True, num_epochs=5);
For experiment 2 we will unfreeze a few more layers from our pre-trained model to make them available for training. We also increase the number of epochs and reload the experiment.
ptf.update_freeze_layers(100);
ptf.update_num_epochs(30);
ptf.Reload()
And finally train the model:
ptf.Train()
Once again we can observe the loss and accuracy plots for this experiment:
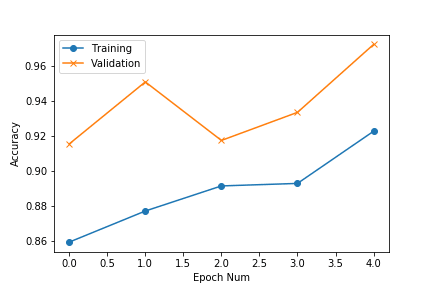 accuracy plot for food_nonfood classifier experiment 2
Comparison
We can compare the two experiments for training and validation accuracies and losses. (Check out DOCS)
from compare_prototype import compare
ctf = compare(verbose=1);
ctf.Comparison("food_nonfood");
ctf.Add_Experiment("food_nonfood", "exp1");
ctf.Add_Experiment("food_nonfood", "exp2");
ctf.Generate_Statistics();

Let’s test our model on food and non_food images.
Inference
First we load the experiment in evaluation mode:
ptf.Prototype(“food_nonfood”, “exp2”, eval_infer=True);
img_name = “./test.jpg”;
predictions = ptf.Infer(img_name=img_name, return_raw=False);
print(predictions);
Prediction
    Image name:         ./test.jpg
    Predicted class:      food
    Predicted score:      4.16873025894165

{'img_name': './test.jpg', 'predicted_class': 'food', 'score': 4.1687303}
Project 2 : Food-11 Classification
Now that we can classify input image as food or nonfood, we shall begin with classifying food images into different categories of dishes.
Dataset
For this project we will utilise Food-11 dataset.
“This dataset contains 16643 food images grouped in 11 major food categories. The 11 categories are Bread, Dairy product, Dessert, Egg, Fried food, Meat, Noodles/Pasta, Rice, Seafood, Soup, and Vegetable/Fruit. Similar as Food-5K dataset, the whole dataset is divided in three parts: training, validation and evaluation. The same naming convention is used, where ID 0–10 refers to the 11 food categories respectively.”
We will combine the training, evaluation and validation folders into one set of images and split them into respective class folders.
classes = {'0':'Bread','1':'Dairy_Product','2':'Dessert','3':'Egg','4':'Fried_Food','5':'Meat','6':'Noodles_Pasta','7':'Rice','8':'Seafood','9':'Soup','10':'Vegetable_Fruit'}from glob import globfolders = glob("./food-11/*")
print(folders)import osfor k,item in classes.items():
    directory = './food-11/' + item
    if not os.path.exists(directory):
        os.makedirs(directory)import shutil
from tqdm import tqdmc = 1
for i in folders:
    imageList = glob(i + '/*.jpg')
    #print(len(imageList))
    for j in tqdm(imageList):
        imgName = j.split('/')[-1]
        label = imgName.split('_')[0]
        outPath = './food-11/' + classes[label] + '/' + str(c) + '.jpg'
        c += 1
        shutil.move(j,outPath)
Start Experiment 1
We can now create a new project, start with our experiment and load our dataset.
ptf = prototype(verbose=1);
ptf.Prototype("food-11", "exp1");
ptf.Default(dataset_path="./food-11/",
            model_name="resnet101",
            freeze_base_network=True, num_epochs=10)
For this experiment we are using Resnet101 as our pre-trained model. Finally we can begin training :
ptf.Train()
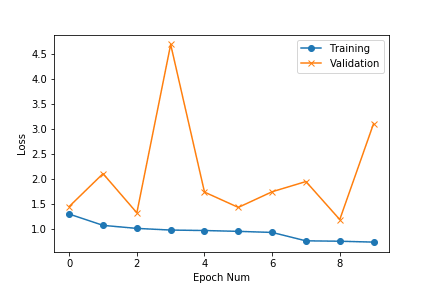 Loss curves
We can observe that after 10 epochs the model achieves an accuracy of ~ 75%. The validation loss was still going down and we can achieve better accuracy if we train for more epochs. Let’s try that out using Copy_Experiment
Start Experiment 2
We create the new experiment using the previous experiment 1 as a template and make a few updates.
ptf = prototype(verbose=1)
ptf.Prototype("food-11", "exp2",
              copy_from=["food-11", "exp1"]);

ptf.update_freeze_layers(100);
ptf.update_num_epochs(30);

ptf.Reload();
Note : Don’t forget to reload the experiment with ‘ptf.Reload()’ after making updates to your experiment
And now we can begin our training. Once training is complete we will compare the both the experiments and choose one to inference with.
Compare
ctf = compare(verbose=1);
ctf.Comparison("food-11");

ctf.Add_Experiment("food-11", "exp1");
ctf.Add_Experiment("food-11", "exp2");

ctf.Generate_Statistics();
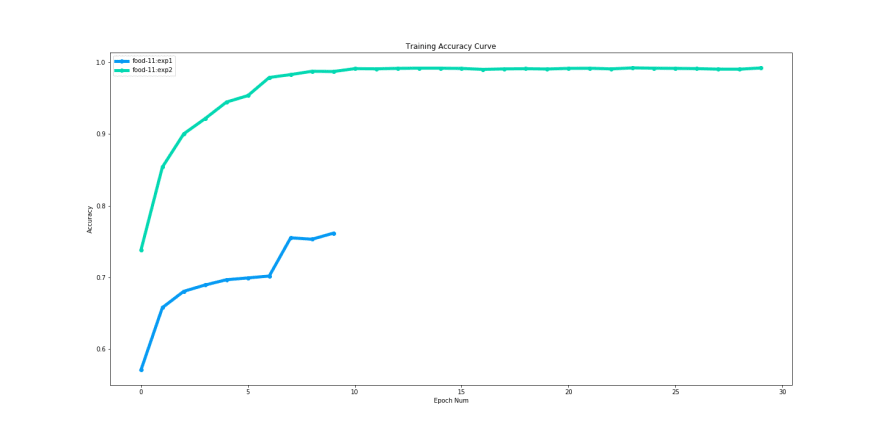
Since we used Copy_Experiment the accuracy for experiment 2 for epoch 1 starts from a better value that experiment 1. We can also observe that we quickly reach saturation around 10 epochs.

We can also observe the validation accuracy keeps fluctuating. We can definitely choose to go ahead with experiment 2 model with considerably better training and validation performance.
Inference
Our food-11 project model can classify an input food image into one of 11 top level food categories.
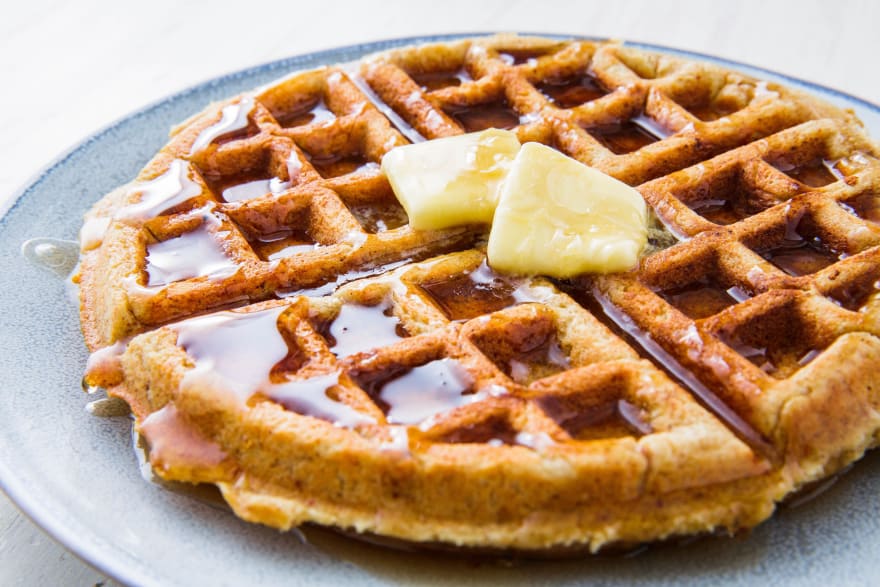
Let’s test it on our waffles image!
{'img_name': './test.jpg', 'predicted_class': 'Dessert', 'score': 27.722319}
The prediction comes out to ‘Dessert’!
Project 3 : Food-101 Classification
Finally we move on to classifying the input image into exactly what we are looking at. In this project we will classify the image from out of 101 classes of food items.
Dataset
For this experiment we will be utilising dataset gathered by these awesome researchers : LINK
Citations at the bottom of the post.
“This dataset contains 101 food categories, with 101'000 images. For each class, 250 manually reviewed test images are provided as well as 750 training images. On purpose, the training images were not cleaned, and thus still contain some amount of noise. This comes mostly in the form of intense colors and sometimes wrong labels. All images were rescaled to have a maximum side length of 512 pixels.”
Start Experiment 1
For this experiment we will utilise a denset201 pretrained model.
We can create the experiment, load the dataset, select the pretrained architecture, set the number of epochs and begin training all in just 4 lines of code.
ptf = prototype(verbose=1)
ptf.Prototype("food-101", "exp1")

ptf.Default(dataset_path="./food-101/images/",
            model_name="densenet169", freeze_base_network=False,
            num_epochs=10)

ptf.Train()
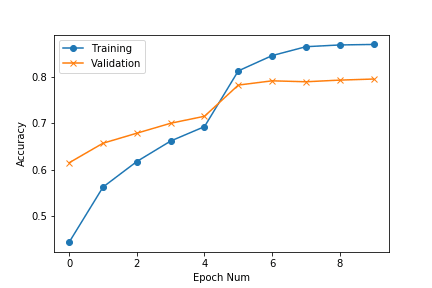
After 10 epochs the training accuracy comes out to ~87% which is not bad to start out with.
Let’s finally test our waffles input image and see the results.
Inference
Let’s load up the experiment in evaluation mode and test on single image. Check out our Docs for running test on a batch of images.
{'img_name': './test.jpg', 'predicted_class': 'waffles', 'score': 74.87055}
And guess what! The model predicts that the input image is of “Waffles”.
Food Classification Application
Finally we will combine the 3 projects to create a Food Classification application, which can detect if an input image is of a food item and if yes then predict the super (out of 11) and sub (out of 101) category of the food.
import requests
import os
import sys
sys.path.append("./monk_v1/monk/");
import psutil
from pytorch_prototype import prototypedef saveImg(img_url):
    # URL of the image to be downloaded is defined as image_url
    r = requests.get(img_url) # create HTTP response object
    with open('test.jpg','wb') as f:
        f.write(r.content)def classify(img_url):
    saveImg(img_url)
    img_name = './test.jpg'
    ptf1 = prototype(verbose=0)
    ptf1.Prototype("food_nonfood", "exp2", eval_infer=True);    predictions = ptf1.Infer(img_name=img_name, return_raw=False);    if predictions['predicted_class'] == "non_food":
        return "Input image does not contain food"
    else:
        ptf2 = prototype(verbose=0)
        ptf2.Prototype("food-11", "exp2", eval_infer=True);
        predictions = ptf2.Infer(img_name=img_name,  return_raw=False);    superLabel = predictions['predicted_class']    ptf3 = prototype(verbose=0)
        ptf3.Prototype("food-101", "exp1", eval_infer=True);
        predictions = ptf3.Infer(img_name=img_name, return_raw=False);    subLabel = predictions['predicted_class']    return "Input image is of category {}, and is actually {}.".format(superLabel,subLabel)
Finally to test the classification app run:
test_url = "https://hips.hearstapps.com/hmg-prod.s3.amazonaws.com/images/delish-keto-waffle-horizontal-034-1543784709.jpg"
output = classify(test_url)
print(output)
To test with a new image, update the test_url.
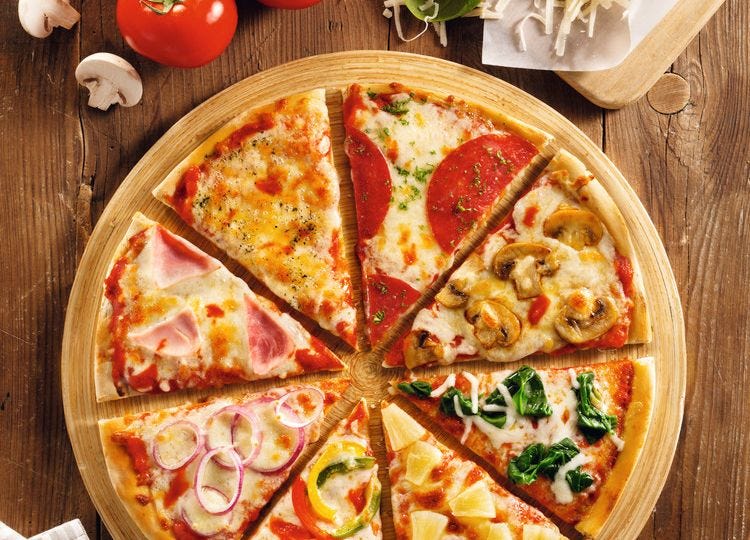
Input image is of category Bread, and is actually pizza.
That’s all for this post folks. Hope you enjoyed going through this.
The trained models are available to download here as a workspace directory HERE.
The workspace folder is cross platform compatible. All you need to do is setup monk and paste the workspace in your working directory to be able to run inference.
Do give us a star on Github if you like what you see (All the haters of food get out!)
Happy Coding!
References
- https://neurohive.io/en/popular-networks/resnet/
- https://www.vision.ee.ethz.ch/datasets_extra/food-101/
- https://mmspg.epfl.ch/downloads/food-image-datasets/
@inproceedings{bossard14,
  title = {Food-101 -- Mining Discriminative Components with Random Forests},
  author = {Bossard, Lukas and Guillaumin, Matthieu and Van Gool, Luc},
  booktitle = {European Conference on Computer Vision},
  year = {2014}
}

Top comments (0)