
We always want to add comments for our Blog, Personal Portfolio, Some Official websites or etc... But instead of creating a backend Database, We here have a very easy and simple way to add comments section on any kind of website for free, with following some conditions.
So, Lets begin...
- Let's What exactly utterances is?
Ans: A lightweight comments widget built on GitHub issues. Use GitHub issues for blog comments, wiki pages and more!
- Open source. 🙌
- No tracking, no ads, always free. 📡🚫
- No lock-in. All data stored in GitHub issues. 🔓
- Styled with Primer, the css toolkit that powers GitHub. 💅
- Dark theme. 🌘
- Lightweight. Vanilla TypeScript. No font downloads, JavaScript frameworks or polyfills for evergreen browsers. 🐦🌲
- I will Tell You how to add Utterances on HTML website:
<script src="https://utteranc.es/client.js"
        repo="[ENTER REPO HERE]"
        issue-term="pathname"
        theme="github-light"
        crossorigin="anonymous"
        async>
</script>
add the following code snippet in your HTML file.
Like this..👇
<html>
   <head>
        <title>Add COMMENT using Utterance</title>
   </head>
   <body>


   <script src="https://utteranc.es/client.js"
        repo="[ENTER REPO HERE]"
        issue-term="pathname"
        theme="github-light"
        crossorigin="anonymous"
        async>
  </script>
  </body>
</html>
Here are some parameters like
1.src
2.repo
3.issue
4.theme
5.crossorigin
6.async
1.src:
Src is by default the Script given by Utterance.
2.repo:
REPO means your G I T H U B repository.
Like: yourgithubusername/repositoryname
So it will look like:
repo = "yourgithubusername/repositoryname"
3.issue:
It is nothing but "The mapping between blog posts and GitHub issues."

4.theme:
It is to give different look and feel of the comment box for the users.
Same as the themes of github.
Here are some options:
* github light
* github dark
* boxy light
* github dark orange
* and many more ...
5.Crossorigin:
It enables cross-origin resource sharing only for this specific method. And which is by default kept "anonymous"
6.async:
It has an asynchronous behaviour so it is by default true.
This is what it all means. In This way we can use Utterance on our static HTML websites.
2.Now Lets See how To use Utterances on our REACT website or web application.
For Reactjs,
It is also very Simple.
create a new react app:
npm install create-react-app@latest your-app-name
Now, after installing your app, you need to cd into your app like
cd your-app-name
In src folder, create a new file named as comments.js
and paste the following code in your comments.js file.
import React, { Component } from 'react'

export default class Comments extends Component {
    constructor(props) {
        super(props);
        this.commentBox = React.createRef();
    }

    componentDidMount() {
        let scriptEl = document.createElement("script");
        scriptEl.setAttribute("src", "https://utteranc.es/client.js")
        scriptEl.setAttribute("crossorigin", "anonymous")
        scriptEl.setAttribute("async", true)
        scriptEl.setAttribute("repo", "yourgithubusername/repositoryname")
        scriptEl.setAttribute("issue-term", "pathname")
        scriptEl.setAttribute("theme", "github-light")
        this.commentBox.current.appendChild(scriptEl)
    }

    render() {
        return (
            <div style={{ width: '100%' }} id="comments">
                <div ref={this.commentBox} ></div>
            </div>
        )
    }
}
Let's understand the code.
*First of all we are importing React and React.Component i.e, {Component}
*```
constructor(props) {
super(props);
}
> In React, constructors are mainly used for two purposes: It used for initializing the local state of the component by assigning an object to this. state. It used for binding event handler methods that occur in your component.


* This code is very simple to understand `this.commentBox =
 React.createRef();`

> It means, createRef() method is used to access any DOM element in a component and it returns a mutable ref object which will be persisted as long as the component is placed in the DOM.


*componentDidMount() method

> This method allows us to execute the React code when the component is already placed in the DOM (Document Object Model).(Here our DOM element includes`document.createElement("script")` ). This method is called after the component is rendered.

The below lines of code are written in Plain JS. Explanation is
same as I explained all the above points.

In simple words, setAttribute("parentaAttribute","childAttribute")
eg `scriptEl.setAttribute("src", "https://utteranc.es/client.js")`
scriptEl.setAttribute("src", "https://utteranc.es/client.js")
scriptEl.setAttribute("crossorigin", "anonymous")
scriptEl.setAttribute("async", true)
scriptEl.setAttribute("repo", "yourgithubusername/repositoryname")
scriptEl.setAttribute("issue-term", "pathname")
scriptEl.setAttribute("theme", "github-light")
After completing these steps.
You need to finally, import This file (Comments.js) in any of your file location.
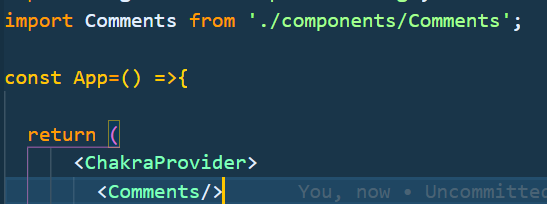
After doing all these steps.
`npm start` to start yout react application.
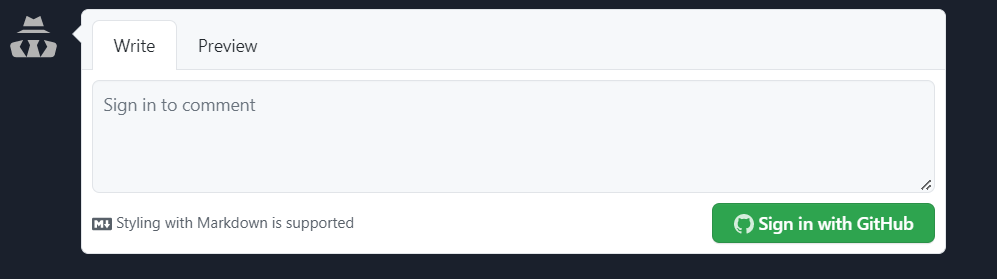
And Finally you get your comment box. You will just need to sign in with your github account to add comment. And You can give reactions with the help of emojis. Like 👇

This is what you will get as an output.
[UTTERANCE OFFICIAL WEBSITE](https://utteranc.es/)

Top comments (2)
Very useful!
Some comments may only be visible to logged-in visitors. Sign in to view all comments.