One of my blind spots when creating apps with the Ionic Framework is adding a side-menu after the fact. Even after using it for so many years, it seems I always need to look up how to do it. So I created this post to remind me (and you) how to create an effective Ionic Menu with and without an Ionic Split Pane View in an Ionic Angular application.
This article is adapted from my book series on Developing Mobile Applications with Ionic and Angular: Ionic Framework - Idea to App Store. I would love for you to check it out and leave me some feedback.
Menu Implementation
These instructions assume you started with a blank Ionic template. Other templates might already have a menu.
Array of Pages
Open the file src/app/app.component.ts. This is where you will define the menu.
Create an array of pages. Inside the array, provide an object literal for each page in your application. Each page needs a title to be used as its menu label, an appropriate icon for both Material Design and iOS, and a route.
const appPages = [
  {
    title: 'Home',
    url: '/home',
    md: 'home',
    ios: 'home-outline'
  }, {
    title: 'Roster',
    url: '/roster',
    md: 'people',
    ios: 'people-outline'
    }
  ];
The icon names come from https://ionicons.com. As you can see, I have chosen to provide outline style icons for iOS, and the default styles for Material Design. Ionic used to make this choice for you, but now they give you the flexibility to decide for yourself.
Menu Component
Next comes the menu itself. That will live inside the app component markup, src/app/app.component.html.
To build the menu component, create an ion-menu element as the first element inside of the ion-app element. Set its contentId to main-content. This value must match the HTML element id attribute of the ion-router-outlet, so add an id attribute to ion-router-outlet with the same value if it does not already have one. If it has one and it is different, change one of them so they are identical.
For the menu type, I am partial to overlay, but feel free to try push or reveal. You can see the various type options here. The differences are subtle, and I explain them in more detail in this article.
Add an ion-header, with an ion-toolbar, and inside that an ion-title. Inside the title, provide a title such as Menu.
This is what the markup should look like at this point.
<ion-app>
  <ion-menu contentId="main-content" type="overlay">
      <ion-header>
          <ion-toolbar>
            <ion-title>Menu</ion-title>
          </ion-toolbar>
      </ion-header>
  </ion-menu>
  <ion-router-outlet id="main-content">
  </ion-router-outlet>
</ion-app>
Just after the menu component’s ion-header, add an ion-content. And just inside that an ion-list. This is where the menu will be constructed, by iterating over the appPages array.
Use an ngFor directive inside of an ion-menu-toggle component.
<ion-menu-toggle
  auto-hide="false"
  *ngFor="let page of appPages; let i = index">
This is a slightly different ngFor expression than is common. It is looping over the appPages array, but there is also the second portion, let i = index. This does what you probably suspect, providing an integer representing the array index of each page in the array.
Set the auto-hide property to false, unless you enjoy watching things vanish for no apparent reason. If it is true, then the menu toggle will disappear if Ionic renders it in a split pane, which you will do shortly.
Ion Item
Inside the toggle, place an ion-item with a routerLink set to page.url. Doing this will automatically turn the item into a hyperlink, which is pretty cool. Make sure you get the binding syntax right, as I am showing here. Otherwise, you could end up sending your users to a route literally called “page.url.” Set the routerDirection to none or root, your choice. This affects the animation. It is subtle, so play with it and decide which you prefer.
 <ion-item
  [routerLink]="[page.url]"
  routerDirection="root"
  (click)="selectedIndex = i"
  [class.selected]="selectedIndex === i"
  lines="none"
  detail="false"
  >
Include a click handler on the ion-item that sets selectedIndex = i. This allows the app component to track the current page
You can use that information to add the selected class to the current page’s menu item with the expression [class.selected]="selectedIndex === i". Recall that specifying an attribute inside of square brackets causes Angular to execute the expression in quotes on the right side of the = sign. If the expression evaluates to true, then the class will be applied. The only thing missing is some custom styling for the selected class, but I will leave that as an exercise for you.
If you want a visible line separating your menu items, set the lines attribute to full or omit the attribute entirely. I am not a fan of the look, so I tend to choose none.
Finally, set detail to false. That will prevent the menu from having a gray forward chevron on its side. I do not like the effect for a menu, but to each his own.
Ion Icon
Inside the ion-item, add an ion-icon with its slot set to start and then provide two icons. Set [ios]="page.ios" and [md]="page.md" Again, pay attention to the binding syntax.
Ion Label
Finally, use an ion-label to show the page title. You can use standard one-way data binding inside the ion-label tag.
<ion-menu contentId="main-content" type="overlay">
  <ion-header>
      <ion-toolbar>
          <ion-title>Menu</ion-title>
          </ion-toolbar>
      </ion-header>
    <ion-content>
      <ion-list id="inbox-list">
          <ion-menu-toggle auto-hide="false"
              *ngFor="let page of appPages; let i = index">
                <ion-item (click)="selectedIndex = i"
                  routerDirection="root"
                    [routerLink]="[page.url]"
                    lines="none"
                    detail="false"
                    [class.selected]="selectedIndex == i">
                    <ion-icon slot="start"
                      [ios]="page.ios"
                      [md]="page.md">
                    </ion-icon>
                    <ion-label>How to Create an Effective Ionic Menu With and Without a Split Pane</ion-label>
                  </ion-item>
              </ion-menu-toggle>
          </ion-list>
      </ion-content>
  </ion-menu>
Make sure you close all your tags properly.
Menu Button
You need to add a menu icon to the header of every page you want one. Nope, it is not automatic. Open src/app/home/home.page.html.
Inside the ion-toolbar, just before the ion-title, add an ion-buttons component with slot="start". Then an ion-menu-button component inside of that.
You do not need to add any text or icons. Those will be managed automatically.
Then you need to do exactly the same code in every other page you want the menu button to appear.
Your page’s headers should now look something like this, with the appropriate value for ion-title, of course.
<ion-header>
  <ion-toolbar>
      <ion-buttons slot="start">
          <ion-menu-button></ion-menu-button>
          </ion-buttons>
        <ion-title>Home</ion-title>
      </ion-toolbar>
  </ion-header>
If all went well, you should now be able to navigate between your pages with ease.
Split Pane
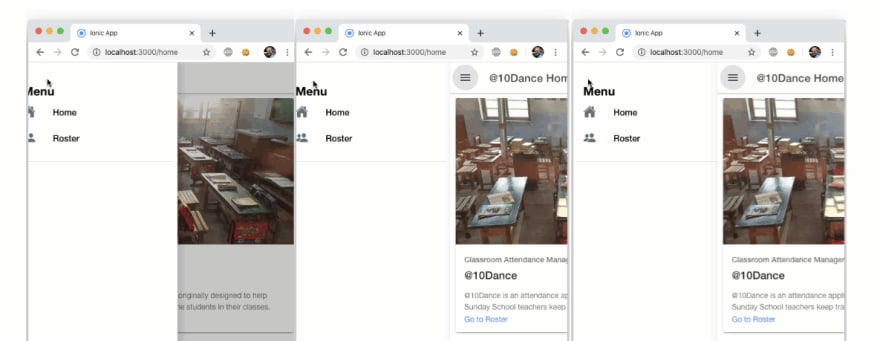
The one thing left to do is to implement the split pane. With a split pane, when the window is narrow, as on a mobile device, the menu is hidden, and will slide out from the side when you click on the menu icon.
The split pane allows you to keep the menu visible when the screen is wide enough. Though you can override this behavior, as a general rule, “wide enough” means if the HTML page is wider than 992 pixels.
Adding the split pane requires just two more lines of code. Back in src/app/app.component.html, as the first child of ion-app, just before the ion-menu, add an ion-split-pane component with the contentId attribute set to main-content. Yes, this exactly matches the contentId attribute of the menu and the id attribute of the ion-router-outlet. This is how Ionic knows that the three components are tied together.
Should you want, you can add a when attribute to the ion-split-pane to indicate when you want it visible. Valid values are xs, sm, md, lg, or xl. Each represents a different page width. The default is lg. Play around with them and choose the one you like best.
Summary
To recap, if you want to add a side menu to your Ionic app that does not already have one:
- Add an
appPagesarray. - Add an object to this array for each navigable page, with: name, route, and two icons.
- Add an
ion-menuwith anion-listin itsion-content. - Iterate
ion-menu-toggleusing*ngForto loop over each element of the appPages array - Provide an
ion-itemwith navigation info, anion-icon, and anion-labelfor each page. - Add an
ion-menu-buttonin the header of each page where you want a menu to appear. - Optionally add an
ion-split-paneto your entire layout.
I hope you found this guide useful. There is more to the menu and lots more customizations you can make, but to me these are the absolutely basics.
If you think I missed something critical, please let me know.

Top comments (0)