
My son recently celebrated his 9th birthday, and like many kids his age, he was looking forward to his birthday party for months. In the midst of the Covid-19 pandemic, we knew that we needed to do something different this year, so I built him a video watch party app using the Vonage Video API!
You, too, can build your own video watch party app with the Vonage Video API and Ruby on Rails, and I'll show you how. This two-part series will walk you through the steps to build your full-stack Rails application. The first part will focus on the backend of the app and the second part will focus on the frontend.
tl;dr If you would like to skip ahead and get right to deploying it, you can find all the code for the app on GitHub or click this button to deploy it straight to Heroku.
![]()
Table of Contents
- What Will the App Do
- Prerequisites
- API Credentials
- Installation
- Creating the Model and Controller Methods
- Providing Custom Site Configuration
- Creating the Views
- Next Steps
What Will the App Do
Before we begin building the application, let's take a moment to discuss what it will do.
The app will have three distinct views:
1) A Landing Page
2) Party Video Chat
3) Video Watch Party
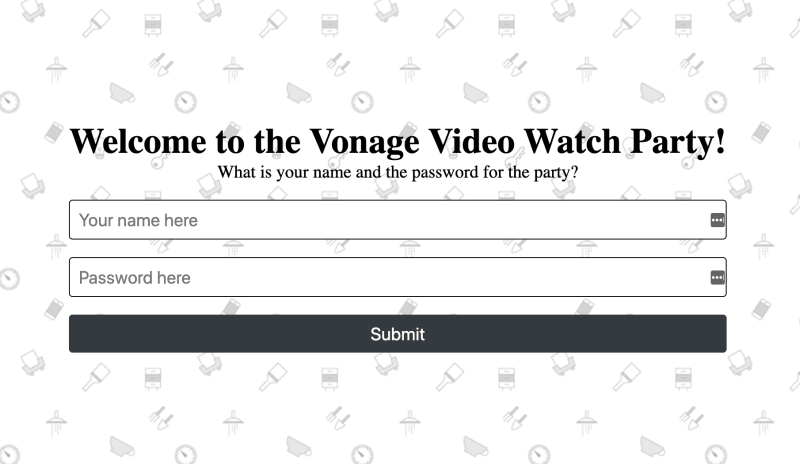
The entry to the app will be through the landing page. At the landing page, participants will be asked to provide their name and the password for the party. The name will be used to identify them in the text chat. The password will provide a small layer of security for the app.
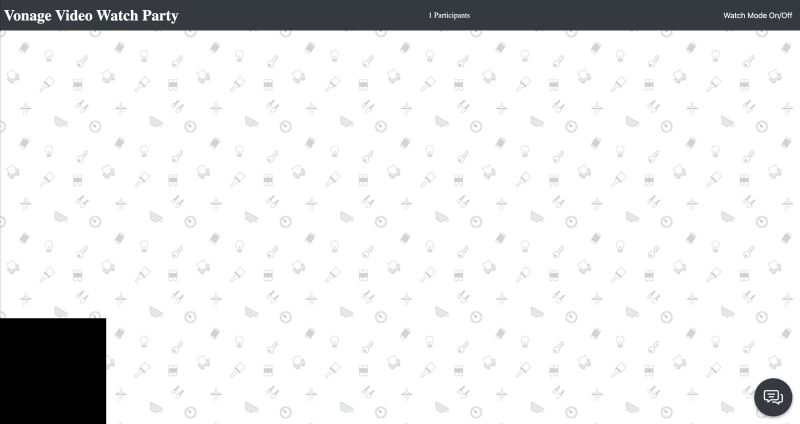
After participants enter their name and the correct party password, they will be redirected to the Party Video Chat view. In this view, each participant will see and hear each other in a grid format. There will also be a place to chat by text as well. Everyone will see a real-time count of the participants in the navigation bar. The moderator of the party will also see a link to turn the Watch Mode On/Off.
Once the moderator turns the Watch Mode on, all the participants will be directed to the third and final view, which is the Video Watch Party. In this view, the moderator will share their screen in the center of the page. The moderator's audio is also published in a hidden <div> so the participants can hear the audio from the shared video. The text chat will be the means of communication in this view. The audio and video feeds of all the participants will be disabled.
The moderator can move people between the Party Video Chat and Video Watch Party modes whenever they would like by pressing the Watch Mode On/Off button in their navigation bar.
Now that we have an idea of what we will be building, let's start building it!
Prerequisites
This app requires the following:
It is free to create a Vonage Video API account. You need to do so in order to obtain your API key and secret, which are essential to making the app functional.
Vonage Video API Credentials
After you have created an account with the Vonage Video API, you will see a dashboard interface. The first step in obtaining API credentials is to create a new project.
- Select the Create New Project link from the left sidebar.
- Select API when asked what kind of project to create
- Provide any name for the project
- Choose the VP8 codec option. (Details on the difference between VP8 and H.264 are detailed here)
You now have access to your project's API key and secret. Keep them somewhere safe, we will be using them soon.
Installation
From your terminal initiate a new Rails application by executing the following:
$ rails new video-watch-party --database=postgresql
Once that is done, change into the project directory and open up the project with your preferred code editor.
Gem Dependencies
We will add the Vonage Video API (formerly TokBox OpenTok) Ruby SDK to the Gemfile, along with the dotenv-rails gem to manage environment variables:
gem 'opentok'
gem 'dotenv-rails'
Once that is done, we can run bundle install from the command line to install our dependencies.
Model Generation
Next, we will generate a model to hold and manipulate the video session information. From the command line execute the following:
$ rails g model Session session_id:string expired:boolean
This command will create a model file inside /app/models/ and a database migration file inside /db/migrate/. Let's open up the database migration file in our code editor. We need to add default values to the columns before we migrate it.
You can find the migration file inside the /db/migrate/ folder. It will be the only file inside the folder, and will look similar to this:
class CreateSessions < ActiveRecord::Migration[6.0]
  def change
    create_table :sessions do |t|
      t.string :session_id, null: false
      t.boolean :expired, default: false

      t.timestamps
    end
  end
end
We want to ensure that the session_id is never null and we also want to make sure that the expired boolean defaults to false. In order to do that, modify your migration file by adding , null: false and , default: false to the :session_id and :expired lines, respectively.
You can now commit this database migration to the schema by running rake db:create from the command line. This command will create the PostgreSQL database and the sessions table with the session_id and expired columns.
Routes Definition
The application needs the HTTP routes that it will be accessed defined and pointing to the correct controller methods. Open up the /config/routes.rb file and add the following:
Rails.application.routes.draw do
  get '/', to: 'video#landing'
  get '/party', to: 'video#index'
  get '/screenshare', to: 'video#screenshare'
  post '/name', to: 'video#name'
  post '/chat/send', to: 'video#chat'
end
All the routes point to methods inside the VideoController. We will create the controller in the next step.
- The
GETroot route directs to the#landingaction. This is the route for the landing page. - The
GET /screenshareroute points to the#screenshareaction. This is the route for the watch party view. - The
GET /partyroute points to the#indexaction. This is the route for the video chat view. - The
POST /nameroute points to the#nameaction. This is where the landing page form will send its data. - The
POST /chat/sendroute points to the#chataction. This is where the text chat messages will be sent.
Lastly in this step, we will create the VideoController.
Controller Generation
In the next step, we will create methods for the controller. In this last Installation step, we will generate the controller file. From the command line execute the following:
$ rails generate controller Video landing index screenshare name chat
This will create a video_controller.rb file inside the /app/controllers/ folder with empty methods for each of the actions we specified in the command. It will also create the basic view structure for the app inside /app/views/video.
Creating the Model and Controller Methods
Now that all the necessary file structure and database schema has been created, it's time to create the methods for the application. We will need to create methods in both the Video Controller and in the Session model. Let's start with the Session model first.
Defining the Model Methods
Each Vonage Video session has its own unique session ID. This session ID is what enables different participants to join the same video chat. Additionally, each participant in the video chat is granted a token that enables them to participate. A token can be given special permissions, like moderation capabilities.
In the Session model we are going to create three class methods that will be used to either create a new session ID or load the previous one, and generate tokens for each participant.
The Session#create_or_load_session_id method will check to see if there already is a session ID. If there is an ID, it will use that ID. If not, it will generate a new one. Session IDs can expire, but for the purposes of this tutorial, we are going to work only with active session IDs:
def self.create_or_load_session_id
  if Session.any?
    last_session = Session.last
    if last_session && last_session.expired == false
      @session_id = last_session.session_id
      @session_id
    elsif (last_session && last_session.expired == true) || !last_session
      @session_id = create_new_session
    else
      raise 'Something went wrong with the session creation!'
    end
  else
    @session_id = create_new_session
  end
end
The above method also references an additional method we need to create called Session#create_new_session that does the work of creating a new session if one does not exist:
def self.create_new_session
  session = @opentok.create_session
  record = Session.new
  record.session_id = session.session_id
  record.save
  @session_id = session.session_id
  @session_id
end
Lastly, we will create a method that will assign the right token for each participant:
def self.create_token(user_name, moderator_name, session_id)
  @token = user_name == moderator_name ? @opentok.generate_token(session_id, { role: :moderator }) : @opentok.generate_token(session_id)
end
At the top of the model definition, we also need to instantiate an instance of the Vonage Video API (formerly known as TokBox OpenTok) SDK and assign it to an instance variable to use it throughout the model. All together the file will look like the following:
require 'opentok'

class Session < ApplicationRecord
  @opentok = OpenTok::OpenTok.new ENV['OPENTOK_API_KEY'], ENV['OPENTOK_API_SECRET']

  def self.create_or_load_session_id
    if Session.any?
      last_session = Session.last
      if last_session && last_session.expired == false
        @session_id = last_session.session_id
        @session_id
      elsif (last_session && last_session.expired == true) || !last_session
        @session_id = create_new_session
      else
        raise 'Something went wrong with the session creation!'
      end
    else
      @session_id = create_new_session
    end
  end

  def self.create_new_session
    session = @opentok.create_session
    record = Session.new
    record.session_id = session.session_id
    record.save
    @session_id = session.session_id
    @session_id
  end

  def self.create_token(user_name, moderator_name, session_id)
    @token = user_name == moderator_name ? @opentok.generate_token(session_id, { role: :moderator }) : @opentok.generate_token(session_id)
  end
end
We are now ready to move on to build our controller methods that will manage the routes of the app.
Defining the Controller Methods
The video controller will have a method for each route, and a few helper methods to build out the site. The first method we are going to build will provide all the subsequent methods access to the Video API credentials information.
Open up the video_controller.rb file in /app/controllers and after the class definition add the following method:
def set_opentok_vars
  @api_key = ENV['OPENTOK_API_KEY']
  @api_secret = ENV['OPENTOK_API_SECRET']
  @session_id = Session.create_or_load_session_id
  @moderator_name = ENV['MODERATOR_NAME']
  @name ||= params[:name]
  @token = Session.create_token(@name, @moderator_name, @session_id)
end
As you will see in Part 2 of this series when we build the frontend of the app, these instance variables will also be critical in passing the data from the backend to the frontend of the site.
Next, we will create a method for each of the routes in our application:
def landing; end

def name
  @name = name_params[:name]
  if name_params[:password] == ENV['PARTY_PASSWORD']
    redirect_to party_url(name: @name)
  else
    redirect_to('/', flash: { error: 'Incorrect password' })
  end
end

def index; end

def chat; end

def screenshare
  @darkmode = 'dark'
end
As you can see above, the #name method assigns the value of the @name variable taken from the landing page welcome form. It also provides the small layer of gatekeeping for the application, by only redirecting the participant to the video chat page if the password they provided matches the one set in the environment variable. If the password does not match they are redirected to the landing page and asked to try again.
The rest of the methods are empty definitions, just the minimum to provide Rails with the information to seek out the view template corresponding to the name of the action. The only other exception is the #screenshare method that sets a @darkmode instance variable, which will be used to put the site into a dark mode visual setting during the screenshare view.
The #name method also references name_params, which leverages Rails Strong Parameters. We need to build a private method called name_params that defines precisely which parameters the form on the landing page should include. Let's do that now:
private

def name_params
  params.permit(:name, :password)
end
With that private method, we have built out our controller. All together it will look like the following:
require 'opentok'

class VideoController < ApplicationController
  before_action :set_opentok_vars

  def set_opentok_vars
    @api_key = ENV['OPENTOK_API_KEY']
    @api_secret = ENV['OPENTOK_API_SECRET']
    @session_id = Session.create_or_load_session_id
    @moderator_name = ENV['MODERATOR_NAME']
    @name ||= params[:name]
    @token = Session.create_token(@name, @moderator_name, @session_id)
  end

  def landing; end

  def name
    @name = name_params[:name]
    if name_params[:password] == ENV['PARTY_PASSWORD']
      redirect_to party_url(name: @name)
    else
      redirect_to('/', flash: { error: 'Incorrect password' })
    end
  end

  def index; end

  def chat; end

  def screenshare
    @darkmode = 'dark'
  end

  private

  def name_params
    params.permit(:name, :password, :authenticity_token, :commit)
  end
end
Before we go on and create our ERB files for our views, we can take a moment now and define a custom YAML file that will serve as the source of truth for information about the site.
This information will be used to populate data on the site like the name of the party, the welcome message, the language and language direction of the site, and more. Putting this information into a single place will allow us to easily change it in the future without needing to modify multiple files.
Providing Custom Site Configuration
The place in Rails to place custom configuration files is inside the /config folder, so let's add a site_info.yml file inside there. We will read the data from this file to create the context for our site, things like the name of the party and language of the site:
language: en
lang_direction: ltr
landing_page:
  welcome_message:
    text: 'Welcome to the Vonage Video Watch Party!'
  name_form:
    text: 'What is your name and the password for the party?'
    name_placeholder_text: Your name here
    password_placeholder_text: Password here
    submit_button_text: Submit
navbar:
  title:
    text: Vonage Video Watch Party
text_chat:
  submit_button_text: Submit
  placeholder_text: 'Enter text here'
There are default values provided in the example above. Feel free to edit and change those for the needs of your application.
In order to use this information, we need to load and read it somewhere. We will add several :before_action settings to the ApplicationController that will take in all of this information and make it available throughout the app.
Open up the application_controller.rb file inside the /app/controllers directory and add the following:
class ApplicationController < ActionController::Base
  before_action :set_site_lang_options
  before_action :set_site_welcome_options
  before_action :set_welcome_form_options
  before_action :set_site_navbar_options
  before_action :set_site_chat_options
  CONFIG = YAML.load_file("#{Rails.root}/config/site_info.yml")

  def set_site_lang_options
    @lang = CONFIG['language']
    @lang_dir = CONFIG['lang_direction']
  end

  def set_site_welcome_options
    @welcome_message = CONFIG['landing_page']['welcome_message']['text']
  end

  def set_welcome_form_options
    @name_form_text = CONFIG['landing_page']['name_form']['text']
    @name_placeholder_text = CONFIG['landing_page']['name_form']['name_placeholder_text']
    @password_placeholder_text = CONFIG['landing_page']['name_form']['password_placeholder_text']
    @name_form_submit_button_text = CONFIG['landing_page']['name_form']['submit_button_text']
  end

  def set_site_navbar_options
    @navbar_title = CONFIG['navbar']['title']['text']
  end

  def set_site_chat_options
    @submit_button_text = CONFIG['text_chat']['submit_button_text']
    @chat_placeholder_text = CONFIG['text_chat']['placeholder_text']
  end
end
Now those instance variables holding the data from the site_info.yml are available to be used inside the view files, which we will create now.
Creating the Views
Defining the Application Layout
The first view we will work with is the default layout for the application. This file can be found at /app/views/layouts/application.html.erb. Inside the view we are goin to add the information about the language of our site, whether to go to dark mode or not, and also load the Video API JS script:
<!DOCTYPE html>
<html lang="<%= @lang %>" dir="<%= @lang_dir %>">
  <head>
    <title>Video Watch Party</title>
    <meta charset="utf-8" />
    <meta http-equiv="X-UA-Compatible" content="IE=edge" />
    <meta name="viewport" content="width=device-width, initial-scale=1" />

    <%= csrf_meta_tags %>
    <%= csp_meta_tag %>
    <script src="https://static.opentok.com/v2/js/opentok.min.js"></script>
    <script type ="text/javascript">
      var api_key = '<%= @api_key %>';
      var api_secret = '<%= @api_secret %>';
      var session_id = '<%= @session_id %>';
    </script>
    <%= stylesheet_pack_tag 'application', media: 'all', 'data-turbolinks-track': 'reload' %>
    <%= javascript_pack_tag 'application', 'data-turbolinks-track': 'reload' %>
  </head>

  <body class="<%= @darkmode if @darkmode %>">
    <%= yield %>
  </body>
</html>
An interesting point you will have noticed in the example above is we also created three JavaScript variables inside <script> tag. We passed the corresponding Ruby instance variable data to those newly instantiated JavaScript variables. In this way, we have started having our backend speak to our frontend.
The rest of the view files we will work with will be the particular views of the app; the landing page, video chat, and video watch views. Before we build those though, let's create some partials that we will use throughout the rest of the views.
Defining the Partials
Partials are a great way to reuse ERB components throughout the view structure in a Rails application. Instead of defining the same content multiple times, we can put it in one file and simply invoke that file whenever we want to use that content. This application will have three partials; a partial for the header, a partial for the text chat, and a partial for the text chat button icon.
Create a file called _header.html.erb inside /app/viws/video/ and add the following to it:
<h1><%= @navbar_title %></h1>
<p id="participant-count"></p>
<button id="watch-mode">Watch Mode On/Off</button>
The header partial reads the data from the @navbar_title instance variable to provide the name of the application. You will also notice an empty <p> tag with an id of #participant-count. That will be populated with data from the JavaScript we will create in Part 2 of this blog post series. Lastly, the header has a <button> tag that will only be visible to the moderator and allows them to switch between chat and screenshare views for all the participants.
Now, create another file called _button-chat.html.erb in the same folder and add the following:
<button class="btn-chat" id="showChat"><svg viewBox="0 0 512 512"><svg xmlns="http://www.w3.org/2000/svg" viewBox="0 0 496 496"><path fill="white" d="M392 279.499v-172c0-26.467-21.533-48-48-48H48c-26.467 0-48 21.533-48 48v172c0 26.467 21.533 48 48 48h43.085l.919 43.339c.275 13.021 15.227 20.281 25.628 12.438l73.983-55.776H344c26.467-.001 48-21.534 48-48.001zm-205.74 16a16.003 16.003 0 00-9.632 3.224l-53.294 40.179-.588-27.741c-.185-8.702-7.292-15.661-15.996-15.661H48c-8.822 0-16-7.178-16-16v-172c0-8.822 7.178-16 16-16h296c8.822 0 16 7.178 16 16v172c0 8.822-7.178 16-16 16H186.26zm309.74-88v132c0 26.468-21.532 48-48 48h-43.153l-.852 33.408c-.222 8.694-7.347 15.592-15.994 15.592-6.385 0-2.83 1.107-82.856-49H232c-8.837 0-16-7.163-16-16s7.163-16 16-16c84.866 0 80.901-.898 86.231 2.438l54.489 34.117.534-20.964c.222-8.675 7.317-15.592 15.995-15.592H448c8.822 0 16-7.178 16-16v-132c0-8.822-7.178-16-16-16-8.837 0-16-7.163-16-16s7.163-16 16-16c26.468.001 48 21.533 48 48.001zm-200-43c0 8.837-7.163 16-16 16H112c-8.837 0-16-7.163-16-16s7.163-16 16-16h168c8.837 0 16 7.163 16 16zm-29 70c0 8.837-7.163 16-16 16H141c-8.837 0-16-7.163-16-16s7.163-16 16-16h110c8.837 0 16 7.163 16 16z"/></svg></button>
The HTML above generates a text chat icon that participants can click on to reveal or hide the text chatbox.
The last partial is a file that will hold the text chat box area, including the form to submit new chat messages.
Create a file called _chat.html.erb in the same directory and its contents will look like the following:
<header class="chat-header">
  <h2>Chat</h2>
  <button class="btn-close" id="closeChat"><svg viewBox="0 0 47.971 47.971"><path fill="white" d="M28.228 23.986L47.092 5.122a2.998 2.998 0 000-4.242 2.998 2.998 0 00-4.242 0L23.986 19.744 5.121.88a2.998 2.998 0 00-4.242 0 2.998 2.998 0 000 4.242l18.865 18.864L.879 42.85a2.998 2.998 0 104.242 4.241l18.865-18.864L42.85 47.091c.586.586 1.354.879 2.121.879s1.535-.293 2.121-.879a2.998 2.998 0 000-4.242L28.228 23.986z"/></svg></button>
</header>
<div id="history" class="messages"></div>
<%= form_with(url: "/chat/send", method: "post") do %>
  <%= text_field_tag :message, nil, placeholder: @chat_placeholder_text %>
  <%= submit_tag(@submit_button_text) %>
<% end %>
In the _chat.html.erb partial you will also see another empty tag, this time a <div> with the id of #history. All the text messages will go into that area automatically using the Vonage Video API text message functionality within the Signal API. We will discuss that in Part 2.
Defining the Landing Page
The landing page will be the place that the participants will first encounter when they come to the application. Its purpose is to ask the participants for their name, and the party password to enter the site.
Create a new file inside /app/views/video called landing_html.erb and add the following:
<main>
  <div class="landing">
    <h1><%= @welcome_message %></h1>
    <p><%= @name_form_text %></p>
    <%= form_with(url: "/name", method: "post") do %>
      <%= text_field_tag 'name', nil, :placeholder => @name_placeholder_text %>
      <%= password_field_tag 'password', nil, :placeholder => @password_placeholder_text %>
      <%= submit_tag @name_form_submit_button_text %>
      <% flash.each do |type, msg| %>
        <p class="error"><%= msg %></p>
      <% end %>
    <% end %>
  </div>
</main>
Similar to the partials, the landing page view leverages the instance variables created in the ApplicationController to generate the welcome message and the text for the form.
Defining the Video Chat View
The video chat view will be the place that the participants will chat with each other with their video cameras and microphones. This view, in addition to the screenshare view, is the two essential parts of the application.
To make this view, create another new file in the same directory called index.html.erb with the following inside of it:
<script type ="text/javascript">
  var token = '<%= @token %>';
  var name = '<%= @name %>';
  var moderator_env_name = '<%= @moderator_name %>';

  // reload page to render with variables
  (function() {
    if(window.localStorage) {
      if(!localStorage.getItem('firstLoad')) {
        localStorage['firstLoad'] = true;
        window.location.reload();
    } else
      localStorage.removeItem('firstLoad');
    }
  })();
</script>

<header>
  <%= render partial: 'header' %>
</header>

<main class="app">
  <div class="videos">
    <div class="publisher" id="publisher"></div>
    <div class="subscriber" id="subscribers"></div>
  </div>

  <aside class="chat">
    <%= render partial: 'chat' %>
  </aside>

  <%= render partial: 'button-chat' %>
</main>
This view has several components that are worth mentioning.
The first is what is happening inside the <script></script> tags. Similar to the application layout, we continue to pass more data to the frontend of the site in the form of new JavaScript variables. Separately, in order to take advantage of these variables inside the site after the JavaScript is loaded, we also add a small function to reload the page if it is the first time it is being loaded in the browser.
The other area we will mention is you will notice that most of the view consists of empty <div> tags. The reason is that those will be populated by the videos from the Video API dynamically. The frontend JavaScript will seek out those tags by their ID names and add the videos of all the participants inside the #subscribers element and add your video to the #publisher element.
Defining the Screenshare View
The final view we need to create for the application is the one for the video screenshare. In this view, the participants can continue chatting via the text chat box, while all watching the same screen together.
This view will only need to provide the <div> elements for the API to provide one publisher, namely the screenshare video, and one audio feed. A screenshare by itself does not include audio, which would make it difficult to watch a video together. That is why we will also publish an audio feed from the moderator's computer to accompany the screenshare.
Add a file called screenshare.html.erb inside the same folder with the following:
<script type ="text/javascript">
  var token = '<%= @token %>';
  var name = '<%= @name %>';
  var moderator_env_name = '<%= @moderator_name %>';
  // reload page to render with variables
  (function() {
    if(window.localStorage) {
      if(!localStorage.getItem('screenshareFirstLoad')) {
        localStorage['screenshareFirstLoad'] = true;
        window.location.reload();
    } else
      localStorage.removeItem('screenshareFirstLoad');
    }
  })();
</script>

<header>
  <%= render partial: 'header' %>
</header>

<main class="app">
  <div class="videos">
    <div class="screenshare" id="screenshare"></div>
    <div class="audio" id="audio"></div>
  </div>

  <aside class="chat">
    <%= render partial: 'chat' %>
  </aside>

  <%= render partial: 'button-chat' %>
</main>
At this point, the backend of our app is ready! Congratulations, you've finished Part 1 of getting the video watch party created.
Next Steps
In Part 2 of this blog post series, we will build the frontend of the application. While the backend of the app was mainly written in Ruby and leveraged the Vonage Video API Ruby SDK, the frontend will be written in JavaScript and utilize the JavaScript SDK.
The work of providing the data that the JavaScript SDK will need has already transpired in the backend we created. Now we need to build the JavaScript classes and functions that will work with that information. Thanks to advances in Rails and its incorporation of Webpack, there is a clear process for incorporating JavaScript into a Rails application, and we will follow those steps.
Continue on to Part 2 of this blog post series to finish up building the application.


Top comments (4)
Ben, this is a great tutorial. I am a Rails developer and I've been planning to build a project using the Twilio video API. I had no idea that there was competition in the space.
I'm a little bit fuzzy on whether you're just a Vonage keener or if this is sponsored content. Luckily, the quality of the material is good enough that I'm not fazed either way, I'm just curious as to how this came about. For example, if you're not affiliated with Vonage, how did you make the decision to use the Vonage API over Twilio, which would seem to be the established choice?
For the Vonage folks who I have a small hunch are reading this, I can say that this looks like an excellent product but I had some gripes getting rolling. I felt like the pricing structure was a bit hidden, and once I found it, well, frankly you should just cut to the chase and make it simple to compare your fee structure to Twilio's. For a lot of devs, that is one of the primary dimensions upon which the CTO will make a decision so make it easier for us to cheerlead for you.
Money aside, the best thing you could do to get us in fighting shape to evangelize for a newcomer when there's an incumbent is present the competitive graph and be really transparent where you're at. Is Twilio able to do something slightly better? Give them the point. Do you have features they don't have? You get the point. Is something coming soon but not quite ready for prime time? Give us some dates so we can plan.
It seems, after basic examination, that you're similar... but there's still limits to what Twilio can do. For example, Twilio breaks their video offerings into: 1:1, small groups of 2-4 and large groups up to 50. They don't appear to have a broadcast option beyond 50 people. They also give by-the-minute price breakdowns for each of these tiers, on a per-person basis. This gives us the ability to make realistic estimates... 10 people for an hour is $0.06 or $0.30 or whatever it works out to be.
I think I read somewhere that you folks can broadcast up to 5000 people. That's amazing. Brag about it, and tell us how much it'll cost our clients to use it.
Finally: when does the next part come out? Please keep it super vanilla in terms of JS. I'm a Stimulus user myself; seeing more and more tutorial written for React is a huge drag and it will seem unfortunate when we look back in a few short years.
Hi @leastbad ,
Nice to hear from you! I work for Vonage and I am lucky enough to get paid to build fun projects, especially ones that make me look like a cool dad and give my son a somewhat decent birthday party during the pandemic! 😂
If you are new to DEV, one of the easiest ways to figure out if a piece of content is coming from a company is to look to see if it is under a company organization. Right above the title at the top of the page, and in the right-hand navigation menu there is identifier information for what organization this content is coming from.
The second part of this series was published just now, and happy to say that it is all vanilla JS.
I appreciate the kind words. If you end up using the Vonage Video API for the product you are building please let us know how it goes. We have dedicated a channel for the Video API in our community Slack.
All the best!
Ben
Thanks, and I appreciate the quick reply! Let me be the first complete stranger to wish your son a very happy birthday. :)
Right now I am in the realm of intrigued! Again, I hope that you can send some of my points/questions/suggestions regarding comparisons up the ladder. My DMs are open, as they say.
I just don't see much value in pretending like there isn't healthy competition. There's extraordinary value for Vonage, Twilio and the developers in that competition, especially in the long term. Any obfuscation or unintended failure to make it mindlessly easy to make an apples to apples comparison will likely favour the known quantity incumbent, after all.
Well, thank you for the happy birthday message! He had a great time, which given the world we are living in, I was happy to make that happen!
The rest of your comments have been shared with others, and I appreciate your candor and the time you took to share those thoughts.