Hello fellow Solana dev !
In this blog post, we will cover a tool which is going to simplify your development workflow when testing your programs locally. It’s called Amman. Amman describes itself as a Toolbelt to help test Solana SDK Libraries and apps on a local running validator.
To put it simply, it takes the existing Solana local validator and adds a couple really great features to it, such as loading programs from other clusters like the Solana mainnet, labelling key pairs or making airdrops in your anchor tests. Amman also comes with its own explorer to match all of its additional features.
If that didn’t make sense to you, it’s all good, we’re going to explore them the further we go down this post.
Let’s get started!
PS: If you don’t want to read the whole post. There is a very short guide at the end to cover all Amman basics without explanations.
Prerequisites:
You’ve already read the Anchor documentation
You have the Solana Tool suite installed
If you want to follow along with the same Anchor program as the one I will be covering today, clone it by clicking here.
Installing Amman
First of all, head to the root of your Anchor project.
If you want to install Amman only for this specific project, run this inside your terminal:
yarn add @metaplex-foundation/amman
or
npm install @metaplex-foundation/amman
If you want to have Amman installed globally, run
npm install -g @metaplex-foundation/amman.
Configurating Amman
Once you have successfully installed Amman, create a file called .ammanrc.js in your project root. Add the following code to it:
module.exports = {
  validator: {
    killRunningValidators: true,
    programs: [],
    accounts: [],
    jsonRpcUrl: "127.0.0.1",
    websocketUrl: "",
    commitment: "confirmed",
    ledgerDir: "./test-ledger",
    resetLedger: true,
    verifyFees: false,
    detached: false,
  },
  relay: {
    enabled: true,
    killlRunningRelay: true,
  },
  storage: {
    enabled: true,
    storageId: "mock-storage",
    clearOnStart: true,
  },
};
This is where the configuration of your Amman instance lives. For now, all you need to know is that:
- the killRunningValidators field will stop any running local validator process
- jsonRpcUrl is the url where your validator should listen to rpc requests
- ledgerDir is where the validators ledger will be created or used(if it already exists). By default it will be stored in the your projects root.
- resetLedger determines if you want to reset the validators existing state every time you start Amman.
Now, you’re ready to start Amman. Run amman start inside your terminal.
The output should look similar to this:
Loading config from /Users/devenv/Documents/GitHub/amman-example/.ammanrc.js

Running validator with 0 custom program(s) and 0 remote account(s) preloaded

Killed currently running solana-test-validator

Launching new solana-test-validator with programs predeployed and ledger at ./test-ledger

Successfully launched Relay at :::50474

ws error: connect ECONNREFUSED 127.0.0.1:8900

Successfully launched MockStorageServer at :::50475

ws error: connect ECONNREFUSED 127.0.0.1:8900

ws error: connect ECONNREFUSED 127.0.0.1:8900

Waiting for fees to stabilize 1...

Waiting for fees to stabilize 2...
Use Amman in your testing workflow
Good, you have a running Amman instance now. We’ll be able to run some cool tests for our program. We only care about one instruction, to send a token which we will send from one person to another.
Again, I have created an example repository for what I will explain in this post, you can find the code here.
Loading mainnet programs
By taking a look at the test file, we can see that we need to pass in the Token Program to call both instructions.
But how do I use the token program when testing locally ? We can tell amman what programs we want to load by passing them into the programs or the accounts field.
This is how to add the mainnet Token Program to your Local Validator:
Add the following program into the “accounts” field in .ammanrc.js.
accounts: [
  {
    label: "Token Program",
    accountId: "TokenkegQfeZyiNwAJbNbGKPFXCWuBvf9Ss623VQ5DA",
    executable: true,
  },
  {
    label: "Random other example account",
    accountId: "4VLgNs1jXgdciSidxcaLKfrR9WjATkj6vmTm5yCwNwui",
    // You can set the cluster on a per account basis
    cluster: "https://metaplex.devnet.rpcpool.com",
  },
],
It‘s important to set "executable" to "true" in this context, because we want to clone a program. If you just want to load data from a non executable account, set it to false. You can also specify the RPC URL from where you want to load these accounts.
Anchor tests in Typescript with Amman
First of all, import Amman at the top of your test file.
import { Amman } from "@metaplex-foundation/amman-client";
Initialize an Amman instance.
const amman = Amman.instance();
Labeled Keypairs
In our program, there should be one Keypair that mints a Token and sends it to the other. We‘re going to call the sending Keypair Alice, and the receiver should be called Bob.
This is once again where Ammans magic comes in. You can label Keypairs, which makes it easier to understand the different accounts inside the Amman Explorer. This is how you generate a new labeled Keypair:
let aliceAmman = await amman.genLabeledKeypair("Alice");
let bobAmman = await amman.genLabeledKeypair("Bob");
The output of this will be an object with:
- The Public Key
- The Keypair
- A string
The actual Solana Keypair is at the index of 1 of the Keypair:
const alice = aliceAmman[1];
You can also label any existing accounts like this:
// publicKey will be the public Key of the account you want to label.
amman.addr.addLabel("Bob", publicKey);
Airdrop SOL
Now we have another problem, your Keypairs will not have any SOL, and will therefore not be able to pay the transaction fees.
But you can easily handle airdrops with Amman, just add this to your existing code:
// Airdrop 1 SOL to Alice
await amman.airdrop(program.provider.connection, alice.publicKey, 1);
We should be good to run our tests now.
If you don’t have a running Amman instance yet, start one in a seperate Terminal using amman start. Then, run your tests with Anchor by running: anchor test --skip-local-validator.
The Amman explorer
You can find it at: https://amman-explorer.metaplex.com/
If Brave doesn’t work, try disabling the Brave Shield.
The explorer is a copy of the Solana explorer that includes Amman’s features.
If everything worked well, it should be connected to your running Amman instance, you can see that in the top left of your screen.
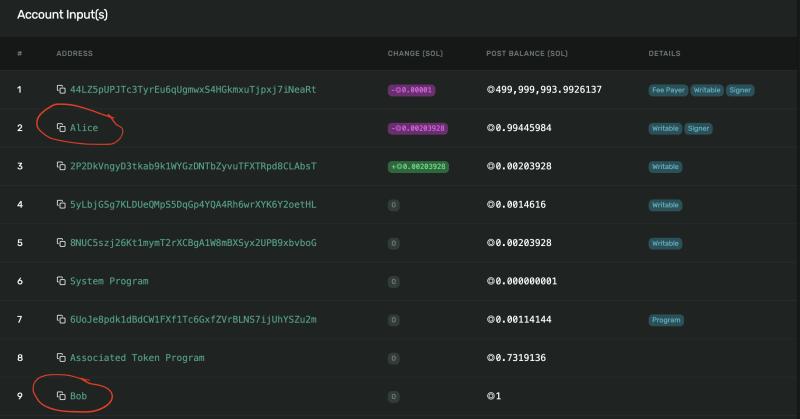
Find the transaction you want to inspect, you will be able to see Token movements and involved accounts thanks to their label. Here’s an example:

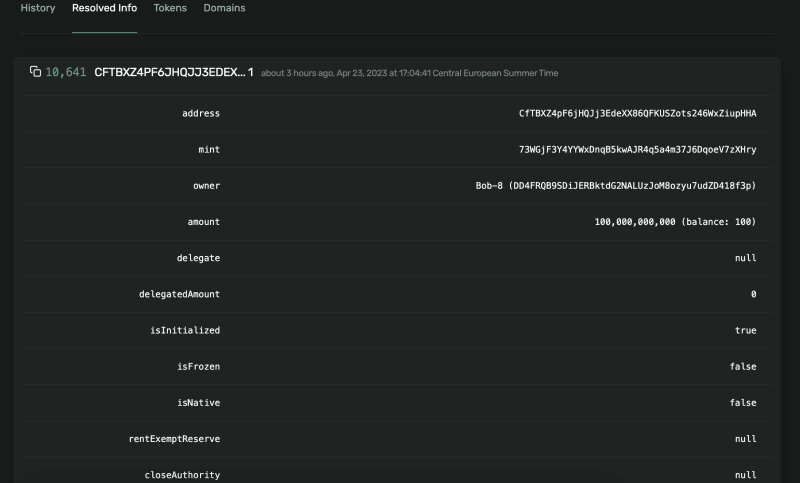
Read deserialized account data
You can read account data directly from the explorer. For that, head to any account and click on the Resolved Info Tab. This should look similar to this image.

Conclusion
Amman is amazing
Amman is an amazing Solana Dev Tool and I recommend to make usage of it. Here’s a really short guide if you don’t want to read trough the whole tutorial:
Short guide
I’ve made a quick recap for you here:
Install Amman
yarn add @metaplex-foundation/amman
Add Amman Configuration
Create a .ammanrc.js file in your project root. Add the following code.
Start Amman
amman start
Use Amman in Tests
1 Import Amman Client
import Amman from "@metaplex-foundation/amman-client";
2 Initialize Amman instance
const amman = Amman.instance();
3 Generate Keypair
let aliceAmman = await amman.genLabeledKeypair("Alice");
const alice = aliceAmman[1];
4 Label Accounts
amman.addr.addLabel("Bob", publicKey);
5 Airdrop SOL
await amman.airdrop(program.provider.connection, alice.publicKey, 1);
The Amman explorer
- Find the Amman explorer here.
- The explorer has a lot of great features like being able to display deserialized account data, go and see what it can do.


Top comments (0)