
Now I am going to show you how to create an online chat for your team/users/friends if you don't have backend or you don't want to spend time on it. We will develop simple text chat in one hour.
It is thought to create chat without a backend. There has to be backend in some way. We will use Chatix and its JavaScript SDK. Chatix and SDK will handle storage and networking issues while we are to do frontend.
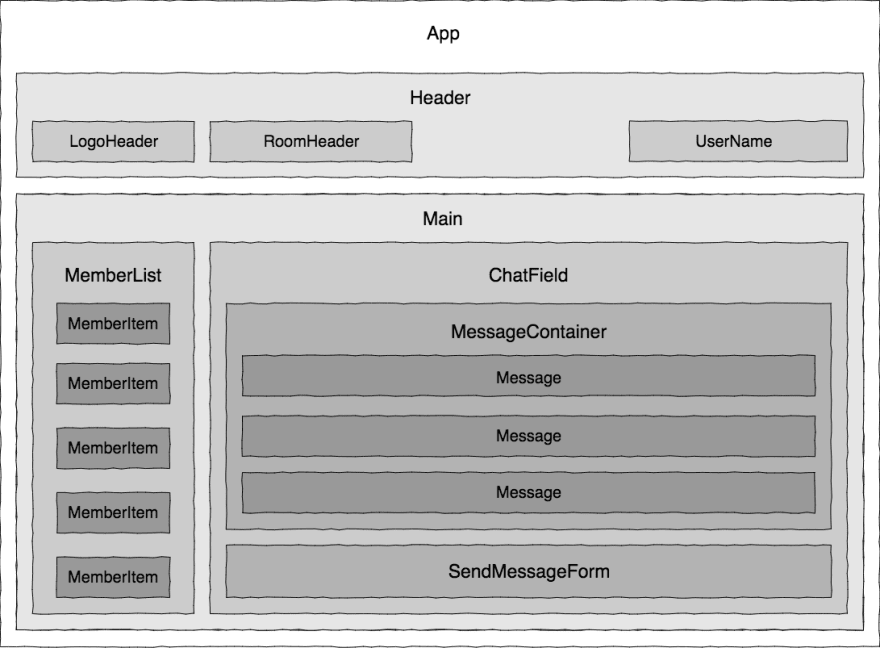
Project structure
-
App(app root component, acts as state manager because we are not going to use Redux or anything like this)-
Header(app top bar that shows logo, chatroom title and displays nickname input)LogoHeaderRoomTitle
-
Main-
MemberList(connected users list)MemberItem[]
-
ChatField(chat messaging container)MessageContainer-
Message[](message view, hehe we are to handle only text messages) -
SendMessageForm(this form will send a text message to the chat)
-
-
ChatixSDK(headless component handles work with Chatix backend)
-
Note about state management. Of course, it will be easier and wiser to add Redux and use it as state manager, but giving a priority to faster prototyping we will store our state in root component and pass data to children. For example, when we receive a chatroom title, we will save it in the root component and pass it with props like this: App → Header → RoomTitle. When a user submits a message we will pass this call form SendMessageForm up to App: SendMessageForm → ChatField → Main → App.
That's how our chat will be in design:
Component interactions
Our components will communicate between themselves to make our app interactive, so let's define what data should be passed to each component:

As you can see in the figure above, App is our root component and it provides data to its children. Thanks to reactivity, we will set a child's prop and this child will handle prop change. Child components can call the parent's method and we will use it when sending a message. That is not the best architecture we can (and we should) use in production, but it is good enough for this demo/tutorial.
Let's start
Work on visual components
1) Let's start by creating an app using create-react-app.
npx create-react-app chatix-chatroom
cd chatix-chatroom
Next - start the app. It will launch a browser with our project.
npm start
2) Let's create our header.
The most important thing in our app is the logo (sarcasm). LogoHeader component will be placed in src/components/logo_header. Create these directories. Place your logo to this folder and create 2 files: LogoHeader.js and LogoHeader.css
LogoHeader.js
import React from 'react'
import logo from './chatix_logo.svg';
import './LogoHeader.css';

function LogoHeader(){
    return (
        <div className="LogoHeader">
            <img src={logo} className="App-logo" alt="Chatix logo" />
        </div>
    );
}

export default LogoHeader;
LogoHeader.css
.LogoHeader{
    flex-basis: 200px;
    flex-grow: 0;
    flex-shrink: 0;
}
It is a pretty simple component. It imports logo and styles and renders them.
I will not paste style sources for the next components, you can see them in project sources at GitHub.
Now let's display chatroom title. First - create directory for this component (src/components/room-title) and create JS and CSS files for our component "RoomTitle". This component will receive a title from its parent via props.chatroomName.
RoomTitile.js
import React from 'react';
import './RoomTitle.css';

function RoomTitle(props){
    return (
        <div className="RoomTitle">
            <h1>{props.chatroomName}</h1>
        </div>
    );
}

export default RoomTitle;
Now it is a good time to create a header component, add logo and room title into it and place it in the root App component.
Let me remind you, we are agreed to keep the app state in the root App component, so we will pass data from App to Header and from Header to RoomTitle.
Header.js
import React from 'react';
import './Header.css'
import LogoHeader from '../logo_header/LogoHeader';
import RoomTitle from '../room-title/RoomTitle';

function Header(props) {
    return (
        <header>
            <LogoHeader/>
            <RoomTitle chatroomName={props.chatroomName} />
        </header>
    );
}

export default Header;
Next open App.js, add Header.js and add chatroom title to the state and pass it to the header using props. Also, we need to display the user's nickname in the header, so add the user object to the state and pass it in the same way to the header.
App.js
import React from 'react';
import './App.css';
import Header from './components/header/Header';

class App extends React.Component {
    constructor(props){
        super(props);
        chatroomName: 'Chatroom',
        me: {
            is_online: true,
            name: "Alex",
            uuid: "98s7dfh9a8s7dhf"
        }
    }
    render() {
        return (
          <div className="App">
            <Header
                chatroomName={this.state.chatroomName}
                me={this.state.me}
            />
          </div>
        );
    };
}

export default App;
Now we have to add nickname input in our header and set change handler to let us know when the user changes it and pass the changed value to the App component.
Let’s create function handleChangeName and call callback from props.updateVisitor. Pass updated visitor object to this callback.
Header.js
function Header(props) {
    const [name, setName] = useState(props.me.name ? props.me.name : props.me.uuid.substr(-10))

    const handleChangeName = (e) => {
        setName(e.target.value)
        let visitor = {...props.me};
        visitor.name = e.target.value;
        props.updateVisitor(visitor)
    }

    return (
        <header>
            <LogoHeader/>
            <RoomTitle chatroomName={props.chatroomName}/>
            {
                props.me ?
                    <input
                        className='name-input'
                        value={name}
                        placeholder='Your name'
                        onChange={(e) => handleChangeName(e)}
                    />
                : null
            }
        </header>
    );
}
Now let's add visitor update handler in our root App component and pass it as a prop to header component. At this time the only thing it does is update a visitor in the state, but later we will update a visitor on a server.
Header.js
onUpdateVisitor = (visitor) => {
    this.setState({me: visitor})
}

So, now our app looks like this and can update the user’s name only. Going forward.
Chatroom members list
Members list will be placed inside the Main component and contains a set of member items. Lets create this set of 3 components: components\main\Main.js, components\main\MemberList.js, components\main\MemberItem.js. The first one is a container for our chat, the second - side panel that will display chatroom members using (third) chatroom member views.
If you feel confused about how these components work together please refer to the figure at the beginning of this post.
Components are created, let's fill them one-by-one.
First, add chatroom members array to the App component and add the Main component into App. Then pass members from App to Main.
App.js
class App extends React.Component {

  constructor(props) {
    super(props);
    this.state = {
      chatroomName: 'Chatroom',
      members: [
        {
          is_online: true,
          name: "Alex",
          uuid: "98s7dfh9a8s7dhf"
        },
        {
          is_online: true,
          name: "Daniel",
          uuid: "mnzxcv97zx6chvo"
        },
        {
          is_online: false,
          name: "Andrew",
          uuid: "kjuhv987ashdfoua"
        },
        {
          is_online: false,
          name: "David",
          uuid: "jdhnf978WEHJSNDL"
        },
        {
          is_online: false,
          name: "Emma",
          uuid: "ashdf987h9sa8d7fh"
        },
        {
          is_online: false,
          name: "Grace",
          uuid: "87623h9hs8df7has7"
        },
        {
          is_online: false,
          name: "Victoria",
          uuid: "098as7f789hsdfdf6"
        },
      ],
      me: {
        is_online: true,
        name: "Alex",
        uuid: "98s7dfh9a8s7dhf"
      }
    };
  }
  render() {
    return (
      <div className="App">
        <Header
            chatroomName={this.state.chatroomName}
            me={this.state.me}
        />
        <Main
            members={this.state.members}
            me={this.state.me}
        />
      </div>
    );
  };
}
Add MemberList to Main and pass members array to it.
Main.js
function Main(props) {
    return(
        <section className="Main">
            <MemberList members={props.members} />
        </section>
    );
}
Iterate chatroom members in the MemberList component and render MemberItem for each of them.
MemberList.js
function MemberList(props) {
    const members = props.members.map((member) =>
        <MemberItem key={member.uuid} member={member} />
    );

    return (
        <section className="MemberList">
            {members}
        </section>
    );
}
MemberItem component received member object and displays it as a list item. Here we check if the member has defined his/her name and define how we will show it. If the member didn’t set name, we display the first 10 characters of member’s ID. Also, we check the online flag, render green dot if the member is here and display the label “You” in your member item.
MemberItem.js
function MemberItem(props) {

    function getName(){
        let name = ''
        if (props.member.uuid === props.me.uuid) {
            if(props.me.name) {
                name = props.me.name
            }
            else {
                name = props.me.uuid.substring(props.me.uuid.length-10, props.me.uuid.length);
            }
        }
        else {
            if(props.member.name){
                name = props.member.name
            }
            else {
                name = props.member.uuid.substring(props.member.uuid.length-10, props.member.uuid.length);
            }
        }
        return name;
    }

    return(
        <div className="MemberItem">
            <img src={ icon } alt={ props.member.name }/>
            <span>
                { getName() }
                {
                    props.member.uuid === props.me.uuid && " (You) "
                }
            </span>
            {
                props.member.is_online && <span className="online">•</span>
            }
        </div>
    );
}
Okay, let’s check how does out app looks now.

Messages list and the form
Let’s work with messages. First, let’s add messages array to our state in the App component.
App.js
this.state = {
      chatroomName: 'Chatroom',
      messages: [
        {
          content: "Hello. Need to have a meeting",
          sender_id: "mnzxcv97zx6chvo",
          uuid: "dg897sdfg"
        },
        {
          content: "Tomorrow",
          sender_id: "98s7dfh9a8s7dhf",
          uuid: "8723hernm"
        },
        {
          content: "Ok",
          sender_id: "mnzxcv97zx6chvo",
          uuid: "435nbcv98234"
        },
        {
          content: "Ok",
          sender_id: "987sdfu987sdf98",
          uuid: "435nbcv98234"
        },
        {
          content: "Ok. For what reason?",
          sender_id: "mnzxcv97zx6chvo",
          uuid: "435nbcv98234"
        }
      ],
      members: [
        {
          is_online: true,
          name: "Alex",
          uuid: "98s7dfh9a8s7dhf"
        },
        {
          is_online: true,
          name: "Daniel",
          uuid: "mnzxcv97zx6chvo"
        },
        {
          is_online: false,
          name: "Andrew",
          uuid: "kjuhv987ashdfoua"
        },
        {
          is_online: false,
          name: "David",
          uuid: "jdhnf978WEHJSNDL"
        },
        {
          is_online: false,
          name: "Emma",
          uuid: "ashdf987h9sa8d7fh"
        },
        {
          is_online: false,
          name: "Grace",
          uuid: "87623h9hs8df7has7"
        },
        {
          is_online: false,
          name: "Victoria",
          uuid: "098as7f789hsdfdf6"
        },
      ],
      me: {
        is_online: true,
        name: "Alex",
        uuid: "98s7dfh9a8s7dhf"
      }
    };
And pass them to the Main component.
App.js
<Main
    members={this.state.members}
    messages={this.state.messages}
    me={this.state.me}
/>
Now create ChatField component (src/components/chat-field/ChatField.js), add it to the Main component and pass messages to it.
App.js
function Main(props) {
    return(
        <section className="Main">
            <MemberList
                me={props.me}
                members={props.members} />
            <ChatField messages={props.messages} />
        </section>
    );
}
Create MessageContainer component (src/components/message-container/MessageContainer.js), add it to ChatField and pass messages to it.
ChatField.js
function Main(props) {
    return(
        <section className="Main">
            <MemberList
                me={props.me}
                members={props.members} />
            <ChatField messages={props.messages} />
        </section>
    );
}
Next we are to display messages list as items of Message (src/components/message/Message.js) components. Let’s create Message component and display sender icon, sender name and message content.
Message.js
function Message(props) {

    const getSenderName = () => {
        if (props.sender) {
            return props.sender.name ? props.sender.name : props.sender.uuid.substr(-10);
        }
        return "Unknown sender";
    };

    return(
        <div className="Message">
            <div className="message-sender-icon">
                <img src={icon} alt="visitor icon"/>
            </div>
            <div className="message-bubble">
                <div className="message-sender-name">{getSenderName()}</div>
                <div className="message-content">{props.message.content}</div>
            </div>
        </div>
    );
}
Now go back to MessageContainer and display messages list using Array.map function and pass the message item to each component.
MessageContainer.js
function MessageContainer(props) {
     const messageList = props.messages.map(message =>
        <Message
            key={message.uuid}
            sender={props.members.find((member) => member.uuid === message.sender_id)}
            message={message} />
        );

    return (
        <section className="MessageContainer" ref={messagesContainer}>
            {messageList}
        </section>
    );
}
Let’s check our app. Now it should be like this:

Let’s create our message sending form. Create component SendMessageForm (src/components/send-message-form/ SendMessageForm.js). Place the form of input and button. Add the component’s local state where we will store the message before sending it. Create currentMessageChanged handler for editing input and sendMessageClick handler for submitting the form. You may note I call function onSendNewMessage in sendMessageClick. It is a callback function that will be created in the App component later and passed to this form.
SendMessageForm.js
class SendMessageForm extends React.Component {
    constructor(props) {
        super(props);
        this.state = {
            message: ''
        };
    }

    currentMessageChanged = (e) => {
        this.setState({message: e.target.value });
    }

    sendMessageClicked = async (e) => {
        e.preventDefault();
        if (this.state.message.length > 0) {
            await this.props.onSendNewMessage(this.state.message);
            this.setState({...this.state, ...{message : ''}});
        }
    }

    render(){
        return (
            <section className="SendMessageForm">
                <form>
                    <input
                        type="text"
                        value={this.state.message}
                        onChange={this.currentMessageChanged}
                        placeholder="Type message to send"/>
                    <button
                        type="submit"
                        onClick={this.sendMessageClicked}
                    >
                        Send
                    </button>
                </form>
            </section>
        );
    }
}
Now place SendMessageForm inside ChatField.
ChatField.js
function ChatField(props) {
    return(
        <section className="ChatField">
            <MessageContainer
                members={props.members}
                messages={props.messages}
            />
            <SendMessageForm onSendNewMessage={props.onSendNewMessage}/>
        </section>
    );
}
Modify the Main component and pass onSendNewMessage to the ChatField component.
Main.js
<ChatField
    members={props.members}
    messages={props.messages}
    onSendNewMessage={props.onSendNewMessage}
/>
Now create this handler in App and pass it to the Main.
App.js
onSendNewMessage = async (message) => {
    console.log(message)
}
// ...
<Main
    members={this.state.members}
    messages={this.state.messages}
    onSendNewMessage={this.onSendNewMessage}
    me={this.state.me}
/>
Well done, now when the user sends a new message it will be displayed in the console. Now our app looks like this:

So, we completed working with UI components. Now let’s make out app dynamic and connect it to Chatix backend.
Integrate backend
First, install the SDK package chatix-core.
npm i chatix-core
Create an account in Chatix and get your websiteId in the dashboard at the settings page. Then create a new chatroom and get its ID.

Go back to our project and create headless component ChatixSDK that will do all network job for us. Import SDK, set websiteId and initialize SDK object in the constructor.
After initialization, we can start a connection to the backend and get selected chatroom information. When we got chatroom details we can pass them to App. Add callback updateChatroomTitle(chatroom.title) to our App component and call it in ChatixSDK.
ChatixSDK.js
import ChatixCore from 'chatix-core';

class ChatixSDK extends React.Component {
    constructor(props){
        super(props);
        const websiteId = "YOUR_WEBSITE_ID";
        this.chatroomId = "YOUR_CHATROOM_ID";
        this.sdk = new ChatixCore(websiteId);
        this.sdk.start()
            .then( async () => {
                try {
                    // refresh information about chatroom and call passed handler
                    const chatroom = await this.sdk.getChatroom(this.chatroomId);
                    if (props.updateChatroomTitle) {
                        props.updateChatroomTitle(chatroom.title);
                    }
                } catch (err) {
                    console.error(err);
                }
            })
            .catch((e) => {
                console.error(e);
            });
    }
    render(){
        return null;
    }
}
You can get your chatroom ID in the dashboard.

Now add ChatixSDK to the App component and pass updateChatroomTitle function to SDK. Then add ref link to the SDK component to let us call the component’s method from App.
App.js
this.chatixSDK = React.createRef();
setChatroomTitle = (newName) => {
    const newStateFragment = { chatroomName: newName};
    this.setState({...this.state, ...newStateFragment});
};
render() {
    return (
        <div className="App">
            <Header
                chatroomName={this.state.chatroomName}
                me={this.state.me}
                updateVisitor={this.onUpdateVisitor}
            />
            <Main
                members={this.state.members}
                messages={this.state.messages}
                onSendNewMessage={this.onSendNewMessage}
                me={this.state.me}
            />
            <ChatixSDK
                ref={this.chatixSDK}
                updateChatroomTitle={this.setChatroomTitle}
            />
        </div>
    );
  };
Done. Now, right after establishing the connection to the backend we request chatroom details and save its name to App state and thanks to reactivity, it will be displayed in the header as well.
Now we can replace the default chatroom title in App state with an empty string.
App.js
chatroomName: ''
Let’s fill side block with real members. Before getting chatroom members we have to be sure the current user is a member of this chatroom and connects him to the room if necessary.
ChatixSDK.js
const myChatrooms = await this.sdk.getMyChatrooms();
if (myChatrooms.filter(x => x.id===this.chatroomId).length === 0) {
    await this.sdk.connectToChatroom(this.chatroomId);
}
After that, we are ready to get chatroom members and save them in the App state.
ChatixSDK.js
// lets get all chatroom members using infinite loop with break on empty server response
let membersPage = 1;
let allChatroomMembers = [];
while(true) {
    let pagedMembers = await this.sdk.getChatroomMembers(this.chatroomId, membersPage++, 10);
    allChatroomMembers = [...allChatroomMembers, ...pagedMembers];
    if (pagedMembers.length === 0) {
        break;
    }
}
Here we are fetching members page-by-page using an infinite loop and break the loop when all records are received. After that, we call the callback App method setChatroomMembers and passing data to our root component.
ChatixSDK.js
if (props.setChatroomMembers) {
    props.setChatroomMembers(allChatroomMembers);
}
App.js
setChatroomMembers = (members) => {
    members.sort(this.sortMembers);
    const newStateFragment = { members: members};
    this.setState({...this.state, ...newStateFragment});
}
Now it would be better if we will sort members to display them like “online first, then sort alphabetically”.
App.js
sortMembers(a, b) {
    if (a.is_online === true && b.is_online === false) {
      return -1;
    } else if (b.is_online === true && a.is_online === false) {
      return 1;
    } else {
      if (a.name && b.name) {
        if (a.name.toLocaleUpperCase() > b.name.toLocaleUpperCase()) {
          return 1;
        } else if (a.name.toLocaleUpperCase() < b.name.toLocaleUpperCase()) {
          return -1;
        }
      } else if (a.name && !b.name) {
        return -1;
      } else if (!a.name && b.name) {
        return 1;
      }
      if (a.uuid > b.uuid) {
        return -1;
      } else {
        return 1;
      }
    }
  }
Next pass callback setChatroomMembers to ChatixSDK
App.js
render() {
    return (
        <div className="App">
            <Header
                chatroomName={this.state.chatroomName}
                me={this.state.me}
                updateVisitor={this.onUpdateVisitor}
            />
            <Main
                members={this.state.members}
                messages={this.state.messages}
                onSendNewMessage={this.onSendNewMessage}
                me={this.state.me}
            />
            <ChatixSDK
                ref={this.chatixSDK}
                updateChatroomTitle={this.setChatroomTitle}
                setChatroomMembers={this.setChatroomMembers}
            />
        </div>
    );
  };
Now right after the connection, we request chatroom members and we can pass them to the App component as like as we did with chatroom header. Don’t forget to change the default chatroom members list to an empty array.
App.js
members: []
Get the current user object from Chatix in the same way and pass it to the App state.
ChatixSDK.js
// lets load 100 last messages from current chatroom
const lastMessages = await this.sdk.getChatroomMessages(this.chatroomId, null, 100);
if (props.setChatroomMessages) {
    props.setChatroomMessages(lastMessages);
}

if (props.setMe) {
    const me = this.sdk.getVisitor();
    this.props.setMe(me);
}
App.js
<ChatixSDK
    ref={this.chatixSDK}
    setMe={this.setMe}
    updateChatroomTitle={this.setChatroomTitle}
    setChatroomMembers={this.setChatroomMembers}
    setChatroomMessages={this.setChatroomMessages}
/>
Now it’s time to deal with messages.
We have already defined the App method onSendNewMessage that logs our message to the console window. We should rewrite it to make it send messages using ChatixSDK. We will use Chatix sendChatroomMessage method to send a text message to the chatroom.
App.js
onSendNewMessage = async (message) => {
    let receivedMsg = await this.chatixSDK.current.sendChatroomMessage(message);

    const currentMessages = this.state.messages;
    currentMessages.push(receivedMsg);
    const newStateFragment = {messages: currentMessages};
    this.setState({...this.state, ...newStateFragment});
  }
Due to the fact state mutation calls re-render related components, the only thing we should do to display messages is update App component’s state, but also it would be better for UX if we will scroll down message container when new message appears, otherwise user may not recognize that there is a new message in a chat.
Open MessageContainer component and us hook useEffect to catch messages array updates. Each time the hook will be called we scroll down the container element. Note how we refer to the container using ref.
MessageContainer.js
function MessageContainer(props) {
    const messagesContainer = React.createRef();

    useEffect(() => {
        messagesContainer.current.scrollTop = messagesContainer.current.scrollHeight
    }, [props, messagesContainer]);

    const messageList = props.messages.map(message =>
        <Message
            key={message.uuid}
            sender={props.members.find((member) => member.uuid === message.sender_id)}
            message={message} />
        );

    return (
        <section className="MessageContainer" ref={messagesContainer}>
            {messageList}
        </section>
    );
}
Now let’s complete with updating the user’s nickname. We have already created input in the header and pass update value to the App component where it is printed to the console. Let's update this function. We need to update the user’s nickname on a server, so let’s call method this.chatixSDK.current.updateVisitor(user). Also, we have to update data in a local state in properties me and members (because the current user is one of the members of this chat).
App.js
onUpdateVisitor = (user) => {
    this.chatixSDK.current.updateVisitor(user)
    this.setMe(user)
    let currentUser = this.state.members.find((member) => (member.uuid === user.uuid))
    let currentUserIndex = this.state.members.indexOf(currentUser)
    let newMembers = [...this.state.members]
    newMembers[currentUserIndex] = user;
    this.setState({
      members: newMembers
    })
}
Now we have to catch incoming messages, other members’ connecting/disconnecting and updating members’ info.
To reach this we have to override callback functions in the constructor of ChatixSDK. Please refer to the project’s page at npm.
Now we are looking for onChatroomMessageReceived, onMemberConnectedToChatroom, onMemberDisconnectedFromChatroom and onApplyVisitorInfo.
Override each with relevant App’s callback (and don’t forget to create callbacks in App).
App.js
this.sdk.onChatroomMessageReceived = (chatroomId, message) => {
    if (chatroomId === this.chatroomId) {
        this.props.onNewMessageReceived(message);
    }
};
this.sdk.onMemberConnectedToChatroom = (chatroomId, member) => {
    if (chatroomId === this.chatroomId && props.addChatroomMember) {
        this.props.addChatroomMember(member);
    }
};
this.sdk.onMemberDisconnectedFromChatroom = (chatroomId, member) => {
    if (chatroomId === this.chatroomId && props.removeChatroomMember) {
        this.props.removeChatroomMember(member);
    }
};
this.sdk.onApplyVisitorInfo = (visitor) => {
    this.props.onMemberUpdated(visitor)
}
Now let me explain some of the used SDK callbacks
onNewMessageReceived(message)
This function accepts a message object and adds it to the state. After mutating, the component will be re-rendered and the message will be displayed as like as it happens when sending a message.
onNewMessageReceived = (message) => {
    const currentMessages = this.state.messages;
    currentMessages.push(message);
    const newStateFragment = {messages: currentMessages};
    this.setState({...this.state, ...newStateFragment});
  }
addChatroomMember(member)
This function accepts a member object, adds it to the state and React will show the new member in a side panel.
addChatroomMember = (member) => {
    const newStateFragment = {};
    const currentMembers = this.state.members;
    currentMembers.push(member);
    currentMembers.sort(this.sortMembers);
    newStateFragment.members = currentMembers;
    this.setState({...this.state, ...newStateFragment});
  }
removeChatroomMember(memberId)
This function is in the opposite of addChatroomMember. It removes the member with passed ID from the state and React updates members list.
removeChatroomMember = (memberId) => {
    const currentMembers = this.state.members;
    const filteredMembers = currentMembers.filter(x=> x.uuid !== memberId);
    const newStateFragment = {members: filteredMembers};
    this.setState({...this.state, ...newStateFragment});
  }
onMemberUpdated(updatedMember)
This function updates information about the member. For example when he/she changes the name. We search the member in the state (by ID field) and replace the record with an updated one.
onMemberUpdated = (updatedMember) => {
    let oldMember = this.state.members.find(member => member.uuid === updatedMember.uuid);
    oldMember = this.state.members.indexOf(oldMember);
    let newStateMembers = this.state.members;
    newStateMembers[oldMember] = updatedMember;

    this.setState({
      members: newStateMembers
    })
}
Final step — pass callbacks to ChatixSDK.
App.js
<ChatixSDK
    ref={this.chatixSDK}
    setMe={this.setMe}
    updateChatroomTitle={this.setChatroomTitle}
    setChatroomMembers={this.setChatroomMembers}
    addChatroomMember={this.addChatroomMember}
    removeChatroomMember={this.removeChatroomMember}
    setChatroomMessages={this.setChatroomMessages}
    onNewMessageReceived={this.onNewMessageReceived}
    onMemberUpdated={this.onMemberUpdated}
/>
Done! We created simple online text chat that can send/receive messages, display members list, handle connecting/disconnecting members and update their details.


Top comments (1)
Creating an online chat application in React with Chatix offers a seamless way to integrate real-time communication into web projects, much like the engaging experiences provided by platforms such as Chatrandom. By leveraging Chatix, developers can easily implement customizable chat solutions, fostering dynamic interactions akin to those found in random chat rooms. This parallels the immediacy and global connectivity of Chatrandom, where users worldwide can instantly engage in video chats. Incorporating Chatix into a React project not only simplifies the development process but also enhances user engagement by enabling live, interactive exchanges. It's an innovative approach to building web applications that cater to the modern web user's preference for direct and spontaneous communication, reflecting the broader trend towards more interactive and connected online experiences. Through Chatix, developers can create a chat feature that brings the unpredictability and vibrancy of random chat rooms into any website, making online interactions more personal and engaging.