
Hello, everybody! 👋
And welcome to the 3rd lecture of the Styled Components 101 series 🙌
In this lecture, we'll be covering:
1️⃣ How we can use Styled Components within a Next.js configuration.
2️⃣ How to use custom icon fonts within our styled components.
If you're new to Styled Components and this lecture is the first one you run into, I suggest taking a look at the previous lectures first, where we covered some basic concepts and examples of Styled Components.
With all this said, let's move on to today's topic 👇
How to get Styled Components to work if we're using Next.js 😺
Let's first see what happens if no configuration for Styled Components has been defined for our Next.js project and we try to use the library.
To start off, we're going to create a StyledButton component (already known to all at this point 😜) and render it within the main component of our app.
StyledButton.js
import styled from "styled-components";

export default styled.button`
    background-color: ${props => props.bg};
    color: ${props => props.color};
    border: none;
    border-radius: 5px;
    padding: 20px;
    font-size: 1.5rem;
`
index.js
import StyledButton from '../components/StyledButton';

const Home = () => {
   return(
      <StyledButton bg="#c64dff" color="#fff">Styled Button in Next.js</StyledButton>
   )
}
If we run our app, this is the resultant button:

Where in the world are our styles? 🤔 Let's find out what's going on in here.
First, if we go to the Console Tab in the browser's dev tools, we see that something is throwing an error:

The error reads:
_Warning: Prop `classname` did not match. Server: "sc-pNWdM kcTaxf" Client: "sc-bdnxRM gSuzZs" at button...
```
It seems like two different classes are being assigned on the server and the client, resulting in an __inconsistency__.
Let's now have a look at the __Elements__ tab:
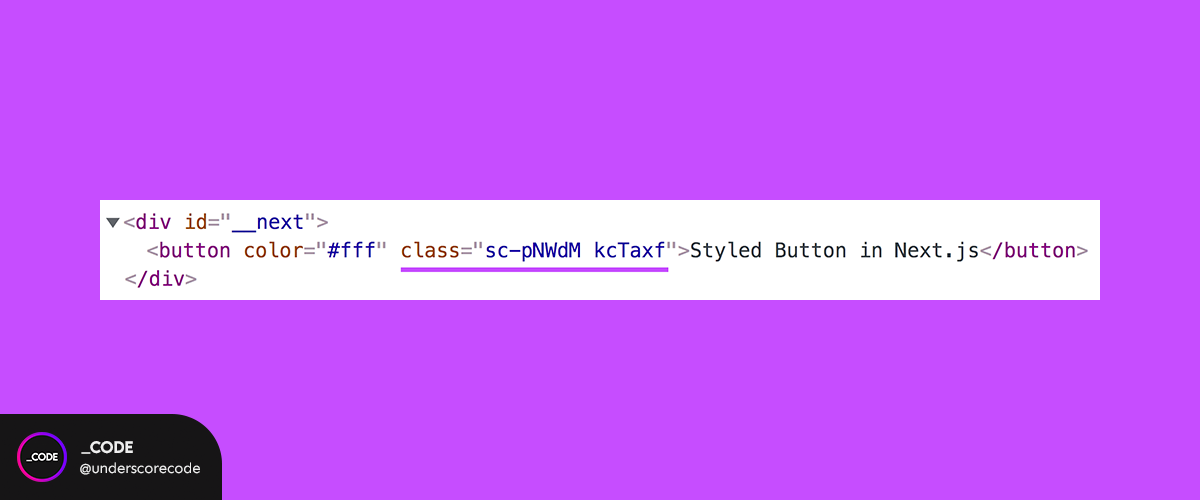
Our button is there and we can confirm that the class provided by Styled Components has been __assigned correctly__, but the __styles are__ completely __missing__.
##So, what can we do to solve this? 😩
Well, this is neither a bug nor even a big deal. It's just that a __further configuration is required by Next.js__ to get to work Styled Components in our project in order to use it.
So, first, we're going to install the `babel-plugin-styled-components`, which is required for __SSR__ (_Server Side Rendering_).
```bash
npm install babel-plugin-styled-components
```
Now, let's create a `.babelrc` file if we haven't already done so (it's not created by default when creating a Next.js app) and write the following configuration for the newly installed plugin on it:
On the terminal:
```bash
touch .babelrc
```
`.babelrc`
```json
{
"presets": ["next/babel"],
"plugins": [["styled-components", {"ssr": true, "preprocess": false}]]
}
```
But we're not done yet, we still need a little bit more of configuration.
Now we need to inject the __server side rendered styles__ in the `<head>` element of our HTML file. For this purpose, we need to override the _Document_ file, which is provided by Next.js.
The _Document_ file is extendable, which means that we can add content to it if needed, and it's mainly used to __add custom content__ to the `<html>` and `<body>` elements of the HTML main file. Note that this file is only rendered on the server.
This _document_ is automatically generated with the creation of the Next.js app, but since we need to extend it, we're going to create another file called `_document.js` to __override the original one__. This new file should be placed within the `/pages` directory and it will look like this 👇
`_document.js`
```jsx
import Document from 'next/document'
import { ServerStyleSheet } from 'styled-components'
export default class MyDocument extends Document {
static async getInitialProps(ctx) {
const sheet = new ServerStyleSheet()
const originalRenderPage = ctx.renderPage
try {
ctx.renderPage = () =>
originalRenderPage({
enhanceApp: (App) => (props) =>
sheet.collectStyles(<App {...props} />),
})
const initialProps = await Document.getInitialProps(ctx)
return {
...initialProps,
styles: (
<>
{initialProps.styles}
{sheet.getStyleElement()}
</>
),
}
} finally {
sheet.seal()
}
}
}
```
Note that `renderPage` should only be modified when working with _CSS-in-JS_ libraries, like Styled Components, since they need the app to be __wrapped to work on server side__. Otherwise the default configuration should always remain 👍
If we're not planning to use any of these libraries, the following configuration could be a good starting point if we need to add something to the structure of our HTML document, being able to remove all that we don't need to change (note that we're __overriding__), like `getInitialProps` or even the `render` method:
```jsx
import Document, { Html, Head, Main, NextScript } from 'next/document'
class MyDocument extends Document {
static async getInitialProps(ctx) {
const initialProps = await Document.getInitialProps(ctx)
return { ...initialProps }
}
render() {
return (
<Html>
<Head />
<body>
<Main />
<NextScript />
</body>
</Html>
)
}
}
export default MyDocument
```
In any other case, there's no need to extend the original _Document_ and we can forget about it 😜.
Once we've made all of these arrangements, let's re-run our application and see what happens!

There we go! Our Styled Button is finally rendering properly 👏
And that would be all the configuration needed to work with __Styled Components + Next.js__.
Let's now dive into how we can add a __custom icon font__ to a _styled_ component 👇
#Custom Icon Fonts in Styled Components ❤️
This topic is totally separate from the previous one, __since an extra configuration for fonts is no longer required in Next.js__, but anyway, let's extend our _styled_ button by adding an icon from a custom icon font and let's see what we need to do to make it work.
##First of all... What is an icon font? 🐔
Unlike regular fonts, which contain letters and numbers, an icon font is nothing more than a __collection of symbols and glyphs__ that works as a typeface. Its use is widely extended because they are really easy to style with CSS.
The tool we're going to use to get our icon font is ___Icomoon___, but this example works for every downloaded fonts coming from any font resource.
Let's say we have already downloaded our font files after generating the custom set and we're all set and ready to go.
##Integrating a custom icon font set into our project 🐸
What we're going to do in this section is to __add an icon__ from our custom icon font as an `::after` pseudo-element, to place it after the text of our button.
So, first, we're going to add a new _prop_ to our styled button call and pass it the content value of an icon of our choice.
Note that every icon has a sort of _id_, which is the value we'll pass in to the _prop_ named ___icon___. This content value is always provided by the tool, so you don't need to assign it yourself.
In this case, the content value for our icon is `\e900`.
```jsx
<StyledButton bg="#c64dff" color="#fff" icon="\e900">Styled Button in Next.js</StyledButton>
```
Then, we'll just add the `::after` pseudo-element to the _StyledButton_ definition:
```js
import styled from "styled-components";
export default styled.button`
background-color: ${props => props.bg};
color: ${props => props.color};
border: none;
border-radius: 5px;
padding: 20px;
font-size: 1.2rem;
&::after{
font-family: "icomoon";
content: "${props => props.icon}";
padding-left: 8px;
}
`
```
##Time to create a global style ⚡️
In the previous lecture, we had a glimpse on __how to create a global style__, as part of the example where we created a light/ dark theme toggler. So don't hesitate to take a look at it for further reference if needed 😀
But in case you missed it or you don't have the time to read one more article, keep reading: everything's explained ahead ✌️
First, we are going to __create our global styles file__, that will be called `IconFont.js`, and which will __host the CSS definition__ to import custom fonts. It's just plain CSS inside a _styled_ component. Nothing new 😎 And it will look like this:
`IconFont.js`
```jsx
import { createGlobalStyle } from "styled-components";
export default createGlobalStyle`
@font-face {
font-family: "icomoon";
src: url("/fonts/icomoon.eot");
src: url("/fonts/icomoon.eot?#iefix")
format("embedded-opentype"),
url("/fonts/icomoon.svg#icomoon") format("svg"),
url("/fonts/icomoon.woff") format("woff"),
url("/fonts/icomoon.ttf") format("truetype");
};
`
```
###Things to consider at this point
1. Pay attention to the __routes__ and the __filenames__: the ones you're seeing above work for the configuration that we're going to see in a minute. __You should always use the actual routes of your project and the names you provided to your font files__. Otherwise, it won't work ❌
It may sound obvious but sometimes it happens that we make a mistake in writing this definition and we go nuts for the rest of the day trying to figure out what's going on. Believe me, it happens more often that you may think 😝
2. In case you're using a ___theme___, you're supposed to already have a global styles file. In such case, just add the `@font-face` definition to it and you'd be set and done.
Then, __how do I have to structure my project__ to make the previous `@font-face` definition work?
First, and as mentioned before, you need to use the __actual names of your font files__ and define every possible format you have for that font (you will likely have something like _.ttf_, _.otf_, _.svg_, and/or _.woff_, but there are others, too).
And, second, and __key to this configuration__ 👉 You need to create a `fonts` directory inside the `/public` directory.
This is necessary because __Next.js serves static files under the `/public` folder__, so since fonts are a static resource, they have to be located in there.
>Note that every resource placed in the `/public` directory should be routed using a slash `/` before its name.
###Making our global theme accessible by the app
As a final step to be able to start using our custom icon font, we just need to __import__ the `IconFont` component into our main app component, `_app.js`, like this:
`_app.jsx`
```jsx
import IconFont from '../components/IconFont';
const MyApp = ({ Component, pageProps }) => {
return (
<>
<IconFont />
<Component {...pageProps} />
</>)
}
export default MyApp;
```
If everything goes as expected, this will be the __result__ of our _styled_ button, to which we have appended a __heart icon__:

Otherwise, __if something went wrong__ along the way, this is what we'll see:

Getting a _square_ instead of the actual icon can mean:
- The icon font has been found but the value for the content you have provided __is not part of the list of values of that font__.
- There's a __problem with the location of the fonts__: the specified font files are not located at the route you have provided.
- Something __wasn't configured properly__.
###Older versions of Next.js
As of Next.js 11, __no extra configuration for Webpack is required__ to _translate_ font file formats. If you're using an older version, it's highly recommended that you __update__ your package version by running the following command:
```bash
npm install next@latest
```
In case you need to use an __outdated version__ for whatever reasons, keep in mind that __a little bit of further configuration__ will be required: you'll need to install the `file-loader` Webpack loader, which will handle font formats appropriately and bundle them up to include them in the final bundle that will be served to the browser, and then, you'll have to add the corresponding configuration in `next.config.js`.
___
And this is all for the third Styled Components 101 lecture!
Stay tuned to know more about Styled Component in future episodes of the series.
A big thanks for reading 🤗 and don't hesitate to reach out to me if you any questions or doubts about today's lecture.

I hope you found this article useful and I see you all in the next 👋
🎉 Don't forget to follow @underscorecode on [Instagram](https://instagram.com/underscorecode) and [Twitter](https://twitter.com/underscorecode) for more daily webdev content 🖥🖤
____
####And last but not least... A quick friendly reminder before we go 😊
We all know there are million ways to get things done when it comes to programming and development, and we're here to __help and learn__, so, if you know another possible way to do what others are sharing (__not better, not worse, just different__), feel free to share it if you feel like it, but, please, __always be kind and respectful__ with the author and the rest of the community. Thank you and happy coding!

Top comments (5)
Thanks for taking time to explain all of this. Setting up Styled Components in Next.js is a hassle! Getting everything up and running with TypeScript and autocomplete on theme variables is even more work. Outch.
Thank you for reading and for your feedback! It’s true that sometimes one has to rack their brains as to configs and it ends up becoming a real headache 😑
This is fantastic! Thank you!! You've earned yourself a new Instagram follower!!
Thanks a lot! 😇
Can we have the souce code?