
Exploring the use cases where android emulators come in handy, how to set them up on the EC2 instances, what variants you can run on cheap t2 instances, and what a solo developer should expect when planning to use AWS instances for cloud emulator deployment.

Disclaimer: The author of this blog post documents his opinions and experiences towards android ROM and kernel in particular, anything other than that like android app development and gradle builds are not his forte and any pieces of advice will not be found under this post. Thank you for the patience, Read on!
Introduction and Use Cases😌
3 Months into Trell and I have a pretty interesting project in my hand, albeit it was on the tech which was completely alien to me, the fabled android kernel, and all the complications which come with it. The task is a simple automation pipeline for application testing on multiple new devices, a purpose which android emulators can serve pretty well. But this kind of pipeline can serve multiple purposes like :
- Thorough testing of apps via background pipeline while not consuming your system's resources and you can carry on with your development.
- Testing of applications on android smartphones that you do not physically possess.
- Logging and Monitoring the behavior of your firebase event tags on multiple devices at once.
- CI/CD pipeline loves an android emulator and all your unit tests would pass through them.
What is an Android Emulator? 🥧
I am around 3 years late to this party (but definitely in sync with the time in terms of the use case) but still, let's get done with the formality and move on to the good stuff.
Taking the definition directly out of Android's book, we can define the Android Emulator as a tool that simulates Android devices on your computer so that you can test your application on a variety of devices and Android API levels without needing to have each physical device.
The emulator provides almost all of the capabilities of a real Android device. You can simulate incoming phone calls and text messages, specify the location of the device, simulate different network speeds, simulate rotation and other hardware sensors, access the Google Play Store, and much more.
Setting Up the Emulator Environment 🧑🏾💻
Now, let's move on to setting up the emulator environment and the instances we would need along with it!
I'll be using a classic t2.medium instance (Ubuntu 18.04, 64 bit, x86 arch) for our purpose, with adding 25 GB storage to the instance (believe me, classic 8GB won't cut it), make sure you have the authentication (.pem) key for logging into your instance and let it bootup!
One important thing to note about this entire usage is that you can't access your emulator using GUI interfaces (actually, you can but that's something I have planned for some later post :P ), so we need to make sure that anything and everything we do is done solely by CLI (aka, our good old terminal!)
Now, once you have logged into your t2.medium instance, you'll need to clone this repository:
 uds5501
/
Emulator-CLI-Autocompleter
uds5501
/
Emulator-CLI-Autocompleter
Python autocomplete CLI for android emulators (Creation and APK Run demonstration)
Thanks for Reading my Blog!
The .zip file contains the legacy command line tools given to setup your emulator environment To setup your emulator environment correctly, please follow the blog instructions given in either of the 2 posts
Using the emulator demo script (with autocompletion support)
Emulator CLI is generally boring and anyone in the automation team can say amen to the fact that staring at a non saucy and tedious CLI can be a tad bit unproductive. Here is my bit to make the terminal a colourful play ground, at least, in the terms of autocompletion behaviour which is more or less non existent in the traditional command line tools provided by our dear Android team.
The script uses the prompt-toolkit to implement interactive CLI experience for the user. You can check out the source code in the internal directory.
Requirements to run the script
…into your instance. This will contain your command-line tools zip file. (currently hosted version by android doesn't work for me :( )
Now follow the commands step by step.
$ sudo apt update && sudo apt install default-jdk unzip -y
$ cd Emulator-Environment-Setup
$ unzip commandlinetools-linux-6609375_latest.zip
$ mkdir ../cmdline-tools
$ mv tools ../cmdline-tools
By now you have taken care of the basics, now we need to set the path variables (which would save us the pain of writing the entire path every time we want to call sdkmanager or emulator etc.)
$ nano ~/.bashrc
Now make sure your bashrc file looks like

Save this file (Ctrl + S) and get out (Ctrl + X)
Now, load the preferences and you are good to use the SDK tools, and accept all the licenses by typing y .
$ source ~/.bashrc
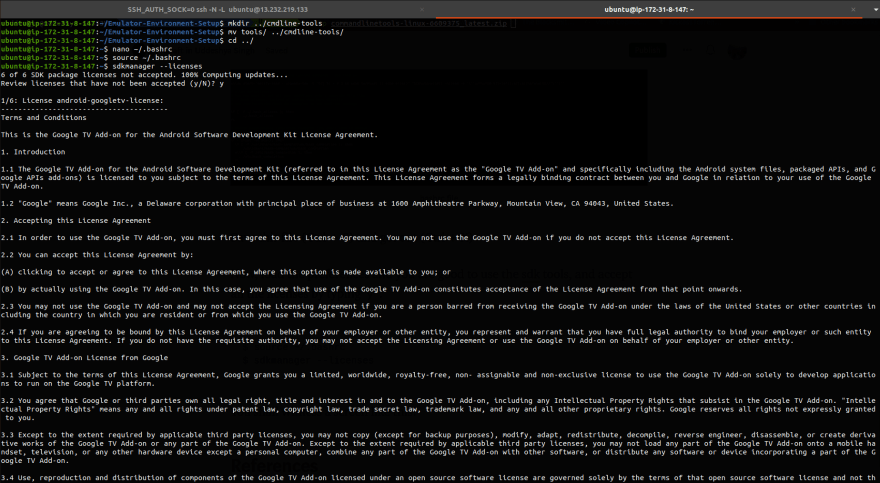
$ sdkmanager --licenses
You shall witness a screen like this!
Now, we just need to set up the emulator, platform-tools and we can create our own Android Virtual Device!
$ sdkmanager "emulator"
$ sdkmanager "platform-tools"
$ mkdir platforms
With this, your basic environment setup is done! Now let's take care of creating a virtual device.
Android Virtual Device on AWS 😁
To create an AVD, you need to first select the system image it will be built on, you can list all the SDK images by typing:
$ sdkmanager --list | grep system-images
You will find multiple system images tailored to multiple devices, with a general format of
"system-images;<version>;<gapi_setting>;<emulator_architecture>"
Take a look at the given configurations, they are all of android-25 (Nougat) and come in variants of android_tv, default, google_apis etc, with 2 architectures namely ARM and Intel's x86 which further bifurcates into 32 bit and 64-bit variants.

But we will specifically be using system-images;android-25;google_apis;armeabi-v7a version. Now let me justify this choice.
Why android-25? 🤔
This is something which Trell needed for checking firebase event logging, anything less than android-29, so picking a decently lower version made sense to observe backward portability of the app.
Why the google_api version? 🙇🏽♂️
We can perform a wide variety of operations on our android emulator if they are rooted by default (we have the superuser access). To connect into root mode and access emulator shell using the command line, we need this version to be "default" because google_apis and google_apis_playstore won't allow root connection from the android debugging bridge (in intel architectures) but in ARM (like this one) you can take anyone, all will be rooted by default!
Why armeabi-v7a architecture? 💁🏾♂️️
v7a represents a 32-bit version of the ARMarchitect architecture (something which is required for the trell app). Now, why ARM? because Intel (x86) architecture requires hardware acceleration to work, and this can be done with either Intel HAXM (in windows) or KVM (in Ubuntu). You can try this sequence of commands to check if KVM can be enabled on your instance or not.
$ sudo apt install cpu-checker -y
$ kvm-ok
This would greet you with the following message.
INFO: Your CPU does not support KVM extensions
INFO: For more detailed results, you should run this as root
HINT:   sudo /usr/sbin/kvm-ok
Why do intel emulators not work in these EC2 instances? 😭
Before we get into this, let's take a quick look at how emulators work. QEMU is a tool that mimics guest device hardware and it then translates the Application Binary Interface (ABI) of the guest device to match that of the host device.(armeabi-v7a to intel x86_64 in this case). Now to speed up this complex and slow process, hypervisors are introduced.
Intel's HAXM (Hardware Acceleration Execution Manager) is a hypervisor component for Windows and macOS. There's KVM (Kernel-based Virtual Machine) for Linux. With hardware-acceleration, the Android emulator can run virtual devices at speeds similar to that of your workstation CPU.
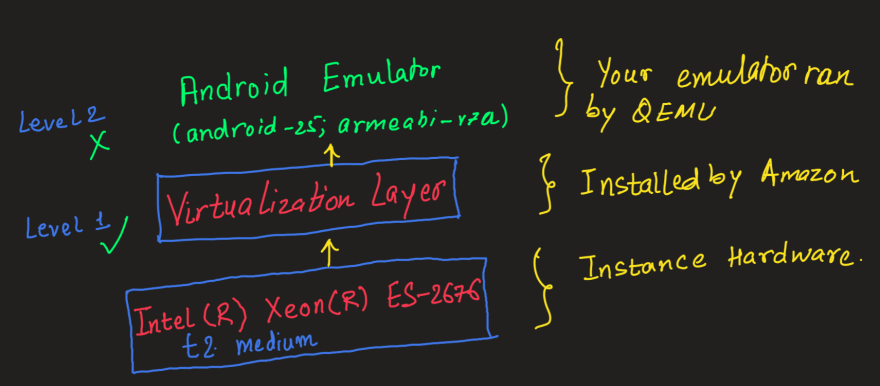
When we choose system-images;android-25;default;x86 we are trying to run a virtual machine within a virtual machine. It is a second level or nested virtualization that we are trying to achieve which, unfortunately, is not yet supported. The Intel hardware supports only a single level of hardware-assisted virtualization, adding support for efficient (i.e., not painfully slow) nesting requires a lot of clever software engineering in hypervisors.
Run a Testing Device 🏃🏽♂️
All the theory currently stated as to what will and what won't work, let's focus on creating a test virtual device. Follow the steps to do so!
$ sdkmanager "system-images;android-25;google_apis;armeabi-v7a"
$ echo "no" | avdmanager create avd --name "testDevice" -k "system-images;android-25;google_apis;armeabi-v7a"
So, you just created an AVD, how to check that out? You can use avdmanager to check your virtual android devices.
$ avdmanager list avd
Now, let's run this virtual device!
$ emulator -ports 5554,5555 -avd testDevice -writable-system -no-window -no-audio -gpu swiftshader_indirect -show-kernel &
-ports 5554,5555 define the connection ports on which the android debug bridge will connect to this emulator (in this case, 5554) and they have to be consecutive!
-writable-system would give you access to modify any file or push any file as you wish in root settings.'
-no-window would simply run the emulator headless (without this flag, it won't work because we don't have any OpenGL based graphics setup on a CLI)
-no-audio would take away it's audio support (something I'd suggest you do)
-gpu swiftshader_indirect to prevent a boot loop.
-show-kernel something for you to maintain your sanity and check the kernel's progress as it boots up because it WILL take forever (60–90 minutes) to boot up properly.
These are the testimonials on why you should not go for something this slow, because this would be counterproductive, you can rather test on your local devices rather on a device which will take 1 hour to function properly and still give you an average of 2.5 minutes to install a normal apk!
Why Genymotion and how good is it? 📱
If you are a solo developer and can afford the Genymotion PaaS subscription ($0.5 + amazon instance charges), it's your way to go. For example, I am using m4.xlarge with Genymotion PaaS on top, it'll cost you $0.7/hr and it will be a decent deal if you can afford it.
Genymotion is a go-to emulator for many organizations still and the amazing support and speed which their emulators provide are good enough for the purpose we want to solve, if and only if, your pocket allows you that much freedom.
But, still, $0.7/hr per emulator is a bit too costly, at least if you wanna do testing on a large scale.
Closing Thoughts and what to expect from the upcoming post? 👨🏽🏫
In this post, we explored the basic setup of an emulator environment and how to setup a simple AVD. What works in a general t2 instance and what are the alternatives.
In the next one, we'll explore how to setup multiple emulators in a single instance and explore android debug bridge in depth while customizing our device and run simple applications with intel emulators (which are at least 10x faster than these ones)!

Top comments (0)