I recently read a great article by Mat Ryer about programmatically generating images in Go and got inspired by it to solve a repetitive task I usually do every month.
My dad is the head of an organization called Projecte LOC that promotes reading to kids and adults in Cornellà de Llobregat, Spain. Once a month they organize a meet-up: either a literary dinner with a book author to talk about a book or a storytelling session. He usually asks me to create an image to illustrate the event and sends the details via email to all the members of the organization. The illustration looks like this:
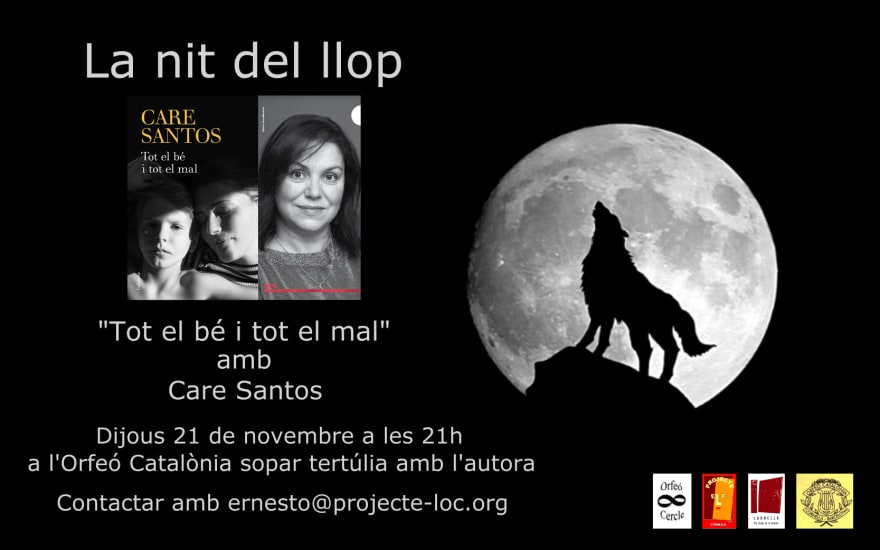
It's quite annoying to do it every single month by hand, importing the image, aligning text, adjusting everything... I usually make mistakes copying the day, the time and the title from the email he sends to me. I end up re-doing it entirely after he finds typos/mistakes.
So when I saw Mat's article I immediately thought that I could do something to improve this tedious process both for myself and my dad. Wouldn't it be great to have something where he would enter a few variable data about the meet-up (title, guest, image and date) and I would programmatically generate the whole image?
I needed something really simple and user friendly for him to enter the info. That was an easy decision: Typeform. He's used to typeforms and I know the API really well, after all, I helped build it. Then, I would take advantage of Typeform webhooks to get the response details from the form submission, process the info about the meet-up, generate the corresponding image and provide a link for him to download it. 💪
1. Creating the Typeform 🛠
First, I created the typeform with all the fields that would change for each meet-up. Each field has a unique identifier called reference, which is useful to identify the fields on the response payload that we'll receive on the webhook. By default, this reference is a long alphanumeric string, but I modified it on the Create Panel to look a bit more human-readable so I could identify each answer quickly in the code.

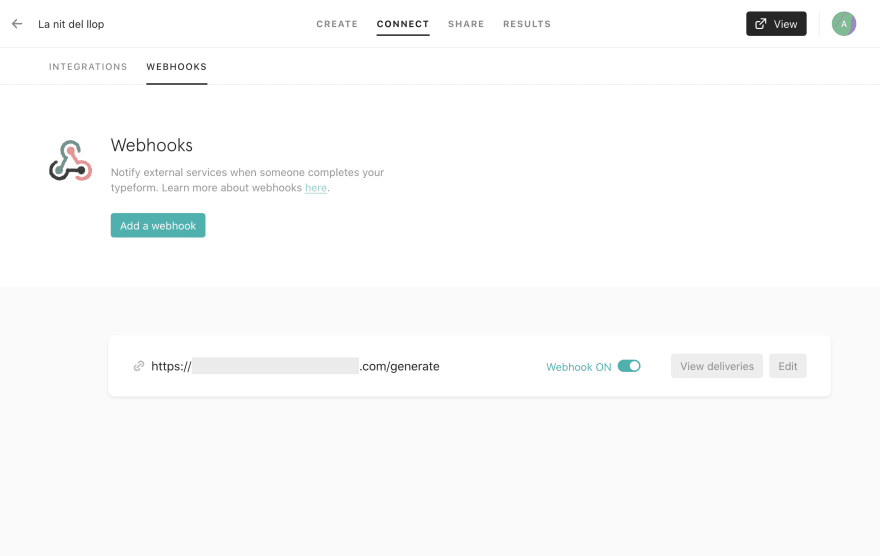
Next, I created the webhook on the Connect Panel pointing it to an endpoint that will handle each typeform submission.
2. Handling the webhook ⚓️
2.1. Signature verification ✍️
When creating a webhook we are exposing the endpoint URL to the internet, which is not secure. Potentially anyone with bad intentions could request to it with any data. I wanted to be sure that I was only processing webhooks coming from Typeform, so I added a secret on my webhook configuration. Then, Typeform would use it to sign the webhook payload and add it as a header on the request.

To accept an incoming webhook request, the first thing the handler has to do is verify that Typeform sent it.
This is done with the verifySignature function that takes multiple parameters: the request body, the shared secret with Typeform, and the value of the Typeform-Signature header.
Then, it computes the signature for the received payload with the secret and compares the result with the receivedSignature.
func verifySignature(payload []byte, secret, receivedSignature string) (bool, error) {
    signature, err := computeSignature(payload, secret)
    if err != nil {
        return false, err
    }

    return signature == receivedSignature, nil
}

func computeSignature(payload []byte, secret string) (string, error) {
    h := hmac.New(sha256.New, []byte(secret))

    _, err := h.Write(payload)
    if err != nil {
        return "", err
    }

    return "sha256=" + base64.StdEncoding.EncodeToString(h.Sum(nil)), nil
}
If the comparison succeeds we are sure the request is coming from Typeform so the execution can proceed, otherwise, the handler stops and returns an error.
func generateHandler(w http.ResponseWriter, r *http.Request) {
    // 1. Read the request body
    body, err := ioutil.ReadAll(r.Body)
    if err != nil {
        w.WriteHeader(http.StatusInternalServerError)
        return
    }
    defer r.Body.Close()

    // 2. Verify the signature
    ok, err := verifySignature(body, os.Getenv(secretToken), r.Header.Get("Typeform-Signature"))
    if err != nil || !ok {
        w.WriteHeader(http.StatusBadRequest)
        return
    }

    // 3. The verification succeeded so we can process the webhook 🙌
    ...
}
2.2. Creating a Poster from the submission 🖼
At this point, we are sure the request is perfectly safe. The next step is actually reading and parsing the JSON body of the request and storing it somewhere. To do that, we create a variable of type Webhook and unmarshal the request body into it.
Next, we want to convert the Webhook into a Poster variable holding only the answers to each of the typeform questions. This will simplify the rendering task, we won't have to work anymore with a complicated Webhook struct with full of non relevant data.
func generateHandler(w http.ResponseWriter, r *http.Request) {
        // 1. Read the request body
      ...
        // 2. Verify the signature
      ...

        // 3. Parse the webhook from the request body
        var wh poster.Webhook
        err = json.Unmarshal(body, &wh)
        if err != nil {
            log.WithFields(log.Fields{"error": err}).Error("could not unmarshal webhook")
            w.WriteHeader(http.StatusInternalServerError)
            return
        }

        // 4. Convert the webhook data to a Poster
        p := wh.ToPoster()

        // 5. Generate the image
        ...
The ToPoster() function loops over the answers of the webhook using the reference attribute (that we previously set when creating the form) to identify to which poster field it corresponds.
type Poster struct {
    Title  string
    Guest  string
    Date   time.Time
    Time   string
    PicURL string
    Type   string
}

func (w Webhook) ToPoster() Poster {
    poster := Poster{}

    for _, answer := range w.FormResponse.Answers {
        switch answer.Field.Ref {
        case "title":
            poster.Title = answer.Text
        case "guest":
            poster.Guest = answer.Text
        case "date":
            date, _ := time.Parse("2006-01-02", answer.Date)
            poster.Date = date
        case "time":
            poster.Time = answer.Text
        case "type":
            poster.Type = answer.Choice.Label
        case "pic":
            poster.PicURL = answer.PicURL
        }
    }

    return poster
}
3. Generating the image 👩🎨
Finally we have our Poster ready to be rendered! 👏
func generateHandler(w http.ResponseWriter, r *http.Request) {
        // 1. Read the request body
      ...
        // 2. Verify the signature
      ...
        // 3. Parse the webhook from the request body
        ...
        // 4. Convert the webhook data to a Poster
        ...

        // 5. Generate the image
        err = p.Render()
        if err != nil {
            log.WithFields(log.Fields{"error": err}).Error("could not generate poster")
            w.WriteHeader(http.StatusInternalServerError)
            return
        }
}
Let's dive into the Render method. We will use the Go Graphics https://github.com/fogleman/gg rendering library to generate the final image.
func (p Poster) Render() error {
    ctx := gg.NewContext(width, height)

    err := drawBackground(ctx, "assets/images/background.png")
    if err != nil {
        return err
    }

    err = drawBackground(ctx, "assets/images/logos.png")
    if err != nil {
        return err
    }

    err = drawPicture(ctx, p)
    if err != nil {
        return err
    }

    err = drawText(ctx, p)
    if err != nil {
        return err
    }

    err = ctx.SavePNG("poster.png")
    if err != nil {
        return err
    }

    return nil
}
The poster always has a similar format with the same background and sponsors logos at the bottom, so that's the first part we will render with the drawBackground and drawLogos methods.
Drawing the picture poster is a bit more interesting since it's uploaded through the typeform and we don't really know the size it will have. In the Poster variable, we have the url of the picture. First we will download it to a temporary file with the [poster.Picture()](https://github.com/albarin/nit-del-llop/blob/master/pkg/poster/poster.go#L71) method, resize it to fit into the poster and position it in the right image coordinates.
func drawPicture(ctx *gg.Context, poster Poster) error {
  // Download the picture to a local file
    filepath, err := poster.Picture()
    if err != nil {
        return err
    }

  // Load it
    pic, err := gg.LoadImage(filepath)
    if err != nil {
        return err
    }

  // Resize it
    resizedPic := resize.Thumbnail(
        uint(pic.Bounds().Dx()),
        250,
        pic,
        resize.Lanczos3,
    )

  // Position and draw it
    contentWidth := ctx.Width()/2 - margin
    ctx.DrawImageAnchored(resizedPic, margin+contentWidth/2, 185, 0.5, 0)

  // Delete the temporary file
    err = os.Remove(filepath)
    if err != nil {
        return err
    }

    return nil
}
The only part left now is drawing all the info about the meet-up (title, guest, image and date) with the drawText method. The challenge here is making sure all the text lines fit in our image, since it comes from a user input we have no idea how long those lines could be. We need to change the font size depending on the length of the line.
To simplify the task we create an array of Line structs holding all the info of the poster. Each Line has the text to render, the margin to position it, the font name, and the default font size. If the font size is too big causing the text to overflow the image, it will be decreased until it fits.
func drawText(ctx *gg.Context, poster Poster) error {
    ctx.SetColor(color.White)

  // Lines with all the info to render
    lines := []Line{
        ...
        {
            text:      fmt.Sprintf(`"%s"`, poster.Title),
            marginTop: 290,
            fontSize:  45,
            fontPath:  RobotoBold,
        },
        {
            text:      "amb",
            marginTop: 25,
            fontSize:  25,
            fontPath:  RobotoLight,
        },
        {
            text:      fmt.Sprintf("%s", poster.Guest),
            marginTop: 20,
            fontSize:  45,
            fontPath:  RobotoBold,
        },
        {
            text:      poster.When(),
            marginTop: 35,
            fontSize:  45,
            fontPath:  RobotoLight,
        },
        {
            text:      poster.Where(),
            marginTop: 20,
            fontSize:  45,
            fontPath:  RobotoLight,
        },
        ...
    }

    contentWidth := float64(ctx.Width()/2 - margin)
    positionX := margin + contentWidth/2
    positionY := margin

    // Loop through each line adjusting the font and drawing it
    for _, line := range lines {
        err := ctx.LoadFontFace(line.fontPath, line.fontSize)
        if err != nil {
            return err
        }

        err = adjustFontSize(ctx, line, contentWidth)
        if err != nil {
            return err
        }

        positionY = calculatePositionY(ctx, line, positionY)
        ctx.DrawStringAnchored(line.text, positionX, positionY, 0.5, 0)
    }

    return nil
}
And we have our poster! We just need to save it as a PNG file.
func (p Poster) Render() error {
  // Draw everything
    ...

    // Store the poster in a file
    err = ctx.SavePNG("poster.png")
    if err != nil {
        return err
    }

    return nil
}
4. Downloading the poster ⬇️
Lastly, the most important part. You must be thinking how my dad is going to access this beautiful poster file and download it. 🤔Let me explain:
As you saw in the last step, we always save the image with the same name, so we know for sure that after the typeform submission, we'll have the poster available in the same path. We'll take advantage of that fact and create another handler on the /download endpoint that shows the poster on the browser.
func download(w http.ResponseWriter, r *http.Request) {
    image, err := os.Open("poster.png")
    if err != nil {
        log.WithFields(log.Fields{"error": err}).Error("could not open image")
        w.WriteHeader(http.StatusInternalServerError)
        return
    }
    defer image.Close()

    w.Header().Set("Content-Type", "image/png")
    _, err = io.Copy(w, image)
    if err != nil {
        log.WithFields(log.Fields{"error": err}).Error("could not write image")
        w.WriteHeader(http.StatusInternalServerError)
        return
    }
}
Now, we go back to our typeform Create Panel and add that link into the Thank You Screen button. With this setup, after the form is submitted, the Thank You Screen will be shown and we'll be able to download the poster by clicking on the button.

5. Deploying it 🚀
I wanted to practice my Docker skills a bit so I decided to use Docker and Heroku to deploy the application.
5.1. Dockerize it 📦
The first thing to do was to dockerize the app. I did it with a multi-stage build. In the first part, we are using golang:1.14-alpine image to build the app into a binary called poster. Then, in the second step we use the alpine:latest image to copy the binary from the previous stage and run it.
FROM golang:1.14-alpine AS builder
ADD . /poster
WORKDIR /poster
RUN go mod download
RUN CGO_ENABLED=0 go build -ldflags "-s -w" -o poster cmd/poster/*.go

FROM alpine:latest
RUN apk --no-cache add ca-certificates
COPY --from=builder /poster ./
RUN chmod +x poster
CMD ./poster
5.2. Deploy to Heroku
I choose to go with Heroku for the deployment, because they support Docker image deploy with their CLI app.
I created a free account and installed the CLI app. After that, creating the application was just logging in and running a simple command:
heroku create
As a result of that command a new app is created in our account and it displays a generated URL to access it.
Once your app is created, you need to tell Heroku which Docker file to use to run your app. We create a heroku.yml at the root of our application.
build:
  docker:
    web: Dockerfile
Finally, our app is ready to be deployed using git:
git push heroku master
Now that the app has been deployed. We can access the handler at https://{something}.herokuapp.com/download
The last step is to update our webhook and Thank You screen buttons to point to the new URLs. Now it works! 💥

I took the opportunity to change the design a bit, this is what it looks like now! 😁

Here you can find the full code: https://github.com/albarin/nit-del-llop
Thanks for reading, any comments or questions are welcomed 😊

Top comments (0)