
In this series, we’re building a video call app with a fully customized UI using Angular and Daily’s Client SDK for JavaScript.
In the first two posts in this series, we:
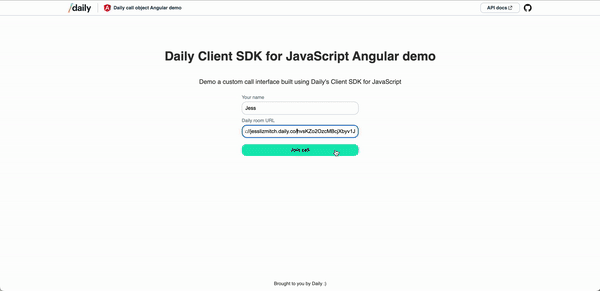
- Reviewed the app’s core features, as well as the general code structure and the role of each component. Instructions for setting up the demo app locally are also included.
Built the join flow for users to submit an HTML form to join a Daily room. This included keeping track of the
participantslist as people join or leave a call.
In this post, we’ll focus on:Updating the
participantslist when participants toggle their device settings during a call.How to render a
video-tilecomponent for each participant present in the call.General recommendations for improving performance when rendering multiple
videoelements.
If you’re looking for more information on the app’s chat component, keep an eye out for the next post in this series.
Reviewing where we left off
So far in this series, we have an app-daily-container component, which connects the join-form and app-call components. It allows the information gathered in the join-form to be passed along to the app-call component.
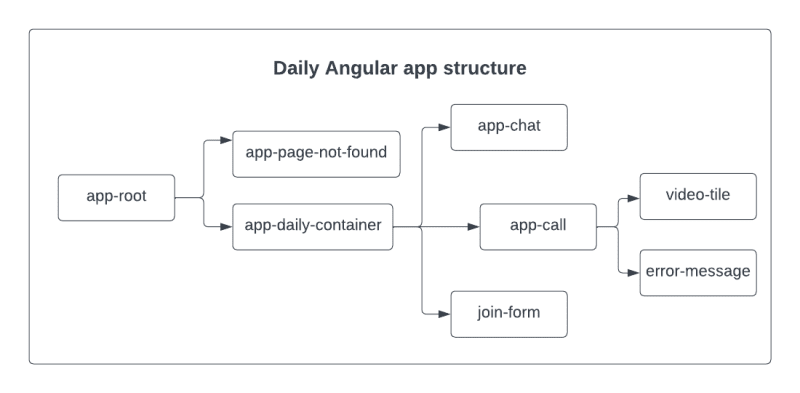
Component structure in the Angular demo app
Once the HTML form in join-form is submitted, the app-call component is shown instead, which immediately creates an instance of Daily’s call object and attaches all of the event handlers related to managing the call and participants.
In terms of tracking participants as they join and leave the call, app-call uses a class variable – the participants object – which will get updated throughout the call. The key-value pair in participants is the participant’s session ID and a participant object, which contains the participant information we’ll need to update our app UI.
// call.component.ts

export type Participant = {
  videoTrack?: MediaStreamTrack | undefined;
  audioTrack?: MediaStreamTrack | undefined;
  videoReady: boolean;
  audioReady: boolean;
  userName: string;
  local: boolean;
  id: string;
};

type Participants = {

};

export class CallComponent {
  // … See source code
  participants: Participants = {};
Let’s now look at what happens when a participant updates their state after they join a call and are already in the participants list.
Updating participants to reflect track updates
In app-call, we previously looked at all the Daily event listeners added to the call object instance after it’s created. For this section, we’ll focus on the ”track-started” and ”track-stopped” events, which are emitted when a video or audio track becomes available or unavailable for a participant:
// Add event listeners for Daily events
this.callObject
  .on("track-started", this.handleTrackStartedStopped)
  .on("track-stopped", this.handleTrackStartedStopped)
  //...
Notice that both of the events attach this.handleTrackStartedStopped() as the event handler. When emitted, this.handleTrackStartedStopped() will then invoke this.updateTrack() and pass information from the Daily event payload, like so:
handleTrackStartedStopped = (e: DailyEventObjectTrack | undefined): void => {
  console.log("track started or stopped")
  if (!e || !e.participant || !this.joined) return;
  this.updateTrack(e.participant, e.type);
};
The goal of this.updateTrack() is two-fold:
- To update a specific participant in our
participantsobject when there’s a change that actually affects the UI. In short, this happens if the device is turned on or off, or if the media track itself has changed. - To only change the specific value of the key that registered an update, which means not updating or reassigning the whole participant object.
Muting video/audio cause track changes that impact the app UI (i.e., the state of the icons)
Let’s see how this.updateTrack() determines which participant values to update:
updateTrack(participant: DailyParticipant, newTrackType: string): void {
  const existingParticipant = this.participants[participant.session_id];
  const currentParticipantCopy = this.formatParticipantObj(participant);

  if (newTrackType === "video") {
    // If videoReady has changed, the track’s state was toggled on or off
    if (existingParticipant.videoReady !== currentParticipantCopy.videoReady) {
      existingParticipant.videoReady = currentParticipantCopy.videoReady;
    }

    // If the id has changed, a new track is available and should be used
    if (currentParticipantCopy.videoReady && existingParticipant.videoTrack?.id !== currentParticipantCopy.videoTrack?.id) {
      existingParticipant.videoTrack = currentParticipantCopy.videoTrack;
    }
    return;
  }

  if (newTrackType === "audio") {
    // If audioReady has changed, the track’s state was toggled on or off
    if (existingParticipant.audioReady !== currentParticipantCopy.audioReady) {
      existingParticipant.audioReady = currentParticipantCopy.audioReady;
    }

    // If the id has changed, a new track is available and should be used
    if (currentParticipantCopy.audioReady && existingParticipant.audioTrack?.id !== currentParticipantCopy.audioTrack?.id) {
      existingParticipant.audioTrack = currentParticipantCopy.audioTrack;
    }
  }
}
In this.updateTrack() we compare the old and new values related to audio and video tracks to see if there was a change that affects our app UI – for example, if the track ID is different, we know a new track is available.
The videoReady and audioReady values represent whether the video/audio track can be played (i.e., if the participant has the device on). As a reminder, these values are set when the participant object is reformatted before getting added to participants:
const PLAYABLE_STATE = "playable";
const LOADING_STATE = "loading";
//… See source code

formatParticipantObj(p: DailyParticipant): Participant {
    const { video, audio } = p.tracks;
    const vt = video?.persistentTrack;
    const at = audio?.persistentTrack;
    return {
      videoReady:
        !!(vt && (video.state === PLAYABLE_STATE || video.state === LOADING_STATE)),
      audioReady:
        !!(at && (audio.state === PLAYABLE_STATE || audio.state === LOADING_STATE)),
      // … See source code for full object
    };
  }
If the videoReady or audioReady value has changed, then we know the participant has toggled their device on or off.
The participant object is then updated as needed. We intentionally avoid reference changes as much as possible by updating the object instead of reassigning the existingParticipant variable to a copy of the object. This helps to avoid unnecessary rerenders of the video and audio elements found in video-tile component, which will be a major factor in building a performant video call app.
Now that we have our participants list and can update it as needed, let’s focus on video-tile to see how we turn participants into actual video and audio elements.
video-tile: rendering media tracks and device controls
As the participants variable is updated, app-call renders a video-tile component for each participant in participants:
// call.component.html
<div *ngIf="!error" class="participants-container">
  <video-tile
    *ngFor="let participant of Object.values(participants)"
    (leaveCallClick)="leaveCall()"
    (toggleVideoClick)="toggleLocalVideo()"
    (toggleAudioClick)="toggleLocalAudio()"
    [joined]="joined"
    [videoReady]="participant.videoReady"
    [audioReady]="participant.audioReady"
    [userName]="participant.userName"
    [local]="participant.local"
    [videoTrack]="participant.videoTrack"
    [audioTrack]="participant.audioTrack"></video-tile>
</div>
We pass several input and output properties, including every value in the participant object.
One extremely important detail to remember with Angular is that components only register reference changes for props, which means we can’t just pass each participant object as a single prop. This is because the object reference doesn’t change when the object values get updated in this.updateTrack(). To ensure prop changes are registered, we instead pass each object value as a separate prop (e.g., videoTrack).
Note: This also creates an interesting balance for our video-tile component because – as mentioned in the last section – we want to avoid reference changes that trigger unnecessary rerenders as much as possible; however, we also need to ensure relevant state changes reliably trigger UI updates.
There are three main aspects to be aware of with the video-tile component. It needs to render:
-
videoandaudioHTML elements for a specific participant. These elements need to update whenever track changes occur for the participant. - Participant information, including their name and icons to represent if their video and audio tracks are on or off. If the video is turned off, we’ll show a placeholder UI that covers the whole tile.
- If the participant is local (if it’s you!), we’ll show a control panel with buttons to turn the video/audio on or off, as well as a button to leave the call.
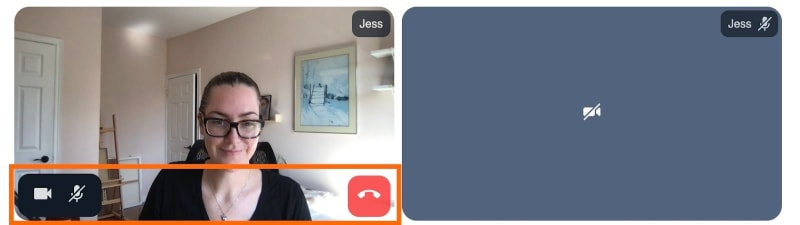
Two video tiles: The local participant with the control panel and a remote participant with their video off
Let’s start by seeing how these features relate to the props declared in the VideoTileComponent class definition:
export class VideoTileComponent {
  @Input() joined: boolean;
  @Input() videoReady: boolean;
  @Input() audioReady: boolean;
  @Input() local: boolean;
  @Input() userName: string;
  @Input() videoTrack: MediaStreamTrack | undefined;
  @Input() audioTrack: MediaStreamTrack | undefined;
  videoStream: MediaStream | undefined;
  audioStream: MediaStream | undefined;

  @Output() leaveCallClick: EventEmitter<null> = new EventEmitter();
  @Output() toggleVideoClick: EventEmitter<null> = new EventEmitter();
  @Output() toggleAudioClick: EventEmitter<null> = new EventEmitter();
 // …
As mentioned, there are several input and output properties passed through the video-tile component. The input properties are the participant values passed from the app-call parent component. The output properties are the events that will be emitted back to app-call. (These are all the events that will be triggered by the local participant’s control panel buttons.)
You’ll also notice there are two class variables: videoStream and audioStream. Each instance of video-tile receives the video and audio tracks as input props, but that’s not what we’ll use in our video and audio HTML elements. Rather, we’ll create a MediaStream for each and swap out the track any time it changes. (More on this below.)
Creating media streams on init
When the VideoTileComponent class instance is initialized, we check if playable video and audio tracks exist for the participant and create media streams for them if so:
export class VideoTileComponent {
  // See source code for full class definition

  ngOnInit(): void {
    if (this.videoTrack) {
      this.addVideoStream(this.videoTrack);
    }
    if (this.audioTrack) {
      this.addAudioStream(this.audioTrack);
    }
  }

  // … See source code
  addVideoStream(track: MediaStreamTrack) {
    this.videoStream = new MediaStream([track]);
  }

  addAudioStream(track: MediaStreamTrack) {
    this.audioStream = new MediaStream([track]);
  }

  // … See source code
Updating media streams during the call
When these tracks are updated during the call, we are alerted to the change in the ngOnChanges lifecycle method:
ngOnChanges(changes: SimpleChanges): void {
  // Note: Only the props that have changed are included in changes.
  // If it's not included, we need to use existing version of the prop (e.g. this.videoTrack)
  const { videoTrack, audioTrack } = changes;

  // If the video stream hasn't been created and the track can be set, create a new stream.
  if (videoTrack?.currentValue && !this.videoStream) {
    // Use the new track and create a stream for it.
    this.addVideoStream(videoTrack.currentValue);
  }

  // If the video stream hasn't been created and the track can be set, create a new stream.
  if (audioTrack?.currentValue && !this.audioStream) {
    // Use the new track and create a stream for it.
    this.addAudioStream(audioTrack.currentValue);
  }

  // If the video stream exists and a track change occurred, replace the track only.
  if (videoTrack?.currentValue && this.videoStream) {
    this.updateVideoTrack(videoTrack.previousValue, videoTrack.currentValue);
  }

  // If the audio stream exists and a track change occurred, replace the track only.
  if (audioTrack?.currentValue && this.audioStream) {
    this.updateAudioTrack(audioTrack.previousValue, audioTrack.currentValue);
  }
ngOnChanges will only include the props that have triggered a change detection, so if the prop is present we already know there was a video or audio track change. From there, we just need to know if we should create a media stream (shown above in this.addVideoStream() and this.addAudioStream()) or swap out the track in the existing media stream.
If we’re updating an existing stream, we remove the old track and add the new. (We do not create a new media stream.)
updateVideoTrack(oldTrack: MediaStreamTrack, track: MediaStreamTrack) {
  // This should be true since it's a track change, but check just in case.
  if (oldTrack) {
    this.videoStream?.removeTrack(oldTrack);
  }
  this.videoStream?.addTrack(track);
}

updateAudioTrack(oldTrack: MediaStreamTrack, track: MediaStreamTrack) {
  // This should be true since it's a track change, but check just in case.
  if (oldTrack) {
    this.audioStream?.removeTrack(oldTrack);
  }
  this.audioStream?.addTrack(track);
}
By doing so, videoStream and audioStream will stay up-to-date with any changes to the participant’s media tracks.
video-tile HTML elements
Now that all the track state management is set up, we can render the HTML for the video-tile component, starting with the video and audio elements and participant information:
<video
  *ngIf="videoStream"
  autoPlay
  muted
  playsInline
  [srcObject]="videoStream"></video>

<div class="video-placeholder" *ngIf="!videoReady">
  <span>
    <img
      *ngIf="!videoReady && !local"
      src="../../assets/vid_off.svg"
      alt="Camera is off" />
  </span>
</div>

<audio
  *ngIf="audioStream && !local"
  autoPlay
  playsInline
  [srcObject]="audioStream">
  <track kind="captions" />
</audio>

<div class="participant-info">
  <p class="name">
    {{ userName }}
  </p>
  <img
    *ngIf="!audioReady && !local"
    src="../../assets/mic_off.svg"
    alt="Mic is off" />
  <img
    *ngIf="audioReady && !local"
    src="../../assets/mic_on.svg"
    alt="Mic is on" />
</div>
// …
If there’s a video stream, we render the video element and pass videoStream to the srcObject attribute. If the video isn’t ready to play (e.g., it’s turned off) we render a placeholder display instead. If there’s an audio stream and it’s not the local participant, we render the audio element using the audioStream variable as the srcObject. (Note: The local participant (you) doesn’t have an audio element because you don’t need to hear the playback of your own voice.) And, finally, we display the user’s name and if they’re muted.
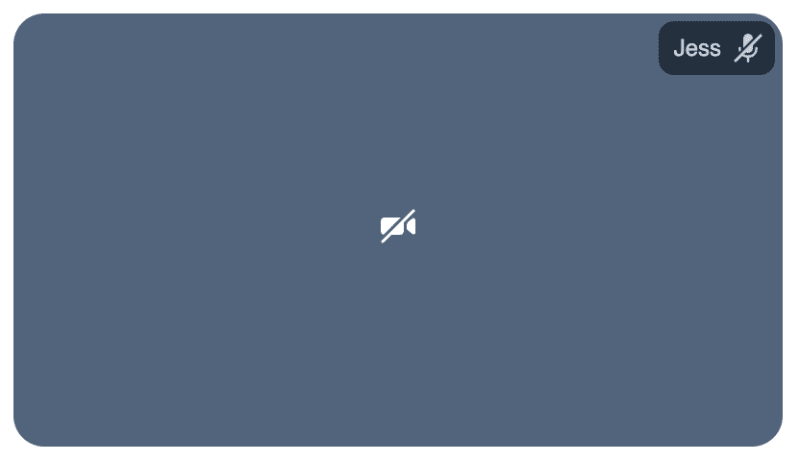
A remote participant’s tile with their name and an icon for their audio state in the top right corner
With these elements added, we now have a functional video/audio component that responds whenever the participant toggles their media devices.
Next, we need to add a control panel for the local participant to turn their media devices on and off.
Building a control panel to manage local devices
The control panel elements are also defined in the video-tile component:
//…
<div *ngIf="local && this.joined" id="controls">

  <button class="media-control" (click)="toggleVideo()">
    <img
      *ngIf="!videoReady"
      src="../../assets/vid_off.svg"
      alt="Turn video on" />
    <img
      *ngIf="videoReady"
      src="../../assets/vid_on.svg"
      alt="Turn video off" />
  </button>

  <button class="media-control" (click)="toggleAudio()">
    <img *ngIf="!audioReady" src="../../assets/mic_off.svg" alt="Turn mic on" />
    <img *ngIf="audioReady" src="../../assets/mic_on.svg" alt="Turn mic off" />
  </button>

</div>

<button *ngIf="local" id="leaveCallButton" (click)="handleLeaveCallClick()">
  <img src="../../assets/leave_call.svg" alt="Leave call" />
</button>
There are three buttons in the control panel:
- One to toggle the local participant’s video.
- One to toggle the local participant’s audio.
- One to leave the call.

Control panel buttons to toggle local video/audio or leave the call
Each button has its associated click handler attached to it:
When invoked, each of these will then emit an event that app-call is already listening for (the output properties mentioned before):
toggleVideo(): void {
  this.toggleVideoClick.emit();
}

toggleAudio(): void {
  this.toggleAudioClick.emit();
}

handleLeaveCallClick(): void {
  this.leaveCallClick.emit();
}
Let’s start with the device-related events (toggleVideoClick() and toggleAudioClick()) and see what happens when the app-call component receives the event.
// in call.component.ts

  toggleLocalVideo() {
    // Event is emitted from VideoTileComponent

    // Confirm they're in the call before updating media
    if (!this.joined) return;
    // Toggle current audio state
    const videoReady = this.callObject.localVideo();
    this.callObject.setLocalVideo(!videoReady);
  }

  toggleLocalAudio() {
    // Event is emitted from VideoTileComponent

    // Confirm they're in the call before updating media
    if (!this.joined) return;
    // Toggle current audio state
    const audioReady = this.callObject.localAudio();
    this.callObject.setLocalAudio(!audioReady);
  }
Each one will use the appropriate Daily call instance method (setLocalVideo() or setLocalAudio()) to toggle the device’s state. Invoking these instance methods will then cause the device state to change, which will in turn cause either the ”track-started” or ”track-stopped” event to be emitted, depending on the device’s final state.
The other event emitter – this.leaveCallClick() – will invoke app-call’s this.leaveCall() method, which will then invoke Daily’s leave() instance method:
// in call.component.ts

leaveCall(): void {
  this.error = "";
  if (!this.callObject) return;

  // Leave call
  this.callObject.leave();
}
Calling Daily’s leave() method will result in the ”participant-left” event being emitted for remote participants and ”left-meeting” being emitted if it’s the local participant leaving a call.
How these Daily events are handled has already been covered in this or the previous post, so we’ve come full circle!
With that, we have a functional call panel that allows each participant to update their devices, as well as to leave the call to reset the app’s state.
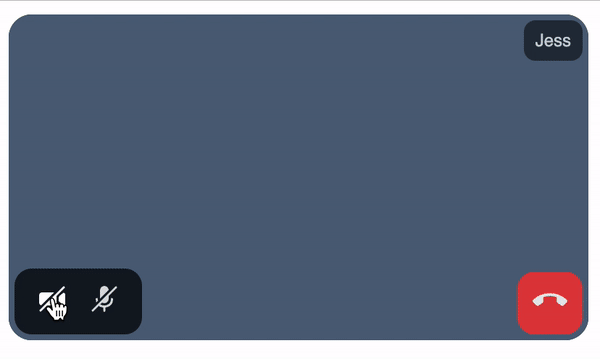
Joining a call, toggling media devices, and leaving a call
Wrapping up
In today’s post, we learned how to update tracks for call participants in an Angular app, as well as render video tiles for them, and toggle the state of their devices.
In our next post, we’ll look at how to add a chat component to the call so participants can message each other. (Spoiler: the chat feature is already in the source code.)
If you have any questions or thoughts about implementing your Daily-powered video app with Angular, reach out to our support team or head over to our WebRTC community, peerConnection.

Top comments (0)