Motivation
Due to the pandemic, a lot of activities require signing up online in advance. At my University’s gym, they offer 2 hour slots throughout the day, each of which open 6 hours in advance for reservation. Because the demand for time slots heavily outweigh the amount of slots, the competition for getting a slot has reached a point where you have to be on your computer exactly when they are released.
 Thomas Montfort@tmonty_12
 Gym slot sign ups feeling like Supreme drops. Legit a minute late and there are no spots. Might have to invest in a bot.15:46 PM - 11 Feb 2021


I decided it was time to combine my coding skills and knack for extreme efficiency (or laziness) to create a bot that would automate signing up for me. My original idea was to have a graphical user interface (GUI) on which I could enter my username and password, and then select the gym location, date, and time for the slot. After submitting the information, there would be a task scheduled 6 hours in advance of the gym time that would reserve a slot for me.
After some research and deliberation, I decided on using the following:
- Command line interface (CLI): reserving a gym slot is as easy as opening the command prompt and entering my username and password along with the specific slot I want.
- Selenium: this is a Python library that wraps the Selenium Web Driver which can automate web tasks like clicking items and filling out forms.
- Windows Task Scheduler: in order to schedule the scripts that reserve a gym slot, I used the Windows Task Scheduler on my computer. Later on, I will cover an option for those with different OSes.
Here is a video of it in action:
You can view my code here.
What Will You Learn?
In this tutorial I will be walking you through how I created my gym web bot, but the topics can be transferable to scheduling and automating web tasks with the use of Selenium in Python. I will be teaching you:
-
Basics of Selenium
- navigating web pages
- selecting certain elements
- filling out forms
- waiting for elements to load
-
Implementing schedulers
- Windows Task Scheduler
- API for automating Windows Task Scheduler
- passing arguments to scripts
- alternative for Windows Task Scheduler
Getting Started
In order to get started with this tutorial, I trust that you have python downloaded and a coding editor (I use VSCode) that you prefer.
I would also recommend using an environment (optional) to avoid cluttering your local environment and having issues with dependencies. After you have handled the tasks above, you can switch to your project environment (if you created one) and enter the following command:
pip install selenium
Your next order of business is to download a Web Driver. This is what Selenium uses to access a browser and perform the tasks that you program it to do. I personally prefer Chrome so that is the browser I will be using for this tutorial. You can download the Chrome Web Driver here . Make sure to save the path of the driver (the location of it in your file system) - we will need this later.
You are now ready to automate web tasks!
Basics of Selenium
Once you have a .py file opened and are ready to code, you first need to import webdriver from Selenium and instantiate the Chrome webdriver instance.
from selenium import webdriver

driver = webdriver.Chrome(insert_webdriver_path_here)
Now that we stored the webdriver instance in a variable, we will be able to use its various methods to interact with the web. Our first order of business is to go to a webpage.
driver.get(insert_target_url_here)
To start, I would choose a simple web page like Instagram. For my project, I have a function that determines the url based on the gym location selection.
Navigating a Web Page
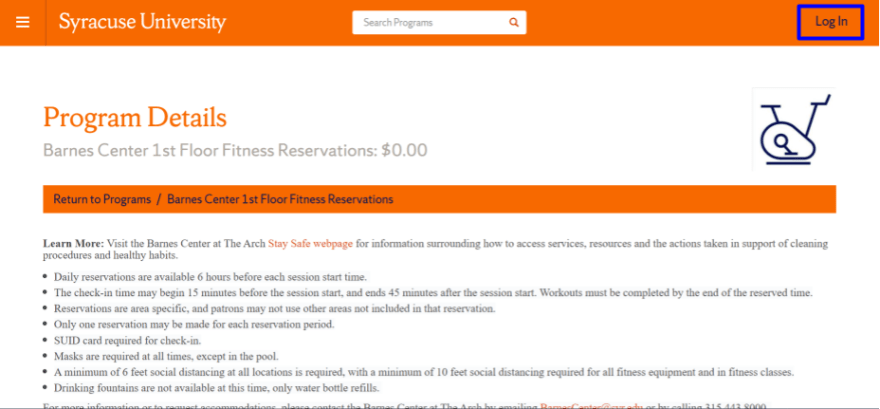
Now that we have landed on a web page, we need to be able to navigate to other pages and perform tasks. When arriving on my University’s gym website, I must first login. To do so, I click the login link in the top right corner.
If you are unfamiliar with html, it implements a Document Object Model (DOM) which is a hierarchical structure of elements that have certain attributes. For instance, links are stored in anchor elements with an href attribute which provides the url. Selenium has direct access to the DOM and can access specific elements like a link and perform actions on them like clicking.
Selenium provides a couple of methods for selecting elements listed here . In order to locate elements that you want to interact with you can inspect the webpage with Google Chrome Dev Tools and use the element inspector.

The element inspector is circled in red and the element in the Dev Tools highlighted in blue refers to the login link. The login link has id “loginLink” so I did the following:
login_link = driver.find_element_by_id(“loginLink”)

login_link.click()
Waiting For Elements To Load
Because clicking on the login link redirects the browser to another page, it takes some amount of time for the web page to load along with its elements. If we tried to access an element on the login page right after clicking the login link, we’d experience an error because the page hasn’t loaded yet. Therefore, we need to implement Selenium’s explicit wait function.
Selenium’s WebDriverWait waits for a certain condition to be true before it proceeds to access an element. To wait for the login page to load and access the username form field I wrote:
from selenium.webdriver.common.by import By
from selenium.webdriver.support.ui import WebDriverWait
from selenium.webdriver.support import expected_condition as EC

username_field = WebDriverWait(driver, 1).until(
    EC.element_to_be_clickable((By.ID, “username”))
)
First, we pass WebDriverWait the webdriver and the maximum amount of time (in seconds) we want the webdriver to wait. Then using the expected_condition we can select the condition we are waiting for and pass it the element we want to select. Once the condition evaluates to true, the WebDriverWait function will return the selected element.
Filling out Forms
Now that we have selected the username form field, we need to have the Web Driver input our username. To write in an element, we take the variable containing the element and use the send_keys() method.
username.send_keys(insert_username_here)
You can access the password field and insert your password with the instructions above. After submitting the login form, I am then redirected back to the web page for registering for a gym slot.
Accessing those Hard to Select Element
Now that I am back to the gym slot reservation page, I have encountered an issue. On the reservation page, there are multiple time slot cards of which I need to click the register button corresponding to the inputted gym time. However, each time slot card has the same attributes so I can’t access the correct time slot with name or id.

This is where using Xpath comes in handy. Xpath stands for XML Path Language and allows you to navigate to certain elements of an XML document with a given path. When using the Google Chrome Dev Tools, you can right click on an element and copy its Xpath. Xpath also allows you to select an element based on the physical text it displays. Therefore, I am able to find the time slot card with the correct time and then navigate to the register button so that I can click it.
To do so I write:
register_btn = driver.find_element_by_xpath(“//*[id=’mainContent’]/ … /div[1]/small[contains(text(), ‘insert_text_to_match_here’]/../../div[2]/button”)
To visualize how I am navigating the DOM tree:

After finding the card with the text that matches that correct gym time, I navigate up the DOM tree back to the card and then traverse down to the register button.
With the above information, you should be able to navigate throughout a website, select elements - even in the most difficult situations, click on them, fill in forms and wait for elements to appear so that you can interact with them.
Implementing Schedulers
A task scheduler allows for you to register scripts to be run given a certain time or condition. In the case of my gym reservation bot, I want it to reserve a gym slot 6 hours in advance of the time slot I selected.
For this, I used the Windows Task Scheduler. It is a Windows Application with a GUI so you can open it, view default scheduled tasks and create your own task. When creating a task, you provide the scheduler a trigger - certain time of day or condition, an action - something to be executed in the command prompt, and conditions - when you want the task to run.
Obviously I don’t want to have to open the app every time to schedule a task, so I need an application programming interface (API) that will allow me to write code to automatically schedule one.
Win32com Library
The win32com is the API library that I choose to automate scheduling tasks on Windows. It is essentially a very thin Python wrapper that allows you to automate Windows Applications which in this instance is the Task Scheduler. To download the library:
pip install pywin32
Once the library is downloaded, you will be able to write code to interact with Task Scheduler. This post shows you exactly the code you need to write to schedule tasks but I’ll show you some small changes to make for my implementation
- Start time: set the start time of the task. For me, its 6 hours before the gym slot.
- Repetitions: set how many times you want the task to repeat. Since, I want the gym sign up task to only occur once (my schedule varies), I deleted the code for this altogether.
- Path: set action.Path to the path of your python interpreter. This will allows you to run python scripts.
- Arguments: set action.Arguments to the path of the script you want to execute and input any arguments for the script.
-
Configure additional conditions:
- DisallowStartIfOnBatteries = False → Will allow task to execute when your computer isn’t charging
- WakeToRun = True → Will wake up your computer when asleep to run a task.
Arg Parser
In order to have my program operate as a CLI, I need to have a way to pass inputs such as the password, username, gym location, etc. to my script. To do this, I used the built-in Python library argparse. Argparse will allow you to define arguments for a python file, and extrapolate them into variables to be used in your program.
For instance, to add an argument for time I wrote the following:
parser.add_argument(‘-t’, type=str, help=’Gym slot starting time in format 00:00’)
I define an argument -t that takes an input of type String and provide a help message that reminds me how to format the time.
When running a python script from the command prompt, to pass the time argument, I write:
python main.py -t 12:30
Then to extrapolate the argument variables I do:
args = parser.parse_args
And to access a specific argument you refer to the name of the argument. For instance, accessing the time argument I passed into the script earlier:
time = args.t
The same can be done for the rest of the variables you need.
Scheduler Alternatives
If you have a Linux or Mac OS then you can use cron. Cron is the same as Windows Task Scheduler in that you can schedule tasks to run at a given time. This post goes into detail about how you can schedule python scripts. However, instead of using an API to schedule tasks, you use the command line. In code, you can use os.system() in a python script in order to have commands executed at the command line.
Putting it All Together
For my gym bot project, I created two .py files, one for scheduling a task and one for executing the task. The scheduler.py file allows me to pass the information necessary to reserve a gym slot. For instance, say I wanted to reserve a spot at Ernie Gym at 4:00pm on May 5th as I do in the video example. I would type in the command prompt:
python scheduler.py --u tjmontfo --pw ******** --d 05/05/2021 --flr ernie -t 16:00
The scheduler.py file will use this information to create a scheduled task at 10:00am on May 5th. When the task is executed, it will run the main.py file which will be passed the username, password, location and time and using the Selenium WebDriver, reserve a gym slot.
This tutorial does not need to be specifically used for creating a gym reservation bot. Selenium in Python has extensive applications like scraping websites for data or testing applications. Also, it is not necessary to use Selenium in tandem with a scheduler like Windows Task Scheduler. Scheduling tasks just allows for scripts to be run in the background without having to remember to run them.
Summary
Thank you for reading through the tutorial, I really hope you gained something from this. In fact, I challenge you to create something using Selenium in Python. It can be as simple as a web bot that logins into your Instagram account and likes a post. Please DM me a video of it in action or a Github repository of your code to my twitter account .
If you enjoyed my in-depth explanation of programming in Python please check out some of my other posts.


Top comments (0)