What do you value the most between a documentation exploring in-depth every aspect of a technology and a cheat sheet?
Biased question, I know. These two tools have different reasons to exists. My point is to make you think about ways to learn the basics of a technology without the unnecessary details. This state of mind can be helpful to tell if this technology fits your needs before consuming too much time in it.
The goal of this article is to provide you with the minimum knowledge required to get you as far as possible. The 20% knowledge that covers 80% of your daily use cases (totally made-up numbers, for the sake of the metaphor).
As it is often the case with engineering, the more advanced concepts will be built upon those bases. Make sure you master them!
Manipulate the whole database
We already discussed that the data are represented as documents in collections.
When manipulating data with MongoDB, we are manipulating JSON (Javascript Standard Object Notation). See this introduction if you never wrote JSON before or if you are looking for more information about the notation.
{
    "course": "MongoDB",
    "level": "M001",
    "information": {
        "titre": "Introduction to MongoDB",
        "description": "Your first tour of the NoSQL database's feature"
    },
    "attendees": [
        "Thomas Ferro",
        "John Doe"
    ]
}
JSON aim to be user-friendly and is already known by a great amount of developers. However, his text-based approach is space-consuming and limiting. MongoDB addresses these issues by compiling the data into the BSON (Binary JSON) format, optimized for speed, space and flexibility.
JSON can be used when wanting to export the data in a human readable form, where BSON should be preferred when making a backup for instance.
To Import and export your data, you will need your cluster's "srv URI" (secured uniform resource identifier) and one of the following command:
- JSON:
- Export a collection as a JSON or a CSV file:
mongoexport --uri <URI to your cluster> --collection=<collection name> --out=<your file>.json - Import a collection from a JSON or a CSV file:
mongoimport --uri <URI to your cluster> --out=<your file>.json(can have an additional argument with the targeted collection)
- Export a collection as a JSON or a CSV file:
- BSON:
- Export the content from a database as a binary file:
mongodump --uri <URI to your cluster> - Restore the database from a binary extract:
mongorestore --uri <URI to your cluster> --drop <your_dump>
- Export the content from a database as a binary file:
Here is an example of a URI:
mongodb+srv://<your username>:<your password>@<your cluster>.mongodb.net/<your database>
Please notice that the password is not mandatory to the URI, but you will be prompted to enter it if you do not set it there.
Explore your data from Atlas' UI
In a cluster, click on the "collections" button to access the view with every databases and collections.

The "Find" tab shows the currently selected collection's documents, filterable with the query filed above the documents. Queries must use valid JSON, we will be discussing more on that matter later.

You can see other tabs like "Indexes", which refer to more advanced concepts regarding MongoDB. We will cover them in future articles.
Explore your data from a terminal
Connect to the cluster from a terminal then use the find command.
First, show the cluster's databases with the command show dbs and choose the one to use with the command use your_database.
To view the collection in the selected database, enter the command show collections.
Get every document in a collection with the find command. For instance, in order to get every grade in the trainings collection, use db.trainings.find({}).
This command will only show you the first 20 documents. To continue exploring your collection, type the command it (to "iterate" through the cursor).
A cursor is the object returned by the find command, a pointer to a result set of your query.
In order to count every document, you can chain the .count() command in the previous query:
db.trainings.find({}).count()
You can also simply replace the find command with a count:
db.trainings.count({})
To view the results in a more readable format, use the pretty() method at the end of your command:
db.trainings.find({}).pretty()
Most of the time, you will need to query your data and not simply getting all of the document. To do so, we will fill the previously empty curly braces with what we need to look for, following the query syntax.
A good first example is to find documents with a field that matches a specified string. For instance, let us find every training regarding the subject of MongoDB:
db.trainings.find({ "subject": "MongoDB" })
You can also search for what are called sub-documents, nested JSON objects inside the document.
What if we want to find this course while only knowing his title, inside the information sub-document?
{
    "course": "MongoDB",
    "level": "M001",
    "information": {
        "titre": "Introduction to MongoDB",
        "description": "Your first tour of the NoSQL database's feature"
    },
    "attendees": [
        "Thomas Ferro",
        "John Doe"
    ]
}
We can do that by using the following notation:
db.trainings.find({ "information.title": "Introduction to MongoDB" })
When searching for data, you may need to limit the number or returned result or to sort them. We can do these actions by using the corresponding limit and sort methods.
Limiting the number of documents returned can be done by chaining a call to the limit method with the number of documents that you want after the find command:
db.trainings.find({ "subject": "MongoDB" }).limit(2)
Sorting looks pretty similar, but with a more complex syntax. You will need to specify every field that you want to use to sort. Each of those fields will have a value of 1 if you want an ascending sort or -1 if you want a descending one.
Searching for the least difficult training can be done using the following command:
db.trainings.find({ }).sort({ "difficulty": 1 }).limit(1)
There is a lot more to learn for querying data in MongoDB, like searching in arrays, comparing with booleans, numbers, partial matching and composition of queries.
However, I think that this is a good time to take a break from querying, now that we covered the basics of MongoDB. The training seems to be on the same page since the chapter ends here 😁
Add new documents
Through the Atlas UI
Here are the few steps required to insert a new document in your database.
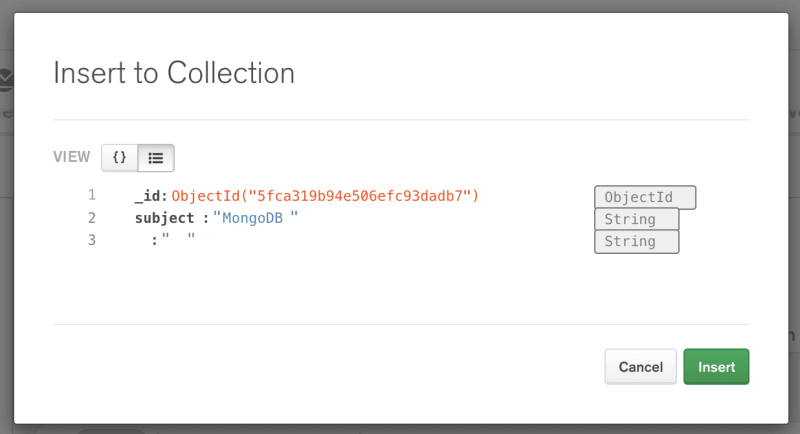
Select a collection and click the "Insert document" button (directly writing a JSON or one field-value pair at the time).
The first thing that we see is an _id field populated with an ObjectId. Every document should have a valid identifier, but not specifically an ObjectID. For instance, if the best identifier for a citizen collection is his own identification number, feel free to use that.
You can specify your unique value or let MongoDB find one by using the ObjectId() method.
Then you can add as many field of the needed type as you want.
Through the shell
First, connect to your cluster from a shell and navigate to the database that you want to use with the use command.
We will use the insert method to add a new document. Here is a basic example creating a document with only a subject field in the "courses" collection:
db.courses.insert({
  "subject": "MongoDB"
})
The identifier (_id) is automatically assigned with a generated unique identifier if not provided.
This command should return the number of inserted documents.
Trying to create a document with an already declared identifier
Every document's ObjectID must be unique. When trying to add a document with an ObjectID that is already in the database, you will get a duplicate key error.
WriteResult({
    "nInserted" : 0,
    "writeError" : {
        "code" : 11000,
        "errmsg" : "E11000 duplicate key error collection: sample_training.zips index: _id_ dup key: { _id: ObjectId('5c8eccc1caa187d17ca6ed29') }"
    }
})
When importing data from a dump or an export, you may want to overwrite document with an already existing identifier. You can do so by using the --drop option.
Inserting many documents at once
One can insert several documents at once by passing an array to the command:
db.courses.insert([{
  "subject": "MongoDB"
}, {
  "subject": "Atlas"
}])
Again, this command returns the number of inserted documents and other useful information.
Error management when inserting many documents
When inserting many documents, MongoDB tries to insert them without modifying the provided order. This means that if the third documents out of a list of a hundred documents fails to insert, only the first two documents will be inserted.
You can prevent that behaviour if needed by adding the ordered option:
db.courses.insert([{
  "subject": "MongoDB"
}, {
  "subject": "Atlas"
}], { "ordered": false })
Updating a document
Through the Atlas UI
Once again, you will first need to connect to the Atlas UI and select the collection containing documents that you want to edit.
You can then filter this collection to find the documents to update or scroll through all of the documents.
Once you find the document to modify, click the "edit" button (the pencil) and start modifying the document as you wish.

This solution can work for punctually modifying a small amount of documents, but we will need the shell to perform more advanced and automated updating.
Through the shell
Update can be performed on one or many documents using respectively the updateOne and the updateMany commands. Both those commands have the same API, taking a query to find the documents to update as the first argument and update operators in MQL as the second argument.
First, we will try to update a single document. If several documents match the query, only the first one will be modified.
Here is how we could fix a typo in our MongoDB course:
db.courses.updateOne({
  "subject": "Mongodb"
}, {
  "$set": {
    "subject": "MongoDB"
  }
})
As expected when using updateOne, the command will only perform the update on the first matching document. To update every document matching the query, we will use updateMany:
db.courses.updateMany({
  "subject": "Mongodb"
}, {
  "$set": {
    "subject": "MongoDB"
  }
})
That operation was a basic one, but MongoDB provides a lot of update operators that can be used depending of your use cases. I highly recommend that you read through the documentation to get a grasp at what MongoDB can do while updating your data.
For instance, if we decide to add an array of students attending our courses, we can modify those students by using arrays update operators. Here is how we can add new students:
db.courses.updateMany({
  "subject": "Mongodb"
}, {
  "$push": {
    "students": { "$each": [ "Eliot Horowitz", "Kevin Ryan", "Dwight Merriman" ] }
  }
})
Here I pushed simple strings into the students array, but you can add any data structure you need.
The last thing I want to discuss regarding updating is the concept of upsert. When using this option, MongoDB will automatically create a new document if it does not find anyone matching your query. An ordinary update will be done if one or more documents match the query.
db.<collection>.updateOne({ <query_to_find_your_document> }, { <update_or_create_operation> }, { "upsert": true });
// Also works with updateMany
Deleting documents
Through the Atlas UI
Navigate to the collection with the documents to delete just like you did to update a document. Instead of clicking the edit button (the pencil), click the remove button (the bin). You can also delete a complete database or a collection by hovering them in the Data Explorer and clicking the corresponding remove button.
From the shell
You will once again be provided with two methods: one to remove a single document (deleteOne) and one to remove many documents (deleteMany). Consider using deleteOne only when deleting a document with a provided identifier, preventing you from only deleting one document when your goal was to remove every matching elements.
The first parameter of the delete methods if the same used in the find or update ones. You can use it to query the documents to remove. For instance, removing every "MongoDB" courses from our collection can be done using this command:
db.courses.deleteMany({
  "subject": "Mongodb"
})
Removing a collection can be done using the drop command:
db.courses.drop()

show collections
// The "courses" collection is no longer here
With this last section, we covered every basic database operations (CRUD operations for Create Read Update Delete). Next, we will see more advanced data manipulation.


Top comments (0)