In this tutorial, I'm going to show you how to work with an Angular library, inside of your Nx Workspace, in your next enterprise project.
If you want to watch the talk about Angular for Enterprise in Spanish: https://www.youtube.com/watch?v=l5j9jVKNYf8&t=499s
If you would rather watch a video instead of reading the step by step article:
https://www.youtube.com/playlist?list=PL-G5r6j4GptEQExoIURbVmWso_pKL3RZK
What is Nx?
Nx is an extensible dev tool for monorepos.
"Using Nx, you can add TypeScript, Cypress, Jest, Prettier, Angular, React, Next.js, and Nest into your dev workflow. Nx sets up these tools and allows you to use them seamlessly. Nx fully integrates with the other modern tools you already use and love." - Nx Team.
Why Use Angular Libraries?
You should use Angular libraries because sharing code across one app is easy but sharing code between different projects requires extra steps.
When we do encounter services or components that can be reused across different teams and projects, and that ideally do not change very often, we may want to build an Angular Library.
Downside Of Using Libraries?
- You have to link your library to your main project and rebuild it on every change.
- You will need to keep syncing your project with the latest version of the library.
Advantages Of Using Libraries?
- We need to think and build these modules with reusability in mind.
- Publish and share these libraries with other teams or projects.
What are Monorepos?
Monorepos are a source control pattern in which essentially all of the codebase lives in the same repository. All projects will always use the latest version of the code. That's one of the reasons why Nx comes in handy when working with libraries.
Advantages Of Using Angular Monorepos?
- Same library version for every app
- Ease of maintenance: when you update a shared library, you update it for all apps
- No conflicts between versions
For more information on Angular Monorepos
Let's Get Our Hands Dirty
1) Run the following command in your terminal to install Nx globally.
npm install -g @nrwl/schematics
2) Create a Nx Workspace. When asked about 'preset', select empty.
npx create-nx-workspace@latest thisdot

When asked what CLI should power your Nx workspace, select Angular CLi

Nx Workspace Structure

3) Add the capability to create Angular applications via:
ng add @nrwl/angular --defaults
4) Create a new angular app inside of your Nx workspace.
ng g @nrwl/angular:application employees
Then it will ask you
which stylesheet format would you like to use. Select sass.

press enter
The next question will be,
"Would you like to configure routing for this application? (y/N)" Type y
press enter
Project Structure

5) Serve the Angular app, and go to http://localhost:4200.
ng serve employees
You should see something like this:

For this app, we are going to create a library that contains an employee interface that will be shared across multiple applications.
6) Create a sharable interface with the following command:
ng g @nrwl/workspace:lib employee
7) Go to libs/employee/src/lib/employee.ts and "copy-paste" the following:
export interface Employee {
  id: number;
  name: string;
}
8) Go to your app.component.ts file inside of your employees application.
Whenever you need to use the employee's interface inside of this workspace, you will import it to your file as following:
import { Employee } from '@thisdot/employee';
Note: If You are using vscode and doens't recognize it - restart vscode.
A cool thing about Nx is that, if you have your backend inside of this workspace, you can reuse this interface as well.
Creating A UI Library
9) To create the UI library, run the following command:
ng g @nrwl/angular:lib ui
Your project structure will look like this:

10) Now go to your ui.module.ts. You file should look like this:
import { NgModule } from '@angular/core';
import { CommonModule } from '@angular/common';

@NgModule({
  imports: [CommonModule]
})
export class UiModule {}
Time To Create A Component In Our UI Library
11) Run the following command:
ng g component employee-list --project=ui --export
Your project structure should look like this:
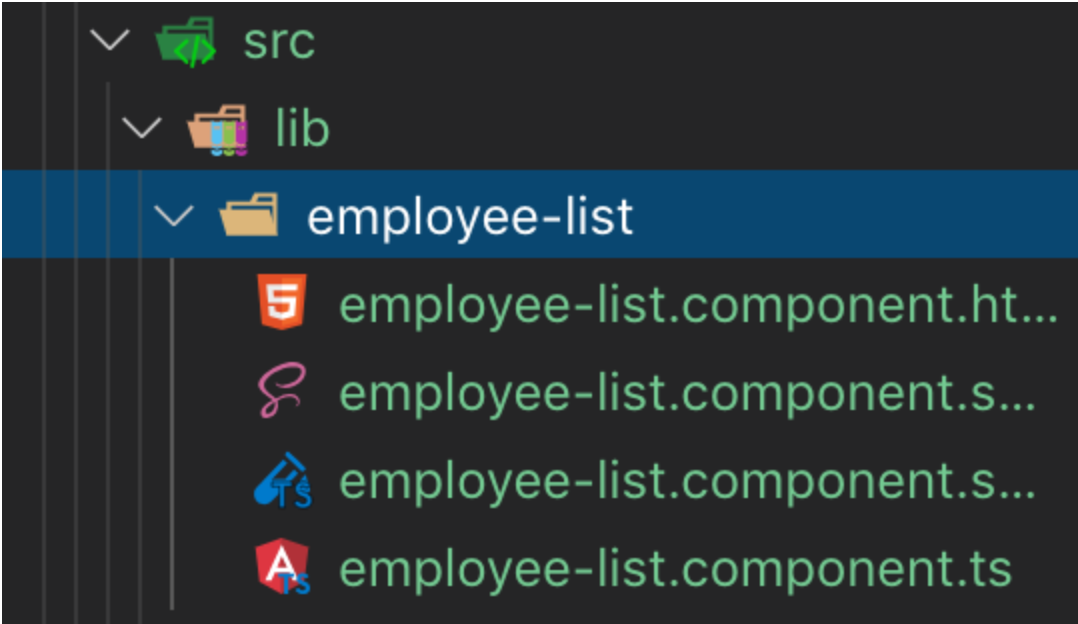
12) Now lets go to your employee-list.component.ts file insdie of our ui library.
- You will add the employee interface we created.
- You will create an input that takes an array of employees.
- We will add a trackBy function just for you to see how we create one for optimization.
Your file should look like this:
import { Component, OnInit, Input } from '@angular/core';
import { Employee } from '@thisdot/employee';
@Component({
  selector: 'thisdot-employee-list',
  templateUrl: './employee-list.component.html',
  styleUrls: ['./employee-list.component.scss']
})
export class EmployeeListComponent implements OnInit {
  @Input() employees: Employee[];
  constructor() { }

  ngOnInit() {}

  trackById(employee: Employee) {
    return employee ? employee.id : null;
  }
}
13) Inside of your employee.component.html file
<ul>
  <li *ngFor="let e of employees; trackBy: trackById(e)">{{ e.name }}</li>
</ul>
As you can see, I'm using the trackBy function to promote better performance of our app.
For more information on trackby visit this link.
Creating A Service
14) Run the following command to create a service inside of our UI library:
ng g s employee --project=ui
15) Now go to your UI library, search for your employee.service file, and make sure it looks like the following:
import { Injectable } from '@angular/core';
import { HttpClient } from '@angular/common/http';
import { Employee } from '@thisdot/employee';
import { Observable } from 'rxjs';

@Injectable({
  providedIn: 'root'
})
export class EmployeeService {
  employees$: Observable<Employee[]>;
  constructor(private http: HttpClient) {
    this.employees$ = this.http.get<Employee[]>(
      'https://my-json-server.typicode.com/devpato/nx-fake-data/employees'
    );
  }
}
16) Now go to your index.ts file

17) Add the service to your file. Your file should look like this:
export * from './lib/ui.module';
export * from './lib/employee.service';
18) Now go to your ui.module.ts. The file should look like this:
import { NgModule } from '@angular/core';
import { CommonModule } from '@angular/common';
import { HttpClientModule } from '@angular/common/http';
import { EmployeeListComponent } from './employee-list/employee-list.component';

@NgModule({
  imports: [CommonModule, HttpClientModule],
  declarations: [EmployeeListComponent],
  exports: [EmployeeListComponent]
})
export class UiModule {}
Note: you can see I have added the HttpClientModule
and Nx has added the component for me already.
Time To Use Our UI Library
19) Go to your employees app, and open the app.module.ts
- Inject our library at the top of the file
- Then add it to your imports
import { BrowserModule } from '@angular/platform-browser';
import { NgModule } from '@angular/core';
import { AppComponent } from './app.component';
import { RouterModule } from '@angular/router';
import { HttpClientModule } from '@angular/common/http';
import { UiModule } from '@thisdot/ui';

@NgModule({
  declarations: [AppComponent],
  imports: [
    UiModule,
    HttpClientModule,
    BrowserModule,
    RouterModule.forRoot([], { initialNavigation: 'enabled' })
  ],
  providers: [],
  bootstrap: [AppComponent]
})
export class AppModule {}
Our Ui library is ready to be used in this project.
20) Now, open your app.component.html file inside of your employees app, and copy paste the following code.
<div class="employees-container">
  <img src="../assets/images/logotdm.png" />
  <h1>Employees</h1>
  <thisdot-employee-list
  [employees]="employeeService.employees$ | async">
  </thisdot-employee-list>
</div>
- This is where I'm injecting the employee-list component we created.
21) Open in your app.component.ts, and change it to match the example below:
import { Component } from '@angular/core';
import { EmployeeService } from '@thisdot/ui';

@Component({
  selector: 'thisdot-root',
  templateUrl: './app.component.html',
  styleUrls: ['./app.component.scss']
})
export class AppComponent {
  constructor(private employeeService: EmployeeService) {}
}
As you can see, I'm injecting the service we created inside of the ui library.
22) Go to your app.component.scss file, and add the following code.
.employees-container {
  display: flex;
  width: 100%;
  height: 100vh;
  flex-direction: column;
  justify-content: center;
  align-items: center;
  img {
    width: 200px;
  }
}
Bonus (Shared Assests)
Now, I'm Going to Show You How to Share Assets Between Projects.
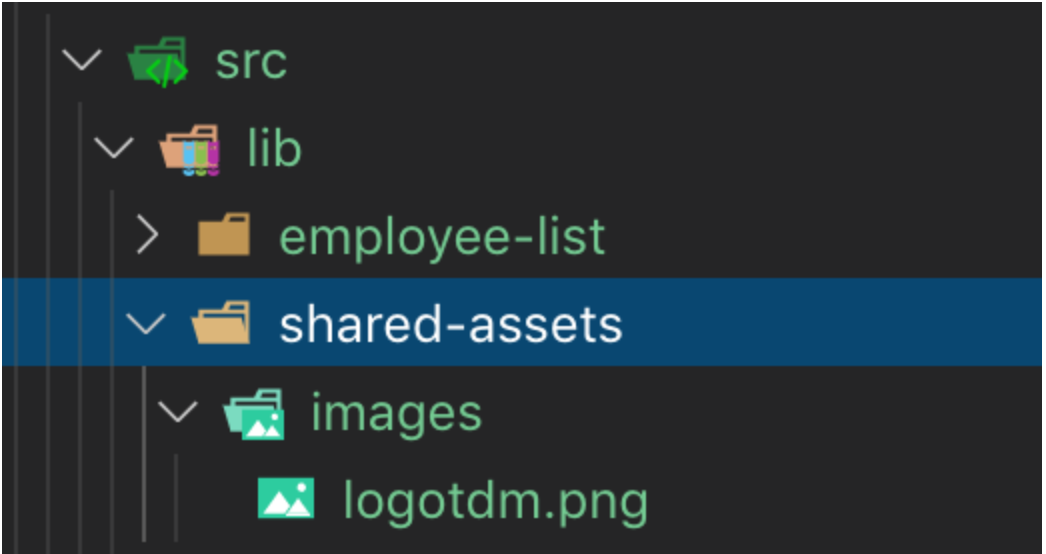
23) Go to your UI library and create a subfolder called 'shared-assets' then create another folder called 'images' and add an image there. Then name it as shown on the picture.
24) Now go to your angular.json, and find assets.
Your file should look like this:
"assets": [
             "apps/employees/src/favicon.ico",
              "apps/employees/src/assets",
            {
              "glob": "**/*",
              "input": "./libs/ui/src/lib/shared-assets",
              "output": "./assets"
            }
          ]
Restart VS Code to make sure it detects all the changes.
Time To Test Our App
25) In your command line run:
ng serve employees

And We Are Done! :)
About Author:
Pato
DevRel at This Dot
GDE | Auth0 Ambassador | Women Techmaker | Cloudinary MDE
Twitter: devpato
Stackoverflow: devpato
Github: devpato
AngularJax Meetup Founder
ReactJS Host

Top comments (10)
529/5000
Excellent tutorial, very well explained.
But I have 2 doubts.
On the Nx page they use nx CLI instead of angular. Which do you recommend? I understand that nx cli is an extension of angular cli and the commands are the same.
My other question is the communication between applications. To mention an example, it could be a project made up of two or three applications, like going from one application to another application, without leaving the single page. I hope you give me tickets. Thank you.
PS: Excuse my writing. Use google translate.
:)
You should use nx in the CLI.
I don't really understand your other question. You have one single page application that consist of multiple applications?
Hola Eduardo. No te entendi la seguna pregunta. La puedes escribir en Espanol :)
Hola pato.
Mi duda es si es posible, navegar entre las rutas de diferentes aplicaciones en un solo compilado.
Ejemplo:
APP1 y APP2, cada una tiene sus rutas. hacer un navigate de APP1 hacia APP2 manteniendo el Single Page Application.
Investigando he encontrado que una aplicación se puede convertir a un webcomponent y utilizarlo en otras aplicaciones. De esta manera se tiene una app padre, con apps hijas. En general seria tener un proyecto con micro aplicaciones.
Y que repercusiones conlleva utilizar webcomponets.
Espero haberme explicado. Muchas gracias.
I would ultimately like to see a hybrid of NX and Lerna for managing all of my code. My goal is to find or make something that allows me to manage and deploy NPM packages, serverless functions, and web/mobile applications using shared libraries.
I can prob do some research and make a tutorial in the near future
Thanks for article, Pato!
Is it possible to npm publish lib in nx repo?
You can just npm login and npm publish in the directory of the library you created. I haven't seen any integration with a tool like Lerna so far.
I just saw this haha my bad Thank Erick for answering the question
Hey, I really enjoyed this article
Question for you though: How do you achieve secondary entry points for Angular libraries inside of an Nx workspace?