In Azure, the "Capture" button is used to capture and generalize a virtual machine (VM) in order to create a similar reusable image on series of VM. The main function of the "Capture" button in Azure is to create a VM image that can be used to deploy new instances of virtual machines.
Prerequisite
Sign in to the Azure portal using [www.azure.microsoft.com]
Select a VM form the existing VM in the Azure resource list or create a new VM or attach a VM to the already created compute gallery.
To capture the image of a VM
Click to open the created VM, on the Azure service home page resource list.

Deallocate the VM: Before capturing the image, it is recommended to deallocate the VM to ensure a clean state.
To deallocate, Select the VM and click on the "Stop" button to deallocate it. Wait until the VM is in the "Stopped (Deallocated)" state.

Click on the "Capture" button in the toolbar at the top. This will open the "Capture virtual machine" blade.

To create the VM image
Provide the following details:
Image resource group: Choose an existing resource group or create a new one to hold the captured image.
Image region: Select the Azure region where you want to store the captured image.

Target azure compute gallery: Choose an existing compute gallery or create a new one to store the captured image.
Image OS state: Select the Azure operating system state (Generalized or Specialized)
Target VM image definition: click on create new and enter a unique VM image definition name for the captured image
Click on Ok button

Enter the version number and click Review and Create

Click Create and wait for the deployment to be completed.

Click the Go to resource to view the VM image definition overview

Differences Between Generalized and Specialized Image
Generalized Image:
A generalized image is represented by a clean and generic template that does not contain any VM-specific configurations or data. It serves as a base image for creating new VM instances. Visually, you can imagine a generalized image as a blank slate or a template without any specific details tied to a particular VM instance. It represents a clean starting point for deploying multiple VMs with consistent configurations.
A generalized image is meant to serve as a simple, repeatable template for building new virtual machine instances.
A VM goes through a process known as generalization in which all VM-specific settings, configuration, and data are eliminated. This procedure detaches the VM from the original VM instance and makes it ready to be used as a base image. No machine-specific configurations, such as hostname, user accounts, or network settings, are present in a generalized image. These settings are anticipated to be used for creating new virtual machine instances based on the generalized image.
Specialized Image
A specialized image represents a customized and specific VM instance, including all the configurations, settings, and software installations that were present in the original VM. Visually, a specialized image can be imagined as a snapshot or a copy of the original VM, preserving its specific configurations. It captures the state of a VM at a particular point in time, including any modifications made to the VM during its usage.
A specialized image is made especially for a certain VM instance.
All of the parameters, settings, and installed applications from the original VM instance are included in a specialized image.
When you wish to save and reuse a virtual machine with a specific configuration or software installation, specialized images might be helpful. They are frequently used to build backups, move VMs between subscriptions, or record a VM state for future usage or recovery.
Specialized images are frequently bound to the original virtual machine instance and may not be readily distributed on multiple virtual machines without risking conflicts or inconsistencies.
Create a VM Scale Set (VMSS) from Existing VM image stored Compute Gallery
prerequisite
The VMSS will be created from existing VM Image
To create a VMSS
Search for the specific VM image from the Azure service resource list and click to navigate.

Click on "Virtual Machine Scale Set (VMSS)" in the top bar of the VM image overview page.

Click on "Create": On the Virtual Machine Scale Set page, click on the "Create" button to start the creation process.
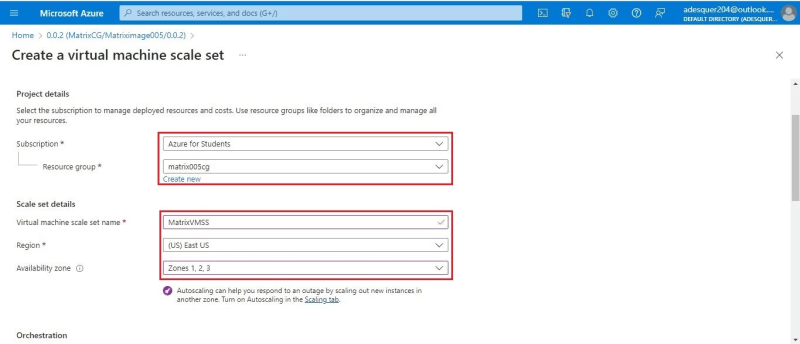
Provide basic details:
- Resource group: Choose an existing resource group or create a new one to hold the VMSS.
- Virtual machine scale set name: Enter a unique name for the VMSS.
-
Region: Select the Azure region where you want the VMSS to be deployed.
Configure instance details:
- Image: Choose an operating system image for your VM instances.
- Authentication: Specify the username and password or SSH public key for authentication.
-
Instance size: Select the desired virtual machine size for the instances in the VMSS.

Configure networking:
- Virtual network: Select an existing virtual network or create a new one for the VMSS.
- Subnet: Choose an existing subnet or create a new one within the selected virtual network.
-
Public IP address: Specify whether to assign a public IP address to the instances or not.

Configure scaling:
- Number of instances: Specify the initial number of VM instances in the scale set.
- Scaling options: Define the scaling behavior, such as manual, automatic, or scheduled scaling.
- Scaling rules: Set up rules to manual or automatically scale the number of instances based on metrics like CPU utilization or application-specific metrics.
Review and create: Review the configuration details you have provided in the previous steps. If everything looks correct, click on the "Review + create" button to validate the settings.

After validation passed, Click the create button

Wait for deployment: The deployment process may take some time to complete. You can monitor the progress on the Azure portal's notifications or in the "Notifications" section.

Once the deployment is finished, you will have a Virtual Machine Scale Set created in Azure, which allows you to scale out and manage a group of virtual machine instances as a single entity.


Top comments (0)