
In this tutorial you'll learn to create a SFTP server. SFTP stands for SSH File Transfer Protocol, and is a secure way to transfer files between machines using an encrypted SSH connection. Although similar in name, this is a different protocol than FTP (File Transfer Protocol), but SFTP is widely supported by modern FTP clients.
SFTP is available by default with no additional configuration on all servers with SSH access enabled. Though it’s secure and fairly straightforward to use, one disadvantage of SFTP is that in a standard configuration, the SSH server grants file transfer access and terminal shell access to all users with an account on the system. In many cases, it is more secure to apply granular control over user permissions. For example, you may want to allow certain users to only perform file transfers, but prevent them from gaining terminal access to the server over SSH.
Here you’ll set up the SSH daemon to limit SFTP access to one directory with no SSH access allowed on a per-user basis.
Pre-requisite: First update the machine
sudo yum check-update
sudo yum update -y
Note : For Ubuntu just use apt instead of yum(CentOS) pkg manager.
sudo apt update
sudo apt upgrade
- Install the OpenSSh server ```
sudo yum install openssh-server
###Step-1) Create a new user(s) out of which first two will be granted access to sftp server.
adduser sftp-user1
adduser sftp-user2
adduser normal_user
After this you will be prompted to create password and fill some additional info about user. To check the SFTP working we will not add normal_user to sftpusers groups hence it will not get access to SFTP server.
Now you have created users that will be granted the access to restricted directory.
Let's create a group and add the users into it.
groupadd sftpusers
sudo usermod -a -G sftpusers sftp-user1
sudo usermod -a -G sftpusers sftp-user1
If you want to give access of sftp server to multiple users then you can create group and add those users into group and specify in the below(Step-4) sshd-config file the name of group as **Match Groups <group name>**

### Step-2) Create a directory for Restricted access
In order to restrict SFTP access to one directory, you first have to make sure the directory complies with the **SSH server’s** permissions requirements, which are very specific.
Specifically, the directory itself and all directories before it in the filesystem tree must be owned by **root** and not writable by anyone else. At the same time, it’s not possible to give restricted access to a user’s home directory because home directories are owned by the user, not root.
- As there are different ways to work around this ownership issue. Here we will create **/var/www/public_ftp** as a target upload directory. **/var/www** will owned by root and will not be writable by other users. The subdirectory public_ftp will be owned by sftp-user1
mkdir -p /var/www/public_ftp
Set the owner of /var/www to root:
sudo chown root:root /var/www
Give root write permissions to the same directory, and give other users only read and execute rights:
sudo chmod 755 /var/www
Now change the ownership of public_ftp directory that you have just created. The following command will make the owner of this directory to **sftp-user1** or its corresponding group.
Now the directory structure is in place, you can configure the SSH server itself.
sudo chown sftp-user1:sftpsusers /var/www/public_ftp/
$ ls -lrt
total 0
drwxr-xr-x. 2 sftp-user1 sftpusers 26 Jul 28 12:06 public_ftp
### Step-3) Restricting Access to only one directory.
In this step, you’ll modify the SSH server configuration to disallow terminal access for sftp-user1 but **allow file transfer access**.
Open the SSH server configuration file using nano or vim.
sudo vim /etc/ssh/sshd_config
Scroll to the very bottom of the file and add the following configuration snippet:
Match User sftp-user1
ForceCommand internal-sftp
PasswordAuthentication yes
ChrootDirectory /var/www
PermitTunnel no
AllowAgentForwarding no
AllowTcpForwarding no
X11Forwarding no
🚨 Note: Here’s what each directive does:
- **Match User** tells the SSH server to apply the following commands only to the specified user. Here, we specify sftp-user1. Again, make sure to update this with your own user’s name, if different.
- **ForceCommand internal-sftp** forces the SSH server to run the SFTP server upon login, disallowing shell access.
- **PasswordAuthentication yes** allows password authentication for this user.
- **ChrootDirectory /var/www/** ensures that the user will not be allowed access to anything beyond the **/var/www/** directory.
- **AllowAgentForwarding no, AllowTcpForwarding no, and X11Forwarding no** disables port forwarding, tunneling, and X11 forwarding, respectively. The purpose of adding these directives is to further limit this user’s access to the server.
This set of commands, starting with Match User, can be copied and repeated for different users too. Make sure to modify the username in the Match User line accordingly.

### Step-4 Run the sshd command to test the changes, then restart the service and Verify the configuration

`Important: If this step is performed incorrectly, it might break your SSHD configuration.`
sshd -t
service sshd restart
**Now to Verify the Configuration**
Let’s ensure that our new  user can only transfer files. As mentioned previously, SFTP is used to transfer files between machines. You can verify this works by testing a transfer between your local machine and server.
First, try logging into your server as the user you created in Step 1. Because of the settings you added to the SSH configuration file, this won’t be possible:
ssh sftp-user1@your_server_ip
You’ll receive the following message before being returned to your original prompt:
Output
This service allows sftp connections only.
Connection to your_server_ip closed.
This means that sftp-user1 can no longer access the server shell using SSH.

Next, verify if the user can successfully access SFTP for file transfer:
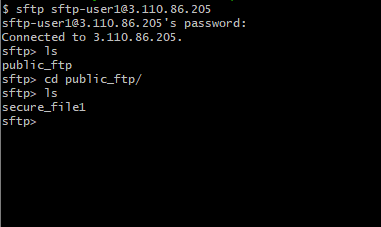
sftp sftp-user1@your_server_ip
Instead of an error message, this command will generate a successful login message with an interactive prompt:
Output
Connected to your_server_ip
sftp>
You can list the directory contents using ls in the prompt:
sftp> ls
This will show the **public_ftp** directory that was created in the previous step and return you to the sftp> prompt:
Output
uploads
#### Final check
For sftp-user1:
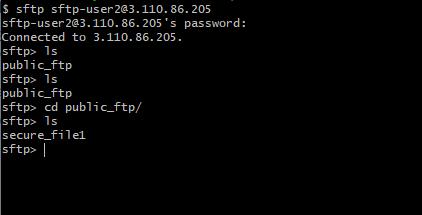
For sftp-user2:

Top comments (1)
There were a few typos to work through, but I got this working in my AWS test account on a t2.micro fairly easily and quickly. Sometimes you just need a place for others to upload a few files and you don't feel like jumping through all the hoops that seem to be inherent with S3 buckets.
Very useful - thanks!
-->S.