
What is this about?
My name is Dimitri Merejkowsky and I’ve been working at Tanker since June 2016. We’re a software company whose goal is to make end-to-end encryption simple. (More details on our website).
I’ve been an enthusiastic user of Mastodon since April 2017. One thing that always bugs me is that Mastodon administrators have access to everything about their users, as we'll see in a minute.
A few weeks ago, I decided to tackle this issue and try to encrypt Mastodon's direct messages with Tanker.
And that's how this series of articles was born. They’re written as something in between a tutorial and a story. You can use it to follow in my footsteps or to just enjoy the ride and have a good read: we'll discover what it actually means to implement Tanker in an existing solution and learn a few things about Mastodon’s internals. If you're curious, you can also jump to the end result on GitHub.
But first, let's go back to the problem that triggered the whole thing.
Introduction - What's wrong with Mastodon's direct messages?
Let's assume there is a Mastodon instance running with 3 users: Alice, Bob, and Eve.
First, Alice decides to send a direct message to Bob. She doesn't want her, or Bob’s, followers to see it, so she selects "Direct" visibility in the drop-down menu before sending her message:

Once the message is sent, she can see it the Direct messages column:

Bob, on the other hand, gets a notification and Alice's message appears in his column:
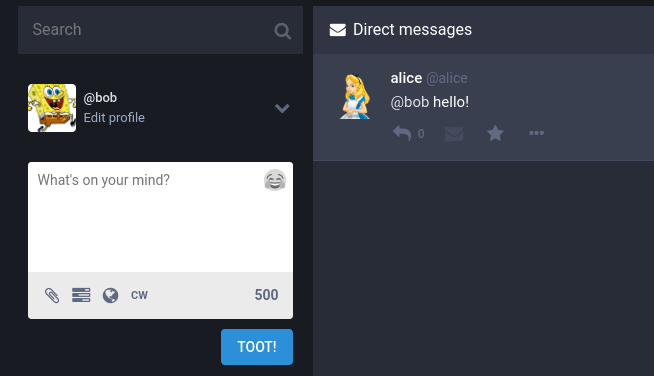
Finally, Eve does not get any notification, and if she tries to access the message directly using the permalink, she gets a 404 error:

At first glance, it looks as if the feature is working - only Bob can see Alice's message.
But, alas, the Mastodon admins can still read it because they have access to the database:
# select text from statuses order by id desc;
        text
-----------------
 @bob hello!
The aim of this series
In this series of articles, I would like to invite you to follow the steps I took to implement end-to-end encryption for direct messages on Mastodon. Note that I'm using Debian 10; your mileage may differ if you’re using a different distribution or another operating system.
When we're done, here's what we'll have:
Nothing will change from Alice's point of view when composing the direct message.
Bob will still see Alice's message, but this time there will be a lock to signify it’s encrypted:

And the admins will no longer be able to read all the messages.
# select encrypted, text from statuses order by id desc;
encrypted | text
----------+---------------------------------
 t        | A4qYtb2RBWs4vTvF8Z4fpEYy402IvfMZQqBckhOaC7DLHzw
 f        | @bob hello!
Sounds interesting? Let's dive in!
Getting started
We are going to make some changes in Mastodon's source code, so let's clone it and make sure we can run an instance on our development machine.
git clone git://github.com/tootsuite/mastodon
cd mastodon
# install all required libraries:
cat Aptfile | sudo apt install -y
# Install correct ruby version with rvm
rvm install ruby-2.6.1
# Install all ruby dependencies
bundle install
# Install all Javascript dependencies
yarn
# Run all processes with foreman
foreman start -f Procfile.dev
Now we can open the http://localhost:3000 URL in a browser and sign up our first user.
The "vanilla" Mastodon is running as expected, so we can start changing the code and see what happens :)
Calling encrypt() the naive way
In the API section of the Tanker documentation, we notice there’s an encrypt() function in a Tanker object. We also see a bit of code that tells us how to instantiate Tanker:
const config = { appId: 'your-app-id' };
const tanker = new Tanker(config);
We need an App ID, so let's create an application in the Tanker Dashboard and patch the front-end code directly, without thinking too much about the implications.
// In app/javascript/mastodon/actions/compose.js
export function submitCompose(routerHistory) {
  const config = { appId: 'our-app-id' };
  const tanker = new Tanker(config);
  let clearText = getState().getIn(['compose', 'text'], '');
  const encryptedData = await tanker.encrypt(clearText);
}
But then we get:
PreconditionFailed: Expected status READY but got STOPPED trying to encrypt.
After digging in the documentation, it turns out we need to start a session first.
If you’re wondering, here's why: Tanker implements an end-to-end protocol and thus encryption occurs on the users' devices. To that end, it uses an Encrypted Local Storage (containing some private keys, among other things) which can be accessed only when a Tanker session has been started.
The doc also says we need to verify users’ identities before starting a Tanker session, and that Tanker identities must be generated and stored on the application server - in our case, the Ruby on Rails code from the Mastodon project.
That means that we can’t do everything client-side in Javascript; we also need to modify the server as well as figuring out how these two communicate with each other.
Getting to know the architecture
The Mastodon development guide contains an overview of the Mastodon architecture. Here are the relevant parts:
- A rails server is in charge of handling authentication (through the Devise gem and serving web pages
- A Node.js WebSocket server is used for refreshing the user timeline, pushing notifications and the like
- A React application using Redux to manage the state shows the main UI
To understand how the Ruby and the Javascript codes cooperate we can look at the HTML source of the page:
<!DOCTYPE html>
<html>
<head>
<!-- .. -->
<script id=”initial-state”, type=”application/json”>
{
  "meta":
  {
    "access_token": "....",
    "email": "alice@tanker.io",
    "me": "2"
    // ...
  },
}
</script>
That page is generated by Rails. The React app parses this HTML, extracts its initial state from the <script> element, and starts from there.
Note that the initial state contains a JSON object under the meta key.
The meta object contains (among other things):
- An access token for the WebSocket server
- The email of the current user
- The ID of the current user in the database (under the me key)
So, here's the plan:
- We'll generate a Tanker identity server-side
- Put it inside the initial state
- Fetch it from the initial state and start a Tanker session
Generating Tanker Identities
First, add the Tanker App Id and secret into the .env file:
(The Tanker app secret must not be checked in along with the rest of the source code):
TANKER_APP_ID = <the-app-id>
TANKER_APP_SECRET = <the-ap-secret>
Then we create a new file named app/lib/tanker_identity.rb containing this code:
module TankerIdentity
  def self.create(user_id)
    Tanker::Identity.create_identity(ENV["TANKER_APP_ID"], ENV["TANKER_APP_SECRET"], user_id.to_s)
  end
end
We adapt the User model:
# app/models/users.rb
class User < ApplicationRecord

  after_create :set_tanker_identity

  def set_tanker_identity
    self.tanker_identity = TankerIdentity.create_identity(self.id)
    self.update_attribute :tanker_identity, self.tanker_identity
  end

end
We write a migration and then migrate the DB:
# db/migrate/20190909112533_add_tanker_identities_to_users.rb
class AddTankerIdentitiesToUsers<ActiveRecord::Migration[5.2]
  def change
    add_column :users, :tanker_identity, :string
  end
end
$ rails db:setup
Finally, we write a new test for the AppSignUpService and run the tests:
# spec/services/app_sign_up_service_spec.rb
it 'creates a user with a Tanker identity' do
  access_token = subject.call(app, good_params)
  user = User.find_by(id: access_token.resource_owner_id)
  expect(user.tanker_identity).to_notbe_nil
end
$ rspec
...
Finished in 3 minutes 49.4 seconds (files took 8.56 seconds to load)
2417 examples, 0 failure
They pass! We now have Tanker identities generated server-side. Let's use them to start a Tanker session.
Starting a Tanker session
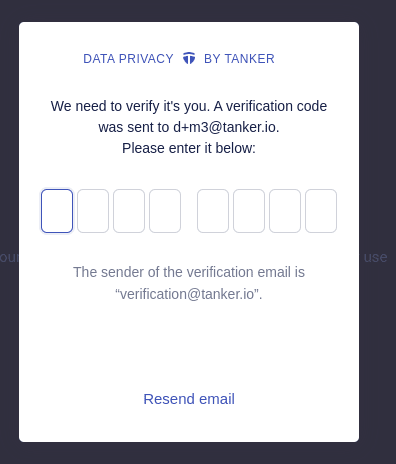
When starting a Tanker session you need to verify the identity of the user. This involves sending an email and entering an 8-digit code - that's how you can be sure that you’re sharing encrypted data with the correct user.
As a shortcut, Tanker provides a @tanker/verfication-ui package containing a ready-to-use UI to handle identity verification using emails.
It's used like this:
const config = { appId: "app id" };
const tanker = new Tanker(config);
const verificationUI = new VerificationUI({ tanker });
await verificationUI.start(email, identity);
We need the app ID, the Tanker identity and the email to start a Tanker session, so let's make sure they appear in the aforementioned <script> element:
# app/helpers/application_helper.rb
def render_initial_state
  state_params = {
    # ...
  }

  if user_signed_in?
    state_params[:tanker_identity] = current_account.user.tanker_identity
    # ...
  end
end
# app/presenters/initial_state_presenter.rb
class InitialStatePresenter < ActiveModelSerializers::Model
  attributes :settings, :push_subscription, :token,
             # ...
             :tanker_identity, :email, :tanker_app_id
end
# app/serializers/initial_state_serializer.rb
require_relative "../../lib/tanker"

class InitialStateSerializer < ActiveModel::Serializer
  attributes :meta, :compose, :accounts,

  # ...

  store[:tanker_identity] = object.current_account.user.tanker_identity
  store[:email]           = object.current_account.user.email
  store[:tanker_app_id]   = TANKER_APP_ID
end
Then, we fetch our values from the initial_state.js file:
// app/javascript/mastodon/initial_state.js
export const tankerIdentity = getMeta('tanker_identity');
export const email = getMeta('email');
export const tankerAppId = getMeta('tanker_app_id');
Creating a Tanker service
The challenge now becomes: how and when do we call verificationUI.start(), knowing that it will display a big pop-up and hide the rest of the UI?
After a bit of thinking, we decide to wrap calls to tanker.encrypt(), tanker.decrypt() and verificationUI.starte() in a TankerService class.
The TankerService class will be responsible for ensuring the tanker session is started right before data is encrypted or decrypted:
// app/javascript/mastodon/tanker/index.js
import { fromBase64, toBase64, Tanker } from '@tanker/client-browser';
import { VerificationUI } from '@tanker/verification-ui';


export default class TankerService {

  constructor({ email, tankerIdentity, tankerAppId }) {
    this.email = email;
    this.tankerIdentity = tankerIdentity;
    this.tanker = new Tanker({ appId: tankerAppId });
    this.verificationUI = new VerificationUI(this.tanker);
  }

  encrypt = async (clearText) => {
    await this.lazyStart();

    const encryptedData = await this.tanker.encrypt(clearText);
    const encryptedText = toBase64(encryptedData);
    return encryptedText;
  }

  decrypt = async (encryptedText) => {
    await this.lazyStart();

    const encryptedData = fromBase64(encryptedText);
    const clearText = await this.tanker.decrypt(encryptedData);
    return clearText;
  }

  stop = async() => {
    await this.tanker.stop();
  }

  lazyStart = async () => {
    if (this.tanker.status !== Tanker.statuses.STOPPED) {
      return;
    }

    if (!this.startPromise) {
      this.startPromise = this.verificationUI.start(this.email, this.tankerIdentity);
    }

    try {
      await this.startPromise;
      delete this.startPromise;
    } catch(e) {
      delete this.startPromise;
      throw e;
    }

  }

}
Next we configure Redux thunk middleware to take the TankerService as
extra argument:
// app/javascript/mastodon/store/configureStore.js
import thunkMiddleWare from 'redux-thunk';
import {
  email,
  tankerIdentity,
  tankerAppId,
} from '../initial_state';
import TankerService from '../tanker';


const tankerService = new TankerService({ email, tankerIdentity, tankerAppId });

const thunk = thunkMiddleWare.withExtraArgument({ tankerService });

export default function configureStore() {
  return createStore(appReducer, compose(applyMiddleware(
    thunk,
    // ...
  )));
}
After this change, the thunk middleware allows us to access the TankerService instance from any Redux action.
So, now we can adapt the submitCompose action properly:
// app/javascript/mastodon/actions/compose.js
export function submitCompose(routerHistory) {
  return async function (dispatch, getState, { tankerService }) {
    let visibility = getState().getIn(['compose', 'privacy']);

    const shouldEncrypt = (visibility === 'direct');

    if (shouldEncrypt) {
      const encryptedText = await tankerService.encrypt(status);
      console.log('about to send encrypted text', encryptedText);
    }

    dispatch(submitComposeRequest());

    api(getState).post('/api/v1/statuses', {
      // ...,
      visibility,
    });
  }
}
When we're done, we get those pop-ups showing us that the verification process worked:

And some logs indicating the status was indeed encrypted
Starting verification UI ...
Verification UI started
About to send  encrypted text: AxMXSEhEnboU732MUc4tqvOmJECocd+fy/lprQfpYGSggJ28
That's all for Part 1. We can now create and verify cryptographic identities of all users in our local instance, use them to start a Tanker session, and encrypt our direct messages.
But how will the server actually handle those encrypted messages?
Stay tuned for part 2!
Follow Tanker on dev.to or on twitter to be notified when the next part is published - and feel free to ask questions in the comments section below.

Top comments (0)