
In this part of the Solace and Ansible blog series, we will describe how to configure and reconfigure a complex Solace event mesh in an automated fashion with a repeatable, consistent approach. The use case discussed here is a globally distributed, hybrid IoT event mesh to set up for an international shipping company. The company wants to enable a digital shipping eco-system with the following examples:
- Analyse tracking and quality data such as geo-location, cooling, and shock of all their customer’s shipments in real time to create an overall better customer experience
- Include data streams from their own containers, 3rd party ships, ports, etc.
- Provide selectively and securely tracking and quality data to regional partners – the freight forwarders – to better service their end-customers
Let’s dive into the details of the project. In our approach, we have separated the deployment concerns into 1) infrastructure, and 2) application-specific configuration so they can be managed and applied independently:
- Infrastructure: the Event Mesh topology which consists of ungoverned DMR (dynamic message routing) links and governed links – static bridges – to public cloud providers
- Application: The use case specific resources such as client usernames, queues as well as attaching subscriptions to bridges – governed links – where events are allowed to flow to brokers in the public cloud
The Ansible tasks described in the previous article give us the capability to safely configure both of these aspects.
Infrastructure – Event Mesh Topology
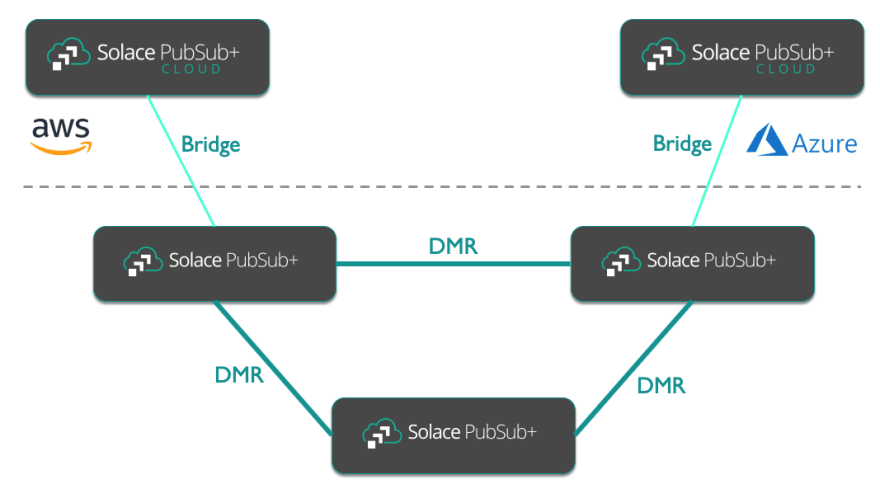
The topology we intend to set up is a fully connected, internal event mesh with governed connections to services hosted in Solace PubSub+ Event Broker: Cloud. This diagram illustrates our original test deployment of three on-premise nodes connected to two Solace Cloud Services.
As we want to grow the event mesh over time by adding additional nodes to the internal Mesh and bridges to cloud services, we are looking to create an Ansible playbook that can accommodate a growing inventory of brokers. Thus, the playbook can serve as a good starting point for your own deployment, possibly with only small adjustments.
The full topology playbook can be found on GitHub. It has two main sections: creating the static bridges (light green in the diagram above) and the DMR cluster and internal links (dark green in the diagram above).
 Playbook to set up Event Mesh Topology: Static Bridgesby solace-iot-teamOpen on GitHub
When setting up the topology, we only set up the bridges but do not attach subscriptions, i.e. we create the link, but no events will initially flow. Static bridges are backed by queues for guaranteed message propagation between brokers. Below is the sequence of the tasks:
- Remove and re-create queues required by bridges
- Remove and re-create the bridges
- Add connection to the remote Message VPN
- Add trusted common names for TLS
- Enable the bridges
This is applied to all brokers in the mesh, regardless of broker location as it links up the internal mesh brokers to the Solace Cloud services. There are two groups of hosts defined:
- internal_dmr: on-premise brokers that form the full mesh
- public_cloud: the Solace Cloud brokers
The code snippet below shows how the bridges are removed and re-created.
# remove existing bridges and re-create
- name: Remove Bridge
  loop: "{{ bridges|default([]) }}"
  solace_bridge:
    name: "{{ item.name }}"
    msg_vpn: "{{ msg_vpn }}"
    virtual_router: "{{ item.virtual_router }}"
    state: absent

- name: Create or update bridge
  loop: "{{ bridges|default([]) }}"
  solace_bridge:
    name: "{{ item.name }}"
    msg_vpn: "{{ msg_vpn }}"
    virtual_router: "{{ item.virtual_router }}"
    settings:
      enabled: false
      remoteAuthenticationBasicClientUsername: "{{item.remote_auth_basic_client_username}}"
      remoteAuthenticationBasicPassword: "{{ item.remote_auth_basic_password }}"
      remoteAuthenticationScheme: basic
Note that many parameters are set from variables defined in the inventory. We will look at the inventory further below.
The second section takes care of creating the Solace DMR cluster. Messages flow freely between the nodes as all brokers are connected via internal DMR links:
- Remove and re-upload the trusted CA’s certificate (this is required to link brokers via TLS)
- Remove the DMR cluster from all brokers and re-create
- Add DMR links
- Add connection to a remote broker to the links
- Add trusted common names for TLS to the links
- Enable the DMR links now that all configuration is done
This code snippet shows how the DMR cluster is added to all brokers in the internal mesh. Again, note that most information comes from the inventory. This playbook is only applied to the “internal_dmr” group of brokers:
- name: Add DMR Cluster
    solace_dmr:
      name: "{{dmr_internal_cluster}}"
      state: present
      settings:
        tlsServerCertEnforceTrustedCommonNameEnabled: "{{enforce_trusted_common_name}}"
        tlsServerCertValidateDateEnabled: false
        tlsServerCertMaxChainDepth: 6
        authenticationBasicPassword: "{{dmr_cluster_password}}"

  - name: Add DMR Link
    solace_link:
      name: "{{item.remote_node}}"
      dmr: "{{dmr_internal_cluster}}"
      state: present
      settings:
        enabled: false
        authenticationBasicPassword: "{{dmr_cluster_password}}"
        span: "{{dmr_span}}"
        initiator: "{{item.initiator}}"
        transportTlsEnabled: false
    loop: "{{ dmr_links|default([]) }}"
As mentioned above, the inventory defines two groups of brokers: internal_dmr and public_cloud. For each host/broker we define the queues, bridges, DMR links and so on that should be created.
Here’s an example of the configuration for an “internal_dmr” broker. See GitHub for the full inventory.
Internal DMRby solace-iot-teamOpen on GitHub
A couple of things to note:
- A host contains two lists: “dmr_links” and “bridges”.
- While in the Solace broker the queues associated to a queue are separate objects, we list the required queue(s) for a bridge underneath it.
- For each DMR link we need to set the initiator of the underlying connection. We will discuss the implications further below.
- The vars within this host group hold the common information for the DMR cluster such as the cluster name and password.
- Reference back to the “Add DMR Cluster” and “Add DMR links” tasks in the snippet above
- The former uses the “vars” in the snippet below, for example,
name: "{{dmr_internal_cluster}}" - The latter loops through the DMR links defined for a host and uses information such as the connection initiator:
loop: "{{ dmr_links|default([]) }}"
- The former uses the “vars” in the snippet below, for example,
internal_dmr:
  hosts:
    macbook:
      ansible_connection: local
      msg_vpn: default
      host: localhost
      dmr_links:
      - name: internal-lenovo
        remote_node: v195858
        dmr_remote_address: 192.168.0.34:55555
        initiator: remote
        trusted_common_names:
        - name: "CA-CERT"
      bridges:
      - name: mac-partner-edge-01
        remote_auth_basic_client_username: solace-cloud-client
        remote_auth_basic_password: secret
        virtual_router: auto
        queues:
        - name: mac-partner-edge-01_Queue
          owner: default
        remote_vpns:
        - name: partner-edge-01
          location: mr2.messaging.solace.cloud:55555
          queue_binding: mac-partner-edge-01_Queue
          tls_enabled: false
        trusted_common_names:
          - name: "CA-CERT"
  vars:
    # use common connection parameters as we use the cloud API SEMP v2 proxy
    secure_connection: false
    port: 8080
    password: admin
    username: admin
    dmr_internal_cluster: internal-cluster
    dmr_cluster_password: secret
    dmr_span: internal
    cert_content: |
        -----BEGIN CERTIFICATE-----
        -----END CERTIFICATE-----
    enforce_trusted_common_name: false
Why did we explicitly define the DMR links in the inventory? Arguably, we could write a playbook that simply links every broker to every other broker automatically. The reason is that we needed to plan out which node initiates the DMR connection – in our case some nodes cannot be reached from the outside due to security policies preventing incoming connections. For links between these nodes and others, the initiator of connections to other nodes in the cluster needs to be the “isolated” node. Configuring the event mesh may require knowledge of the network infrastructure and means you may need to plan and configure DMR links explicitly. Especially since there could be multiple nodes that have restricted inbound connectivity so you will need to figure out how to connect a pair of these brokers.
Now that we have the topology set up, let’s see how we can add the resources required by an application interacting with this topology.
Use Case-Specific Resources
An example similar to our actual use case is a global shipment company that tracks containers as they move across regions and continents. For internal processes the company needs to be able to track any shipment from anywhere in the world. The company offers partners to propagate all shipping and tracking events to a Solace Cloud service so they can process and analyse events in real time – but only the data that concerns shipments into or out of their region.

Tracking events are sent on a topic structure like shipment/from/US/to/UK/{shipment_id}/scan/{location}. Mapping this use case onto our topology will make it clearer what we need to configure:
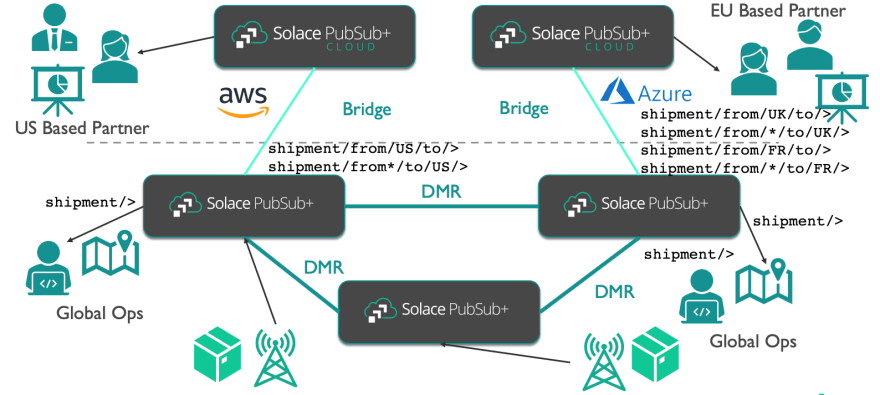
We have multiple clients that require to connect to different parts of the mesh:
- Global Ops – they can connect to any node on the internal mesh and receive all shipment tracking events.
- US-Based Partner – it can only connect to the public cloud broker in the US. It should only be able to receive events concerning their region. We could enforce this via their Access Control List (ACL). As the service is connected to the internal mesh via a bridge, we can enforce this rule on the bridge itself and only relevant events are actually propagated to the broker servicing the partner.
- EU-based partner – it can only connect to the EU broker. As above, we can enforce only France and UK relevant events ever are propagated to the partner service.
- Tracking points within the shipment networks that emit the network events — they need to be able to connect to a specific node in the mesh and allowed to publish on any topic within the “shipment” namespace.
To enable this use-case we need to create
- ACL profiles
- Client Usernames
- Bridge subscriptions
An example playbook to do exactly these steps can also be found in GitHub.
Shipment Setup Exampleby solace-iot-teamOpen on GitHub
Here are some examples from the playbook – as for the topology you can see we use a lot of variables form the inventory file so we can easily add additional client usernames, subscriptions, and so on:
- name: Remove Client Usernames before removing the ACL Profile
  solace_client:
    name: "{{ item.name }}"
    msg_vpn: "{{ msg_vpn }}"
    state: absent
  loop: "{{ users | default([]) }} "

- name: Add ACL Profile
  solace_acl_profile:
    name: "{{ item.name }}"
    msg_vpn: "{{ msg_vpn }}"
    settings:
      clientConnectDefaultAction: "{{ item.client_connect_default }}"
  loop: "{{ acls | default([]) }} "

- name: Add ACL Publish Exception
  solace_acl_publish_exception:
    name: "{{ item.1.topic }}"
    acl_profile_name: "{{ item.0.name }}"
    msg_vpn: "{{ msg_vpn }}"
    topic_syntax: "{{ item.1.syntax }}"
  with_subelements:
    - "{{ acls | default([]) }} "
    - publish_topic_exceptions
    - flags:
      skip_missing: true

- name: Add Client
  solace_client:
    name: "{{ item.name }}"
    msg_vpn: "{{ msg_vpn }}"
    settings:
      clientProfileName: "{{ item.client_profile }}"
      aclProfileName: "{{ item.acl_profile }}"
      password: "{{ item.password }}"
      enabled: "{{ item.enabled }}"
  loop: "{{ users | default([]) }} "

- name: add subscriptions
  solace_bridge_remote_subscription:
    name: "{{ item.1.name }}"
    msg_vpn: "{{ msg_vpn }}"
    bridge_name: "{{ item.0.name }}"
    virtual_router: "{{ item.0.virtual_router }}"
    deliver_always: true
  with_subelements:
    - "{{ bridges | default([]) }}"
    - remote_subscriptions
    - flags:
      skip_missing: true
Note that before removing an ACL, all client usernames using the ACL must be removed or updated to use a different ACL.
The full playbook contains some more tasks, however, it is a straightforward playbook whose results can be easily changed by adjusting the inventory. The inventory defines only one host group – “shipment_demo”. For each broker in the mesh (cloud and on premise), it specifies the configurations to make. The snippet below shows the configuration for one internal broker and one cloud service. You can find the full inventory in GitHub:
Local Shipment Setupby solace-iot-teamOpen on GitHub
# internal broker
macbook:
  ansible_connection: local
  secure_connection: false
  port: 8080
  host: 192.168.0.8
  password: admin
  username: admin
  msg_vpn: default
  bridges:
  - name: mac-partner-edge-01
    virtual_router: auto
    guaranteed_remote_subscriptions:
    - name: "shipment/from/UK/to/>"
      queue: mac-partner-edge-01_Queue
    - name: "shipment/from/FR/to/>"
      queue: mac-partner-edge-01_Queue
    - name: "shipment/from/*/to/UK/>"
      queue: mac-partner-edge-01_Queue
    - name: "shipment/from/*/to/FR/>"
      queue: mac-partner-edge-01_Queue
  acls:
  - name: shipping_publisher
    client_connect_default: allow
    publish_topic_exceptions:
    - topic: shipment/>
      syntax: smf
  - name: global_shipping_ops
    client_connect_default: allow
    subscribe_topic_exceptions:
    - topic: shipment/>
      syntax: smf
  users:
  - name: publisher
    password: HLP2
    acl_profile: shipping_publisher
    client_profile: default
    enabled: true
  - name: global_ops_europe
    password: wzC3B
    acl_profile: global_shipping_ops
    client_profile: default
    enabled: true
# partner broker in Europe
partner_edge_01_na:
  ansible_connection: local
  secure_connection: true
  port: 943
  host: mr2.messaging.solace.cloud
  password: nrkijp
  username: partner-edge-01-admin
  msg_vpn: partner-edge-01
  acls:
  - name: partner-subscriber
    client_connect_default: allow
    subscribe_topic_exceptions:
    - topic: "shipment/>"
      syntax: smf
  users:
  - name: demo
    password: HLP2
    acl_profile: partner-subscriber
    client_profile: default
    enabled: true
The first thing to note is that we attach guaranteed message subscriptions to the bridge configuration on the internal broker so messages for the EU partner can flow to the cloud service. We also declare ACLs for the internal broker so publishers of shipment events can connect and send events as well as consumers from the global Ops applications can connect and receive events. The allowed topic permissions are very wide allowing these clients to publish or respectively consume messages on a wide range of topics.
Having ensured relevant messages are propagated to the EU partner broker, we simply declare an ACL and a client username on this broker – we can even grant very permissive subscription privileges to the ACL as the bridge configuration gives us tight control over the events that are propagated to the partner broker.
Summary
In this article we have seen how we can use the solace-ansible tasks to completely automate the setup of a use case utilizing a hybrid event mesh. We have discussed why it makes sense to separate event mesh topology configuration from the specific configuration required to support a use case with all its connecting apps. Creating generic playbooks that are driven by the inventory allows us to easily amend the event mesh topology, de-provision and re-provision use case configurations and support different use cases by simply creating new inventory files.

Top comments (0)