
Introduction
Authentication is an important aspect of an application to verify the identity of users. We use a combination of email/username with a password for authentication. Managing the password of various websites is a hectic job to do. We can also opt for OAuth for authentication such as Login with Google, FaceBook, Twitter, etc. You do not have to deal with password managers. This power comes with the cons of privacy. The website can request access to a variety of data from the OAuth application.
Web3 is rising and it has a better way of authenticating the user. We can use Crypto Wallets for authentication purposes. Using a crypto wallet for authentication will not require a managing password and your privacy will be protected.
Crypto Wallets in the form of a hard wallet such as a USB stick or a web/mobile application form such as Metamask allow people to exchange coins and tokens. Crypto Wallets have public/private keys. These wallets are protected by password or biometric authentication. To use the crypto wallet, the user needs to sign in to the wallet. As there are unique private keys for every user, we can use these crypto wallets for authenticating the user.
Today, we are going to look into:
- Connect dApp to Wallet in our case MetaMask
- Getting a signature from the wallet
- Verifying signature for authentication
You can follow me on Twitter(@surajondev) as we will explore more authentication techniques in the future. Get the notification as soon as possible.
So, let's get started.
Environment Setup
We are going to use ReactJS for our front-end. React is for building the component-based frontend application.
Here is the command to install React:
npx create-react-app crypto-auth
Delete all the unnecessary files and code.
Dependencies
As for dependencies, we only need one library i.e, ethers. Ethers will be helpful in interacting with our wallet.
cd into the crypto-auth and enter the below command in the terminal:
npm i ethers
Note: To run the above commands, you need to have node.js pre-installed.
Download MetaMask wallet as a chrome extension from here
Now, we are all set for writing code.
App.js
In App.js file, at the top, we have to import the necessary libraries and CSS files. Here we have all the imports:
import "./styles.css";
import { useState } from "react";
import { ethers } from "ethers";
In the functional component having the name App we are going to implement all the functionality of the authentication using the Crypto Wallet.
As for the return statement, that contains the JSX of the component to display on the web page. We are going to have:
-
H1displaying the titleCrypto Auth - Button to connect our application to Wallet(MetaMask)
- Message paragraph for displaying error/info for instance Login failed/ User Login successful
- If login happens, a paragraph to display the public key of the account
Here is the code:
import "./styles.css";
import { useState } from "react";
import { ethers } from "ethers";

const cryptoButton = async () => {
  const [msg, setMsg] = useState();
  const [accnt, setAccnt] = useState();

  return (
    <div className="App">
      <h1>Crypto Authentication</h1>
      <button className="ConnectBtn" onClick={cryptoButton}>
        Connect Wallet
      </button>
      <p>{msg}</p>
      {msg === "User Login" && <div>Account: {accnt}</div>}
    </div>
  );
}
We have used the cryptoButton function to implement the code for connecting MetaMask.
cryptoButton
First, let's look into the code, and then I will explain each step. Here is the code:
  const cryptoButton = async () => {
    const { ethereum } = window;
    if (ethereum.isMetaMask) {
      setMsg("MetaMask Installed");
      await ethereum.request({ method: "eth_requestAccounts" });
      const accounts = await ethereum.request({ method: "eth_accounts" });

      const provider = new ethers.providers.Web3Provider(ethereum);
      const signer = provider.getSigner();
      const message = randomString(16);
      const signature = await signer.signMessage(message);

      const signAddress = await ethers.utils.verifyMessage(message, signature);
      if (signAddress.toLowerCase() === accounts[0].toLowerCase()) {
        setMsg("User Login");
        setAccnt(accounts[0]);
      } else {
        setMsg("Login failed");
      }
    } else {
      setMsg("MetaMask is not installed");
    }
  };
At the top, we are extracting the ethereum object from the window. This function contains all the information regarding blockchain interaction. If MetaMask is installed, it injects its code into the ethereum object. Now, we have used the ethereum.isMetaMask() function to verify the valid installation of MetaMask. We will progress only if the MetaMask is installed as the browser extension. Otherwise, it will set a message with MetaMask is not installed.
With the next two lines, we are accessing the account details from the wallet. This will make a request to the MetaMask. After that, we are storing the public key from the wallet in the accounts variable. The public key will be in the array format.
await ethereum.request({ method: "eth_requestAccounts" });
const accounts = await ethereum.request({ method: "eth_accounts" });
At this point, we have successfully connected our application with MetaMask. We need to get a signature from the wallet user. As anyone with API can inject the pubic key but the signature require a private key which makes it a valid authentication.
Signature
Here is the code for getting the signature:
      const provider = new ethers.providers.Web3Provider(ethereum);
      const signer = provider.getSigner();
      const message = randomString(16);
      const signature = await signer.signMessage(message);
In the first line, we are getting the provider. A Provider in ethers is a read-only abstraction to access the blockchain data. From the provider, we are accessing the getSigner() function and storing it into the signer variable. We need to pass a message to which the wallet will sign. You can pass a message like "Welcome to Crypto Auth". It will be shown to the user will signing the message.

This message is used to create the signature. Complicating the signature will make it harder to decode. So passing a nonce is ideal. A nonce is an arbitrary number that is unique for each user. This nonce can be alphanumeric or big numbers. You can store this nonce for each user in the database. As we are not connecting our application to the database, we need not insure uniqueness, so I have created randomString(16) function to provide us with random alphanumeric values. 16 as an argument is for 16 characters of the string.
Here is the code for the randomString() function:
const randomString = function (length) {
  var text = "";
  var possible =
    "ABCDEFGHIJKLMNOPQRSTUVWXYZabcdefghijklmnopqrstuvwxyz0123456789";
  for (var i = 0; i < length; i++) {
    text += possible.charAt(Math.floor(Math.random() * possible.length));
  }
  return text;
};
After that, we are getting the signature from the user through the wallet.
Signature Verification
After getting the signature, we need to verify that the public key from the wallet that's signing the signature is the same as the public key that we requested earlier.
In ethers library, there is a function, ethers.utils.verifyMessage(), for verification of signature. This function takes nonce (In our case, we have stored the nonce in the variable having a name message) and signature as the argument. The function returns the public key that has signed the message.
const signAddress = await ethers.utils.verifyMessage(message, signature);
Now, we have two public keys. The first one is from the earlier request to the wallet and the second one is from the signed message. We just need to make sure that both public keys are the same.
if (signAddress.toLowerCase() === accounts[0].toLowerCase()) {
        setMsg("User Login");
        setAccnt(accounts[0]);
} else {
        setMsg("Login failed");
}
We have converted both the public key into lowercase for verification. The message will be displayed according to the verification.
Here is the code of the App.js altogether at once:
import "./styles.css";
import { useState } from "react";
import { ethers } from "ethers";

const randomString = function (length) {
  var text = "";
  var possible =
    "ABCDEFGHIJKLMNOPQRSTUVWXYZabcdefghijklmnopqrstuvwxyz0123456789";
  for (var i = 0; i < length; i++) {
    text += possible.charAt(Math.floor(Math.random() * possible.length));
  }
  return text;
};

export default function App() {
  const [msg, setMsg] = useState();
  const [accnt, setAccnt] = useState();

  const cryptoButton = async () => {
    const { ethereum } = window;
    if (ethereum.isMetaMask) {
      setMsg("MetaMask Installed");
      await ethereum.request({ method: "eth_requestAccounts" });
      const accounts = await ethereum.request({ method: "eth_accounts" });

      const provider = new ethers.providers.Web3Provider(ethereum);
      const signer = provider.getSigner();
      const message = randomString(16);
      const signature = await signer.signMessage(message);

      const signAddress = await ethers.utils.verifyMessage(message, signature);
      if (signAddress.toLowerCase() === accounts[0].toLowerCase()) {
        setMsg("User Login");
        setAccnt(accounts[0]);
      } else {
        setMsg("Login failed");
      }
    } else {
      setMsg("MetaMask is not installed");
    }
  };
  return (
    <div className="App">
      <h1>Crypto Authentication</h1>
      <button className="ConnectBtn" onClick={cryptoButton}>
        Connect Wallet
      </button>
      <p>{msg}</p>
      {msg === "User Login" && <div>Account: {accnt}</div>}
    </div>
  );
}
Demo
If everything goes well you can see the below screen.

Now, if you click on the Connect Wallet button. Your MetaMask will pop up asking for a signature with the message.
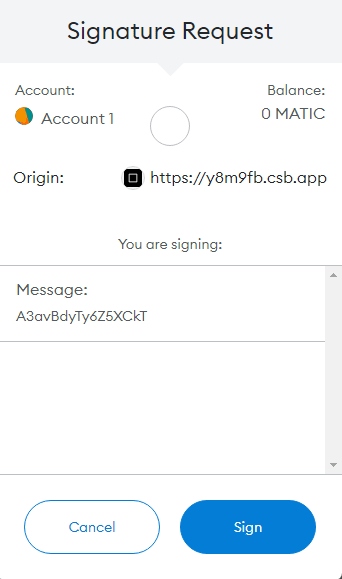
After you click on Sign, you will see the public key from the wallet on the screen.

Extending the project
You can extend the project by adding a database in the backend. You can use MongoDB Atlas for database.
Connect With Me
Conclusion
We have successfully created a button that will surely connect your application to the wallet (MetaMask). In this way, you need to worry about the password and all.
I hope, the article has benefitted you with more knowledge. Thanks for reading the blog post.


Top comments (3)
Thank you for sharing this!
Glad to help you!
This is very nice but is there a way to connect other wallets like Solana wallets