
In recent years there has been a consistent rise in demand for headless solutions, from e-commerce to content management. We will focus on Strapi, an open-source headless CMS, and break down how to quickly build and customize tailored headless CMS solutions.
In this article, you will learn:
- How to install and set up the Strapi GraphQL plugin
- Concepts like resolvers, mutations, and queries in the context of GraphQL
- How to customize Strapi's GraphQL backend with custom resolvers for queries and mutations
Headless CMS
The term headless comes from the idea of chopping the head (the frontend) from the body (the backend). A headless CMS is focused on storing and delivering structured content—it doesn't really care where and how the content is displayed.
Headless CMS systems have many uses, including:
- Building websites and applications with any JavaScript framework (Next.js, React, Vue, Angular)
- Providing content for static site generators (Gatsby, Jekyll, Hugo)
- Mobile applications (iOS, Android, React Native)
- Enriching product information on e-commerce sites
Strapi
Strapi is an open-source, Node.js-based headless CMS that saves developers time while giving them freedom to use their favorite tools and frameworks. Strapi also enables content editors to streamline content delivery (text, images, video, etc.) across any device.
– Strapi | What is Strapi
Strapi offers the following advantages:
- Open source: Available in GitHub and supported by hundreds of contributors.
- Self-hosted: Gives you full control of your data and privacy.
- Customizable: Via admin panel or directly extending with plugins and customizations.
- Flexible: Consume it from any client, SPA, or mobile app, as well as via REST or GraphQL.
GraphQL
GraphQL is an open-source data query and manipulation language for APIs and a runtime for fulfilling queries with existing data. GraphQL was developed internally by Facebook in 2012 before being publicly released in 2015.
– Wikipedia
Unlike REST, GraphQL allows you to retrieve only the content needed. This gives the client a lot more freedom, resulting in much faster development compared to REST.
Implementing the Basic Solution
For this article, let’s use one of the many Strapi Starters as your starting point. You’ll then customize it to suit your needs, in this case with the Nuxt.js Ecommerce Start.
Start by creating a brand-new project:
    yarn create strapi-starter graphql-commerce nuxt-e-commerce
    cd graphql-commerce
Next, validate that the Strapi installation worked correctly by running:
yarn develop
Strapi will require you to generate an admin account on the initial run, like so:

Next, you should be able to see your Strapi admin fully set up in the context of an e-commerce store:
This starter doesn't have GraphQL installed by default, so your next step is to install that. It’s easy to enable GraphQL support directly from the Strapi admin:
- Go to General > Marketplace.
- Click Download on the GraphQL plugin.

Manually restart the server to make sure the GraphQL plugin is fully initialized—you can do this from the terminal as before:
yarn develop
Once the server has restarted, you can test your new GraphQL API by opening the GraphQL playground: localhost:1337/graphql.
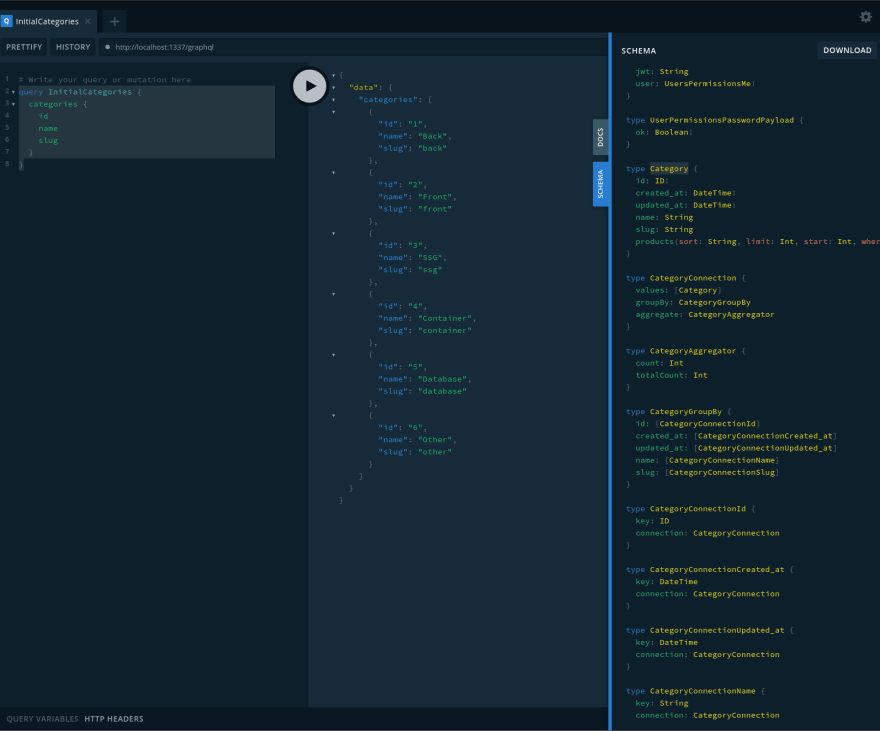
Next, type the following query to validate that you can retrieve categories:
    query InitialCategories {
      categories {
        id
        name
         slug
      }
    }
You should see the results on the right:
By default, the Strapi GraphQL plugin has Shadow CRUD enabled, a useful feature eliminating the need to specify any definitions, queries, mutations, or anything else.
Shadow CRUD will automatically generate everything needed to start using GraphQL based on your existing models. However, this auto-generated implementation might not be enough for every use case. It’s likely you’ll have to customize your queries and mutations for your specific use case.
Next, let's look at how you can use custom resolvers to customize both your queries and mutations.
Resolvers
Resolvers are functions that resolve a value for a type or a field in a schema. You can also define custom resolvers to handle custom queries and mutations.
Your current project is set up with Shadow CRUD, so you need to create a schema.graphql.js file in order to start customizing the GraphQL API implementation.
This file can be placed at the API or plugin levels. For this use case, let’s set this up at the API level, starting with the Product API.
Create a placeholder schema: graphql-commerce/backend/api/product/config/schema.graphql.js.
    module.exports = {
      definition: ``,
      query: ``,
      type: {},
      resolver: {
        Query: {},
        Mutation: {},
      },
    };
- definition: allows you to define new inputs, types, etc.
- query: allows you to define custom queries relevant to your API.
- mutation: allows you to define custom mutations relevant to your API.
- type: allows you to add a description, deprecated field, or disable the Shadow CRUD feature on a specific type.
-
resolver:
- Query: section for defining one or more custom query resolvers.
- Mutation: section for defining one or more customer mutation resolvers.
Now that you have a base schema set up, let's add a custom query.
Queries
A GraphQL query is used to read or fetch values, while a mutation is used to write or post values. In either case, the operation is a simple string that a GraphQL server can parse and respond to with data in a specific format.
– Tutorialpoints
For this example, use a new query type called productsByCategory. This query will allow you to quickly retrieve all available products in any given category. Go ahead and add the following to your schema.graphql.js:
    module.exports = {
       ...
        query: `
            productsByCategory(id: ID, status: ENUM_PRODUCT_STATUS, limit: Int): [Product]!
        `,
      ...
      };
This query specifies the query name the parameters will take, in this case:
-
idis the category ID. -
statusspecifies if the product is published or a draft. -
limitallows you to specify a limit for the results.
Additionally, [Product]! specifies the return type for this query, which is a list of product types in this case. Go ahead and test your query by opening the GraphQL Playground and running the following query:
    query ProductsByCategory {
      productsByCategory(id: 2, status: published, limit: 10) {
        id
        title
        description
      }
    }
However, if you attempt to run your query right now, you’ll find the following error:
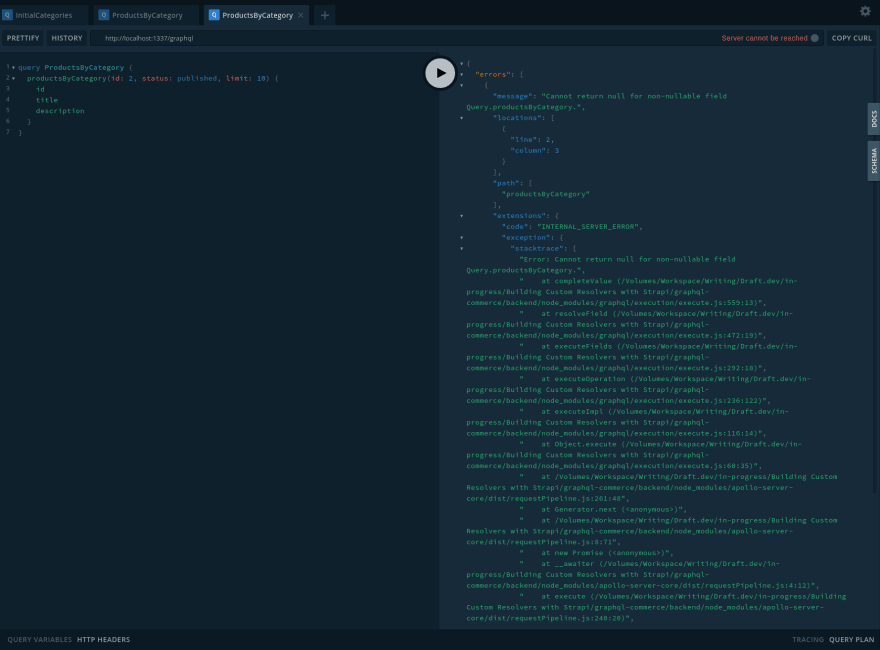
This makes perfect sense since you’ve only specified the new query type you want to add, but not how to resolve that query and return data. This is where resolvers come into play.
When defining resolvers, you have two options. You can define an existing controller action as the resolver for your custom query, or you can create a fully custom one inside the schema file. In this case, define a fully custom one.
Add the following code into your custom schema and try to rerun the query:
    module.exports = {
    ...
        resolver: {
          Query: {
            productsByCategory: {
                description: 'Return a list of products by category',
                resolverOf: 'application::product.product.find',
                resolver: (obj, options, { context }) => {
                  return [
                    {
                      id: 1,
                      title: 'Awesome T-shirt',
                      description: 'The most awesome T-shirt in the world',
                    },
                    {
                      id: 2,
                      title: 'Almost as awesome T-shirt',
                      description: 'Close second to the most awesome T-shirt',
                    },
                  ];
                }
            }
          },
    ...
      };
Once you have saved the changes to your schema, make sure to restart the server and run yarn develop again to make sure the changes are reflected.

Success! Your custom query is now returning some data. However, this isn’t very helpful as it's only returning hardcoded results.
Tweak your existing code to retrieve live results. For this example, you’re going to add a new controller action and then call that from your custom resolver:
    module.exports = {
        definition: ``,
        query: `
            productsByCategory(id: ID, status: ENUM_PRODUCT_STATUS, limit: Int): [Product]!
        `,
        type: {},
        resolver: {
          Query: {
            productsByCategory: {
                description: 'Return a list of products by category',
                resolverOf: 'application::product.product.find',
                resolver: async (obj, options, { context }) => {
                  const {id} = context.params;
                  const category = await strapi.services.category.findOne({id});

                  return category ? category.products : `There are no products on this category.`;
                }
            }
          },
          Mutation: {},
        },
      };
Next, you’ll go back to the GraphQL playground to rerun your query:

This time you should see a list of products that belong to the category you just specified. Now let's take a look at custom resolvers for mutations.
Mutations
Mutation queries modify data in the data store and return a value. They can be used to insert, update, or delete data.
– Tutorialpoints
The mutation resolvers look very similar to your query resolvers—with one main difference. In a query operation, the root fields are executed in parallel, but in mutations, root fields are executed in serial order.
For this example e-commerce application, create a custom mutation to assign a product to a category. Similar to when you created your query, start by defining the mutation name and parameters in your schema.graphql.js.
    module.exports = {
    ...
        mutation: `
            assignProductToCategory(productID: ID, categoryID: ID): Product!
        `,
    ...
      };
This is defining the mutation name and parameters. You can verify that by looking at the GraphQL Playground schema:

The schema reference can be accessed from the right tab on the GraphQL Playground:

GraphQL mutations follow slightly different syntax:
    mutation assignProductToCategory {
      assignProductToCategory(productID: 1, categoryID: 2){
        id
        title
        categories {
          id
          name
        }
      }
    }
The mutation takes two parameters: the productID and the categoryID that you specified. On top of that, you’re also defining the field that you want to retrieve back from the product.
Next, let's take a look at what the resolver definition looks like on the inside of your schema.graphql.js:
    ...
    Mutation: {
        assignProductToCategory: {
            description: 'Assign a product to a category',
            resolverOf: 'application::product.product.update',
            resolver: 'application::product.product.assignProductToCategory',
        }
    },
    ...
Unlike your query resolver, which is defined inside of your schema.graphql.js, for the mutation fully defer to the product controller. Start by adding the following function to the end of the graphql-commerce/backend/api/product/controllers/product.js controller:
    module.exports = {
    ...
      async assignProductToCategory(ctx) {
        const {id, categoryID} = ctx.request.body;

        let product = await strapi.query('product').findOne({ id: id }, ["id","title","categories"]);
        let category = await strapi.query('category').findOne({ id: categoryID }, ["id", "name", "slug",]);

        product.categories = _.concat(product.categories, category)
        product = await strapi.services.product.update({ id }, product)

        return product || 'No products found'
      }
This controller action will trigger the following steps:
- Load the product and category based on the IDs that you specified on your mutation
- Add the new category to the list of category relationships on the product
- Update the product with the new data
Finally, you can run the mutation that you specified before and see the results.

Success! Your product is now mapped to your new category.
Conclusion
As you can see, Strapi provides a highly flexible environment that can be used to create a fully functional content API in minutes. Plus, Strapi allows for full control over the API and system.
Whether you’re looking to create a simple headless content system or to fully centralize your e-commerce product information, Strapi offers a robust backend.


Top comments (0)