
This post is intended to be a guide for those that want to deploy a full-stack MERN app. It will be very specific on steps so it's a bit of a read, however, it will ensure there is minimal to no confusion on how to get from point A to point B.
Feel free to hop around if you've got some of these steps done, know how to do them already, what have you.
If this is your first time don't intimidate yourself! Just read and complete each step one at a time.
NOTE: This guide is based on my specific project structure and this works well for it. There are definitely other ways to deploy and other ways people prefer to have their project structured.
Let's get started!
Project Context
So you've got a cool project you'd like to show off to the world, how do we deploy a full-stack MERN app?
Let's first get some basics out of the way and context on how I did this: my project structure, basic configuration, and why I chose this way of deployment.
What is MERN?
MERN stands for MongoDB - Express - React - Node.
- MongoDB for the database
- Node & Express for the server-side
- React for the client-side
There's also the MEAN stack, which uses Angular instead of React, and the... MEVN(?) stack... whatever, it uses Vue instead of React or Angular.
Project Structure
One thing that is definitely dev to dev, company to company, is how we structure our project as a whole. By this I mean where our directories are in relation to each other. Here is my fully collapsed root directory to show you the top-level:

Just three things:
- My VS Code settings and extensions JSON files
- Client-Side Code
- Server-Side Code
I like this structure because to me there's a clear separation of responsibilities. It makes it easier for me to work on one or the other by just collapsing that whole folder. For instance if there's some UI feature I want to add/fix/alter then I have no reason to open my server directory.
I feel it makes it logical and simple to work with. Again, this is absolutely personal preference. This is also a big reason why this project was deployed in the way this guide will describe.
Some Options for Deployment
Credit to Dave Ceddia for putting this list together - this was found in a blog post of his.
- Keep
clientandservertogether- Your Express and React files will live on the same machine and Express will both serve your API requests and the React files as well
- Put your API behind a proxy
- This will allow your Express and React files to still live on one machine but each will be served by a different server
- Split
clientandserverapart (the option for this guide)- Host your Express API on one machine and the React App on another
Deployment is not something I have a ton of experience with so the first two options I've never attempted.
I do know that in some cases for deployment on one machine a lot of devs must nest their entire client directory inside of server. This was a big reason I went the route I did for deployment because for me I wanted to keep the structure pictured above with a clear separation of client-side code and server-side code.
Project Configuration
The base of the project I deployed was the Create-React-App, which comes with a webpack.config.js and other basic configurations out of the box, for the front-end.
I also used Webpack for the server directory as well to allow all those beautiful imports and exports to work for me and allow me to separate responsibilities on the server-side.
Here's a shot of the client and server directories expanded just to show you how I have it setup. There's only a couple things that will need to be there for this project structure to work which I'll point out.

Each directory, client and server, needs:
-
.gitignore- To ignore the files and directories we don't want stored in our repo
-
package.json- To specify our separate
dependenciesanddevDependencies
- To specify our separate
-
webpack.config.js- The
clientdoesn't have one because Create-React-App again provides one out of the box so I didn't need to specify it there
- The
You may have noticed I have a yarn.lock inside client and a package-lock.json inside server. I intentionally use yarn for client-side and npm for server-side because it helps me just keep those separate in my mind. I know if I'm using yarn then I'm in client and if I'm using npm I'm in server. Once again just a personal preference - you could use yarn or npm for both and have no issues.
You may have also noticed the Procfile which we'll get to later in the guide. As a teaser this will be needed by Heroku to deploy our server code which is why it lives inside of server.
Now that we have some context on how my project is setup let's talk about the actual process of deploying.
Deployment Process
What we're going to do specifically is host our server code on Heroku and our client code on Netlify. So our React App hosted on Netlify will make API requests to our Express API hosted on Heroku.
This will assume that you have both client and server running correctly and that you have already connected your app to a hosted database on MongoDB.
Steps
Create a Netlify account or sign in if you have one
Create a Heroku account or sign in if you have one
-
- There is instructions on how to do this for both Mac and Windows in this linked article
-
Go to your terminal and type
heroku login- This will prompt you to press any key, once you do it will take you to your browser where you will just need to click 'Log In'.
- Once this is successful you can close that browser window and navigate to your text editor now with your project open
-
Create a file named
Procfile, no file extension, in/serverdirectory.- Include this text and this text only in the
Procfileweb: node dist/main.js
- This tells Heroku what to do after building our app - which specifically is to run our bundled file from webpack with all of our server logic inside it
- If we didn't include this it would likely build just fine but never actually start our server
- Include this text and this text only in the
-
Now we must add to our
server/package.jsonthe following block:- You can more than likely add this anywhere (not nested in any other property) but I added it right below the
"main"property near the top in theserver/package.json. - Recommended to check your node and npm versions first to know which versions to put in this next block. While it likely won't break your app with a slightly different version it is safer to specify the versions you used in development to prevent unexpected behavior.
-
node -vornode --versionto check your Node version -
npm -vornpm --versionto check your npm version - Add those versions that return to this
enginesproperty if they're different than mine. - I used
"14.x"fornodeto say, "As long as the major version of Node is 14 then use the latest minor version. Major version releases are when they're likely to be breaking changes which we want to avoid. ```jsx
"engines": {
"node": "14.x",
"npm": "6.14.7"
}, - You can more than likely add this anywhere (not nested in any other property) but I added it right below the
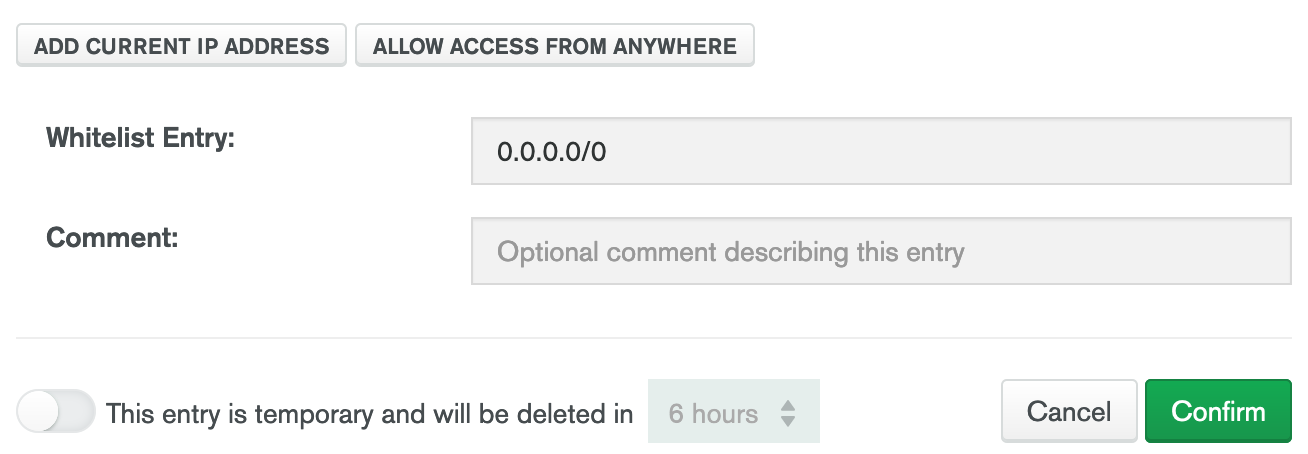
7. We need to allow access to your MongoDB database now from a new IP address. For simplicity, I added all IP addresses to be allowed.
- **BIG NOTE**: In a production app **_you do not want to allow all IP addresses to access your database_**! You will want to find the specific IP address that hosts your server-side and add just that one as allowed.
- The app I deployed does not contain any sensitive information. It's just a simple card game so no need for me to be super secure. _Once more_, do not do this for a real production app or even a side project that may contain sensitive information.
1. Go to the [MongoDB Website](https://www.mongodb.com/) and sign in
2. Navigate to the Project you're deploying using the dropdown on the top left
3. Then click the `Network Access` tab on the left side bar
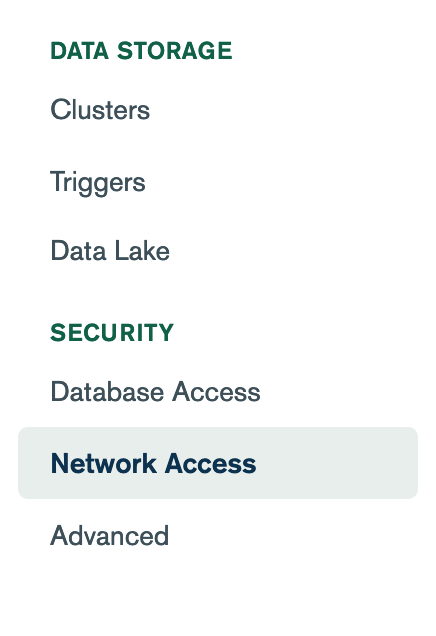
4. Click the green button on the right of the screen that says `Add IP Address`

5. A modal will popup. Click the button that says `Allow Access from Anywhere`. This will place `0.0.0.0/0` in the `Whitelist Entry` input. Then click `Confirm`.
8. In development I had the express server listen to `localhost:5000` to run there and my react app ran on port `3000`. We must change what this Express server will listen for to `app.listen(process.env.PORT || 5000)`
- So this will tell the server to listen to the `.env` environment variable `PORT` which **_we should not have set in our own_** `.env` _file_. OR it will listen to port 5000.
- The `process.env.PORT` will be set by Heroku's `.env` - they essentially will tell our server which port to listen to.
- If there is no such `process.env.PORT`, in other words there is no `.env` file that has been configured, then it will default to `5000`. This will allow us to keep that code in *and* be able to run it in our local development environment on port `5000` because we *do not* have a `.env` variable `PORT`.
```js
// server.js
/*
Other code...
*/
app.listen(process.env.PORT || 3000);
---

**Ensure in your terminal that you are inside the _root_ of the project you are deploying for these next two steps**

---
-
Now back inside your Terminal the next command we type is
heroku git:remote -a <project-name>. Replace<project-name>with really whatever name you want - I recommend the name of your project to keep it simple. So for example it will look likeheroku git:remote -a my-project.- This is going to create a remote connection with Heroku specifically and also create a branch on that remote for you and your app name will be the name you provided, such as
my-projectabove. Next we're going to actuallypushour server code to that remote Heroku branch. ```
heroku git:remote -a my-project
- This is going to create a remote connection with Heroku specifically and also create a branch on that remote for you and your app name will be the name you provided, such as
10. The command we need to push our `server` code specifically, because we have the separation of `client` and `server` in our project structure, is `git subtree push --prefix server heroku master`
    - This is telling git to push a subtree, or in other words a *subdirectory*, from our current git repo. The `--prefix` flag comes before that subdirectory that we want to push, in our case it is `server`. And lastly we're telling it to push to the remote `heroku` our `master` branch.
    ```


    git subtree push --prefix server heroku master
---

**IF you want to test and ensure that you've deployed your server to Heroku just add in a test route in your `server.js` like:**
```js
app.get('/', (req, res) => { res.send('Hello from Express!')
You can view your app by:
- Copy and pasting the url that will appear in your Terminal after successfully pushing your code to the remote Heroku branch
- Navigating to your project on [the Heroku website](http://heroku.com) and there will be a button that says 'View App' - click it and it will take you there
- If you see the 'Hello from Express!' (or whatever test message you used) then that means your server is running correctly
---
11. Now for our MongoDB connection to work we must define an environment variable for Heroku to store our MongoDB connection string.
> We want to keep our connection string secret as we don't want anybody able to connect to our database and change, delete, add things etc.
> In our local build the connection string, is stored in our `.env` file inside of `/server`. I named by connection string `MONGODB_URI`. You can do this next step on the Heroku CLI or on the Heroku website.
> I recommend the website it's more straightforward and you don't have to worry about escaping special characters. I'm going to describe the next steps going through the website.
- Navigate to your dashboard on Heroku
- Click on your project name that will be present from our previous steps where we created our remote branch and pushed the code
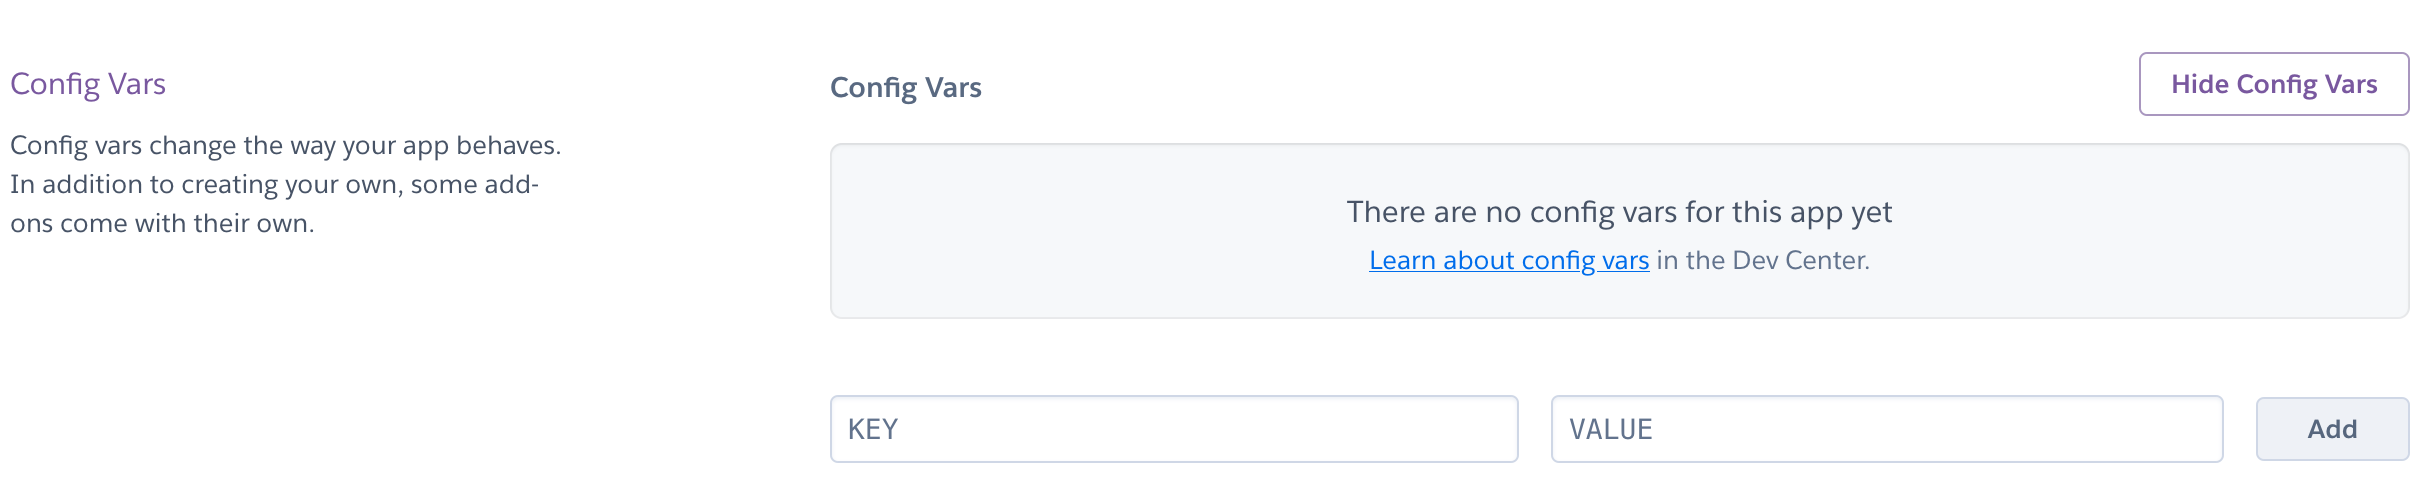
- Navigate to the Settings tab near the top
- The second section is 'Config Vars' - click on 'Reveal Config Vars'
- You'll see two inputs:
- One is the name of your environment variable - name this **whatever you have it named in your local build**. For me that is `MONGODB_URI`.
- Second is the value - paste your whole connection string here that you should copy from your `.env` file directly to avoid any typos.
- Then just click 'Add' and our MongoDB connection environment variable is set.
---
Our `server` code is officially deployed and configured correctly. Now onto the `client` code with Netlify.
---
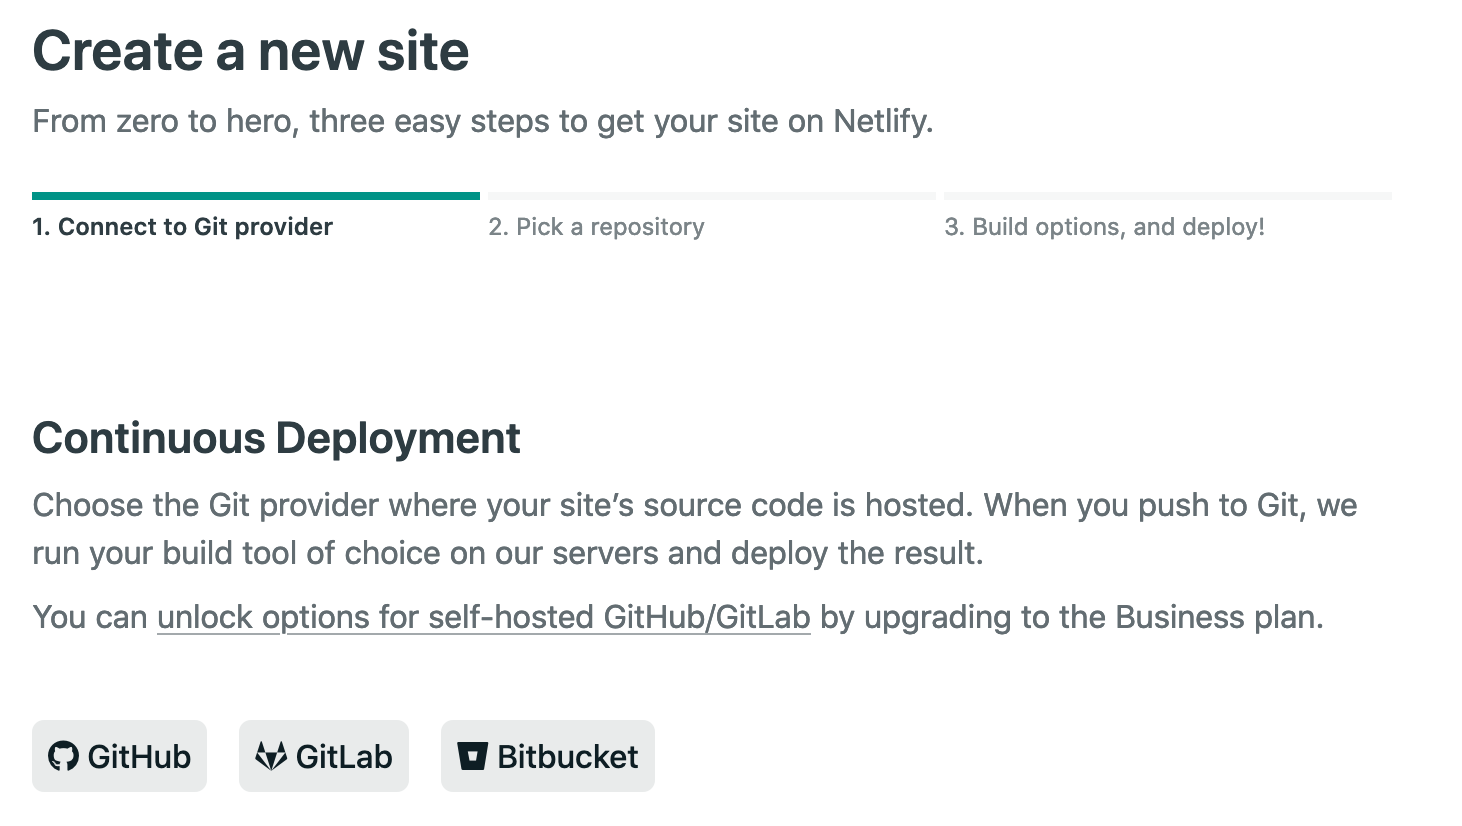
12. Next is to deploy the front-end React code in `/client` to Netlify. Login to Netlify if you haven't already, the default tab should be `Sites` or just navigate to that tab.
- Click the button that says `New site from Git`

- Click the `Github` (or `GitLab` / `BitBucket` if that's where your repo is hosted) button below `Continuous Deployment`
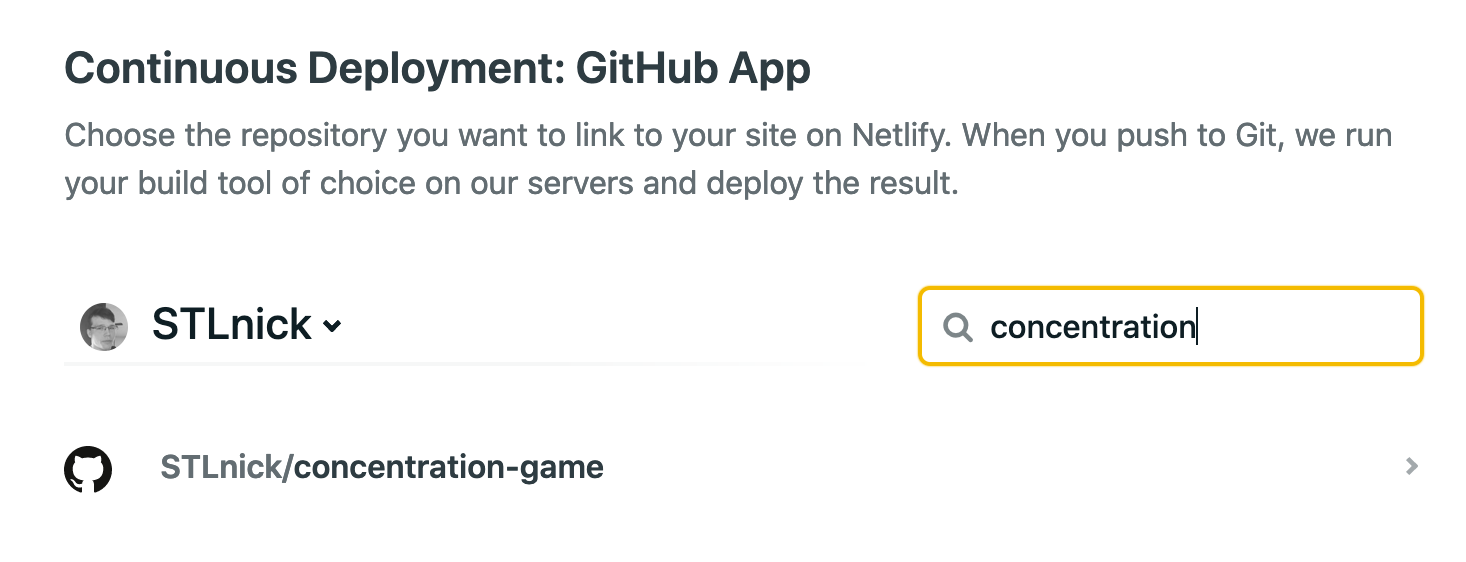
- There will be a search bar that says `Search Repos` - type in the name of your project repo here to find it then click the line that has the repo you're looking for
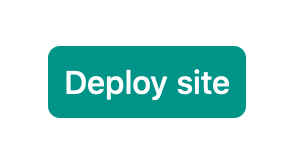
- Click `Deploy Site`.
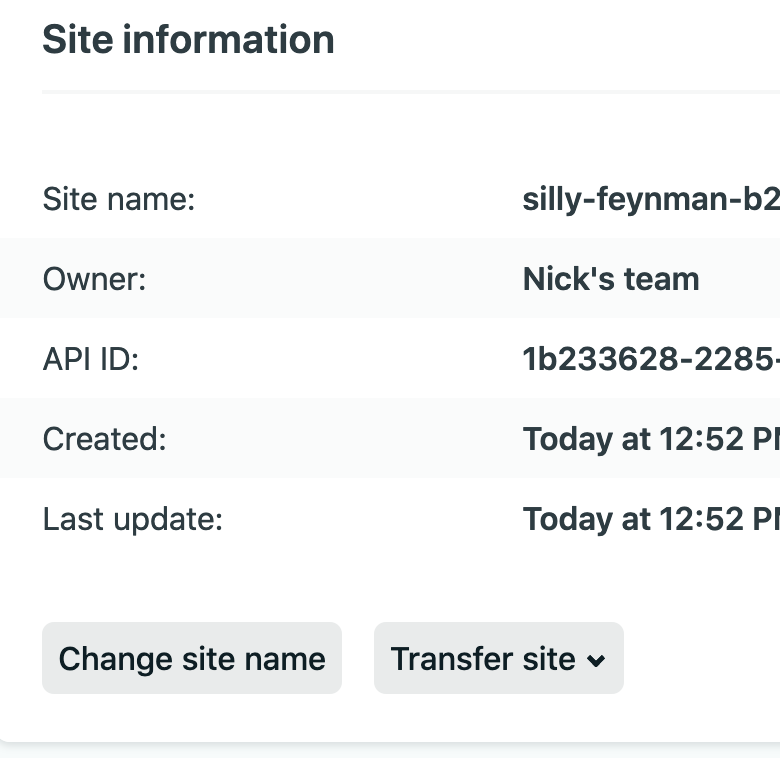
- Once that's done it will take you to a page that shows a box near the top with your auto-generated site name and your site url right under it. In that box click `Site Settings`.
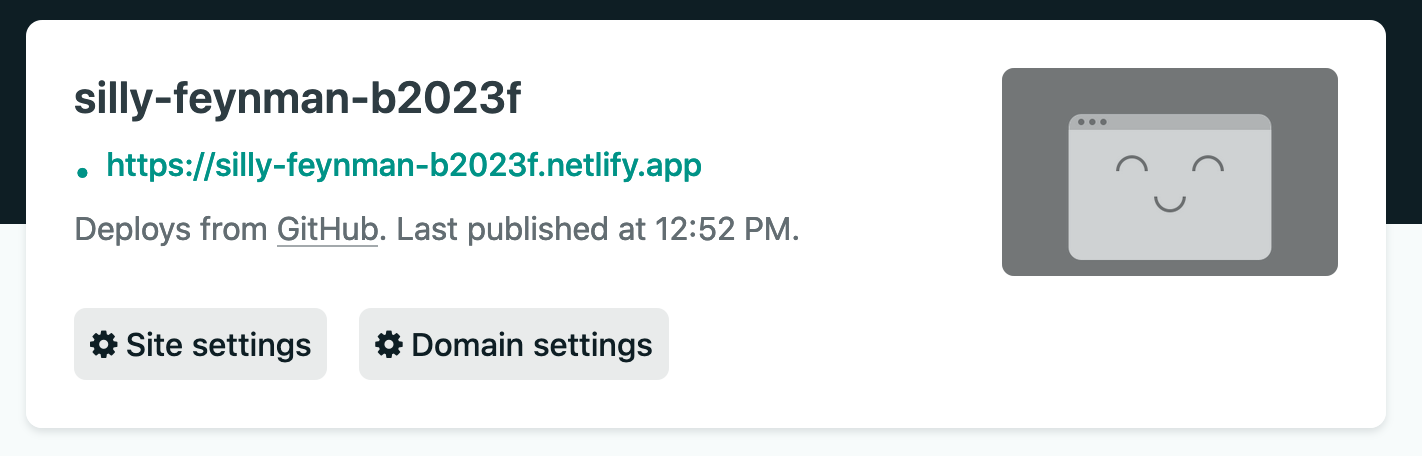
- First you can change your site name here if you'd like by clicking the `Change site name` button on that first page. Do that if you'd like.
- Now on the left menu bar click on the tab that says `Build & Deploy`.
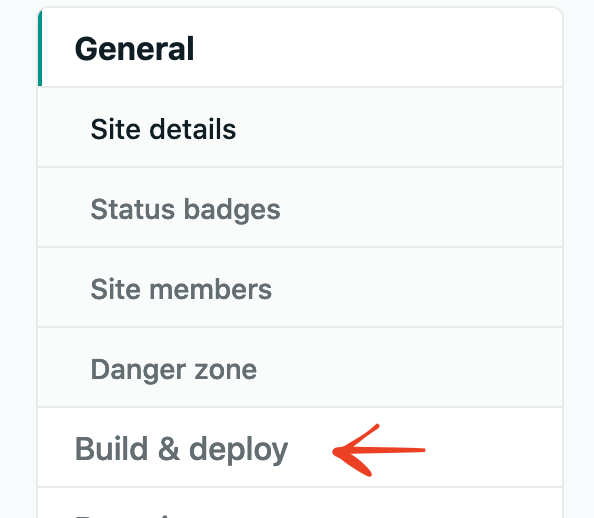
- Click the `Edit Settings`

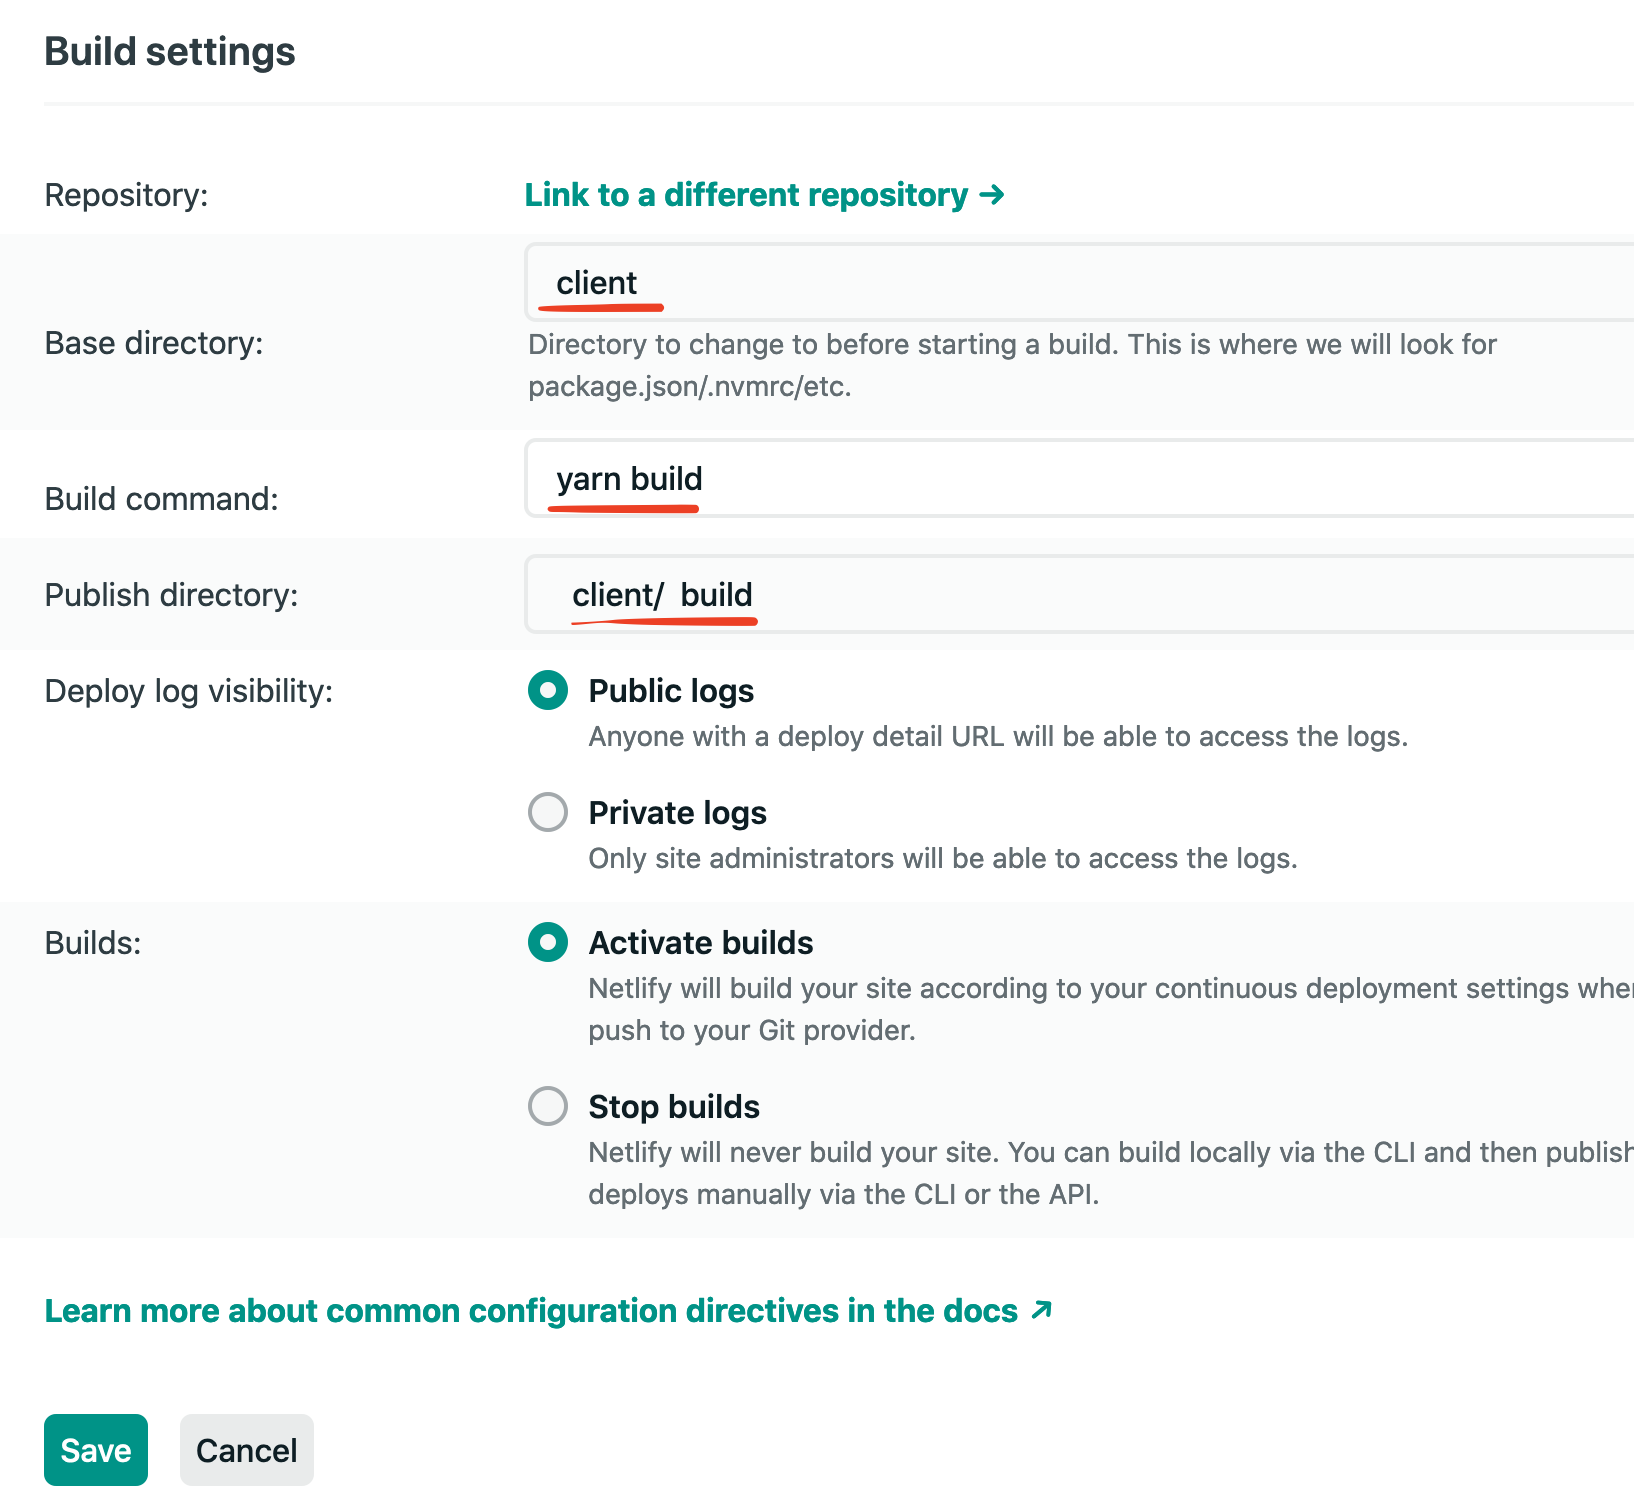
- Change your `Base directory` to `client`, change your `Build command` to `yarn build`, and change your `Publish directory` to `client/build`. Then click the `Save` button on the bottom left.
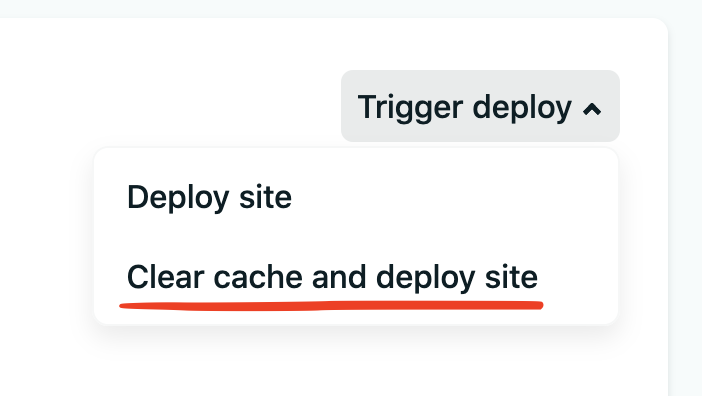
To ensure this all redeploys after we change these settings I like to explicity trigger a redeploy.
- Near the top in the tabs located right under your team name and site name click on `Deploys`

- Then click the `Trigger deploy` button which has a drop down with two options. I always use `clear cache and deploy site` to ensure a fresh build that has all changes I've made.
13. **LASTLY** after we deploy our front-end React code we must ensure _any requests_ we're sending from the client-side is changed to use our Heroku URL now instead of localhost.
- In my structure the requests were being made from `client/api/index.js` so navigate to that file and *any request that contains* `http://localhost:5000` must be replaced by your Heroku URL.
```js
// Before
const res = await fetch('http://localhost:5000/scores/'
// After
const res = await fetch('https://my-project.herokuapp.com/scores/')
// 'my-project' in the URL will either be the auto-generated
// name from Netlify or if you changed the name it will
// be the name you gave it
Ensure that you push these changes up to GitHub. Netlify will trigger a redeploy when they detect changes to your master branch. So for this to work you must make those changes apparent to Netlify essentially.
Now any request, instead of going to your local server you've ran while developing, will go to the hosted server you just deployed to Heroku with all of your Express Routes still intact and functioning properly.
You did it!
It's undoubtedly a long process to get this done. But the important thing is that it can be done!
It's awesome to see the things we build on our local machine in development. After this though you can send a live link to your friends, colleagues, etc. for them to check it out!
This is awesome to have a live example as well for anyone looking for a job. Being able to not only have a link on your Resume or Portfolio site to the code on GitHub but for recruiters, managers, whoever to be able to see the project in action is huge!
Let me know in the comments...
... how you like to deploy! Link me an article, give me a brief overview, or whatever you want. I'd love to hear of the other ways devs get their projects out there for the world to see and enjoy!

Top comments (35)
hey, guys. idk what's wrong, but i can't connect my server with client. can somebody help me with this? the only thing i know is that links which i used on localhost is not working and they looks like this 5f85f700cdda755ccf152d30--medvedev... . it doesn't look like it should be
my git github.com/Eugene362624/pdf-app
Hey Eugene, can you briefly run me through what the process is for using your app and where it fails?
I see it’s something to create a pdf after entering some info but at what point does it not work?
in general, the idea is this: this is a project for an internship in a company. There is a database for 10,000 records, it should load in about 10 seconds. Then a list of entries from mongodb should have appeared. There they can be changed and deleted. The routing itself does not work, I cannot follow the links and there is no download from the database. everywhere it gives a 404 error, so, apparently, I did not correctly specify the URL of my server to heroku. but I don't understand where .-.
I’m looking through the code now to maybe find some potential issues. One thing popped in my mind though.
Did you specify in your MongoDB cluster to allow Network Access from either all IP addresses or your Heroku IP address? (Step 7 in the post)
So far checking out your code I noticed a couple things. To be clear Heroku is where you would've deployed your server. So in your
frontendis where any axios request you're making should go to your Heroku URL which I gather ishttps://medvedevs-pdf-app.herokuapp.com.I'm just going to try and list out some of the potential issues / confusions could be.
In
App.jsyou do not have a component specified for your root url.<Route path='/' />should have a component property attached. Not sure if you wanted something for that Route, if not, you could remove that.Looking at your Network request it's trying to request your Netlify URL for the
/files/syncpath and that is a path you have defined in yourbackend/server.jsnot yourfrontend. I'm not exactly sure why that is honestly looking at your code nut it's trying to requesthttps://5f85f700cdda755ccf152d30--medvedev-pdf.netlify.app/files/syncinstead ofhttps://medvedevs-pdf-app.herokuapp.com/files/sync.One big thing in
server.jsis you need to remove the base URL from all of your routes.https://medvedevs-pdf-app.herokuapp.comneeds to be deleted. Your server code lives at that url so you don't have to specify that part. Only specify the rest of the path - so your paths should just be/,/files/:id,/files/sync,/files/:id/update, and so on. Otherwise your request is going tohttps://medvedevs-pdf-app.herokuapp.com/https://medvedevs-pdf-app.herokuapp.com/files/syncwhich your server will not pickup.In your
frontendinside ofFile.jsxin your methodsCreateFileanddeleteFileyouhistory.push()to your server (Heroku) URL. With react-router'shistoryyou should be pushing to valid client-side routes or essentially different URLs you'd see in the browser address bar.In
File.jsx, thecreateAndDownloadPdfmethod, youhistory.push('/files')and also your Delete button at the bottom of the file Linksto={'/files'}. You don't have a Route defined inApp.jsnor any conditional renders dependent on the URL path being/files.I'm not sure if this was working prior to deployment to Heroku/Netlify but it seems there are a few places where you may have gotten mixed up on making
axiosrequests to your server for a task to be performed and defining yourclient-sideroutes to display certain data.First thing I would try if it was working prior is to absolutely change the base URLs in your
server.js, that is definitely one part of the bigger issue.I am really very grateful to you for the time spent on "consulting" me :) many thanks for the detailed description of the problems in my code, I will fix them. yes, on localhost this service turned out to be completely working, but I will definitely try to make it work on the hosting
Absolutely, no problem. A second set of eyes can be a life-saver sometimes! Throw an update in here if it gets working or not and I can try to dig a little deeper. Good luck!
Did you not get a CORS error while making call from netlify to heroku?
I did not. In my Express router I used the cors package so
app.use(cors())to prevent that.I do, however, need to remove that and just specify to allow requests and responses between my Netlify and Heroku urls. I haven’t done it yet but I do know it can be done to allow those two urls to communicate.
Thanks for replying 😀
cors() package did not help with browser hosted on one domain making a backend call to a different domain server. I had to add "_redirects" file specified by Netlify documentation to redirect the browser-server call to server-server call between netlify and heroku.
Anyways, I followed this article to get my fullstack running. So a BIG BIG THANK YOU!! It was very helpful. 🤗
I'm very glad it helped! And now you've helped me by giving me a better idea of what I'll need to do to set my cors up properly for Netlify instead of allowing all cors. So thank you!
I am getting the same cors error from the browser. I tried surfing the internet for the solution but could not find one and could not understand the Netlify's documentation either.
Now, the thing is: I want to register/login using my backend to save all the data and to retrieve it. I have changed everything from the client side, it looks fine to me and the server is also up and running. This is the only issue. How did you resolve it. Could you elaborate it?
--
For some reasons, I can not upload the image here but I am pretty sure you got the same error as mine. It's like:
Access to XML....(BACKEND URL) from origin (FRONTEND URL) has been blocked by CORS policy....
@stlnick
@salyadav
There is more to the error but I am just pointing out the main one.
I hope you get the point and help me resolve it asap!
--
Cheers~
Thank you for this article by the way, it has helped me loads. Also, I know I am late to this post, but I am wondering how you solved your cors issue using _redirects file as I have scoured the docs and still confused about how to go about this. I have a _redirects file as well as a netfliy.toml file trying to redirect requests from my Netlfiy client to my Heroku backend but to no avail. Any direction in this matter would be greatly appreciated
github.com/salyadav/gundoosmean-cl...
This is the reference to the client side code hosted on netlify.
github.com/salyadav/gundoosmean-se...
This is the server side code on heroku.
The reason why this will not be an issue on local, let’s say if you have your frontend backend in different port is because both are localhost and you are not actually making a cross origin request.
There Are other ways to resolve this core error, which is including your cors header in the http request that you are making.
Adding __redirects is another way.
Things to look out for-
The base_url changed to herokus server, and the redirect for the api calls.
Let me know if the reference to the github also doesn’t help... we can debug your code further.
Hey Nick, I'm having trouble deploying my client and I get the following error.
Can you help me out?
Failing build: Failed to prepare repo
Failed during stage 'preparing repo': Error checking out submodules: fatal: No url found for submodule path 'server' in .gitmodules
: exit status 128
Okay just to get some context.
Are you deploying client to Netlify?
And is your project structure the same as mine in the article? As in do you, in the root of your project, have a separate client and server folder?
Yes exactly the same
I deployed the server successfully on heroku that's fine, but i'm getting errors when i try to deploy the client on Netlify
Okay, great. Looking it up through google it looks like there’s some permission issue with the repo and Netlify being able to clone it. Check the link below out and go to “Build fails with exit status 128”. Also maybe check out the “Troubleshoot repository linking” section. There’s a few steps to follow to try and correct the issue.
docs.netlify.com/configure-builds/...
Do you own that repository? As in, is it yours alone and do you have admin privileges on it?
Hopefully those steps can remedy it but let me know if not and we can dig deeper.
Somehow I got it to work by deleting the repo and restarting everything. Thanks for the quick reply though!!
Awesome! I’m glad it worked for you.
Great post Nick, thanks.
One thing to mention that
heroku git:remote -a my-projectwon't work unless you already created an app namedmy-projecton Heroku. It will throw an errorError: Couldn't find that app..You should run
heroku create my-projectbefore running the command.Great tutorial. Thanks so much!
If anyone is trying this with GatsbyJS, I needed to insert the following code for my build to complete successfully:
// gatsby-config.js
Hi Nick,
I followed your instruction. It looks like uploaded and I am able to login but it fails to fetch contacts. In console it shows it makes reques to itself(netlify url) instead of heroku. Is it normal? In network, it shows correct request url(heroku url). I am confused.
Hi Nick, nice article, need help with the next step,
How to get the HTTPS certificate for all the links..
Bought a domain on NameCheap
need HTTPS for,
1 - customdomain.com to Netlify URL
2 - customdomain.com/api/ to Heroku URL
How to go about this ?
Hello guys, I know in the article is mentioned that the communication between backend and frontend is not secure. But I want to know how to make it secure. What are the alternatives to IP restriction for the example heroku and netlify? I don't talk about user authentification, I want to know how to make the connection between the backend and frontend secure. Many thanks in advance!
do you have a github link to the steps mentioned above?
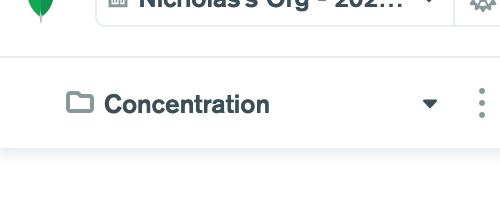
The project I did this on is:
github.com/stlnick/concentration-game
Just browse the commits and you’ll see the steps I had to take in the code. I tried to commit each step to make it clear what I was doing.
I was getting this error after I tried to redeploy the netlify website. I'm using firebase in the client folder, is there a way to solve this?