
Almost every frontend application needs some form of authentication. This post will build a JWT login flow with Auth0, Next.js, and StepZen. Auth0 Next.js authentication library nextjs-auth0, a library maintained by Auth0 to make integrating with Next.js flawless, will handle the authentication flow. Auth0 is a popular authentication provider that supports many different authentication methods, including social login, passwordless login, and more.
TLDR; You can find the complete source code for this blog post on GitHub.
What does the login flow look like?
For this login flow, we will rely on OAuth 2.0 and more specifically the Authorization Code Grant flow. This flow involves both a frontend and a backend. The frontend application will handle the login flow and redirect the user to the backend. The backend will exchange the authorization code for a JSON Web Token (JWT) and return it to the frontend application. The frontend application will then use the JWT to make requests to the backend.

The frontend application will be a Next.js application that uses the nextjs-auth0 library to handle the login flow. In this application, users click a button that brings them to the Auth0 Universal Login page. From this page, they can log in using a combination of email address and password, or one of the many social providers that are available in Auth0. After logging in, the user is asked to grant access to their profile information to the authorization server. The backend StepZen GraphQL API references an Auth0 JSON Web Key Set to verify the JWT before returning sensitive data to the frontend application.
Setting up Auth0
In this section, we will configure our Auth0 account to integrate it into our application later. This involves creating an Auth0 account, creating an API in the Auth0 dashboard, and an application that will be used to generate access tokens for our StepZen GraphQL API.
First, you need to have an Auth0 account. If you don't have one yet, you can create one for free by following the instructions on the Auth0 website.
Second, we need to create an API in Auth0. This API will represent our StepZen GraphQL API and give it access to the Auth0 authorization server. To do this, we need to go to the Auth0 dashboard and:
- Click the Applications link in the left navigation pane.
- Click the APIs` link in the left navigation pane.
- Click the + Create API button.
- On this page you need to fill out the following fields:
- Enter a name in the Name field to help you identify this client. For example: "My StepZen API".
- For the Identifier field, enter a unique value. For example: "https://my-stepzen-api.com".
- And click the Create button.
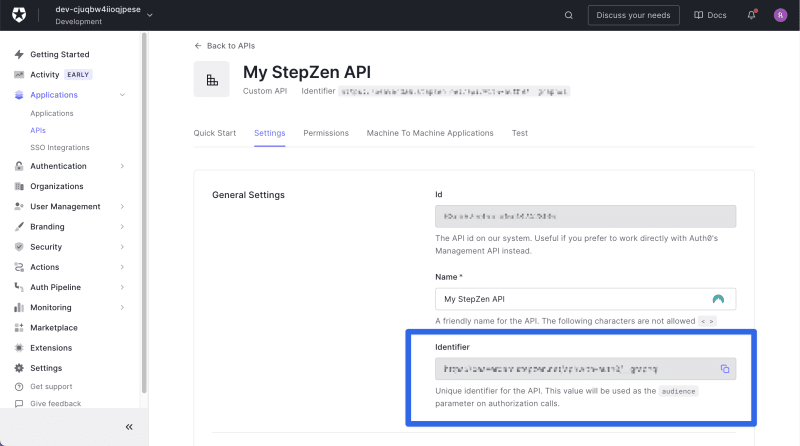
You should now see a page that contains the Identifier and Audience fields. The Identifier is the URL that will be used to identify your API; this is the value that will be used to identify your API when requesting an access token. We will need these values later on, so copy them somewhere.
Not setting up an API in this stage will lead to Auth0 creating an opaque access token. This token will not be able to be validated by StepZen, but only by Auth0. This is not what we want, so make sure to create an API.
Finally, we need to create an application in Auth0. This application is the authorization server that will be used to generate access tokens for our StepZen GraphQL API.
- Go Back to the Applications page.
- Click the + Create Application button.
- Fill out the following fields:
- Enter a name in the Name field to help you identify this client. For example: "My StepZen App".
- For application type, select Single Page Web Applications (or Regular Web Applications).
- Click the Create button.
Go the Settings tab to find the configuration needed to integrate with StepZen:
- Domain
- Client ID
- Client Secret
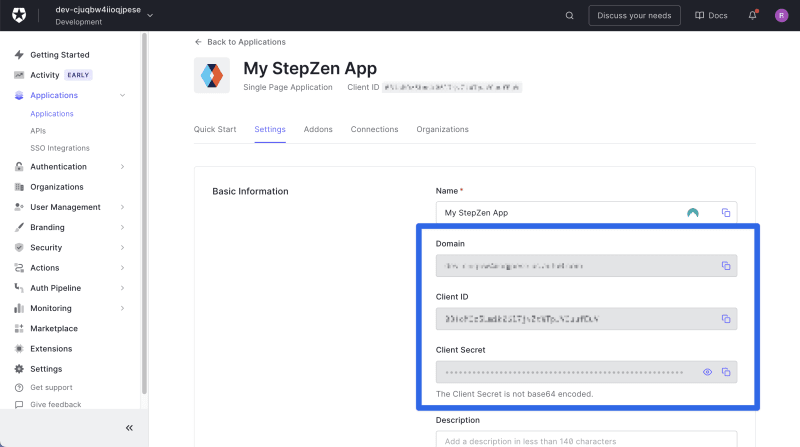
Copy the values for the Domain, Client ID, and Client Secret fields. We will need these values in our frontend application later on.
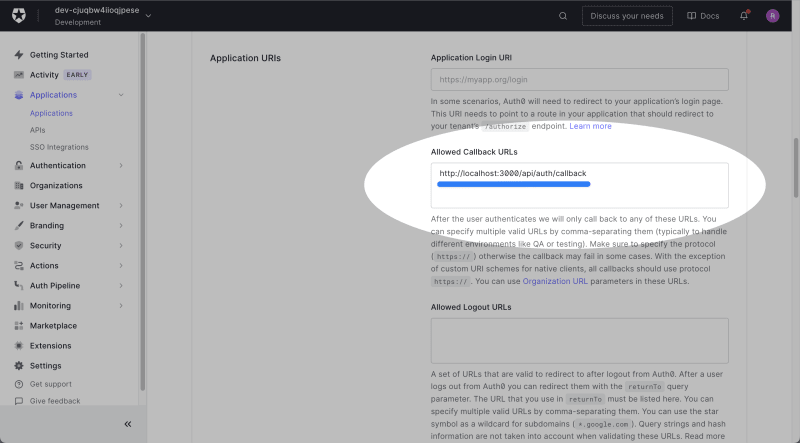
We also need to configure the application to allow it to redirect to our frontend application. Scroll down to the Allowed Callback URLs field and add the following URL: "http://localhost:3000/api/auth/callback"
Great! We have now configured our Auth0 account and can move on to the next step.
Creating a Next.js application
In this section, we will create a Nextjs frontend application to handle the login flow with nextjs-auth0. This application will use the nextjs-auth0 library to handle the login flow. This library will take the redirect to the Auth0 Universal Login page and handle the callback from the Auth0 authorization server. It will also handle storing the JWT in the browser and, optionally, refreshing the JWT when it expires.
You can create a new Nextjs application by running the following command:
bashnpx create-next-app`
`
The Next.js setup will prompt you with a few questions, such as the name you want to give to the application, if you want to use TypeScript, and if you want to use experimental features. We will use the default settings for this post, so you can press enter to accept the default values.
Once you've finished the setup of the Next.js application, let's install the following dependency that is needed for authentication:
`bash
npm install @auth0/nextjs-auth0
or if you're using yarn
yarn add @auth0/nextjs-auth0
`
And add your Auth0 API and Application configuration to the .env file:
bash

AUTH0_SECRET='LONG_RANDOM_VALUE' # A long, secret value used to encrypt the session cookie

AUTH0_BASE_URL='http://localhost:3000'

AUTH0_ISSUER_BASE_URL='https://YOUR_AUTH0_DOMAIN.auth0.com'

AUTH0_CLIENT_ID='YOUR_AUTH0_CLIENT_ID'

AUTH0_CLIENT_SECRET='YOUR_AUTH0_CLIENT_ID'

AUTH0_AUDIENCE='YOUR_AUTH0_API_IDENTIFIER'
You can execute the following command to generate a suitable string for the
AUTH0_SECRETvalue:node -e "console.log(crypto.randomBytes(32).toString('hex'))"
With the configuration in place, we can now add the code to the Next.js application to use the nextjs-auth0 library to handle the login flow.
Create a new file called
pages/api/auth/[...auth0].ts(or create the file as.jsif you prefer not to use TypeScript). Thenextjs-auth0library will use this file to handle the login flow and as the callback URL for the Auth0 authorization server.Add the following code to the new
pages/api/auth/[...auth0].tsfile:
`ts
import { handleAuth, handleLogin } from '@auth0/nextjs-auth0';
export default handleAuth({
login: handleLogin({
authorizationParams: {
audience: process.env.AUTH0_AUDIENCE, // or AUTH0_IDENTIFIER
// Add the offline_access scope to also get a Refresh Token
scope: 'openid profile email', // or AUTH0_SCOPE
},
}),
});
`
- We also need to wrap the application with the
UserProvidercomponent. This component will be used to store the user information in the React context. This will allow us to access the user information in any component in the application. For example, by using any of the Hooks provided bynextjs-auth0. To do this, we need to add the following code to thepages/_app.tsxfile:
`ts
// pages/_app.tsx
import '@/styles/globals.css';
import type { AppProps } from 'next/app';
import { UserProvider } from '@auth0/nextjs-auth0/client';
export default function App({ Component, pageProps }: AppProps) {
return (
);
}
`
- The last step is to add a login button to the application. To do this, we need to add the replace the contents in the
pages/index.tsxfile with the following code:
`tsx
// pages/index.tsx
import Head from 'next/head';
import Link from 'next/link';
import styles from '@/styles/Home.module.css';
export default function Home() {
return (
<>
My StepZen App
  <main className={styles.main}>
    <Link href='/api/auth/login' className={styles.loginButton}>
      <span className={styles.auth0Logo} />Login with Auth0
    </Link>
  </main>
</>
);
}
`
- And finally, we need to add some styles to the application. Open the file called
styles/Home.module.cssand add the following code to the bottom of it:
`css
.loginButton {
display: flex;
align-items: center;
background: #eb5424;
padding: 10px 20px;
border-radius: 10px;
font-size: larger;
color: white;
}
.auth0Logo {
width: 32px;
height: 32px;
margin-right: 10px;
background: url('/auth0_icon.svg');
}
`
- Now run the application by executing the following command:
`bash
npm run dev
or if you're using yarn
yarn dev
`
- Open the application in your browser by navigating to
http://localhost:3000. You should see a login button:

- Once you press the login button, you should be redirected to the Auth0 Universal Login page. Sign up here for a new account that will be added to the linked Auth0 account.

- After clicking the Continue button, you should be redirected back to the application. If you open the browser's developer tools and look at the cookies, you should see a new cookie added that includes your JWT. This cookie is used to authenticate you in the application.
We now have the first part of the login flow that uses Auth0 to get a JWT. Next, we want to use this JWT to authenticate the user in the StepZen GraphQL API, so we can fetch the user's profile information from the Auth0 API.
Creating a StepZen GraphQL API
With StepZen, you can create a GraphQL API for every data source, including REST APIs, databases, and more. In this section, we will create a GraphQL API that uses the Auth0 JWT to authenticate the user. The GraphQL API will fetch the user's profile information from the Auth0 API.
First, we need to create a new StepZen project. To do this, create a new directory called stepzen in the root of your project and run the following command in your terminal:
bashstepzen init api/jwt-login-flow`
`
This will create a new StepZen configuration file and set the endpoint name to api/jwt-login-flow. You can also choose to use a different name if you prefer.
To set up the StepZen GraphQL API, we need to complete the following steps:
- Create a new schema file called
api.graphql. This file will contain the GraphQL schema for the API, including a query to get user information from the Auth0 API. Replace the value forYOUR_AUTH0_DOMAINwith the domain of your Auth0 account:
`graphql
type User {
email: String
email_verified: Boolean
name: String
nickname: String
picture: String
sub: String
updated_at: DateTime
}
type Query {
me: User
@rest(
endpoint: "https://YOUR_AUTH0_DOMAIN/userinfo"
forwardheaders: ["Authorization"]
)
}
`
- StepZen needs to have an
index.graphqlthat references theapi.graphqlfile. Create a new file calledindex.graphqland add the following code to it:
graphql

schema @sdl(files: ["api.graphql"]) {

  query: Query

}
- To verify the Auth0 JWT, we need to create a new file called
config.yaml. In this file, we'll add the configuration to valide the JWT using the JSON Web Key Set (JWKS) endpoint from Auth0 and the configuration to protect the GraphQL querymeso authenticated users can only access it. Replace the value forYOUR_AUTH0_DOMAINwith the domain of your Auth0 account:
`yaml
Add the JWKS endpoint
deployment:
identity:
jwksendpoint: 'https://YOUR_AUTH0_DOMAIN/.well-known/jwks.json'
Set the policies
access:
policies:
- type: Query
policyDefault:
condition: true
rules:
- condition: '?$jwt' # Require JWT
fields: [me] # Define fields that require JWT
`
- Now run the following command to deploy and run your StepZen project:
bashstepzen start`
`
- In your terminal, you should see a message that includes the URL of your GraphQL API. Copy the URL (which starts with
https://YOUR_USERNAME.stepzen.net/api/******and paste it into the.envfile:
`bash
Your StepZen endpoint
STEPZEN_ENDPOINT='YOUR_STEPZEN_ENDPOINT'
`
That's it! We now have a working GraphQL API that can be used to validate the Auth0 JWT and fetch user information from the Auth0 API.
In the next section, we'll use this GraphQL API to fetch the user's profile information in the Next.js application.
Fetching user information in the Next.js application
In this section, we will use the GraphQL API that we created in the previous section to fetch the user's profile information in the Next.js application. We'll take the token from Auth0 using the library nextjs-auth0 to authenticate the user in the GraphQL API.
To do this, we need to complete the following steps:
- Create a new file called
pages/api/graphql/index.ts. This file will be the API route to send requests to the StepZen GraphQL API. It uses thewithApiAuthRequiredfunction from thenextjs-auth0library, so the JWT will be available in the request, which we can extract using thegetAccessTokenfunction. We're using an API route here as exectuting the data fetching server side is the recommended way to fetch data in Next.js. This JWT will then be forwarded to the GraphQL API together with the GraphQL query. You can add the following code to this file:
`ts
import type { NextApiRequest, NextApiResponse } from 'next';
import { withApiAuthRequired, getAccessToken } from '@auth0/nextjs-auth0';
export default withApiAuthRequired(async function handler(
req: NextApiRequest,
res: NextApiResponse,
) {
const { accessToken } = await getAccessToken(req, res);
const headers = {
Authorization: Bearer ${accessToken},
'Content-Type': 'application/json',
};
const body = req.body;
try {
const response = await fetch(process.env?.STEPZEN_ENDPOINT || '', {
method: 'POST',
headers,
body,
});
const json = await response.json();

res.status(200).json(json);
} catch (e: unknown) {
const message = (e as Error).message;
res.status(500).json({ error: message });
}
});
`
You can also generate a code snippet to connect to a StepZen GraphQL API from the StepZen dashboard. You can find this under the Explorer tab in the left pane of the dashboard by clicking on the Connect button in the top navigation.
- In the
pages/index.tsxfile, we're using the new API route to fetch the user's profile information. When sending a request to this API route, we need to pass along the GraphQL query to get the user's name and picture. You can add the following code to this file:
`tsx
export default function Home() {
const [userData, setUserData] = useState
name: string;
picture: string;
}>(null);
useEffect(() => {
async function fetchData() {
const res = await fetch('/api/graphql', {
method: 'POST',
body: JSON.stringify({
query:
            query {

              me {

                name

                picture

              }

            }
}),
});
const json = await res.json();
  if (json?.data?.me) setUserData(json.data.me);
}

fetchData();
}, [setUserData]);
return (
// ...
);
}
`
- After retrieving the user's profile information, we can display it in the UI. You can add the following code to the
pages/index.tsxfile:
tsx${userData.name}'s profile picture
return (
<main className={styles.main}>
<div className={styles.center}>
{userData ? (
<div className={styles.profile}>
<img
src={userData.picture}
alt={}
width={200}
height={200}
/>
<p>
<strong>Welcome {userData?.name}!</strong>{' '}
<a href='/api/auth/logout'>Logout</a>
</p>
</div>
) : (
<Link href='/api/auth/login' className={styles.loginButton}>
<span className={styles.auth0Logo} />
Login with Auth0
</Link>
)}
</div>
</main>
)
Next.js recommends using the
Imagecomponent fromnext/imageto render images. However, when rendering remote sources, you need to allow access to the remote URLs of these sources. Therefore, we're using theimgtag instead.
- Finally, we need to add the styling for the profile information. You can add the following code to the
Home.module.cssfile:
`css
.profile {
display: flex;
justify-content: center;
align-items: center;
flex-direction: column;
margin-top: 20px;
}
.profile img {
border-radius: 50%;
margin-bottom: 20px;
}
.profile a {
color: #eb5424;
text-decoration: underline;
}
`
- Now, if you open the application in the browser again and click on the Login with Auth0 button, you should be redirected to the Auth0 login page. After logging in, you should see the user's profile information in the UI.

- As a finishing touch, we can show a loading indicator while the application checks if the user is authenticated and fetches the user's profile information. Therefore the
useUserhook should be imported from@auth0/nextjs-auth0/clientand theisLoadingproperty should be used to check if the user is authenticated. You can add the following code to thepages/index.tsxfile:
`tsx
import { useEffect, useState } from 'react';
import Head from 'next/head';
import Link from 'next/link';
import { useUser } from '@auth0/nextjs-auth0/client';
import styles from '@/styles/Home.module.css';
export default function Home() {
const { isLoading } = useUser();
// ...
return (
{isLoading ? (
Loading...
) : (
{
// ...
}
)}
);
}
`
Great! With this, we've implemented the login flow using Auth0 and StepZen. You can find the complete source code for this blog post on GitHub.
Next Steps?
The flow we've implemented in this blog post is a typical pattern for frontend applications that want to provide a secure way to authenticate users. The application uses the @auth0/nextjs-auth0 package to handle the authentication flow and a StepZen GraphQL API to verify the JWT on the server side. This way, the application can use the user's profile information on both the client side and in requests to the GraphQL API.
Follow us on Twitter or join our Discord community to stay updated about our latest developments.
This post was originally published on stepzen.com. Reposted automatically with Reposted.io.

Top comments (0)