
This tutorial was originally published in StackPath Blog.
FoundationDB is an open-source distributed NoSQL database released by Apple under the Apache 2.0 license. It is non-relational, so instead of using tables it organizes data as a set of ordered key-values. It can also handle massive volumes of data and is exceptionally well suited for write-intensive workloads.
FoundationDB has been designed from the ground up for distributed computing and, to get the most out of FoundationDB's performance features, you need to put the database cluster as close as possible to where it is needed. To do this, you can leverage StackPath's low-latency edge compute VMs to run FoundationDB clusters.
We'll show you how in the tutorial below. But first, let's review what makes FoundationDB great and determine if it's a good fit for your project.
FoundationDB: A Distributed, Multi-Model Database
As the name implies, FoundationDB focuses on working with simple data types such as strings, integers, floating-point numbers, and arrays. Higher-order types are available via installable Layers.
Currently, there are two official Layers:
- Record Layer: a Java library that offers structured records and additional data types
- Document Layer: a layer that offers a document-oriented MongoDB compatible API
Core features
- Horizontal scaling: as we add more nodes to the cluster, the performance of the system increases proportionally
- Fault tolerance: the database remains available even if some nodes in the cluster go down
- Coordinated transactions: FoundationDB automatically routes transactions inside the cluster
- Strong consistency: unlike other NoSQL databases that compromise on consistency (e.g. eventual consistency), FoundationDB uses strict serialization, the most robust consistency model available
- Non-blocking: FoundationDB uses Multi-Version Concurrency Control (MVCC) for consistency; performance is not affected by slow clients and deadlocks are impossible
- Self-tuning: FoundationDB automatically optimizes its settings for best performance
- Network aware topology: FoundationDB is data center- and region-aware, using network information for tuning and fault tolerance.
Is FoundationDB right for your project?
The scalable nature of FoundationDB makes it a great fit for:
- Read-intensive workloads
- Write-intensive workloads
- Workloads with strong transactional requirements
- Databases distributed over several data centers and regions
- Multi-petabyte databases
FoundationDB design deliberately limits the size of the transactions. Because of this, the following workloads are NOT compatible with FoundationDB:
- Large transactions: there is a 10 MB limit on transaction size.
- Long transactions: transactions longer than 5 seconds are canceled.
- Large payloads: FoundationDB doesn’t support keys larger than 10 kB and values larger than 100 kB
Deploying FoundationDB on StackPath
Sizing virtual machines
Each FoundationDB process uses up to one CPU and is assigned its own data directory. We can run as many processes as CPU cores we have in the machine.
FoundationDB minimum specs for production are:
- RHEL or CentOS 6 or 7
- Ubuntu 12.04 or later
- 4 GB of RAM per CPU process
- Storage as required (more on that below)
FoundationDB has two storage modes:
- memory: Optimized for small databases. The whole data must fit in memory. This mode is ideal for fast-cache applications. FoundationDB still requires some disk space to ensure consistency.
- ssd: This mode stores the data on disk and is intended for big databases. The amount of usable space depends on the chosen redundancy level.
FoundationDB has three levels of redundancy. Each redundancy level represents a different tradeoff between usable space and fault tolerance.
- single: Best for 1 or 2 nodes. Doesn’t provide any fault tolerance. Maximizes space available for data. Good for development and cache storage.
- double: Best for 3 or 4 nodes. Data is duplicated. The cluster can survive the failure of 1 or 2 nodes. The amount of usable free space is halved.
- triple: Best for more than 5 nodes. Data is triplicated across the cluster nodes. Provides the highest safety level for a single-data-center cluster.
As a general rule, keep in mind the following when deciding what type of machine to choose:
- In order to ease management, try to keep all machines in the cluster the same type and size.
- Leave enough free space to accommodate sudden bursts of incoming data.
- Memory is king for databases; dedicate all the memory you can afford to databases.
- Increasing the redundancy level prevents data loss, but reduces the usable space for data.
Network and security
FoundationDB doesn’t have any built-in security mechanisms; there are no database users or passwords, nor read and write permissions. As a result, most deployments will likely only run inside a private network.
Access control must be controlled by other means:
- Network permissions: each FoundationDB process listens on a separate port, starting from port TCP 4500 for the first process, 4501 for the second process, and so on
- Connection file: clients must have a copy of the cluster file (fdb.cluster) to connect
- Certificates: access can be secured by configuring mutual TLS certificates
Prerequisites
To get started you will need:
- A StackPath account
- Beginner-level knowledge of Linux servers: editors, executing commands, and connecting via SSH
Step 1 - Create an SSH key pair
You will need an SSH key to access your StackPath servers. If you already have one, you can skip to Step 2.
To create an SSH key pair in Linux or Mac:
ssh-keygen -C "your_email@example.com"
On Windows, install PuTTY and use puttygen.exe to generate the key pair.
Step 2 - Create the first VM
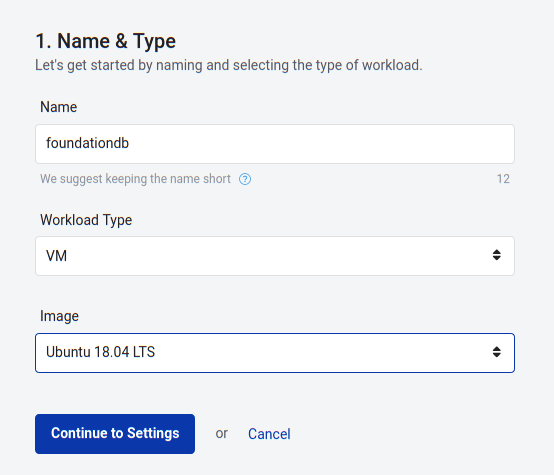
In this section, we’ll create our first Virtual Machine (VM) on StackPath.
To start, go to StackPath and log in or sign up for an account.
In the left menu, click Workloads and then Create Workload. Name your workload and, on Workload Type, select VM.
On Image select the most recent Ubuntu LTS version available (Ubuntu 18.04 LTS).
Click Continue to Settings.
On Public Ports, type 22 and select TCP.
On First Boot Key, copy the contents of your SSH public key (the file with the .pub extension, for instance: id_rsa.pub).
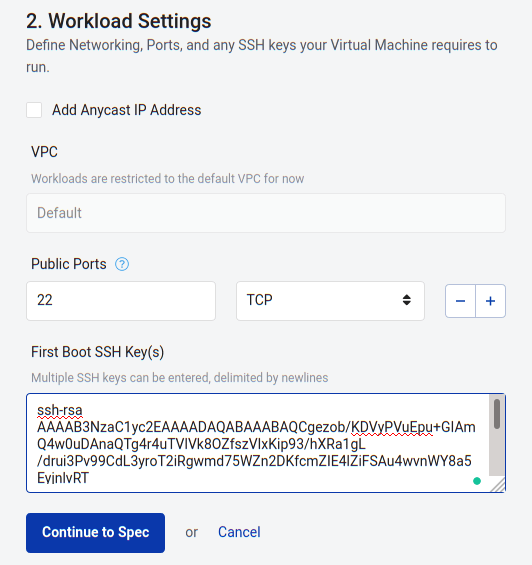
Click Continue to Spec.
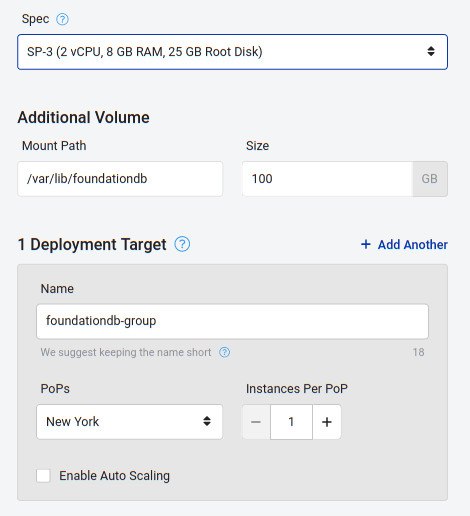
Select the machine Spec that suits your needs. The SP3 machine has enough power to run two FoundationDB processes.
If you’re planning to use the ssd mode, add a volume for the data. On Additional Volume, type /var/lib/foundationdb and set the amount of storage you want to dedicate to the databases on this node.
On Deployment Target, type the name of the deployment group. Deployment targets are groups of instances with the same scaling needs.
Select one of the PoPs that are near you or your users.
For Instances per PoP, select 1.
Create the machine using the Create Workload button.
Step 3 - Install FoundationDB
Wait a few seconds for the machine. You’ll know it’s ready when it reaches the Running status.
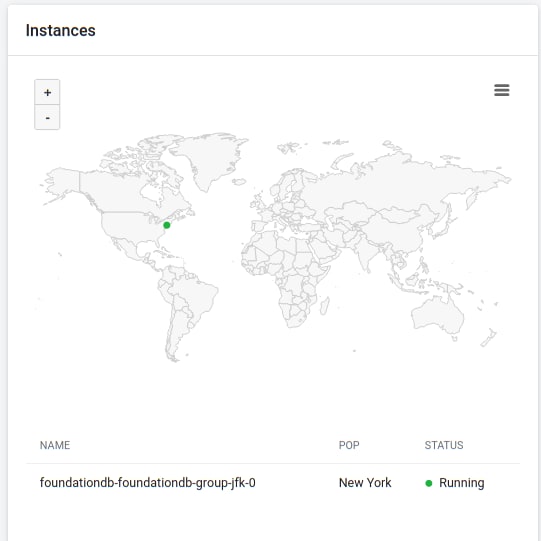
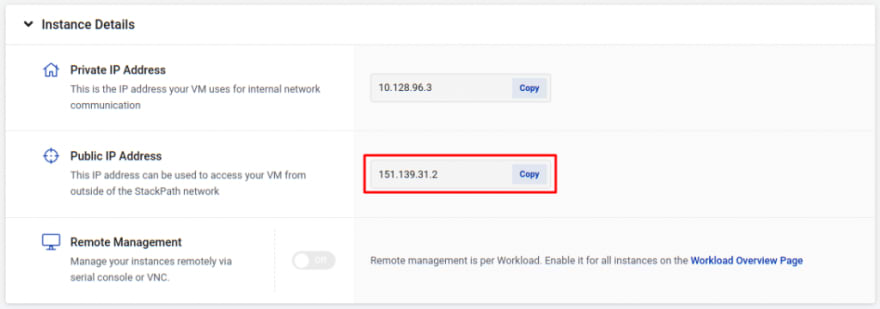
Copy the Public IP, as shown in StackPath.
Open a terminal in your machine or start PuTTY.
Connect to the Public IP with SSH or PuTTY using the key generated in Step 1.
Log in with the ubuntu user.
ssh ubuntu@YOUR_NODE1_IP
Go to the FoundationDB download page and pick the newest version of FoundationDB server and client packages for Ubuntu.
Copy the addresses of the packages and download both files to the server.
wget https://www.foundationdb.org/downloads/6.2.11/ubuntu/installers/foundationdb-clients_6.2.11-1_amd64.deb
wget https://www.foundationdb.org/downloads/6.2.11/ubuntu/installers/foundationdb-server_6.2.11-1_amd64.deb
Install them with dpkg.
dpkg -i foundationdb-clients_6.2.11-1_amd64.deb foundationdb-server_6.2.11-1_amd64.deb
After a few seconds, your first FoundationDB instance should be up and running.
$ ps -e | egrep "(fdb|backup_agent)"

14108 ?        00:00:02 fdbserver
14106 ?        00:00:00 fdbmonitor
14107 ?        00:00:00 backup_agent
FoundationDB has three types of processes:
- fdbserver: is the core server process, each of these uses a single CPU. For dedicated machines, we want to run as many fdbserver processes as CPUs the system has. Each fdbserver has a dedicated port, starting from TCP 4500.
- fdbmonitor: monitors the configuration files and the server processes. Whenever we make a change in the configuration, fdbmonitor automatically reloads the servers. fdbmonitor is also in charge of managing the backup_agent.
- backup_agent: is responsible for taking backups and importing data into the database.
To get the server status information use:
fdbcli --exec status
At any point, you can start, stop, or restart the database with:
sudo systemctl stop foundationdb
sudo systemctl start foundationdb
sudo systemctl restart foundationdb
Step 4 - Configure the first node
In this section, we’ll prepare FoundationDB for production.
Copy the configuration to a temporary directory.
cp /etc/foundationdb/foundationdb.conf /tmp
Open the file with your preferred editor.
nano /tmp/foundationdb.conf
And find the [fdbserver] section and uncomment the datacenter_id line.
Set a data center name; you should use an identical string for all nodes in the same PoP. For example, for a node in New York, a good name would be:
datacenter_id = nyc
If your server has two CPUs: add the following line right before the [backup_agent] section; this tells FoundationDB to start a second process on port 4501.
[fdbserver.4501]
If your server has more than two CPUs: repeat the previous step until the number of processes matches the number of CPUs.
When you complete the modifications, the file should look like this:
[fdbmonitor]
user = foundationdb
group = foundationdb

[general]
restart_delay = 60
cluster_file = /etc/foundationdb/fdb.cluster

[fdbserver]
command = /usr/sbin/fdbserver
public_address = auto:$ID
listen_address = public
datadir = /var/lib/foundationdb/data/$ID
logdir = /var/log/foundationdb
datacenter_id = nyc

[fdbserver.4500]
[fdbserver.4501]

[backup_agent]
command = /usr/lib/foundationdb/backup_agent/backup_agent
logdir = /var/log/foundationdb

[backup_agent.1]
Save the file and copy it back to /etc/foundationdb.
cp /tmp/foundationdb.conf /etc/foundationdb/foundationdb.conf
You should now find a second fdbserver process (or as many processes as you configured).
ps -e|egrep "(fdb|backup_agent)"
14106 ?        00:00:00 fdbmonitor
14107 ?        00:00:09 backup_agent
14412 ?        00:00:00 fdbserver
14413 ?        00:00:00 fdbserver
You can also check how many processes are running with fdbcli.
fdbcli --exec status

[...]
Cluster:
  FoundationDB processes - 2
  Zones                  - 1
  Machines               - 1
  Memory availability    - 4.1 GB per process on machine with least available

[...]
Step 5 - Make server listen for external connections
In this step, we’ll open the ports for external connections.
Keep in mind that if you have opened ports 4500 or 4501 in StackPath, your server may be publicly accessible. In that case, ensure that you've read all the security considerations carefully before continuing.
To allow external connections, install Python.
apt-get update && sudo apt-get install python -y
Then run the make_public.py script. FoundationDB binds itself to the server’s private IP.
/usr/lib/foundationdb/make_public.py
/etc/foundationdb/fdb.cluster is now using address 10.128.96.3
Restart the service.
sudo systemctl restart foundationdb
The first server is ready! Now we'll copy the configuration files to your machine.
End your SSH session with logout or CTRL+D and copy the config and cluster files to your computer.
scp ubuntu@YOUR_NODE1_IP:"/etc/foundationdb/*" .
Step 6 - Create more machines
In this step, we’ll create additional nodes to form a cluster. You can stop here if you plan on deploying only one machine.
To provision the rest of the machines, go back to your StackPath dashboard. Locate your FoundationDB workload and click the Gear icon to modify its settings.

Click Edit next to Spec, Storage & Deployment.

In the Deployment Target section, increase the number of instances to the number of nodes you want in the cluster.
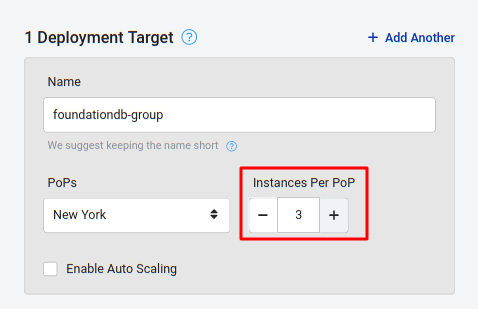
Click Save Changes and wait for the new servers to reach the Running status.

FoundationDB clients and servers connect to the cluster using the information contained in the fdb.cluster file.
To add a node to a cluster, we have to copy this file from any server already in the cluster and put it on /etc/foundationdb on the new machine. Once restarted, the new node will automatically join the cluster and start synchronizing.
For each of the new servers, repeat these steps:
- Copy configuration files you saved in your machine at the end of Step 5.
scp foundationdb.conf fdb.cluster ubuntu@YOUR_NEW_SERVER_IP
- Repeat Step 3 to install FoundationDB with its default configuration.
- Overwrite the default config and cluster files.
cp foundationdb.conf fdb.cluster /etc/foundationdb
- Restart FoundationDB.
sudo systemctl restart foundationdb
Step 7 - Configure the cluster
In this section, we’ll finalize the configuration of the cluster. Since the servers are linked up, we only need to run the following commands once.
First, ensure you are connected via SSH to any of the servers in the cluster. Then, start an interactive fdbcli session.
fdbcli

Using cluster file `/etc/foundationdb/fdb.cluster'.

The database is unavailable; type `status' for more information.

Welcome to the fdbcli. For help, type `help'.

fdb>
Type status and check the number of machines in the Cluster.
> status

[...]
Cluster:
  FoundationDB processes - 6
  Machines               - 3
[...]
Set the coordinator mode to auto so the cluster can automatically nominate coordinators.
> coordinators auto
You can also set a name for the cluster.
> coordinators description=mycluster
After a few seconds, you should see that the coordinators are activated.
> coordinators

Cluster description: mycluster
Cluster coordinators (3): 10.128.96.3:4500,10.128.96.4:4500,10.128.96.5:4500
Type `help coordinators' to learn how to change this information.
If you wish to activate ssd storage mode, set the redundancy level now (single, double or triple).
> configure double ssd
Check the coordinator settings and the redundancy level with status.
> status

Configuration:
  Redundancy mode        - double
  Storage engine         - ssd-2
  Coordinators           - 3

[..]
Next Steps
Congratulations! You’ve learned about FoundationDB and how to deploy it using StackPath’s edge compute VMs. You’re on your way to using high performance, low-latency databases.
As a next step, learn how to use datacenter mode to extend your database over more data centers. Then, learn how regions can help you build a truly global distributed database so that data is always close to your users.
Finally, check out these links to continue learning about FoundationDB:

Top comments (0)