This is a long title, but it is on the point.
I am going to show you how to set up AWS Cloudfront, the CDN solution of Amazon, in front of your AWS website.
The solution works if your website is hosted on a single server or if you have multiple instances behind a load balancer. In the case you host your website in a Kubernetes cluster, I don't have a solution at the moment, but feel free to leave your solution in the comments.
Why would you do that first?
Because you will take profit of the very distributed CDN network of AWS! That means your website will be faster and available to a bigger audience. That relies on the good connectivity that AWS maintains inside its internal network.
It means for example instead of serving your website from a central location: a server or a load balancer located in Singapore to a Canadian visitor. You will serve your website from the closest point in the CDN of AWS in Canada.
And why that works? Because of the internal AWS network which is a lot more optimized than the regular internet. Using the regular internet routing to reach out to a website on the other side of the planet would never be as optimized. Internet neutrality won't favor your communication, and your Canadian ISP does not control routing up to Singapore.
On top of that, increasing performances means increasing your core web vitals and your SEO!
Ok sounds great! So how do I do that?
First, let's set up the CDN.
- Go to Cloudfront in AWS
- Click on
Create distribution -
Enter your origin
-
In the section
Default cache behavior,-
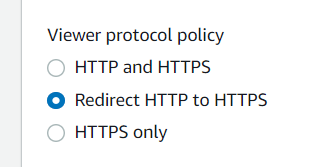
I suggest you set
Redirect HTTP to HTTPS, -
(Optional) Set
Allowed HTTP methodstoGET, HEAD, OPTIONS, PUT, POST, PATCH, DELETEif your website have interactions and forms, -
Check
Cache policy and origin request policy, selectCachingDisabledasCache policy(because your website is dynamic so you don't want to cache), and selectAllViewerasOrigin request policy(this will allow cookies and query parameters to be transferred to your website origin).
-
-
In the section
Settings-
Check
Use all edge locations (best performance) -
Click on
Add iteminAlternate domain name (CNAME)to add your domain name- If you want to have your root domain and www subdomain behind the CDN do it twice
-
Select or request a certificate for the domain you entered previously
- Select the recommended
Security policy
- Select the recommended
-
Click on
Create distribution
Second, update your DNS record. Once your distribution is ready copy the Distribution domain name of it, it should start by d. Then update the domain you entered at step 5b.
And voilà.
If you encounter any issues implementing it, leave comments. If you are using Kubernetes and you found a solution to do that, let me know I am curious about it.


Top comments (1)
Thank you for the useful article. You can learn more about our Bizfly CDN service