
Linux operating system powers a huge portion of the world’s servers and supercomputers!
In fact, ~96% of web servers (out of the top 1M) and the 500 fastest supercomputers worldwide use Linux. Fun trivia – SpaceX used Linux-based systems to successfully complete 65 space missions.
**
Does Linux send email?
**
Oh yes, system administrators can easily send emails with the Linux command line using various tools available in the ecosystem. In this article, we’ll walk you through the steps to send emails with Linux using some popular command-line tools.
Send Emails in Linux with Command Line
The following sections list the most popular commands, you’ll learn how to send with Mailtrap Sending API, and we included a section to test emails in a sandbox with Mailtrap Testing.
Note that some of the typical command options you can use to send emails with a Linux command line interface include:
-a – to denote an attachment
-b – (BCC) the blind copy
-c – (CC) the email address copy
-s – to denote email subject
We included the installation steps on Debian and RedHat-based distributions for the commands that might not be on Linux by default. Note that some may require installing an additional package manager. But if you already have them installed, feel free to skip these steps.
**
The curl command
**
The curl command is a versatile tool for transferring data between servers and applications. It can also be used to send emails from the command line in Linux.
Here’s how to use it:
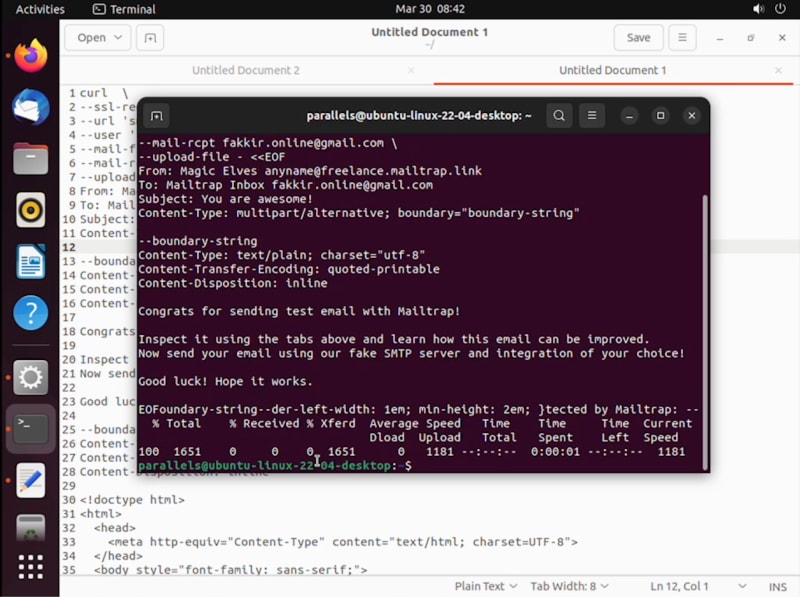
First, create a plain text file containing the email message you want to send. You can use a text editor like nano or vim to create the file. For example, let’s create a file called message.txt with the following content:
From: "User Name" username@example.com
To: "John Doe" john@example.com
Subject: You are awesome
Congrats for sending a test email with Mailtrap on Linux.
Replace the credentials, and modify the subject and body of the email as needed.
Next, use the curl command to send the email. Here’s the basic syntax:
curl \
--ssl-reqd \
--url 'https://send.api.mailtrap.io/api/send:587' \
--user 'YourMailtrapPassword or API token' \
--mail-from from@example.com \
--mail-rcpt to@example.com \
--upload-file - message.txt
From: “User Name” username@example.com
To: “John Doe” john@example.com
Subject: You are awesome!
Content-Type: multipart/alternative; boundary="boundary-string"
--boundary-string
Content-Type: text/plain; charset="utf-8"
Content-Transfer-Encoding: quoted-printable
Content-Disposition: inline
Congrats for sending test email with Mailtrap on Linux!
--boundary-string
Content-Type: text/html; charset="utf-8"
Content-Transfer-Encoding: quoted-printable
Content-Disposition: inline
--boundary-string--

**
The mail command
**
Aptly named, the mail command does exactly that – sends emails from the command line. It’s a good option to programmatically generate emails from web apps or Shell scripts, particularly in systems sans a GUI.
Step 1: Install mail
If you’re running a Debian-based distribution like Ubuntu, use the following commands to update and install it:
$ sudo apt-get update
Then, run the following command to install mailutils:
$ sudo apt install -y mailutils
If you’re running a Red Hat-based distribution like CentOS, you can use the following command:
sudo yum install mailx
Note: When installing mailutils on Debian-based distributions, the action automatically installs Postfix. Follow the Postfix Configuration wizard to connect it to your website.
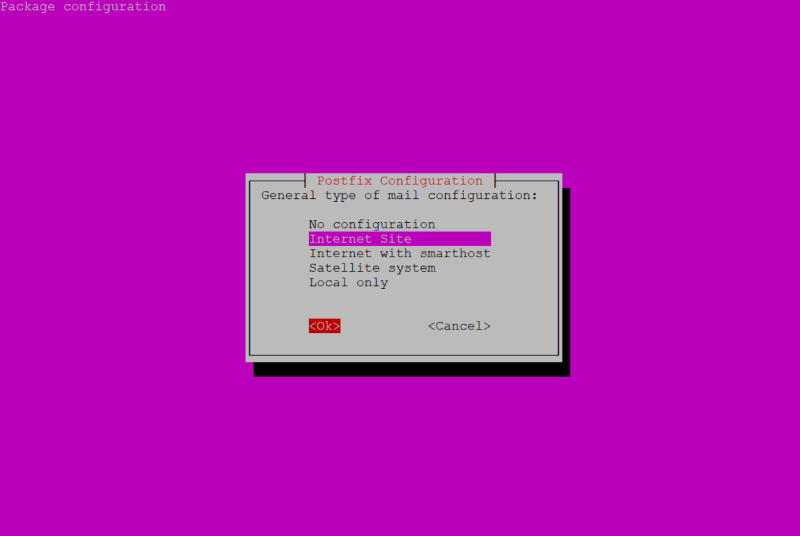
Step 2: Postfix Configuration
Continue configuring Postfix so it works with your email provider. To do that, first, navigate to the configuration file below and edit it.
$ sudo nano /etc/postfix/main.cf
At the end of the file, you’ll find relayhost =. Delete the line and add the following in its place:
relayhost = [live.smtp.mailtrap.io]:587
smtp_sasl_auth_enable = yes
smtp_sasl_password_maps = hash:/etc/postfix/sasl_passwd
smtp_sasl_security_options = noanonymous
smtp_tls_CAfile = /etc/postfix/cacert.pem
smtp_use_tls = yes
Save the file, then exit.
Step 3: DB Files and Password
To keep your credentials safe, create a file using the snippet below:
$ sudo nano /etc/postfix/sasl_passwd
Then, populate the file with your credentials.
[live.smtp.mailtrap.io]:587 username@example.com:password
If you aren’t a Mailtrap user, list your credentials, then save and exit.
Next, use the postmap command to make a hash database.
$ sudo postmap /etc/postfix/sasl_passwd
Now, navigate to the /etc/postfix/directory, and you should be able to find the sasl_passwd.dbfile.
Step 4: Certification
Use the snippet below to change the certs directory.
$ cd /etc/ssl/certs
Get the Thwate cert.
$ sudo wget https://www.thawte.com/roots/thawte_Primary_Root_CA.pem
Create certificate.
$ cat /etc/ssl/certs/thawte_Primary_Root_CA.pem | sudo tee -a /etc/postfix/cacert.pem
Inspect the configuration by locating the cacert.perm under /etc/postfix directory.

**Step 5: Send an email
Now that mail is installed and configured, you can send an email using the following command:
echo "This email body is sent with Mailtrap" | mail -s "Mailtrap Linux email" recipient@example.com
You can change the body and the subject in the echo command, and the recipient, of course.**
Click here to continue reading on mpack and mutt command to finalize the process!


Top comments (0)