
When deploying software, businesses often face a tough decision: running their software on-premises or in the cloud. While on-premises software has been the traditional option for many years, running software on Amazon Web Services (AWS) can provide several benefits:
Six reasons why running software on AWS is better than on-premises:
- Scalability. One of the great benefits of AWS is the ability to scale up or down resources without worrying about purchasing additional hardware and software.
- Cost-Effective: Running software on AWS can be cost-effective as it eliminates the need for upfront hardware and infrastructure investments. With AWS, businesses only pay for the resources they use and can quickly scale up or down as per their needs.
- High Availability: AWS provides high availability and redundancy features that ensure your applications and data are always available, even during a hardware failure. Companies can rely on AWS to keep their software running without worrying about downtime or data loss.
- Security: AWS provides a secure infrastructure that meets various compliance standards, making it a trusted choice for businesses to run their software.
- Flexibility: AWS provides various services and tools to customize and configure their software. Companies can easily make changes to their software as needed.
- Global Reach: AWS has a global infrastructure, with data centers in various regions worldwide. So businesses don't need to build and maintain data centers in each location.
This article will guide you through the steps to deploy DBConvert Streams on the Amazon Web Services (AWS) infrastructure. The example demonstrates how to set up DBS to stream data from an Amazon RDS for MySQL Binlog, using Change Data Capture (CDC), to an Amazon RDS for PostgreSQL database.
The guide will take you through the following steps:
- Creating an Amazon Elastic Compute Cloud (EC2) instance.
- Setting up the source database (RDS for MySQL).
- Setting up the target database (RDS for PostgreSQL).
- Configuring the DBConvert Streams services to replicate data changes from the source to target databases.
- Testing the deployment by inserting 1 million records into the MySQL source database and checking if they are successfully transferred to the PostgreSQL target database.
Following these steps will enable a working DBConvert Streams deployment on AWS, with data replication configured from the source to target databases.
Preparing the environment.
Step1. Create an Amazon EC2 instance.
To create a new Amazon Elastic Compute Cloud (EC2) instance, please refer to the steps outlined at https://stream.dbconvert.com/guide/deploy-ec2. We will not provide a detailed explanation of these actions in this article to keep the focus on the main topic.
Connect to EC2.
To work with the data on Amazon RDS, you must install both MySQL and PostgreSQL clients.
Before installing MySQL and Postgres clients, connect to your EC2 instance.
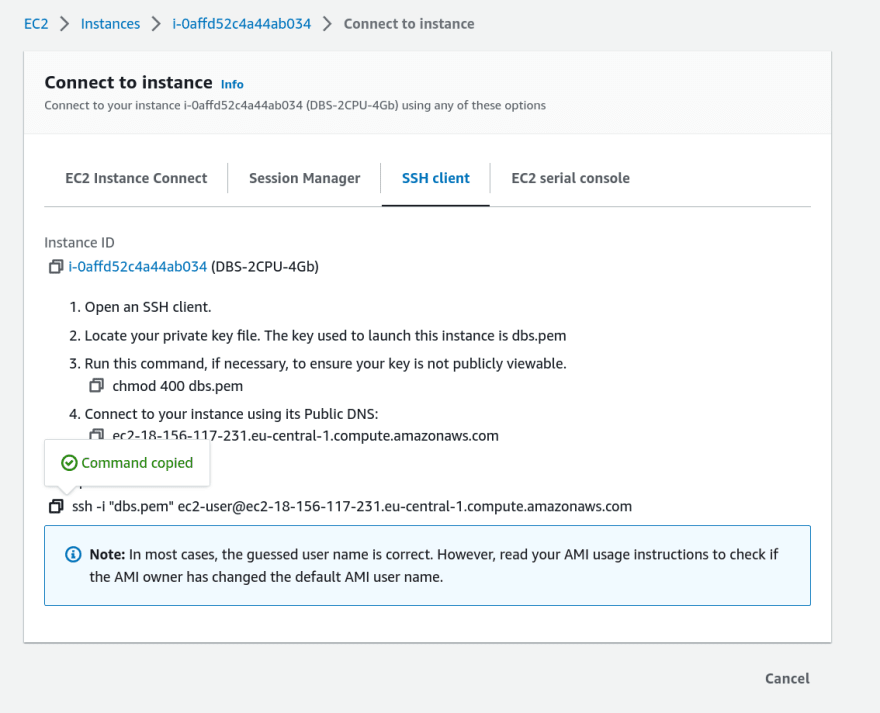
SSH client settings
Copy and paste the command into terminal to connect to your instance using its Public DNS via ssh. To connect to your instance using its Public DNS via SSH, copy and paste the following command into your terminal:
ssh -i "/path/to/your/key.pem" ec2-user@public-dns-name
Note that you will need to replace /path/to/your/key.pem with the file path to the private key file you used to launch the instance, and public-dns-name with the Public DNS of your instance. Also, make sure that the security group associated with the instance allows incoming SSH traffic on port 22.
Example:
ssh -i "~/.ssh/dbs.pem" ec2-user@ec2-18-156-117-231.eu-central-1.compute.amazonaws.com
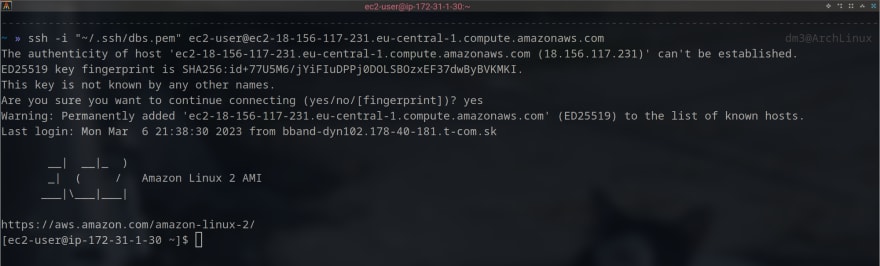
Connected to Amazon EC2
Install MySQL Client.
Run the following command to install MySQL command-line client:
sudo yum install mariadb
For additional information on installing the MySQL client, you can refer to this link
Install PostgreSQL Client.
To install the Postgres client, run the following command:
sudo amazon-linux-extras install postgresql14
Step2. Create source database (RDS for MySQL).
To create a new Amazon RDS for MySQL instance, please refer to the steps at https://stream.dbconvert.com/sources/mysql/amazon-rds. It includes all the necessary steps to enable MySQL binary logs for making CDC replication available.
Create database on the source.
First, connect to an EC2 instance using SSH. Once connected, use the following command to connect to the RDS for MySQL source database:
mysql -h mysql-database.cssv1n52dnnd.eu-central-1.rds.amazonaws.com -u admin -p12345678
This command will open a MySQL prompt. Next, create a database named source and use it as the current database:
CREATE DATABASE `source`;
USE `source`;
Finally, create a table named products in the source database with the following structure:
CREATE TABLE IF NOT EXISTS `products` (
  `id` BIGINT NOT NULL AUTO_INCREMENT,
  `name` VARCHAR(255) NOT NULL,
  `price` DECIMAL(10, 2) NOT NULL,
  `weight` DOUBLE NULL,
  `created` TIMESTAMP DEFAULT CURRENT_TIMESTAMP,
  PRIMARY KEY (`id`)
) ENGINE=InnoDB DEFAULT CHARSET=utf8mb4 COLLATE=utf8mb4_unicode_ci;
Step 3. Create target database (RDS for PostgreSQL).
Creating an RDS for PostgreSQL instance on AWS is a fairly straightforward process. You can follow the steps outlined in the AWS documentation to create and connect to a PostgreSQL instance on RDS.
Here's a summary of the steps:
- Log in to the AWS Management Console and navigate to the RDS console.
- Click
Create Databaseand selectPostgreSQLas the database engine. - Choose the instance specifications, such as the instance class and storage type.
- Configure the database settings, such as the name, username, and password.
- In the Connectivity section, select Connect to an EC2 compute resource and choose an existing EC2 instance to connect to the database. This step can help you automatically connect DBConvert Services running on EC2 with MySQL without allowlisting them on the database side.

- Review the settings and click "Create Database" to create the instance.
Execution
DBConvert Streams services.
The docker-compose.yml file specifies the following DBS services:
-
dbs-api: This is the entry point for DBConvert Streams. Configuration settings for the source and target databases are sent to this service via requests. -
dbs-source-reader: This service monitors data changes in the source database and sends batches of records to the Event Hub. -
dbs-target-writer: This service receives changes from the Event Hub and uploads them to the target database. -
nats: This is the core of the Event Hub, providing communication between other DBS services. -
prometheus: This service monitors DBS service metrics.
Install Git and clone the repo.
Connect to Amazon EC2 as described above.
Once connected, the next step is to install Git on it so that you can clone our demo repository and run tests. Here are the steps to install Git on your EC2 instance:
- Perform a quick update of your instance:
sudo yum update -y
- Install Git using the following command:
sudo yum install git -y
- Clone the repository
git clone https://github.com/slotix/dbconvert-streams-public.git
- Change the current working directory to the
1-million-records-aws
cd dbconvert-streams-public/examples/mysql2postgres/1-million-records-aws/
Step 1. Start services.
docker-compose up --build -d
The command above starts the services listed in docker-compose.yml file in the background.
Note that the command needs to be run in the same directory where the docker-compose.yml file is located.
Step 2. Send stream configuration.
Send a request to the DBConvert Streams API with configuration parameters.
curl --request POST --url http://127.0.0.1:8020/api/v1/streams\?file=./mysql2pg.json
Step 3. Populate the source table with sample data.
To execute the SQL script that populates the source table with random sample data, you can run the following commands:
Connect to the RDS for MySQL source database:
mysql -h mysql-database.cssv1n52dnnd.eu-central-1.rds.amazonaws.com -u admin -p12345678
In MySQL prompt, execute the following command:
INSERT INTO products (name, price, weight)
SELECT
  CONCAT('Product', number) AS name,
  ROUND(RAND() * 100, 2) AS price,
  RAND() * 10 AS weight
FROM
  (SELECT @row := @row + 1 AS number FROM
    (SELECT 1 UNION SELECT 2 UNION SELECT 3 UNION SELECT 4 UNION SELECT 5 UNION SELECT 6
     UNION SELECT 7 UNION SELECT 8 UNION SELECT 9 UNION SELECT 10) t1,
    (SELECT 1 UNION SELECT 2 UNION SELECT 3 UNION SELECT 4 UNION SELECT 5 UNION SELECT 6
     UNION SELECT 7 UNION SELECT 8 UNION SELECT 9 UNION SELECT 10) t2,
    (SELECT 1 UNION SELECT 2 UNION SELECT 3 UNION SELECT 4 UNION SELECT 5 UNION SELECT 6
     UNION SELECT 7 UNION SELECT 8 UNION SELECT 9 UNION SELECT 10) t3,
    (SELECT 1 UNION SELECT 2 UNION SELECT 3 UNION SELECT 4 UNION SELECT 5 UNION SELECT 6
     UNION SELECT 7 UNION SELECT 8 UNION SELECT 9 UNION SELECT 10) t4,
    (SELECT 1 UNION SELECT 2 UNION SELECT 3 UNION SELECT 4 UNION SELECT 5 UNION SELECT 6
     UNION SELECT 7 UNION SELECT 8 UNION SELECT 9 UNION SELECT 10) t5,
    (SELECT 1 UNION SELECT 2 UNION SELECT 3 UNION SELECT 4 UNION SELECT 5 UNION SELECT 6
     UNION SELECT 7 UNION SELECT 8 UNION SELECT 9 UNION SELECT 10) t6,
    (SELECT @row := 0) r
  ) numbers
LIMIT 1000000;
Step 4. Control the process.
In the next AWS EC2 terminal run the following command to control the process:
watch -n 1 'curl --request GET --url http://0.0.0.0:8020/api/v1/streams/stat | jq'
This command monitors the status of an API stream by repeatedly fetching and parsing the data every second from the stream using the curl and jq tools.
Check the number of records on the target.
Additionally, check the count of records on the target PostgreSQL DB.
Run this command to connect to AWS RDS for Postgres DB:
psql \
   --host=postgres-database.cssv1n52dnnd.eu-central-1.rds.amazonaws.com \
   --port=5432 \
   --username=postgres \
   --password \
   --dbname=postgres
In the PostgreSQL prompt run the command:
SELECT COUNT(*) FROM products;
Stop the demo
docker compose down --remove-orphans
Conclusion
Following this guide, you can deploy DBConvert Streams to AWS and take advantage of the benefits of running software on the cloud.
This guide provides a reliable and efficient way of migrating data between databases while taking advantage of the scalability, security, and cost-effectiveness of the AWS infrastructure.

Oldest comments (0)