
Sign in with Apple has become a standard most websites implement, and with Supabase we can easily add this to our Ionic application!
To celebrate #SupaLaunchWeek next week I’ve made this little guide on adding Sign in with Apple using Supabase, and turns out we don't need to write a lot of code for it.

To achieve the flow, we need to configure our Supabase project in a specific way and setup some information within the Apple Developer Program to which you need to be enrolled.
It's a bit tricky but shouldn't take you more than a couple of minutes.
Setup a Supabase Project
First of all we need a new Supabase project. If you don't have a Supabase account yet, you can get started for free!
In your dashboard, click "New Project" and leave it to the default settings, but make sure you keep a copy of your database password!
For the moment there's nothing else we need to do in here, so just let the project creation happen in the background and move on to Apple.
Sign in with Apple Configuration
To integrate Sign in with Apple we need to create a few things like described in the Supabase documentation, namely:
- An Apple App ID
- An Apple Service ID
- A Key
- A secret string based on the key
To get started, sign in to your Apple developer account.
Within your account you can first of all create a new App ID, which is usually required when you build a native iOS application.
Inside the dialog scroll down and make sure you active the Sign in with Apple capability from the list.

Once your App ID is registered, you can add another Service ID from the same menu point. Give it a meaningful name and identifier, click continue and enable Sign in with Apple.
Now we need to configure the Service ID, and this becomes more challenging as we need to combine some information.
To configure it correctly you need to:
- Select the app ID we created in the previous step as the Primary App ID
- Define the web domain where your project is hosted
- Set the callback URL that points to Supabase
You can obtain the callback URL by opening up the Providers menu inside the Authentication menu entry of your Supabase project. From here, enable the Apple provider and grab the Redirect URL:

If you already host the current version of your web app somewhere you can use that domain, in my case I simply created a project in Netlify and uploaded the build of an Ionic Angular project to get a domain!
To get a domain quickly, scroll down to Hosting your App with Netlify and perform the steps based on a blank new Ionic app.
With that in place you can finally configure the service ID correctly:

Bear with me, we are almost there!
The last step is to register a new key inside your Apple portal for which you also want to enable Sign in with Apple and select your Primary App ID from before.
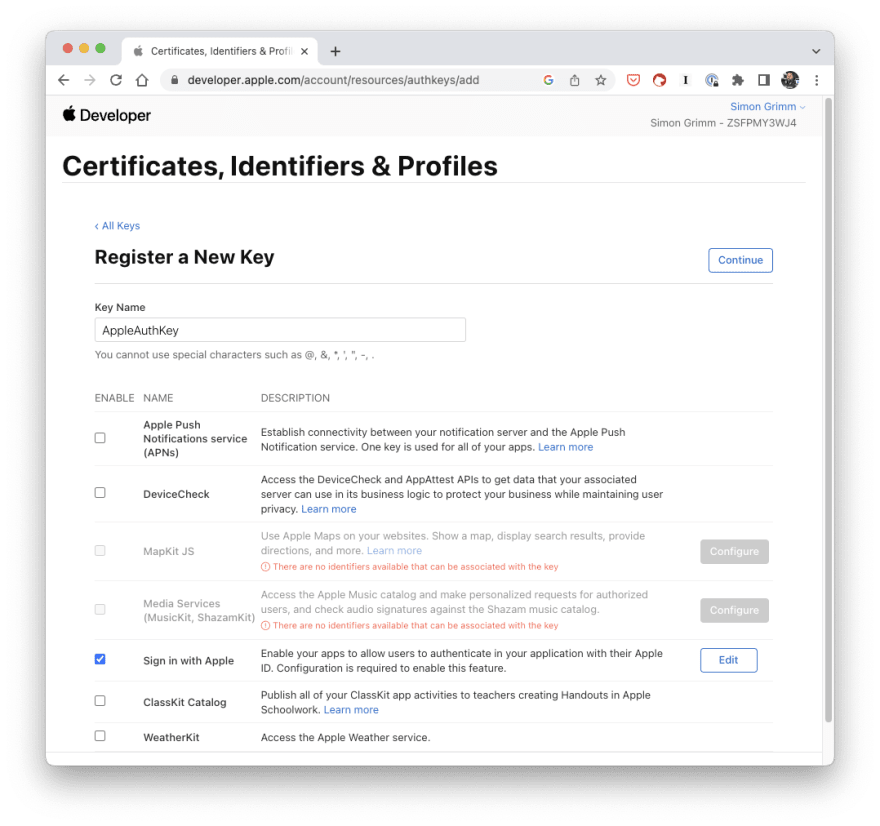
At the end of that dialog you need to download the p8 key file and you can also take note of the key id(it's also in the name of the file)!
Now things take a strange turn as we need to generate a secret key based on the auth key, and we can do it with a little Ruby script that Supabase provides.
Go ahead and create a file in a folder in which you also place the downloaded p8 file from before, and create a new file secret_gen.rb with the following next to it:
require "jwt"

key_file = "AuthKey_7Z2PMU8UY9.p8"
team_id = "ZS...."
client_id = "com.devdactic.supaauthservice"
key_id = "723..."

validity_period = 180 # In days. Max 180 (6 months) according to Apple docs.

private_key = OpenSSL::PKey::EC.new IO.read key_file

token = JWT.encode(
    {
        iss: team_id,
        iat: Time.now.to_i,
        exp: Time.now.to_i + 86400 * validity_period,
        aud: "https://appleid.apple.com",
        sub: client_id
    },
    private_key,
    "ES256",
    header_fields=
    {
        kid: key_id
    }
)
puts token
Make so to insert your own information at the top for the four variables. The client_id is the Service ID we generated before - don't confuse it with the App ID although it might look similar!
Now you can execute that script by running:
ruby secret_gen.rb > client_secret.txt
Inside the new client_secret.txt you will find a string that you want to copy now and insert into the Secret Key field of your Supabase Apple provider configuration.

At this point you also add the Service ID to Supabase, and with that the provider configuration is done!
Now there is just one more thing, and that's making sure that Supabase will redirect to our App after the callback from Apple is triggered.
To do this, you need to add the domain where your app is hosted under the URL Configuration as the Site URL of your Supabase project. I simply used my Netlify default domain again:

It's done - you have (hopefully) successful configured Sign in with Apple for your Supabase project!
Supabase Project Configuration
One addition I recommend is to create a simple users table now because when you are using Sign in with Apple, the full user information is only returned on initial sign up.
When a user uses Apple Sign in again in the future, you will only get a minimum of information back.
Therefore bring op the SQL Editor of your Supabase project and run the following query:
create table users (
  id uuid not null primary key,
  email text,
  name text
);

-- Function for handling new users
create or replace function public.handle_new_user()
returns trigger as $$
begin
  insert into public.users (id, email, name)
  values (new.id, new.email, new.raw_user_meta_data ->> 'full_name');
  return new;
end;
$$ language plpgsql security definer;

create trigger on_auth_user_created
  after insert on auth.users
  for each row execute procedure public.handle_new_user();
Now you have a new table, and a trigger that runs when a new user is first time authenticated. This will grab some user information including the full name and add it to your table!
Sign in with Apple from Ionic Angular
The last part is the easiest as we simply need to connect Supabase to our Ionic app and call one function. Get started by bringing up a new Ionic app and install the Supabase JS client:
ionic start supaAuth blank --type=angular
cd ./supaAuth

npm install @supabase/supabase-js
Now add the Supabase credentials that you can find under Project Settings -> API and add them to the src/environments/environment.ts file:
export const environment = {
    production: false,
    supabaseUrl: 'https://YOURSUPABASEPROJECT.supabase.co',
    supabaseKey: 'YOURKEY'
};
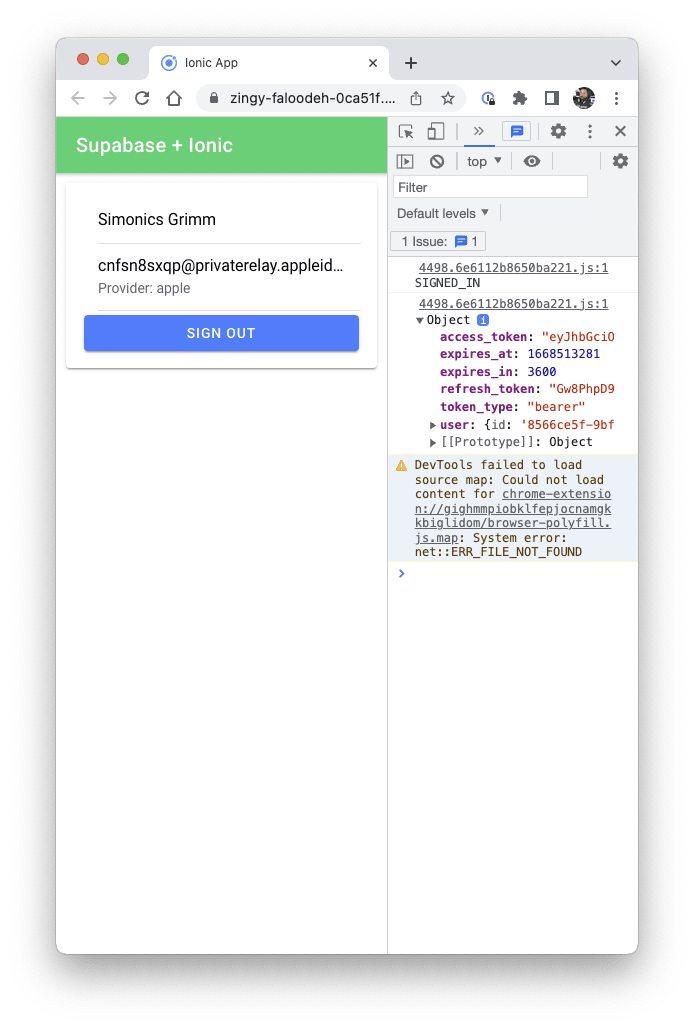
For our page we will simply create the usual connection to Supabase and use onAuthStateChange to listen to changes regarding the authentication state.
Triggering the Apple sign in flow is now as easy as calling signInWithOAuth and passing apple as the provider - and yes, you could easily do this for other providers like Google as well!
Go ahead and change the src/app/home/home.page.ts to this now:
import { Component } from '@angular/core';
import { SupabaseClient, User, createClient } from '@supabase/supabase-js';
import { BehaviorSubject } from 'rxjs';
import { environment } from '../../environments/environment';

@Component({
    selector: 'app-home',
    templateUrl: 'home.page.html',
    styleUrls: ['home.page.scss']
})
export class HomePage {
    user = new BehaviorSubject<User | null>(null);
    private supabase: SupabaseClient;

    constructor() {
        this.supabase = createClient(environment.supabaseUrl, environment.supabaseKey);

        this.supabase.auth.onAuthStateChange((event, session) => {
            console.log(event);
            console.log(session);

            if (event === 'SIGNED_IN' || event === 'TOKEN_REFRESHED') {
                this.user.next(session!.user);
            } else {
                this.user.next(null);
            }
        });
    }

    async signInWithApple() {
        const { data, error } = await this.supabase.auth.signInWithOAuth({
            provider: 'apple'
        });
    }

    async signOut() {
        const { error } = await this.supabase.auth.signOut();
    }
}
Based on the user object we can now extract some values and either show a login button or the information and a log out button inside the src/app/home/home.page.html:
<ion-header>
    <ion-toolbar color="success">
        <ion-title> Supabase + Ionic </ion-title>
    </ion-toolbar>
</ion-header>

<ion-content>
    <ion-button (click)="signInWithApple()" expand="block" *ngIf="(user | async) === null">
        Sign in with Apple
    </ion-button>

    <ion-card *ngIf="(user | async) !== null">
        <ion-card-content>
            <ion-item>
                <ion-label>{{ (user | async)?.user_metadata!['full_name'] }}</ion-label>
            </ion-item>
            <ion-item>
                <ion-label
                    >{{ (user | async)?.email }}
                    <p>Provider: {{ (user | async)?.app_metadata!.provider }}</p>
                </ion-label>
            </ion-item>

            <ion-button (click)="signOut()" expand="block"> Sign out </ion-button>
        </ion-card-content>
    </ion-card>
</ion-content>
YOu have to trust me on those values as we can't test this locally because of the different redirect URLs we configured, and because SSL is required for Sign in with Apple.
To finally prepare our app for hosting let's slightly change the routing inside the src/app/app-routing.module.ts:
import { NgModule } from '@angular/core';
import { PreloadAllModules, RouterModule, Routes } from '@angular/router';

const routes: Routes = [
    {
        path: '',
        loadChildren: () => import('./home/home.module').then((m) => m.HomePageModule)
    },
    {
        path: '',
        redirectTo: '',
        pathMatch: 'full'
    }
];

@NgModule({
    imports: [RouterModule.forRoot(routes, { preloadingStrategy: PreloadAllModules })],
    exports: [RouterModule]
})
export class AppRoutingModule {}
Now we can test our app - but we need to do it on our domain!
Hosting your App with Netlify
Don't worry if you have no domain (although you had to use one during configuration!) but you easily get this with Netlify or other providers.
First of all build your app by running:
ionic build
Inside Netlify you can now click Add new site and select Deploy manually to make this as easy as possible.

Simply drag the www folder of your Ionic project into the dialog and your app will be deployed in seconds!
You can now test the flow and your app should open the Sign in with Apple dialog and afterwards guide you back to the same URL, but now you should be authenticated and see some logs with more information.
If you want to see it in action you can test the flow with my hosted Ionic app!
Testing Sign in with Apple
During testing you might have to reset your information some time, but as said before the actual information from Apple is only returned once.
The trick is that you can not only remove the user data from Supabase, but you can also reset Sign in with Apple for a specific service!
For this, bring up the system preferences on your Mac (works almost the same on mobile) and click on your Apple ID.
From there, navigate to Password & Security in the menu and at the bottom click Edit... next to Apps using Apple ID.

In that dialog you now only need to find your service and remove it - and you can test the whole Sign in with Apple flow again!
Conclusion
We have implemented Sign in with Apple using Supabase for the web, however the process right now would not work perfectly for a native mobile app.
To make this work, we could easily integrate the Capacitor Community Plugin which would trigger the native Sign in with Apple dialog and return us some tokens.
The problem after that step is that we currently don't have a way to pass that information to Supabase as the OIDC functions were removed until the team comes up with a better way to integrate this process.
Supabase is already actively working on this, so I expect a solution for native apps soon - but extending our code with a Capacitor plugin and passing the result to Supabase will hopefully be a small change of about 5 minutes when we got access to the right functions.


Top comments (0)