
Introduction
In this tutorial, we will deploy an existing Solana dApp to the Sonic Testnet. Specifically, we’ll use the SVM-Greet Solana program and the SVM-Greeting dApp as examples. This guide is intended for those who already know how to build a Solana dApp and describes the core modifications needed when deploying a Solana dApp to the Sonic SVM Testnet RPC.
You can also take a look at the SVM-greeting deployed frontend.
At a high level, developers should take the following steps:
- Get an overview of solana dApp
- Set up developer environment
- Acquire Sonic Testnet tokens
- Deploy the solana program with the Sonic Testnet RPC
- Modify frontend
- Test and deploy
Overview of solana dApp
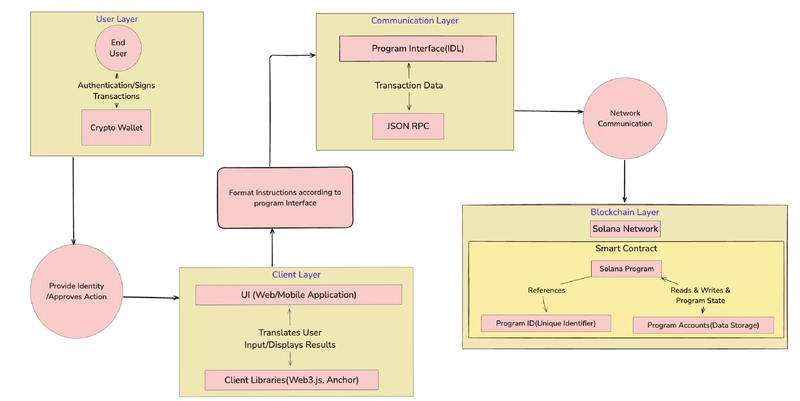
Solana DApp can be built using various tech stacks and environments, depending on the developer’s requirements. However, every Solana DApp follows a fundamental architecture composed of several layers, each serving a distinct purpose.
This diagram represents the essential layers that define the architecture of a Solana DApp.
Let’s dive into each layer and explore its purpose.
User layer:
In this layer, we focus on the user—the individual who interacts with the Solana DApp. The purpose of this layer is to authorize users to connect, sign transactions, and interact with the Solana program.
A user can use any compatible solana wallet to connect with the DApp and sign transactions as required.
A developer can use the Solana Wallet Adapter to integrate solana wallets into a DApp to enable user interactions.
Find reference implementation here: wallet integration
Client layer:
In this layer, we focus on building the UI and integrating Solana-compatible libraries like Solana Web3.js and Anchor’s coral. These libraries enable users to submit data to the program and retrieve data in a compatible format.
Find reference implementation here:
Communication layer:
In this layer, we focus on setting up the Solana program and integrating it with the UI. We implement program APIs using the program IDL and a provider(that is created through the wallet and a cluster connection).
This setup provides an interface that allows users to directly interact with the Solana program through a frontend UI, sending requests to the RPC cluster and receiving responses.
Find reference implementation here:
Blockchain layer:
In this layer, we focus on building the Solana program. In this example, we use the Anchor framework to create a Solana program that initializes a Solana account and stores a greeting message sent by the user from the UI.
An Anchor Solana program consists of Three main parts: the Program ID, the Program Module, and the Account Creation and Validation section.
Find reference implementation here:
Within an Anchor project, we can build a program to generate program IDL and program types, which will be used on the client side. We can then deploy it to the preferred network cluster and test it to ensure the program works as expected.
Find reference implementation here:
Deploying the solana program to the Sonic SVM cluster
Solana programs can be easily deployable to Sonic SVM clusters. A variety of Solana programs are available, such as those written natively in Rust or built using frameworks like Anchor, Steel, or Seahorse. For simplicity, we will use an Anchor Solana program to deploy to the Sonic test-net RPC endpoint.
I assume you have set up your developer environment for Solana development. If not, first go through the setup local development for Sonic SVM and set it up.
The first step is to clone the solana-greet repo:
git clone git@github.com:shivamSspirit/solana-greet.git
Now, go to the root of the project and configure your Sonic cluster.
solana config set --url https://api.testnet.sonic.game
Verify your configuration.
solana config get
It will output something like this:
Config File: /Users/shivamsoni/.config/solana/cli/config.yml
RPC URL: https://api.testnet.sonic.game ## Here it is setted-up
WebSocket URL: wss://api.testnet.sonic.game/ (computed)
Keypair Path: ~/.config/solana/id.json
Commitment: confirmed
Now check your wallet address and account balance. (I assume you have created a CLI wallet using the Solana-keygen command.)
solana address
solana balance
If it shows 0 or no amount of SOL, go to the Sonic Faucet and acquire some testnet SOL for the deployment.
You have testnet SOL, and your RPC endpoint is configured. Now, go to the project folder, open the Anchor.toml file and update the cluster URL to this:
[provider]
cluster = "https://api.testnet.sonic.game" ## sonic testnet RPC endpoint
wallet = "~/.config/solana/id.json" ## your wallet path
At this stage, we are ready to deploy our program to the Sonic testnet.
Go to the terminal and build your program:
anchor build
Deploy your program:
anchor deploy --provider.cluster https://api.testnet.sonic.game
For simplicity, here we are overriding our cluster to deploy it to the correct endpoint.
On successful deployment output will look like this:
Deploying cluster: https://api.testnet.sonic.game
Upgrade authority: ~/.config/solana/id.json
Deploying program "svm_greet"...
Program path: /Users/shivamsoni/Desktop/svm-sonic/svm-greet/target/deploy/svm_greet.so...
Program Id: 97uCKFPMDU4S4DQmNwu7BQAYCCFM5fMBms7zk71uJeib

Signature: 65MAiMNGH3BhE41dSXssNUQgxLEmCqDXg3cVj3zJ7GzDkDcbP6CiU6AbzQ965w1aGdCMGivFoLLKNEHzYyDV9Wbz

Deploy success
Whoa, Congrats! Now your solana program is deployed to Sonic testnet.
Grab your program ID from the terminal, and grab the IDL and program types from the target folder generated by the anchor build command, as we will use these in our frontend program.
Test your program:
Before moving to the front end, please ensure that your program works as expected.
anchor test
On successful testing, all your tests should pass.
  svm-greet
Transaction Signature: CSL7JmirqfRmbUPnYYamSmtE9y6L9SnDiCKDvGkhCmEg98Tqpj9RbCRosi8ydChjQU5NT77xBypPDawHYZMzQXX
    ✔ Is initialized! (4261ms)
{
  "user": "LVw9ncQJe9aRMj4YZcSNgS82bfEKu1rrNJXv6WY1QPs",
  "greet": "Hello, Svm maxim!",
  "bump": ##### your account bump
}
    ✔ Fetch Account (799ms)


  2 passing (5s)

✨  Done in 7.49s.
Modifying Frontend
For this, we will not create an entire frontend dApp. Instead, we will use the Solana SVM-Greeting dApp and make some adjustments to get it working for the Sonic SVM testnet.
First, clone the SVM-Greeting repository onto your system:
git clone git@github.com:shivamSspirit/svm-greet-dapp.git
Go to the svm-greet-dapp directory and run npm install
npm install
Update IDL, Program types, and ProgramID
First, we must set up our program’s interaction with the client. To do this, we need to update our IDL file, program types, and program ID.
At the project root, go to the src/app/idl.json and src/app/programtypes.ts files, remove their contents, and add the IDL and program types that you grabbed from the Sonic SVM program.
In src/app/programsetup.ts, update your program ID with the one you grabbed when you deployed your Sonic program.
export const greetSvmProgramId = new PublicKey(
  "97uCKFPMDU4S4DQmNwu7BQAYCCFM5fMBms7zk71uJeib"
);
Update RPC endpoints and supported wallets
In src/app/context/NetworkContext.tsx, update network endpoints to:
export const NETWORKS = {
  MAINNET: {
    name: "mainnet",
    endpoint: "https://rpc.mainnet-alpha.sonic.game",
    label: "Sonic Mainnet",
  },
  TESTNET: {
    name: "testnet",
    endpoint: "https://api.testnet.sonic.game",
    label: "Sonic Testnet",
  },
} as const;
Update Sonic Testnet as the default network
const [network, setNetwork] = useState<Network>(NETWORKS.TESTNET);
In src/app/components/WalletProvider.tsx, update WalletAdapterNetwork to:
const walletAdapterNetwork = useMemo(() => {
    switch (network.name) {
      case "mainnet":
        return WalletAdapterNetwork.Mainnet;
      case "testnet":
        return WalletAdapterNetwork.Testnet;
      default:
        return WalletAdapterNetwork.Testnet;
    }
  }, [network.name]);
Add configuration for Sonic SVM-supported wallets.
  const wallets = useMemo(() => [new NightlyWalletAdapter()], [walletAdapterNetwork]);

  const supportedWalletNames = ["Backpack", "Nightly"];

  const filteredWallets = wallets.filter(
    (wallet:any) =>
      supportedWalletNames.includes(wallet.adapter?.name) &&
      wallet.readyState === WalletReadyState.Installed
  );

  return (
    <ConnectionProvider endpoint={endpoint}>
      <SolanaWalletProvider wallets={filteredWallets} autoConnect>
        <WalletModalProvider>{children}</WalletModalProvider>
      </SolanaWalletProvider>
    </ConnectionProvider>
  );
In src/app/programsetup.ts, update the getGreetSvmProgramId function to this:
export function getGreetSvmProgramId(cluster: Cluster): PublicKey {
  switch (cluster) {
    case "testnet":
      return greetSvmProgramId;
    case "devnet":
    default:
      return greetSvmProgramId;
  }
}
Update the provider to use Sonic SVM network endpoints.
export function useAnchorProvider(): AnchorProvider {
  const { network } = useNetwork();
  const testConnection = new Connection(network.endpoint)
  const wallet = useWallet();
  return new AnchorProvider(testConnection, wallet as AnchorWallet, {
    commitment: "confirmed",
  });
}
In src/app/components/CustomWalletButton.tsx and src/app/components/CustomWalletModal.tsx, we are adding configuration for Sonic SVM-supported wallets to ensure that only supported wallets are displayed. If no supported wallet is installed on the user's system, it will suggest download a supported wallet.
const supportedWalletNames = ["Backpack", "Nightly"];
  const filteredWallets = wallets.filter(
    (wallet) =>
      supportedWalletNames.includes(wallet.adapter.name) &&
      wallet.readyState === WalletReadyState.Installed
  );
In src/app/components/CreateGreet, we are updating the transaction explorer link to the Sonic Explorer.
          <Link
            href={`https://explorer.sonic.game/tx/${tx}?cluster=${network.name}`}
            target="_blank"
            rel="noopener noreferrer"
            className="text-sm text-green-400 hover:underline"
          >
We have also changed some refreshing logic when sending our first transaction to initialize the greet account on the Sonic testnet and retrieve it for greet data. You can check these changes in the GitHub repo provided in the resources section.
Finally, we run the front end and test it to ensure transactions are going through and can be observed in the block explorer.
We ran this modified dApp using npm run dev to ensure it works as expected, and yes, it is running! Congrats, our dApp is now live on sonic testent.
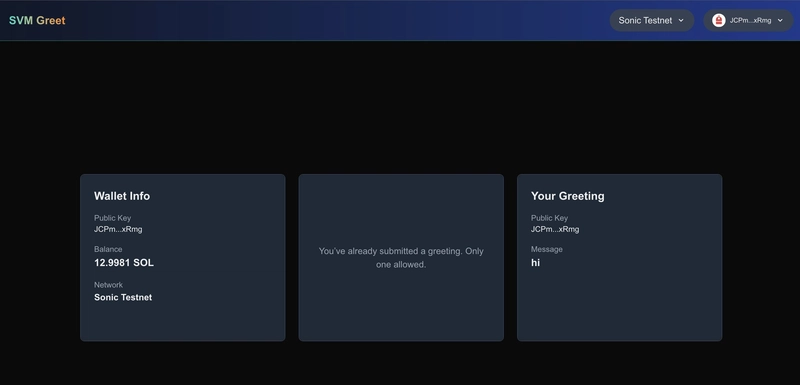
Supported wallet on Sonic SVM
In this simple example, we use the Backpack wallet as it works on Sonic. You can use other wallets based on your requirements. Here are some wallets that natively support the Sonic network.
Also, note that we updated the Sonic Explorer link to pop up when initializing a greet account.
Here, we are using the Solana Explorer link structure to provide dynamic values for the cluster and transaction signature, but it may not work as expected. For more information about the Sonic Explorer, visit Sonic Explorer.


Top comments (0)