
Transfer token via cpi(solang-series part-3)
Introduction
Greetings to the fourth instalment of our series! here, we're continuing our exploration of making solana programs. We're still using the solidity language, which is compiled by the solang compiler.
In the previous articles, we laid the foundation by understanding how solana's high-performance blockchain merges with the familiar solidity syntax. we learned how to build smart contracts and make cross program invocation easily.
In this article, we will explore the intriguing concept of cross program invocation. our focus will be on developing a program responsible for transferring tokens between different accounts through cross program invocation.
By the end of this tutorial, you will gain insights into the concept of composability in solana programming. We will discuss the process of transferring tokens between accounts.
Prerequisite
Prior to proceeding, it would be beneficial if you have reviewed the previous articles in this series. You can find them at this link: solang-series.
The code for this project is located here.
You can clone it(instruction provide in readme file) or use same repo spl-token-minter program.
Setup development environment using this link
Here's what you're gonna learn:
Table Of Content
- Recap Of Previous Articles
- Transfer spl tokens
- Associated token accounts in solana
- Upgrading spl-token-minter program by implementing transfer
gold token to another account via cpi
- Solidity code
- Typescript test
- Building, deploying and testing
- Conclusion
- Further resources
Recap Of Previous Articles
In our earlier articles, we've discussed different aspects of Solana programs. We explained how Solana programs work, talked about using Invoke CPI to make switch power programs, and explored the idea of composability in Solana programs. We believe these articles have helped you understand how to develop Solana programs better.
In this article, we will take a deeper look at transferring our gold token to another associated token account by utilizing the Invoke CPI method.
Transfer spl tokens
First understand the analozy
I am Shivam,
And I want to send some of the gold tokens we minted (in spl-token-minter program) to my friend, Justin.
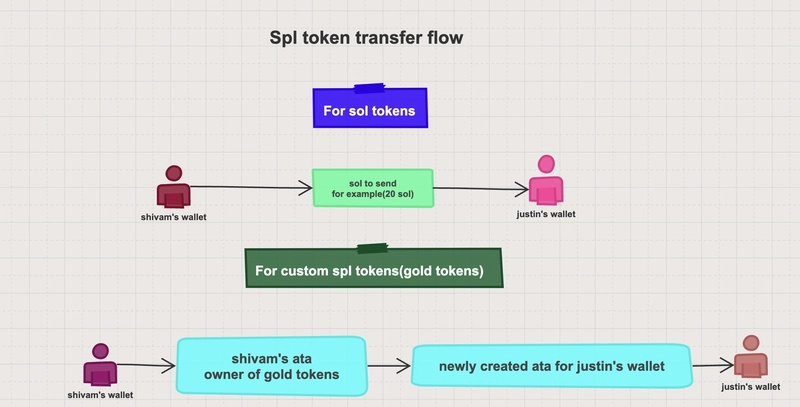
To get started, we need token accounts linked to the same mint, specifically the gold token mint. The actual token transfer happens from my account to Justin's. To make this transfer smoother, we need to create a brand-new associated token account for Justin. This step ensures that the transfer takes place seamlessly from my account to Justin's.
But here's the twist - this isn't your typical wallet-to-wallet transfer. It stands apart from the usual Sol transfer process. Why? Because in this case, the system program takes charge of the transaction, eliminating the need to create another associated token account to hold the Sol that's being transferred.
You can see this analogy in below image
We will now proceed to interact with the Associated Token Account.
Associated token accounts in solana
Associated Token Accounts (ATAs) provide a simple and reliable way to find the token account associated with a specific public key and token mint. This makes it easier to manage token transfers and interactions within programs.
Managing multiple token accounts under the same mint can be complex and confusing.
Token program offers a way to generate token account keys based on a user's main System account address and the token mint address. This makes it easier for users to create a primary token account for each token they own, for simplifying management.
These specialized accounts are called Associated Token Accounts (ATAs).
This program establishes a standard and provides a mechanism to map a user's wallet address with their associated token accounts.
See below image
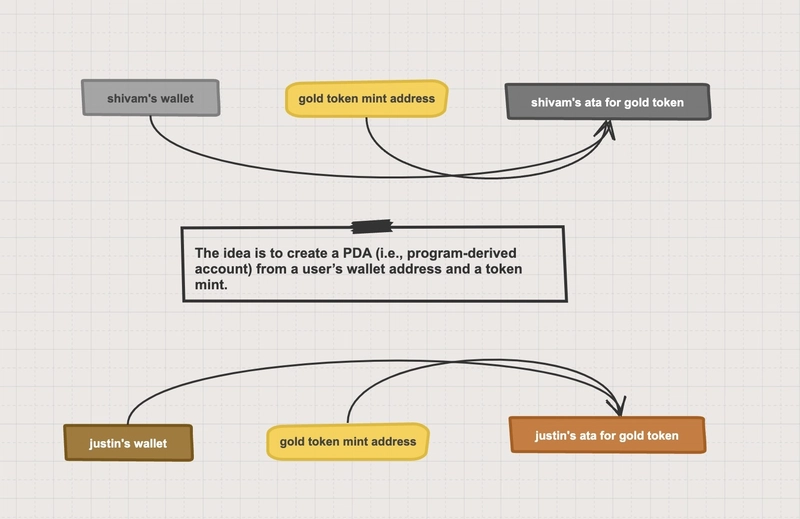
In this image, we're creating two linked token accounts for the Gold Token. We do this by using The Gold Token Mint and the owners' addresses. This process is essentially about generating a Program Derived Address (PDA) from the user's wallet and the Gold Token Mint.
We will learn about pda in next article
Some key take-away for ata
Each Associated Token Account (ATA) is also a Program Derived Address (PDA).
Every Associated Token Account (ATA) is also a Token Account.
We can create associate token account for shivam in typescript using getOrCreateAssociatedTokenAccount method provide by spl-token module
const tokenAccount = await getOrCreateAssociatedTokenAccount(
    connection,// web3 connection
    wallet.payer, // payer for the account
    mintKeypair.publicKey, // mint for the gold token
    wallet.publicKey // owner(shivam)
  );
getOrCreateAssociatedTokenAccountuse to get the Token Account associated with a given address or create it if it doesn't exist and return a public key for gold token account
Same for justin to hold some gold token we need to change owner to justin and create brand new ata for him
like this
const receipient = anchor.web3.Keypair.generate(); // Random key generator

const receipientTokenAccount = await getOrCreateAssociatedTokenAccount(
    connection,   // web3 connection
    wallet.payer, // payer for the account
    mintKeypair.publicKey, // mint for the gold token
    receipient.publicKey // owner(justin)
  );
Upgrading spl-token-minter program by implementing transfer gold token to another account via cpi
In our spl-token-minter program we mint some gold token and transfer to our ata
Now we want to transfer some gold token to another account(justin’s ata).
We're using the same code for our project. It's the same code for minting, and we've added the transfer function in both the Solidity program and the TypeScript test file.
Now open our code directory in vscode and move to solidity folder
In transfergold.sol file we are adding a transfer function under mintTo function
// Transfer tokens from one token account to another via Cross Program Invocation to Token Program
function transferTokens(
address from, // token account to transfer from
address to, // token account to transfer to
uint64 amount // amount of gold to transfer
) public {
SplToken.TokenAccountData from_data = SplToken.get_token_account_data(from);
SplToken.transfer(from, to, from_data.owner, amount);
}
let’s break it down
We've made a transferTokens function that needs three things to work:
- The sender's token account with Gold Tokens.
- The recipient's account with the Gold Token Mint.
- The amount of Gold Tokens to transfer.
Now on first line of function body we retrive the shivam’s token account data by make a call to SplToken.get_token_account_data(from).
On the next line
SplToken.transfer function performs the actual gold token transfer between the specified ATAs.
This function requires the following parameters:
- from: The account from which we're transferring tokens.
- to: The account to which we're transferring tokens.
- owner: The public key of the owner of the from account.
- amount: The amount of tokens to transfer.
It executes a cross-program invocation to the SPL Token Library using the transfer CPI (Cross-Program Invocation).
Now see in below image
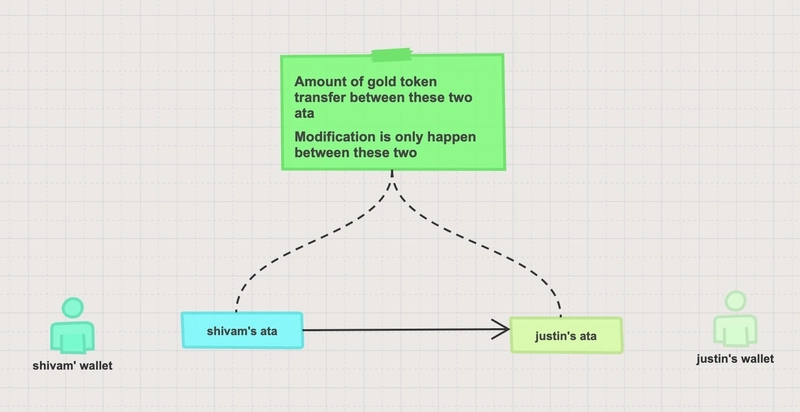
We transferred the amount of Gold Tokens from Shivam's Associated Token Account (ATA) to Justin's ATA using CPI (Cross-Program Invocation).
Now, we're going to write the test for transferring Gold Tokens.
Open the transfersol.ts test file and add this test right after the mint tokens to our wallet test.
// transfer token to another wallet via cpi

it("Transfer some tokens to another wallet!", async () => {
  // Wallet's associated token account address for mint
  const tokenAccount = await getOrCreateAssociatedTokenAccount(
    connection,
    wallet.payer, // payer
    mintKeypair.publicKey, // mint
    wallet.publicKey // owner(shivam)
  );

  const receipient = anchor.web3.Keypair.generate();
  const receipientTokenAccount = await getOrCreateAssociatedTokenAccount(
    connection,
    wallet.payer, // payer
    mintKeypair.publicKey, // mint account
    receipient.publicKey // owner(justin) account
  );

  console.log("receipientTokenAccount",receipientTokenAccount)

  const tx = await program.methods
    .transferTokens(
      tokenAccount.address,
      receipientTokenAccount.address,
      new anchor.BN(54000000000)
    )
    .accounts({ dataAccount: dataAccount.publicKey })
    .remainingAccounts([
      {
        pubkey: wallet.publicKey,
        isWritable: true,
        isSigner: true,
      },
      {
        pubkey: mintKeypair.publicKey,
        isWritable: false,
        isSigner: false,
      },
      {
        pubkey: tokenAccount.address,
        isWritable: true,
        isSigner: false,
      },
      {
        pubkey: receipientTokenAccount.address,
        isWritable: true,
        isSigner: false,
      },
    ])
    .rpc();
  console.log("Your transaction signature", tx);

 const recepienttokenAmount = (await getAccount(connection, receipientTokenAccount.address)).amount;
  console.log("recipienttokenAmount", recepienttokenAmount);
  let tokens = Number(recepienttokenAmount);

  assert.equal(tokens / LAMPORTS_PER_SOL, 54);
});
let’s break it down
First, we create Shivam's Associated Token Account (ATA) using this.
const tokenAccount = await getOrCreateAssociatedTokenAccount(
    connection,
    wallet.payer, // payer
    mintKeypair.publicKey, // mint
    wallet.publicKey // owner(shivam)
  );
We use the getOrCreateAssociatedTokenAccount method from the SPL Token library to create an associated token account.
We're using the same Gold Token Mint for this, and the owner is our wallet.
Next, we create a new keypair for the recipient, which is Justin in our case.
const receipient = anchor.web3.Keypair.generate();
After we create justin’s ata using this
const receipientTokenAccount = await getOrCreateAssociatedTokenAccount(
    connection,
    wallet.payer, // payer
    mintKeypair.publicKey, // mint account
    receipient.publicKey // owner(justin) account
  );
By using same gold token mint and set owner as receipient
Next, we start a transaction using the transferTokens method provided by the Solidity program. We give it the necessary token accounts and specify the amount of Gold Tokens we want to transfer.
Then, we provide the data account and other required accounts for these cross-program invocation (CPI) calls. Finally, we confirm our test by ensuring that Justin's ATA contains 54 Gold Tokens.
Next we move to building, deploying and testing our program
Building
Open the terminal in the root directory of your project and enter the following command.
anchor build
This command will generate a target folder in the project root and generate idl and types of our solana program to interact with the client side using rpc methods.
Now open a new terminal and check our configuration By writing this command
solana config get
After running this you will see something like this
Config File: ~/.config/solana/cli/config.yml
RPC URL: https://api.devnet.solana.com
WebSocket URL: wss://api.devnet.solana.com/ (computed)
Keypair Path: ~/.config/solana/id.json
Commitment: confirmed
Devnet is the RPC URL, and my wallet's default location is at keypairpath. Make sure you Generate a wallet keypair for deploying the program.
You can set devnet for cluster
By writing this command
solana config set --url https://api.devnet.solana.com
By writing this command you can generate a new keypair
solana-keygen new
Now you have a wallet
You can check the address(pubkey) and balance of this account using these commands
solana address
solana balance
If you have some devnet sol then it is okay for deployment if it is not then Get some devnet airdrop by writing this command
solana airdrop 4
Deploying
Deploying the program by opening terminal in a new tab and starting network cluster by writing this command
solana-test-validator
This will start a devnet cluster in the system next deploy program using
anchor deploy
you will get something like this
Deploying cluster: https://api.devnet.solana.com
Upgrade authority: ~/.config/solana/id.json
Deploying program "spl_token_minter"...
Program path: /Users/shivamsoni/Desktop/composability/transfergold/transfergold/target/deploy/spl_token_minter.so...
Program Id: EhJE9AUd8ybeRoTz79QHrxG6j3Z2hWX22g4SCSCKmGwE

Deploy success
Now our both program is on chain (devnet)
We get program id of our deployed program on the chain
Now grab this program id and change it in our program (solidity file) as well as anchor.toml file After pasting the new program id to both files
Build the program again with the command
anchor build
Testing Program
Before testing check dependencies and run:
yarn install
npm install
Now we run the test using this command
anchor test
After this, you will see something like this
spl-token-minter
Your transaction signature 5eMMtzhkGq8sZFNkLir3i7KFCua6b9itjym7mn1Gm2KBTPDjUL6p27qMba8GynZwVfvEBynF2rc57qBrtR3XZdiJ
    ✔ Is initialized! (2311ms)
Your transaction signature 38opFwF4DgQyXmtUwKgx2NDoTGsCTaWJzLqcRk49BS4x1a3hj8MyHSAn89cRvEaf6p62DVKX1u9tBzXtxSK861u9
    ✔ Create an SPL Token! (1540ms)
tokenAmount 199000000000n
    ✔ Mint some tokens to your wallet! (1794ms)
Your transaction signature 36aRV86YKuSab4iMcrBJbgcF2QskVshnFC5fQGDdoXoJm7qnpwAKJ7coXTM9ia2JNDPnr15FTvALtHT9DzvhCksQ
recipienttokenAmount 54000000000n
    ✔ Transfer some tokens to another wallet! (2814ms)


  4 passing (8s)

✨  Done in 12.26s.
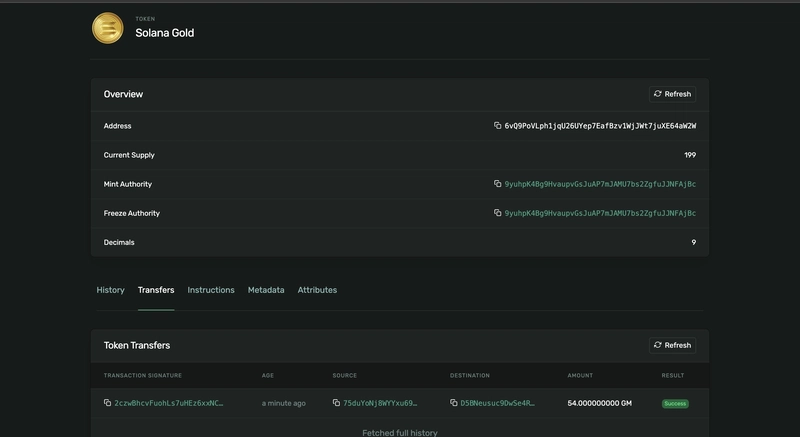
And that's it! We've successfully made a CPI call to transfer gold token from our account to jsutin’s account.
Here is the solana explorer demo
Conclusion
To wrap up our article on How to Transfer Solana Tokens with Solidity, we've expanded on our previous discussion of cross-program invocation. This time, we've dived into the details of Solana token transfers and explained how Associated Token Accounts play a crucial role in making these transfers happen on the Solana network.
In the last part, we put this knowledge into action by performing a transfer using the CPI method for the Gold Tokens that we minted in our SPL Token program.
In next article we will learn about program derived address
Further resources
helius spl token transfer
associated token account
sol dev
solana cookbook
solana token program


Top comments (0)