

Top 10 Tips for Configuring Automated Plugins to Enhance DevOps in Webpack
Webpack is a packaging tool whose purpose is to pack all static resources. Some people will ask why is webpack needed? Webpack is the cornerstone of modern front-end technology. Conventional development methods such as jQuery, HTML, and CSS static web page development have fallen behind. Now is the era of MVVM and data-driven interfaces. Webpack packs all kinds of new and useful technologies in modern JavaScript development.
Trying to describe webpack can be overwhelming, so I won’t waste everyone’s time. Understand this picture to know the ecosystem of webpack:
1. Loader Lists
**raw-loader: Load the original content of the file (UTF-8)
**file-loader: output the file to a folder, and use the relative URL to refer to the output file in the code (processing pictures and fonts)
**url-loader: Similar to file-loader, the difference is that the user can set a threshold, if the threshold is greater than the threshold, it will be handed over to the file-loader for processing, and when the threshold is less than the threshold, it will return the file base64 format encoding (processing pictures and fonts)
**source-map-loader: Load additional Source Map files to facilitate breakpoint debugging
svg-inline-loader: Inject compressed SVG content into the code
image-loader: load and compress image files
json-loader loads JSON files (included by default)
handlebars-loader: Compile the Handlebars template into a function and return
babel-loader: Convert ES6 to ES5
ts-loader: Convert TypeScript to JavaScript
awesome-typescript-loader: Convert TypeScript to JavaScript, performance is better than ts-loader
sass-loader: Convert SCSS/SASS code to CSS
css-loader: Load CSS, support modularization, compression, file import and other features
style-loader: Inject CSS code into JavaScript, and load CSS through DOM manipulation
postcss-loader: Extend CSS grammar, use next-generation CSS, and automatically fill in CSS3 prefixes with the autoprefixer plug-in
eslint-loader: Check JavaScript code through ESLint
tslint-loader: Check TypeScript code through TSLint
mocha-loader: Load the code for Mocha test cases
coverjs-loader: Calculate the coverage of the test
vue-loader: Load Vue.js single file component
i18n-loader: Internationalization
cache-loader: It can be added before some loaders with high performance overhead, the purpose is to cache the results to disk
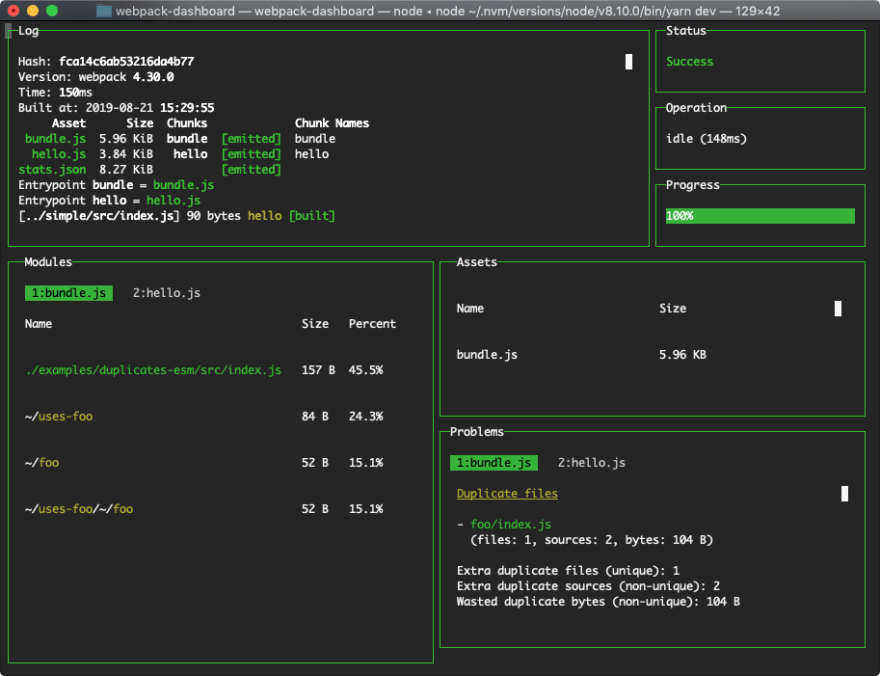
2. Webpack Dashboard
When using webpack, especially for a dev server, you are probably used to seeing something very long and difficult to read. However, webpack dashboard helps you to save time from reading the actual configuration:
To install:
$ npm install --save-dev webpack-dashboard
# ... or ...
$ yarn add --dev webpack-dashboard
Adding config to the webpack:
// Import the plugin:
const DashboardPlugin = require("webpack-dashboard/plugin");

// Add it to your webpack configuration plugins.
module.exports = {
  // ...
  plugins: [new DashboardPlugin()];
  // ...
};
3. Webpack Merge
**webpack-merge** provides a merge function that concatenates arrays and merges objects creating a new object. If functions are encountered, it will execute them, run the results through the algorithm, and then wrap the returned values within a function again.

This behavior is particularly useful in configuring webpack although it has uses beyond it. Whenever you need to merge configuration objects, webpack-merge can come in handy.
const { merge } = require('webpack-merge');

// Default API
const output = merge(object1, object2, object3, ...);

// You can pass an array of objects directly.
// This works with all available functions.
const output = merge([object1, object2, object3]);

// Keys matching to the right take precedence:
const output = merge(
  { fruit: "apple", color: "red" },
  { fruit: "strawberries" }
);
console.log(output);
// { color: "red", fruit: "strawberries"}
4. Speed Measurement Plugin
The first step to optimising your webpack build-speed, is to know where to focus your attention.
This plugin measures your webpack build speed, giving an output like this:

To install:
npm install --save-dev speed-measure-webpack-plugin

yarn add -D speed-measure-webpack-plugin
Adding config to the webpack:
const webpackConfig = {
  plugins: [new MyPlugin(), new MyOtherPlugin()],
};
5. Size Plugin
Prints the gzipped sizes of your webpack assets and the changes since the last build.

To install:
Install size-plugin as a development dependency using npm:

npm i -D size-plugin
Adding config to the webpack:
// webpack.config.js
+ const SizePlugin = require('size-plugin');

module.exports = {
  plugins: [
+    new SizePlugin()
  ]
}
6. Hot Module Replacement Plugin
Webpack’s hot update is also called Hot Module Replacement, abbreviated as HMR. This mechanism can replace the old module with the newly changed module without refreshing the browser.
The core of HMR is that the client pulls the updated file from the server. To be precise, it is chunk diff (the part of the chunk that needs to be updated). In fact, a Websocket is maintained between WDS and the browser. When local resources change, WDS will push updates to the browser, and bring the hash when it is built, so that the client can compare with the last resource. After comparing the differences, the client will initiate an Ajax request to WDS to obtain the changed content (file list, hash), so that the client can use this information to continue to initiate a jsonp request to WDS to obtain incremental updates of the chunk.
The subsequent parts — how to deal with the incremental update? Which state should be retained? Which need to be updated? — is completed by HotModulePlugin, which provides related APIs for developers to process for their own scenarios, such as react-hot-loader and Vue-loader uses these APIs to implement HMR.
HotModuleReplacementPlugin | webpack
config.plugins = config.plugins.concat([
 **new** webpack.optimize.OccurenceOrderPlugin(),
 **new** webpack.[**HotModuleReplacementPlugin](https://www.codota.com/code/javascript/functions/webpack/HotModuleReplacementPlugin)**(),
 **new** webpack.NoErrorsPlugin()
]);
7. File Hash
Hash: Related to the construction of the entire project, as long as the project file is modified, the hash value of the entire project construction will change
Chunkhash: It is related to the chunks packaged by Webpack. Different entries will produce different chunkhash.
Contenthash: Define hash according to the content of the file. If the content of the file is unchanged, the contenthash is unchanged
module.exports = {
  entry: {
  app: './scr/app.js',
  search: './src/search.js'
},
  output: {
  filename: '[name][chunkhash:8].js',
  path:__dirname + '/dist'
  }
}
8. CSS Autoprefix
The autoprefixer in postcss can be used to add response prefixes to some properties in CSS3 that need to be compatible with writing, which saves us a lot of time Since it is also a loader, we also need to install it first:
npm i postcss-loader autoprefixer -D
Creating **postcss.config.js **and import into the webpack config:
module.exports = { plugins: [require('autoprefixer')] }
Adding config to the webpack:
module.exports = {
    module: {
        rules: [
            {
                test: /\.css$/,
                use: ['style-loader', 'css-loader', 'postcss-loader']
            }
        ]
    }
}
9. Webpack Bundle Analyzer
Visualize size of webpack output files with an interactive zoomable treemap.

To install:
# NPM
npm install --save-dev webpack-bundle-analyzer
# Yarn
yarn add -D webpack-bundle-analyzer
Adding config to the webpack:
const BundleAnalyzerPlugin = require('webpack-bundle-analyzer').BundleAnalyzerPlugin;

module.exports = {
  plugins: [
    new BundleAnalyzerPlugin()
  ]
}
10. Progress Bar Webpack Plugin

To install:
npm i -D progress-bar-webpack-plugin
Adding config to the webpack:
var ProgressBarPlugin **=** require('progress-bar-webpack-plugin');

plugins**:** [

**new** ProgressBarPlugin({
    format: 'build [:bar] ' + chalk.green.bold(':percent') + '(:elapsed seconds)', clear: false    })

]
At this point, we have completed the basic configuration. But this is not perfect, or sometimes, we will have some other needs. The next article on webpack configuration will introduce some other situations. Thank you for reading.
More content at [https://shijiezhou.com/blog](https://shijiezhou.com/blog)

Top comments (1)
You copy-pasted incorrect setup instructions for
speed-measure-webpack-plugin