
This continues my entry for #twiliohackathon!
GitHub Repository (MIT Licensed)
Stackshare
In a previous post, Workdrop — UI Design and Prototyping, I went over my project's design system and some basic UI elements. This post will summarize the actual frontend, built with Nuxt.
Nuxt setup
Usually, I use Gridsome for my Vue SPA's, but it seems like Nuxt is much more oriented towards dynamic applications that are constantly interacting with a backend.
When creating my project, I did not use SSR mode because I wanted to host my site on Netlify. I suppose using SSR would reduce client bundle size, but for now it'll stay an SPA.
nuxt.config.js
Nuxt provides a really nice config file for configuring <head> contents, plugins, middleware, routing, and other build settings.
I inserted some custom <meta> tags for OpenGraph tag support and some other service integration for PWAs.
// nuxt.config.js

export default {
  // ...

  head: {
    title: process.env.npm_package_name || '',
    meta: [
      // ...
      {
        name: 'apple-mobile-web-app-status-bar-style',
        content: 'black-translucent',
      },

      { name: 'twitter:card', content: 'workdrop' },
      { name: 'twitter:url', content: 'https://www.workdrop.app/' },
      { name: 'twitter:title', content: 'workdrop' },
      {
        name: 'twitter:description',
        content: 'An assignment requesting app for teachers and educators.',
      },

      { property: 'og:title', content: 'workdrop' },
      { property: 'og:type', content: 'website' },
      { property: 'og:url', content: 'https://www.workdrop.app/' },
      { property: 'og:image', content: 'https://www.workdrop.app/ogimage.png' },
  },

  // ...
}
Plugins
For error tracking, I'm using Sentry. All you have to do to add Sentry integration to your Nuxt project is install @nuxtjs/sentry and add it to your modules and set your Sentry DSN:
// nuxt.config.js

{
  // ...

  modules: [
    // ...
    '@nuxtjs/sentry'
    // ...
  ],

  sentry: {
    DSN: '[Your DSN]'
  },
  // ...
}
Tailwind and PurgeCSS
When creating a new Nuxt project, you can choose to automatically setup TailwindCSS and PurgeCSS, which go together like bread and butter.
However, global styling rules can be slightly frustrating to configure since PurgeCSS will automatically remove CSS that it doesn't think is being used.
To circumvent this, I added a donotpurge.css (appropriately named) stylesheet that is loaded along with the ignored assets loaded with Tailwind:
/* tailwind.css */

/* purgecss start ignore */
@import 'tailwindcss/base';
@import '~/assets/css/donotpurge.css';
@import 'tailwindcss/components';
/* purgecss end ignore */
@import 'tailwindcss/utilities';
The Design
In my earlier post I discussed the basics of the design system, but did not disclose the full UI. Well, here it is!

Now, onto the actual implementation .
Navigation
For desktop navigation, it's a pretty simple Navbar with a little stylish border animation:

For mobile, I normally like to implement a fullscreen navigation menu to make the links larger and easier to tap. I right-justified the text since most people are right handed to make it easier to reach.

Also, I really considered some of the details in the simplicity of my app, considering the target audience. In this project, I tried to move away from non-labeled buttons for the most part, so rather than using a hamburger icon to open the menu it simply says "MENU", which obviates its function. I actually am considering doing this with all my projects from now on.

The footer is very basic as well:

Landing Page
For the landing page, I am using an illustration from isometric.online as mentioned in my previous post. I customized the colors to fit the design system.

I wanted to get my users up and running ASAP, so the "Request an Assignment" button takes you to the request form without needing to sign in.
About page
I really enjoyed laying out this page's content. Since it doesn't require a lot of interaction, I had a lot more creative freedom.

Request page
This page was very interesting to design and program.
The form is split into four parts, and each part requires one specific piece of information. This way, it's clear each step of the way what is needed and reduces mental overhead.
In the code, it's a bit hacky, but I used a dynamic Vue component. To transition between each part of the form, each form emits a continue or back event. This calls a method that increments a counter and changes the dynamic component to the step of the form that the counter is on.
<component
  :is="currentFormSection"
  @continue="nextStep"
  @back="previousStep"
></component>
const FORM_STEPS = [
  'RequestFormAssignmentName',
  'RequestFormStudents',
  'RequestFormMessage',
  'RequestFormEmail',
  'RequestFormReview',
]

export default {
  // ...
  computed: {
    currentFormSection() {
      return FORM_STEPS[this.currentStep]
    }
  }
  // ...
}
I really want to refactor this to use a state machine library such as XState, but for the time being it works well.
Form errors
Whenever a field is empty of invalid, such as emails, it opens my custom toast notification through a reference.
<toast ref="errorToast" title="Uh oh!" icon="error">
  We couldn't create the assignment. Refresh and try again.
</toast>
this.$refs.errorToast.open()
Form data
Since the form switches between components, it was obvious that Vuex would be needed as a centralized store. The Vuex module is very straightforward:
// store/request.js

export const state = () => ({
  assignmentName: '',
  students: [{ email: '', valid: false }],
  message: '',
  email: '',
})

export const mutations = {
  addStudent(state, email) {
    state.students.push({ email: '', valid: false })
  },
  editStudent(state, { index, newEmail }) {
    state.students[index].email = newEmail
  },
  setStudentValid(state, { index, valid }) {
    state.students[index].valid = valid
  },
  removeStudent(state, { index }) {
    state.students.splice(index, 1)
  },
  setAssignmentName(state, assignmentName) {
    state.assignmentName = assignmentName
  },
  setEmail(state, email) {
    state.email = email
  },
  setMessage(state, message) {
    state.message = message
  },
  clear(state) {
    state.assignmentName = ''
    state.students = [{ email: '', valid: false }]
    state.message = ''
    state.email = ''
  },
}
Email Validation Microinteraction
A few weeks ago, I found a very nice email validation microinteraction from dribbble that had been converted into an actual CSS keyframe transition.
I took the code and converted it into a Vue component, and thought this would be a great opportunity to use it!

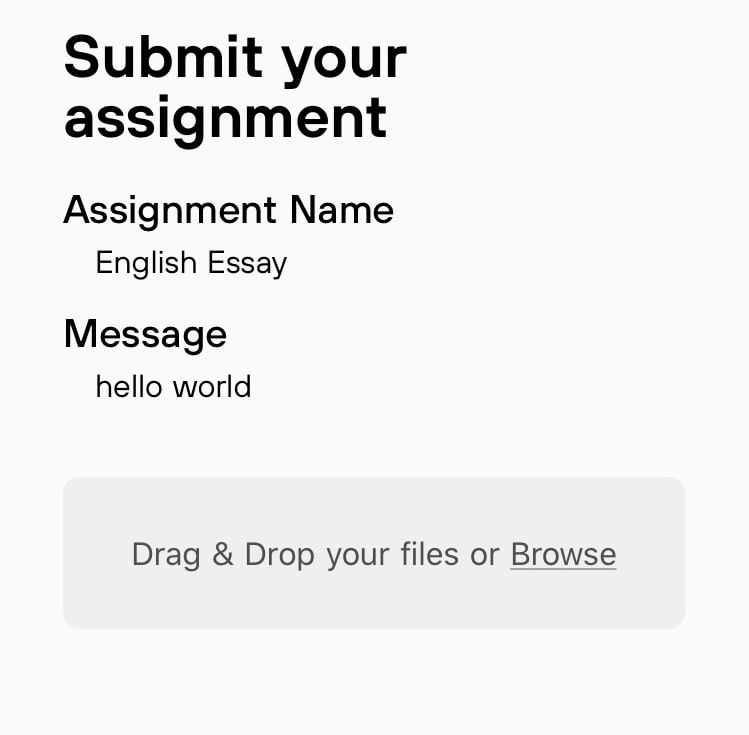
Submit page
The submit page has two possible states: accessing and submitting. The state depends on the provided queries in the URL. Currently, the solution is pretty ugly, but it works.
When accessing submissions, the assigner has the capability to individually download each submission or download them all simultaneously. I plan to integrate zip.js or a similar library to compress the downloads when downloading them all.
When submitting, I used FilePond to easily integrate a nice file uploading component in my page. When a file is submitted, it gets the AwsService from MongoDB Stitch and calls PutObject on the file object.
However (and this had me stuck for a couple days), when using Stitch you have to convert the file to a specific binary type using MongoDB's BSON type by first converting an ArrayBuffer from the file's contents to a UInt8Array:
// pages/submit.vue

const reader = new FileReader()

reader.onload = (e) => {
  const fileData = new Uint8Array(reader.result)
  const fileBson = new BSON.Binary(fileData)

  // upload to S3
  // ...
}

reader.readAsArrayBuffer(file)
The Logic
So now that I've detailed the design, here's a high-level layout of the entire application's flow:


Top comments (0)