
You can incredibly increase your page speed by setting up your media files appropriately. This article is a collection of tools and tricks that will help you optimize your page easily, along with other things related to visual media files.
First, let's take a look at the free tools found online. Then we will see some simple HTML5 code snippets that can make a huge difference at speed and user experience. Finally, we will see a couple of tools that can analyze your webpage speed.
Free Tools
Disclaimer: All of the tools shared in this article are free, but if you like them and have the money for it I encourage you to donate money to its creator(s).
Reduce File Size
tinypng.com

When it comes to the speed of your webpage, the size of your media files is one of the first things you should look into. TinyPNG.com reduces the file size of your images while having basically no effect on the look of the original. By doing this your images will load faster, thereby making your webpage faster as well.
videosmaller.com
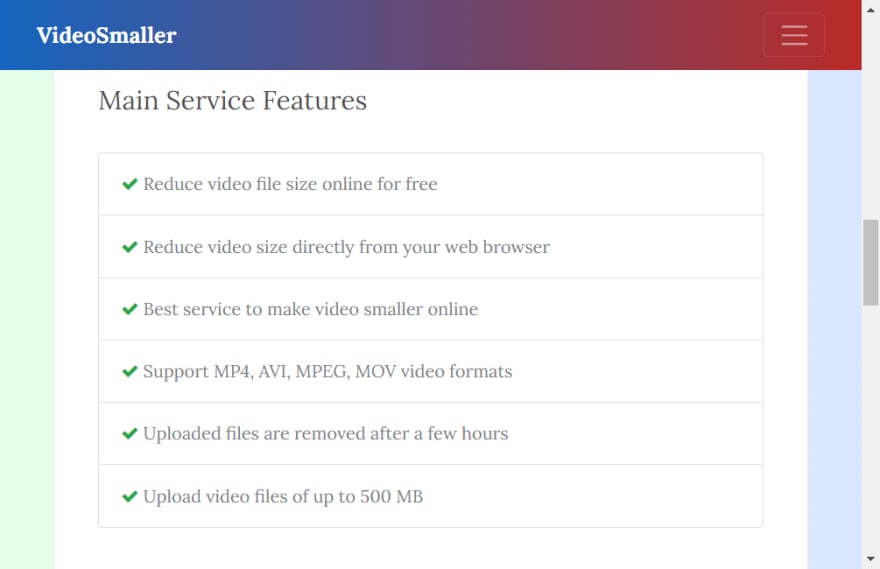
Upload your videos (up to 500mb) to this service to reduce video file size without losing quality. You have several features like removing the audio and you also have the assurance from them that even if you don’t delete the video yourself, they will remove it from their servers after a few hours.
Remove Background
remove.bg

Couldn’t be easier. Drag the image into remove.bg, download the new image, and done. With the help of AI technology, remove.bg can remove your image’s background in seconds with no editing on your part. You can also replace that transparent background using this tool.
unscreen.com
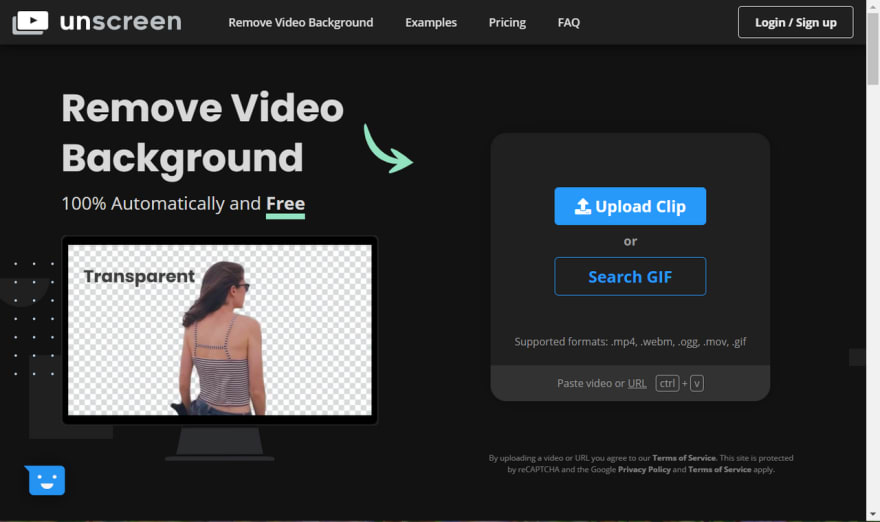
Using the same upload or drag and drop system as with remove.bg, this tool will remove the background of any gif or video using AI technology.
Free Stock Photos and Videos
pixabay.com

Pixabay has over 1.8 million royalty-free stock images and videos. Highly recommended for those side projects where you need images and/or videos, but you have no budget (or the artistic ability to produce high-quality media yourself!).
pexels.com

Has Pixabay’s selection left you wanting more? Head over to Pexels and take a look at their free stock of photos and videos.
giphy.com

With GIPHY you can search, share, discover, and create GIFs. When it comes to creating your own GIF you can use your own videos or set of pictures. You can also pick one of their popular GIFs and edit it by adding things like stickers and your own text. Finally, you can download and/or get a link to your new GIF so you can use it on your projects.
Placeholder
lorempixel.com

Named after the famous dummy text, this tool will provide you with a link from which you can essentially get dummy images. You can also use the placeholder generator in cases where you want a more specific image to appear, and even add text to said images!
A basic example of this tool in use would be <img src=”http://lorempixel.com/400/200” /> to get a random picture of 400 x 200 pixels.
Train your brain
pixact.ly

When dealing with media files you will probably have to deal with pixels at some point. This game will train your brain by giving you a series of measurements in pixels. You guess how much space those pixels should occupy on your screen, and get scores depending on how close your guess was.
Links
postimages.org

Have your own image and can’t (I’m looking at you codepen!) or don’t want to upload the image to a project? Get permanent links for your images with postimages.org.
HTML Tricks for Web Optimization
HTML tricks that go a long way when dealing with heavy media files.
GIFs
GIF video files are quite heavy and can make your page significantly slower. You can bypass this problem by ‘faking’ a GIF using the following code:
<video src="file.mp4" autoplay loop muted>
The autoplay boolean attribute will make the video automatically play itself even before all the data has loaded. The loop boolean attribute will make the browser automatically replay the video once it ends. And the muted boolean attribute will set the video's audio to mute by default.
Other video attributes you can use are:
- Controls: this display controls to allow the user to control the video’s playback.
- height: to adjust the height (in pixels) of the video’s display area.
- width: to adjust the width (in pixels) of the video’s display area.
Video
The <video> element has several attributes that could help with your page’s performance and with user experience, when used correctly.
<video
   controls width="500" height="400"
   poster="images/movie-poster.png"
   preload="auto|metadata|none">
<source src="videos/movie.webm" type="video/webm">
    <source src="videos/movie.mp4" type="video/mp4">
    Your browser does not support the video tag.
        Instead, you can watch it on <a href="youtube.com/movie">youtube</a>.
</video>
Videos may take a while to load. Adding a poster attribute with a src to a selected image will enhance the user experience as the browser will display this image when the video isn’t being played yet.
The preload attribute lets us control when the video data is loaded. This attribute will be ignored if the autoplay attribute (seen in the GIFs section) is included as well. When set to auto the video will load when the page loads, metadata will load only the metadata when the page loads, and none won't load the video when the page loads.
There are browsers that don’t support all video formats, but including several <source> tags will solve that issue. The browser will go from top to bottom and display the first video it recognizes. You should always include a fallback text with a link to where the user can watch/download the video in case any of the other formats fail to load.
To get the full list of <video> attributes take a look at the MDN web docs’s documentation. If accessibility is a concern for you (as it should be!) and you want to add captions and subtitles, take a look at this MDN web doc's article on Adding captions and subtitles to HTML5 video
Images
Img || Picture || Figure
The <img> element should always have an alt attribute. This will ensure that there is a descriptive alternative text available to be used by search engine bots, in the case of an error loading the image or when needed for accessibility purposes. It is recommended to set a width and height so that the element always takes the same space and doesn't mess with the layout of the page later.
A useful attribute regarding page performance is loading. When set to lazy the loading of the image is deferred until it reaches a calculated distance from the viewport. There's no need to load, for example, the images in the footer of the page until we are close to displaying that part of the page in our screen, right?
<img src="images/dog.png" loading="lazy" alt="A dorky looking dog image." width="200" height="200">
The <picture> element is not that different from the <img> element. It is meant as a way to have multiple <img src="#" > sources for responsive sites and to help with speed on mobile. Think about it this way: larger image = larger file size = slower website.
<picture>
   <source media="(min-width: 500w)" srcset="images/dog-500.png">
   <source media="(min-width: 800w)" srcset="images/dog-800.png">
   <source media="(min-width: 1000w)" srcset="images/dog-1000.png">
   <source media="(min-width: 1400w) and (orientation: landscape)" srcset="images/dog-1400L.png">
   <source media="(min-width: 1400w) and (orientation: portrait)" srcset="images/dog-1400P.png">
   <img src="images/dog.png" alt="A dorky looking dog image.">
</picture>
The browser will go through this element from top to bottom and display the appropriate image, depending on the specifications in the media attribute. An <img> element is needed as a last child element of the <picture> element. This will serve as a fallback for when none of the other <source> tags match the current screen size.
Of course, you could do the same using the <img> element as follows:
 <img src="images/dog.jpeg"
    alt="A dorky looking dog image."
    sizes="(max-width: 500px) 100vw, 800px"
    srcset="images/dog-500.jpeg 500w, images/dog-1000.jpeg 1000w">
So what can you do with the <picture> element that you can’t with the <img> element? Well, you can use this element to include different image formats. The user’s browser will use the first format it recognizes and ignores the rest.
<picture>
   <source type="image/webp" srcset="dog.webp">
   <source type="image/png" srcset="dog.png">
   <img src="dog.jpg" alt="A dorky looking dog image.">
</picture>
WebP image files are around 30% smaller than the more common PNG and JPEG files, with no loss of quality. The downside is that WebP files are not supported by all browsers. That is why we include a fallback image to cover all of our bases.
The <figure> element can contain images, illustrations, charts, diagrams, tables, code snippets, and the like. It is usually used when you want to display an image with a caption.
<figure>
   <img src="dog.jpg" alt="A dorky looking dog image.">
   <figcaption>A dorky looking dog.</figcaption>
</figure>
The <figure> element serves as a way to semantically add captions to an <img> or a <picture> element (and others). An <img> element is essential when wanting to display an image and should always have an alt attribute. A <picture> element is useful when we have more than one image format available. Both <img> and <picture> can be used for responsiveness (by instructing the browser to load the appropriate image size).
Performance
Check your page’s performance score with tools like GTmetrix and PageSpeed Insights.
If you liked what you read hit that ❤️ on the left or wherever it is. If you really liked it don’t forget to share it with the community by hitting that dot-dot-dot icon near the heart.
Feel free to add more tricks and tools on the comment section below! As for me, I will keep updating this article as I stumble upon new or better tools and tricks.
💻 article.close()


Top comments (0)