
More than just your average Flip Card tutorial. Don’t just flip your card on hover, use JavaScript to flip it on command. Includes instructions on how to change the reverse face to show a different face each time and tricks to give the card a nice 3D effect while flipping.
This series will be divided into three parts (plus maybe a fun bonus at the end 😉 ):
- Part I: HTML
- Part II: CSS
- Part III: JavaScript
- Bonus: Going further into 3D space
Part 1: The HTML
How I came about upon this project
Last week I was working on a challenge in which I was supposed to validate Planck’s constant, as appears in the Netflix show Stranger Things. For those that haven’t seen Season 2, I’ll try to not give too many spoilers.
Basically, Planck’s constant was the key to saving the world. But since the show is set in the 80s, the characters couldn’t just google it. Luckily for them, Susie knew it and recited Planck’s constant, 6.62607004. Hurray! The kids saved the day in the show, but had this been real life they would have all died. Scientists at the National Institute of Standards and Technology watched the show and reminded people that the constant in 1985 was thought to be 6.62607015, and it wasn’t until 2014 that more precise measuring techniques saw the constant updated to 6.62607004. Oops.

The challenge mentions this error, but doesn’t tell you what to do with this information. I thought about it and decided to make a flip card with a <form> element on the front used to validate the number given by the user. The tricky part was getting the back of the card to display different outcomes, depending on the solution to the validation. One card-back for Planck’s constant before 2014, a second one for the constant’s value after 2014, and a third one for if the user fails to guess either of these values.
Visualize the project
I find it helpful to visualize a project in my head. There are many programs out there that can help you organize and design your web pages, but do not underestimate the clarity you might get from conceptualizing the problem as a whole on a piece of paper before any line of code is even written. Even more so when you are dealing with animation and 3D effects.
My initial research took me to w3schools where I began to understand a simpler flip-card project. Expanding from that example I end up with a structure as follows.
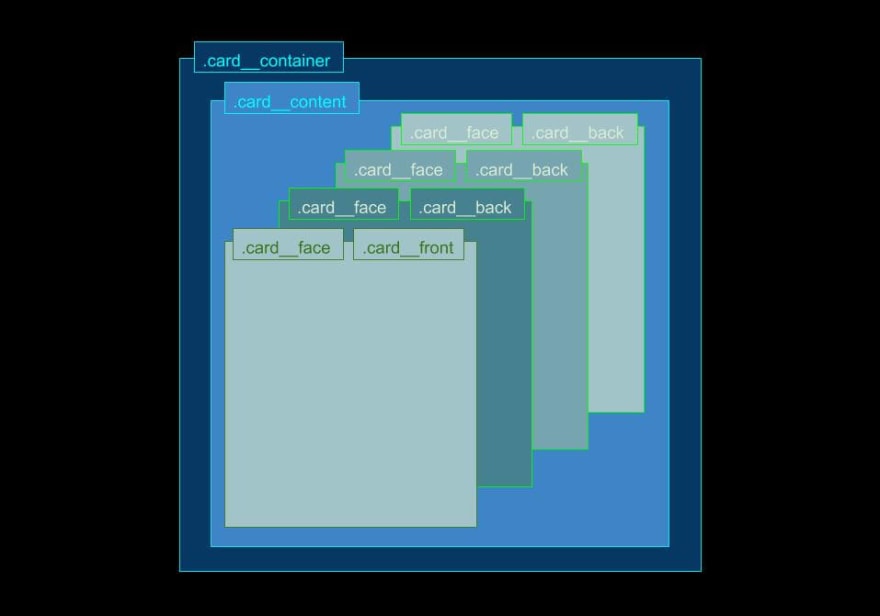
Why like this? We want the card__content to be the one doing the flip and for the card__container to always take up the same space, so as to avoid glitches or odd behaviors. As for the card__front and card__back sharing a class named card__face, this will make more sense when we work with the CSS.
Note: There are different ways to name your classes. In this project, I used BEM naming convention. For more on this, you can do some research on naming conventions.
For now, our basic HTML code will look something like this:
<div class="card__container">
   <div class="card__content">
      <div class="card__face card__front"></div>
      <div class="card__face card__back"></div>
      <div class="card__face card__back"></div>
      <div class="card__face card__back"></div>
   </div>
</div>
Card Front
On the front face of the card, we will be including a simple <form> with a heading, an input, and a submit button. In order for decimal values to be allowed inside the input field, I added the step attribute to the element and set it to 0.00000001. I also decided to restrict the legal values to be between 6 and 7 by adding the attributes min and max into the same element (though this is completely optional).
You could include a label for the input element in your project, but I decided against it and just have a placeholder attribute in place to show a text inside the input field when it is empty. You also want some sort of number to be entered before trying to submit the form, so add a required attribute (set it to required) to the <input> element as well.
As for the button, you have to add at least the type attribute (set it to submit) and a class so as to later customize the button with CSS.
<!-- Front of the card -->
<div class="card__face card__front">
   <h2>Planck's Constant</h2>
   <form>
      <input
        id="input__form"
        type="number"
        step="0.00000001"
        min="6"
        max="7"
        placeholder="Enter Number"
        required="required"
      />
      <button id="btn__form" class="btn" type="submit">
        Validate
      </button>
   </form>
</div>
Card Back
For the first back face of the card, I decided to have only an image representing a happy Karen Wheeler holding Christmas lights and a button that will serve to flip the card back to the front.
You may notice that the button on this <div> has an extra class compared to that of the previous button on the front face of the card. This is related to the CSS as I want the buttons to look the same, but for them to have different positions inside the card.
I’ve also added an id attribute to this <div> to help differentiate between the different card backs. The next two card__back divs will be the same; the only difference would be the id attributes and the src of the images.
The end result of our HTML should look something like this:
<div class="card__container">
   <div class="card__content">
      <!-- Front of the card -->
      <div class="card__face card__front">
         <h2>Planck's Constant</h2>
            <form>
               <input
                  id="input__form"
                  type="number"
                  step="0.00000001"
                  min="6"
                  max="7"
                  placeholder="Enter Number"
                  required="required"
                />
                <button
                   id="btn__form" class="btn" type="submit">
                   Validate
                 </button>
            </form>
         </div>
         <!-- Back of card__one if 6.62607015 -->
         <div id="card__back__one" class="card__face card__back">
            <img
               class="image__back"
               src="https://i.postimg.cc/BZpQPT4M/stranger-things-lights.jpg"
               alt="Kareen Wheeler happy"
            />
            <button
               id="btn__back__one"
               class="btn btn__back">
                Reset
            </button>
         </div>
         <!-- Back of the card__two if 6.62607004 -->
         <div id="card__back__two" class="card__face card__back">
            <img
               class="image__back"
               src="https://i.postimg.cc/hjrgxnWf/susie-constante-planck.jpg"
               alt="Susie's Planck is 6.62607004."
            />
            <button
               id="btn__back__two"
               class="btn btn__back">
               Reset
            </button>
         </div>
         <!-- Back of the card default -->
         <div id="card__back__three" class="card__face card__back">
            <img
               class="image__back"
               src="https://i.postimg.cc/tTTkpd57/robin-stranger-things-you-suck.jpg"
               alt="Robin thinks you suck."
            />
            <button
               id="btn__back__three"
               class="btn btn__back">
               Try Again
            </button>
         </div>
      </div>
   </div>
</main>
In the next part of this series, we will be looking into the CSS of this project.
💻 article.close()


Top comments (0)