In this tutorial, we will make a 90s-inspired website using HTML and a little CSS.
Nineties web design is pretty iconic. With backgrounds that can make your eyes water, animated GIFs and cursors, and an overload of text, graphics, and ads, there is only one word to describe 90s web design - garish!
Yet for those who witnessed the birth of the world wide web, 90s web design brings back fond memories.
As most of the websites built in the 90s didn't require complicated CSS and JavaScript, building a 90s-inspired website can be a fun first project to learn web development.
HTML and CSS
Every website you see on the web has two main building blocks: HTML and CSS.
Hyper Text Markup Language (HTML) is not a programming language. It is, as the name suggests, a markup language. To understand what a markup language is, we need to travel back in history.
Imagine you are an editor in the olden days and you receive a manuscript to revise. You want to write a bunch of revision instructions for the author on the manuscript. Or you may want to write instructions for the copy editor (write certain lines in a bigger font, make certain words bold, and so on).
To keep your instructions distinct from the content of the manuscript itself, you grab a red or blue pencil and write your instructions. In other words, you "mark up" the manuscript.
Fast forward to the electronic age. You are a website developer. You want your website to look a certain way. You need to "mark up" the content for the browser, which is responsible for displaying the content on the screen.
Enter HTML!
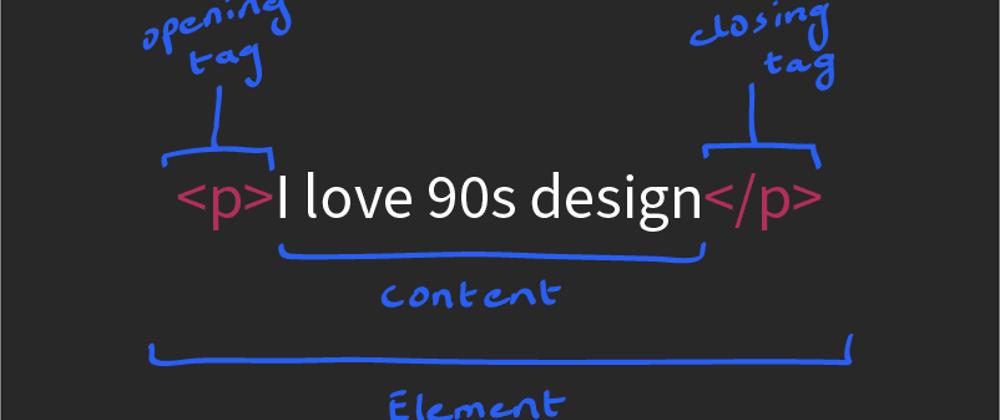
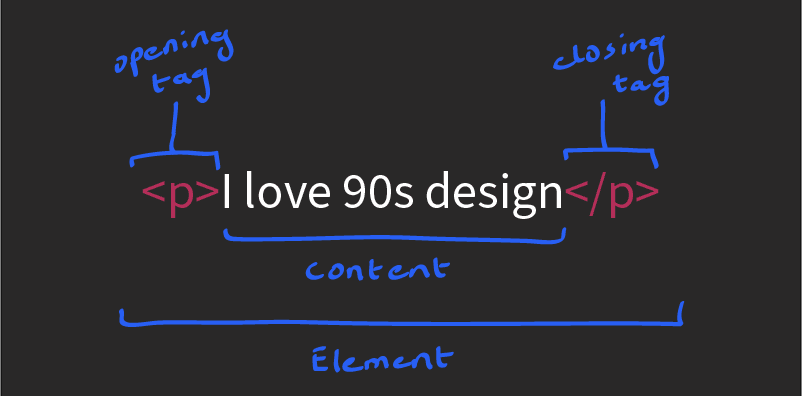
Rather than marking up our content with red and blue pencils, we will break our content into elements and wrap each element inside an opening and closing HTML tag.
HTML is a markup language that defines the structure of your content. HTML consists of a series of elements, which you use to enclose, or wrap, different parts of the content to make it appear a certain way, or act a certain way. The enclosing tags can make a word or image hyperlink to somewhere else, can italicize words, can make the font bigger or smaller, and so on. ~ MDN
HTML tags are written using angle brackets, like these: < >. A closing tag also has a forward slash: </ >.
Let's say we have some text:
I love 90s design
And we want to instruct the browser to display this text as a heading. We can simply wrap the text between the opening and closing tags, like so:
<h1>I love 90s design</h1>
There are tons of HTML elements. But don't worry! You don't have to memorize everything. Once you understand how elements and tags work, you can always refer to the documentation and find relevant elements and their usage.
HTML is the skeleton of our website. But CSS or Cascading Style Sheets is what adds interest to a website. CSS is used to style and alter the layout of HTML elements. We use CSS to specify fonts, change colors and size, add animations, and control other decorative features of our website.
We will learn more about HTML and CSS as we make our website.
Getting started
In this tutorial we are going to use Replit to make our website. The cool thing about Replit is that you don't need to install anything. All you need is a computer with a browser and internet connection.
Create an account on Replit if you haven't already. Create a new Repl and choose HTML, CSS, JS from the template dropdown.

You will see that we have three files added to our project. The index.html file is where we will write our HTML. The style.css file is where we will write our CSS. You can delete the script.js file, as we won't write any JavaScript in this tutorial.
Replit prepopulates the index.html file with a bunch of code. Delete everything in there as we will start from scratch.
Copy the following line in your index.html file, and you will see it formatted as a heading in the browser preview window:
<h1>Web Design in the 90s</h1>

That's it! You just made your very own web page 🎉🎉🎉
Building structure
While writing individual HTML tags does work, to create a real website we need to combine individual elements in a structured way. We will also need to add some extra information and metadata about our site for SEO and other purposes.
In your code editor, erase everything.
The very first piece of HTML we will write is <!DOCTYPE html>.
<!DOCTYPE html>
The <!DOCTYPE html> tag is a doctype tag. It is a required tag that is added at the top of all HTML documents. This tag makes sure everything behaves as expected. Note that there is no closing tag as we are not wrapping this tag around any content.
Next we will add an <html> element:
<!DOCTYPE html>
<html lang="en-US"></html>
The <html> tag wraps around all the content and is often called the root element. This tag tells the browser that everything enclosed inside this tag is HTML. HTML elements can also be nested inside each other. All further elements we add will be nested inside the <html> element.
Also, notice how we set the language to USA English by setting the value of the lang attribute to "en-US". We can pass extra information to an HTML element using attributes.
The <head> element
Inside the <html> element, the content is divided into a <head> element and a <body> element.
<!DOCTYPE html>
<html lang="en-US">
  <head> </head>

  <body></body>
</html>
The head element is a container where we include all the meta information. We can also include extra information about the website, which we don't want to render, or show, on the website itself. This extra information can include data to improve our website's SEO ranking, links to other files, and so on.
Let's add these elements to the <head>:
<!DOCTYPE html>
<html lang="en-US">
  <head>
    <meta charset="utf-8" />
    <title>My 90s website</title>
  </head>

  <body></body>
</html>
To display an HTML page correctly, a web browser must know which character set to use. Adding the line <meta charset="utf-8"> tells our browser to use the UTF-8 character set. UTF-8 is the recommended character set as it covers almost all of the characters and symbols in the world!
The <title> element contains the title of our website. This title appears in the browser tab. It is also used to describe the page when you bookmark it.
Tip
In Replit you can generate this boilerplate code by typing ! followed by the tab key in an empty HTML file.
The <body> element
Everything we want to display on our website will be nested within the <body> element. We will spend most of our time as web developers in this element.
Let's add a <header> element and a heading to the <body> of our site:
<!DOCTYPE html>
<html lang="en-US">
  <head>
    <meta charset="utf-8" />
    <title>My 90s Website</title>
  </head>
  <body>
    <header>
      <h1>My 90s Website</h1>
    </header>
  </body>
</html>
The <header> element usually contains introductory and/or navigational content. Don't confuse the <header> with the <head> element.
The <h1> element is the level one heading element. Heading elements allow us to specify that certain parts of our content are headings or subheadings. There are six heading levels in HTML, <h1> to <h6>.
Info Indentation
The indentation in the HTML code is not required. The only reason we indent our code is to make it easier to read.
Adding more content
Let's add some more content to our site. We already have a heading, so let's add a <main> element to our web page:
<body>
  <header>
    <h1>My 90s Website</h1>
  </header>
  <main></main>
</body>
The <main> element represents the dominant content of the body of a document.
Next we will add some text or paragraph elements:
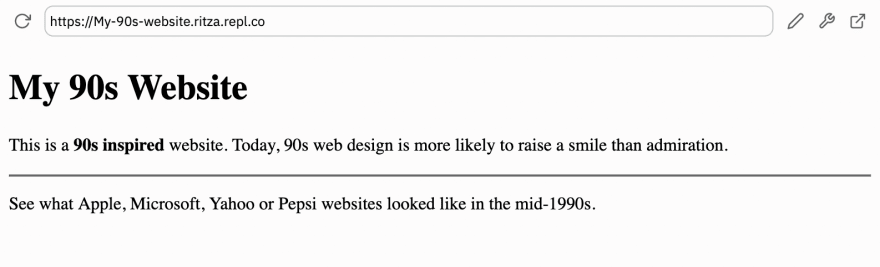
<body>
<header>
<h1>My 90s Website</h1>
</header>
<main>
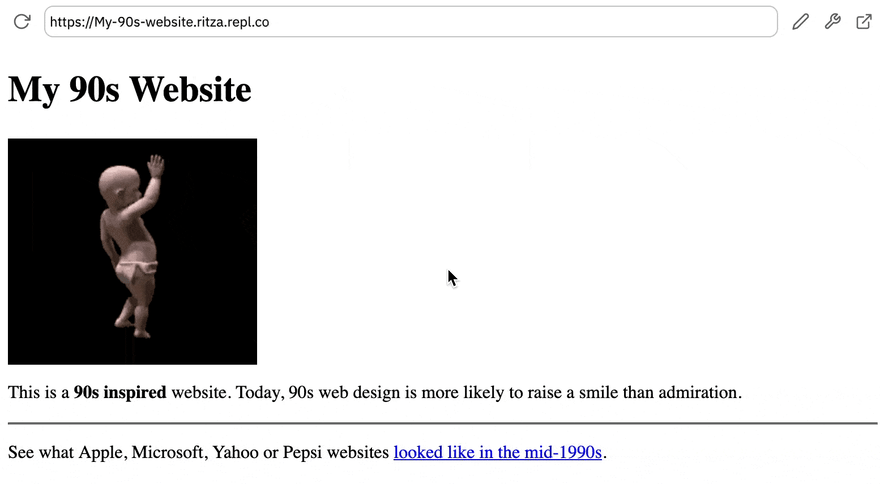
<p>
This is a <strong>90s inspired</strong> website. Today, 90s web design is
more likely to raise a smile than admiration.
</p>
<hr />
<p>
See what Apple, Microsoft, Yahoo or Pepsi websites looked like in the
mid-1990s.
</p>
</main>
</body>
We have added two paragraph elements under the heading. According to the documentation:
The
<p>HTML element represents a paragraph. Paragraphs are usually represented in visual media as blocks of text separated from adjacent blocks by blank lines and/or first-line indentation, but HTML paragraphs can be any structural grouping of related content, such as images or form fields.
We have also wrapped the text "90s inspired" with the <strong> tag. The <strong> element indicates that its contents have strong importance. The browser will render the contents of <strong> element in bold type.
Also, notice the <hr> element which is adding a horizontal separator between the two paragraphs. There are certain elements like the <hr> element that do not require a closing tag as they do not wrap around any content.
Tip
Which other element have we used that didn't require a closing tag?
Hit the "Run" button on your Replit site and you will see the new text appear in the browser preview window.
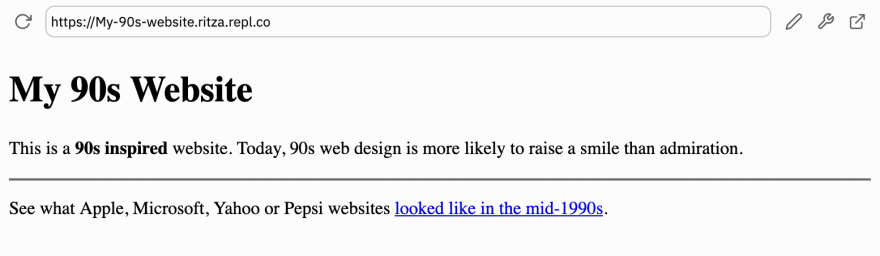
Adding links
Next, we will add a link to the web design museum so our readers can see some actual 90s websites. We want to make some of our text clickable. We can do that by using the anchor tag <a>.
First wrap the text that you want to make clickable with the <a></a> tags, like so:
<p>
  See what Apple, Microsoft, Yahoo or Pepsi websites
  <a>looked like in the mid-1990s</a>.
</p>
The anchor element requires an href or hyperlink reference attribute, which is the URL that the hyperlink points to.
<p>
  See what Apple, Microsoft, Yahoo or Pepsi websites
  <a href="https://www.webdesignmuseum.org/exhibitions/web-design-in-the-90s"
    >looked like in the mid-1990s</a
  >.
</p>
Hit "Run" and you should see the link in action:
Adding images
You can't have a 90s-inspired website without the animated GIF of the dancing baby!
Create a new folder in the "Files" section in your repl, and name it "img". Download the images from here and upload them to the "img" folder.
Images are added with an image element <img>. Inside this tag we need to give the image location, or source, with a src attribute, like so:
<img src="img/dancing-baby.gif" />
We will add the image within the <header> element. We will also add a description of the image with an alt attribute:
<body>
  <header>
    <h1>My 90s Website</h1>
    <img src="img/dancing-baby.gif" alt="Animated GIF of a dancing baby" />
  </header>
  <main>
    <p>
      This is a <strong>90s inspired</strong> website. Today, 90s web design is
      more likely to raise a smile than admiration.
    </p>
    <hr />
    <p>
      See what Apple, Microsoft, Yahoo or Pepsi websites
      <a
        href="https://www.webdesignmuseum.org/exhibitions/web-design-in-the-90s"
        >looked like in the mid-1990s</a
      >.
    </p>
  </main>
</body>
This is how our website looks:
The <div> element
The <div> element is like an empty box. We can use it when we need to break the content on our website into different sections, to control styling, and more.
For our site, we will use the <div> element to add a background image to our site later.
Let's add a new <div> element to our "index.html" file and nest everything else inside it:
<body>
  <div><!-- This is the new addition. -->
    <header>
      <h1>My 90s Website</h1>
      <img src="img/dancing-baby.gif" alt="" />
    </header>
    <main>
      <p>
        This is a <strong>90s inspired</strong> website. Today, 90s web design
        is more likely to raise a smile than admiration.
      </p>
      <hr />
      <p>
        See what Apple, Microsoft, Yahoo or Pepsi websites
        <a
          href="https://www.webdesignmuseum.org/exhibitions/web-design-in-the-90s"
          >looked like in the mid-1990s</a
        >.
      </p>
    </main>
  </div><!-- Don't forget to close the div element -->
</body>
Info Comments
The <!-- --> characters mark a comment. Anything written between these two tags will be ignored by the browser. We add comments to explain our code to other humans.
Linking files
The website has all the content that we need. Now it's time to add some CSS magic.
Before we write any CSS, we need to leave instructions for our browser so it knows where to look for our CSS file.
To link the CSS file to the HTML file, we will use a link element <link>. The <link> element is used to specify relationships between the current document and an external resource. This element is most commonly used to link to CSS, but it can be used to link other files.
We will add the <link> element within the <head> element of our site:
<head>
  <meta charset="UTF-8" />
  <meta name="viewport" content="width=device-width, initial-scale=1.0" />
  <link rel="stylesheet" href="style.css" />
  <title>My 90s Website</title>
</head>
The <link> element needs a rel or relationship attribute and an href attribute. We set the rel attribute to "stylesheet" to tell our browser what kind of document are we linking. We will add the name of our stylesheet as the value of the href attribute.
Info
If your CSS file is in another folder or directory, you will need to provide the complete path to the CSS sheet.
Notice we have also added a new <meta> tag. This gives the browser instructions on how to control the page's dimensions and scaling. You can read more about it on MDN documentation.
Basic styling
In our CSS file, we can list the HTML elements we’ve used and say how we want them to look. We use CSS properties and values to control the look of our elements.
There are many ways to point to the elements we want. The easiest way is to use the element's name.
For example, the following code will select the <body> element, and change its background-color property to black:
body {
    background-color: black;
}
You can also select multiple elements at once. For example, the following code will change the text color of both <h1> and <p> elements:
h1, p {
    color: blueviolet;
}
We can also declare more than one rule at once. For example, the following group of rules will alter the size and the extra spacing (padding) at the top of our <h1> elements:
h1 {
    font-size: 4rem;
    padding-top: 10rem;
}

There are a lot of CSS properties. Covering them all is beyond the scope of this tutorial. You can look up all the CSS properties on MDN documentation.
Another good way to find CSS properties and their values for your use case is searching for them using your favorite search engine. For example, if we want to learn how to align the text on our web page to the center, we can search "CSS text align".
The first result was this MDN page which explains the usage of text-align property. Add this new property to your code:
body {
    background-color: black;
    text-align: center;
}
Tip
A good way to learn CSS is by playing around with different properties and their values.
HTML classes
Selecting elements by name comes in handy when we want to select all elements of the same type on a page at once. But for better control, we may want to select and make changes to individual elements. One way to select individual elements is using classes.
HTML classes are attributes that we can add to elements. Once an element has a class name, we can use this in our CSS. You can think of classes as custom labels that we attach to our elements.
Let's add a class bigger-text to our first <p> element:
<p class="bigger-text">
  This is a <strong>90s inspired</strong> website. Today, 90s web design is more
  likely to raise a smile than admiration.
</p>
Naming the classes is totally up to you. You can name the classes whatever way you want. But it's a good practice to give classes a descriptive name.
In our style.css file we can select the element with the class bigger-text. To tell the CSS that we are selecting a class, and not a built-in HTML element, we have to add a dot . before the class name. For example, we can select the bigger-text class and change its fonts to a different size like so:
.bigger-text {
  font-size: 1.5rem;
}
Info
CSS has several different units for expressing length. We are using a relative size unit rem here. But we can also use absolute units like px, which stands for pixels.
Let's also add a class container to our <div> element and use it to add a background image:
<body>
  <div class="container">
    <header>...</header>
    <main>...</main>
  </div>
</body>
Upload the window.png file to your image folder, if you haven't already. Now add the following CSS code to your style.css file:
.container {
  background: url("img/window.png");
  background-position: center;
  background-repeat: no-repeat;
  background-size: contain;
  height: 800px;
  width: 800px;
  margin: auto;
}
CSS properties are pretty self-explanatory. In the code above, we use an image as a background with a url() function. This is just like passing the URL of an image to the href attribute in HTML.
Next, we tell the browser to position this image in the center and not to repeat it multiple times. We also set the height and width. This time we use absolute length units px.
The margin property controls the extra space around an element. Setting it to auto means we want equal space all around an element, which is a good way to center an element.

Let's add our emoji image to the body element to make our website as eye-watering as possible 😀
body {
  background: black url("img/emoji.png");
  text-align: center;
}
Notice we changed the background-color property to background and added both a color and an image to it in a single line.
Also notice that this time we didn't use the background-repeat: no-repeat which resulted in our image repeating multiple times to fill the whole body element.

Custom domain
Our website is done! We can share it with the world by sharing the URL of our repl.

There is one problem, however. The URL is not very reader-friendly. We want something easier like "ilove90sdesign.com".
There are many places you can buy a custom URL or domain. Some of them are Google Domains, GoDaddy, and Namecheap.
Let's walk through the process of connecting our repl to a custom domain from Namecheap.
Buy a domain on Namecheap.
Next, in your Replit site, click on the pencil icon in the browser preview window and click on "Create Domain Link". Enter your domain and the domain linking window will open:
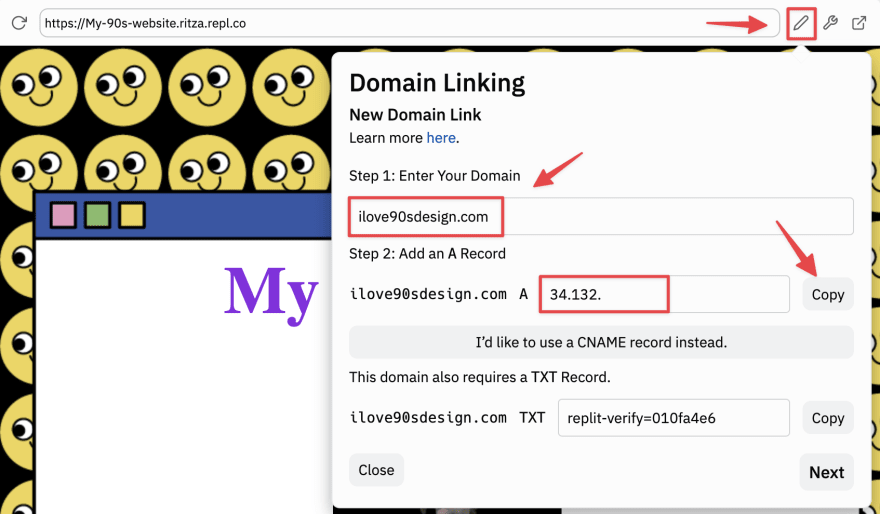
Copy the IP address from the "Domain Linking" dialog.
Sign in to your Namecheap account. Follow the instructions from step 3 of this guide. Select "@" for "Host" and enter the IP address that you have copied above in the "IP Address" field.
Click "Save changes". Back in your Replit site, click the "Next" button. Replit will verify the domain and you are done!
Note
It can take some time before the changes take effect.
Where next?
That's it for this tutorial, but you can build your site further. Try adding more sections to your website, or play around with CSS properties and selectors to give your site a different look.
You can find our repl below:


Latest comments (0)