In this tutorial, we'll build an application that sends regular emails to its users. Users will be able to subscribe to RSS and Atom feeds, and will receive a daily email with links to the newest stories in each one, at a specified time.
As this application will require a number of different components, we're going to build it using the power of Nix repls. By the end of this tutorial, you'll be able to:
- Use Nix on Replit to set up a database, webserver, message broker and background task handlers.
- Use Python Celery to schedule and run tasks in the background.
- Use Mailgun to send automated emails.
- Build a dynamic Python application with multiple discrete parts.
Getting started
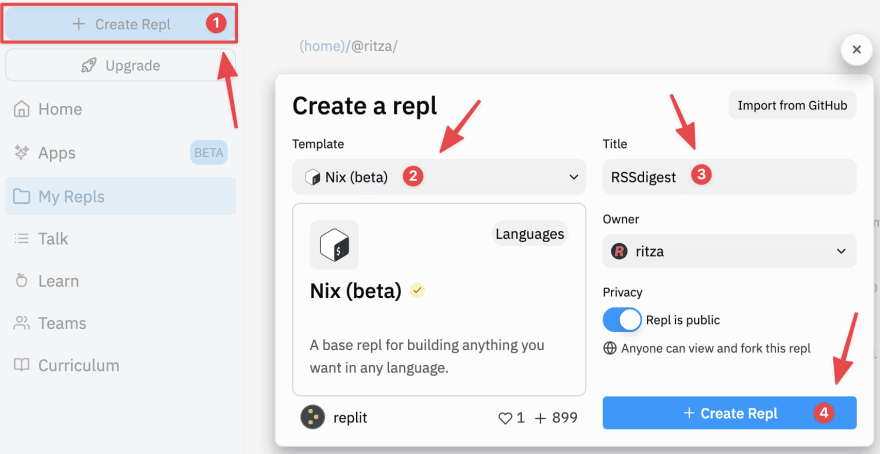
To get started, sign in to Replit or create an account if you haven't already. Once logged in, create a Nix repl.
Installing dependencies
We'll start by using Nix to install the packages and libraries we'll need to build our application. These are:
- Python 3.9, the programming language we'll write our application in.
- Flask, Python's most popular micro web framework, which we'll use to power our web application.
- MongoDB, the NoSQL database we'll use to store persistent data for our application.
- PyMongo, a library for working with MongoDB in Python.
- Celery, a Python task queuing system. We'll use this to send regular emails to users.
- Redis, a data store and message broker used by Celery to track tasks.
- Python's Redis library.
- Python's Requests library, which we'll use to interact with an external API to send emails.
- Python's feedparser library, which we'll use to parse news feeds.
- Python's dateutil library, which we'll use to parse timestamps in news feeds.
To install these dependencies, open replit.nix and edit it to include the following:
{ pkgs }: {
    deps = [
        pkgs.cowsay
        pkgs.python39
        pkgs.python39Packages.flask
        pkgs.mongodb
        pkgs.python39Packages.pymongo
        pkgs.python39Packages.celery
        pkgs.redis
        pkgs.python39Packages.redis
        pkgs.python39Packages.requests
        pkgs.python39Packages.feedparser
        pkgs.python39Packages.dateutil
    ];
}
Run your repl now to install all the packages. Once the Nix environment is finished loading, you should see a welcome message from cowsay.
Now edit your repl's .replit file to run a script called start.sh:
run = "sh start.sh"
Next we need to create start.sh in the repl's files tab:

And add the following bash code to start.sh:
#!/bin/sh

# Clean up
pkill mongo
pkill redis
pkill python
pkill start.sh
rm data/mongod.lock
mongod --dbpath data --repair

# Run Mongo with local paths
mongod --fork --bind_ip="127.0.0.1" --dbpath=./data --logpath=./log/mongod.log

# Run redis
redis-server --daemonize yes --bind 127.0.0.1
The first section of this script will kill all the running processes so they can be restarted. While it may not be strictly necessary to stop and restart MongoDB or Redis every time you run your repl, doing so means we can reconfigure them should we need to, and prevents us from having to check whether they're stopped or started, independent of our other code.
The second section of the script starts MongoDB with the following configuration options:
-
--fork: This runs MongoDB in a background process, allowing the script to continue executing without shutting it down. -
--bind_ip="127.0.0.1": Listen on the local loopback address only, preventing external access to our database. -
--dbpath=./dataand--logpath=./log/mongod.log: Use local directories for storage. This is important for getting programs to work in Nix repls, as we discussed in our previous tutorial on building with Nix.
The third section starts Redis. We use the --bind flag to listen on the local loopback address only, similar to how we used it for MongoDB, and --daemonize yes runs it as a background process (similar to MongoDB's --fork).
Before we run our repl, we'll need to create our MongoDB data and logging directories, data and log. Create these directories now in your repl's filepane.

Once that's done, you can run your repl, and it will start MongoDB and Redis. You can interact with MongoDB by running mongo in your repl's shell, and with Redis by running redis-cli. If you're interested, you can find an introduction to these clients at the links below:

These datastores will be empty for now.
Important note: Sometimes, when stopping and starting your repl, you may see the following error message:
ERROR: child process failed, exited with error number 100
This means that MongoDB has failed to start. If you see this, restart your repl, and MongoDB should start up successfully.
Scraping RSS and Atom feeds
We're going to build the feed scraper first. If you've completed any of our previous web-scraping tutorials, you might expect to do this by parsing raw XML with Beautiful Soup. While this would be possible, we would need to account for a large number of differences in feed formats and other gotchas specific to parsing RSS and Atom feeds. Instead, we'll use the feedparser library, which has already solved most of these problems.
Create a directory named lib, and inside that directory, a Python file named scraper.py. Add the following code to it:
import feedparser, pytz, time
from datetime import datetime, timedelta
from dateutil import parser

def get_title(feed_url):
    pass

def get_items(feed_url, since=timedelta(days=1)):
    pass
Here we import the libraries we'll need for web scraping, XML parsing, and time handling. We also define two functions:
-
get_title: This will return the name of the website, for a given feed track (e.g. "Hacker News" for https://news.ycombinator.com/rss). -
get_items: This will return the feed's items – depending on the feed, these can be articles, videos, podcast episodes, or other content. Thesinceparameter will allow us to only fetch recent content, and we'll use one day as the default cutoff.
Edit the get_title function with the following:
def get_title(feed_url):
    feed = feedparser.parse(feed_url)

    return feed["feed"]["title"]
Add the following line to the bottom of scraper.py to test it out:
print(get_title("https://news.ycombinator.com/rss"))
Instead of rewriting our start.sh script to run this Python file, we can just run python lib/scraper.py in our repl's shell tab, as shown below. If it's working correctly, we should see "Hacker News" as the script's output.

Now we need to write the second function. Add the following code to the get_items function definition:
def get_items(feed_url, since=timedelta(days=1)):
    feed = feedparser.parse(feed_url)

    items = []
    for entry in feed.entries:
        title = entry.title
        link = entry.link
        if "published" in entry:
            published = parser.parse(entry.published)
        elif "pubDate" in entry:
            published = parser.parse(entry.pubDate)
Here we extract each item's title, link, and publishing timestamp. Atom feeds use the published element and RSS feeds use the pubDate element, so we look for both. We use parser to convert the timestamp from a string to a datetime object. The parse function is able to convert a large number of different formats, which saves us from writing a lot of extra code.
We need to evaluate the age of the content and package it in a dictionary so we can return it from our function. Add the following code to the bottom of the get_items function:
# evaluating content age
        if (since and published > (pytz.utc.localize(datetime.today()) - since)) or not since:
            item = {
                "title": title,
                "link": link,
                "published": published
            }
            items.append(item)

    return items
We get the current time with datetime.today(), convert it to the UTC timezone, and then subtract our since timedelta object. Because of the way we've constructed this if statement, if we pass in since=None when calling get_items, we'll get all feed items irrespective of their publish date.
Finally, we construct a dictionary of our item's data and add it to the items list, which we return at the bottom of the function, outside the for loop.
Add the following lines to the bottom of scraper.py and run the script in your repl's shell again. We use time.sleep to avoid being rate-limited for fetching the same file twice in quick succession.
time.sleep(1)
print(get_items("https://news.ycombinator.com/rss"))
You should see a large number of results in your terminal. Play around with values of since and see what difference it makes.
Once you're done, remove the print statements from the bottom of the file. We've now built our feed scraper, which we'll use as a library in our main application.
Setting up Mailgun
Now that we can retrieve content for our email digests, we need a way of sending emails. To avoid having to set up our own email server, we'll use the Mailgun API to actually send emails. Sign up for a free account now, and verify your email and phone number.
Once your account is created and verified, you'll need an API key and domain from Mailgun.
To find your domain, navigate to Sending → Domains. You should see a single domain name, starting with "sandbox". Click on that and copy the full domain name (it looks like: sandboxlongstringoflettersandnumbers.mailgun.org).

To find your API key, navigate to Settings → API Keys. Click on the view icon next to Private API key and copy the revealed string somewhere safe.

Back in your repl, create two environment variables, MAILGUN_DOMAIN and MAILGUN_APIKEY, and provide the strings you copied from Mailgun as values for each.

Run your repl now to set these environment variables. Then create a file named lib/tasks.py, and populate it with the code below.
import requests, os

# Mailgun config
MAILGUN_APIKEY = os.environ["MAILGUN_APIKEY"]
MAILGUN_DOMAIN = os.environ["MAILGUN_DOMAIN"]

def send_test_email(to_address):
    res = requests.post(
        f"https://api.mailgun.net/v3/{MAILGUN_DOMAIN}/messages",
        auth=("api", MAILGUN_APIKEY),
        data={"from": f"News Digest <digest@{MAILGUN_DOMAIN}>",
              "to": [to_address],
              "subject": "Testing Mailgun",
              "text": "Hello world!"})

    print(res)

send_test_email("YOUR-EMAIL-ADDRESS-HERE")
Here we use Python Requests to interact with the Mailgun API. Note the inclusion of our domain and API key.
To test that Mailgun is working, replace YOUR-EMAIL-ADDRESS-HERE with your email address, and then run python lib/tasks.py in your repl's shell. You should receive a test mail within a few minutes, but as we're using a free sandbox domain, it may end up in your spam folder.
Without further verification on Mailgun, we can only send up to 100 emails per hour, and a free account limits us to 5,000 emails per month. Additionally, Mailgun's sandbox domains can only be used to send emails to specific, whitelisted addresses. The address you created your account with will work, but if you want to send emails to other addresses, you'll have to add them to the domain's authorized recipients, which can be done from the page you got the full domain name from. Keep these limitations in mind as you build and test this application.

After you've received your test email, you can delete or comment out the function call in the final line of lib/tasks.py.
Interacting with MongoDB
As we will have two different components of our application interacting with our Mongo database – our email-sending code in lib/tasks.py and the web application code we will put in main.py – we're going to put our database connection code in another file, which can be imported by both. Create lib/db.py now and add the following code to it:
import pymongo

def connect_to_db():
    client = pymongo.MongoClient()
    return client.digest
We will call connect_to_db() whenever we need to interact with the database. Because of how MongoDB works, a new database called "digest" will be created the first time we connect. Much of the benefit MongoDB provides over traditional SQL databases is that you don't have to define schemas before storing data.
Mongo databases are made up of collections, which contain documents. You can think of the collections as lists and the documents as dictionaries. When we read and write data to and from MongoDB, we will be working with lists of dictionaries.
Creating the web application
Now that we've got a working webscraper, email sender and database interface, it's time to start building our web application.
Create a file named main.py in your repl's filepane and add the following import code to it:
from flask import Flask, request, render_template, session, flash, redirect, url_for
from functools import wraps
import os, pymongo, time

import lib.scraper as scraper
import lib.tasks as tasks
from lib.db import connect_to_db
We've imported everything we'll need from Flask and other Python modules, as well as our three local files from lib: scraper.py, tasks.py and db.py. Next, add the following code to initialize the application and connect to the database:
app = Flask(__name__)

app.config['SECRET_KEY'] = os.environ['SECRET_KEY']

db = connect_to_db()
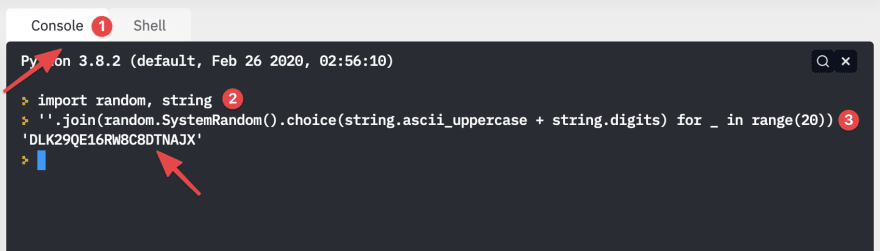
Our secret key will be a long, random string, stored in an environment variable. You can generate one in your repl's Python console with the following two lines of code:
import random, string
''.join(random.SystemRandom().choice(string.ascii_uppercase + string.digits) for _ in range(20))
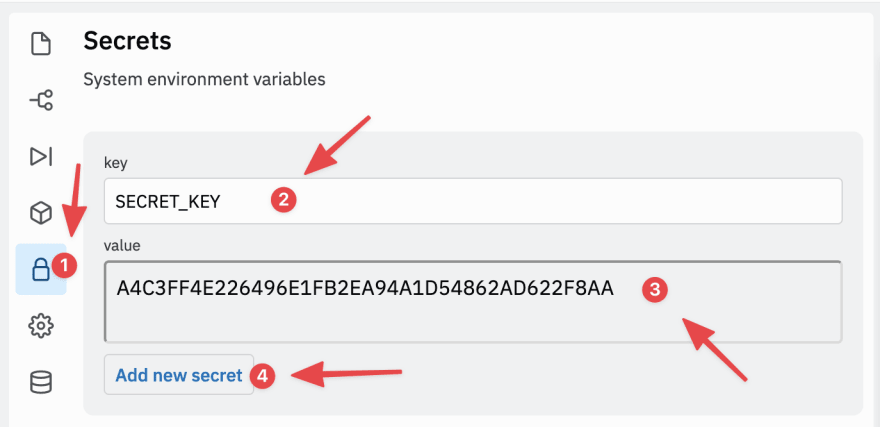
In your repl's "Secrets" tab, add a new key named SECRET_KEY and enter the random string you just generated as its value.
Next, we will create the context helper function. This function will provide the current user's data from our database to our application frontend. Add the following code to the bottom of main.py:
def context():
    email = session["email"] if "email" in session else None

    cursor = db.subscriptions.find({ "email": email })
    subscriptions = [subscription for subscription in cursor]

    return {
        "user_email": email,
        "user_subscriptions": subscriptions
    }
When we build our user login, we will store the current user's email address in Flask's session object, which corresponds to a cookie that will be cryptographically signed with the secret key we defined above. Without this, users would be able to impersonate each other by changing their cookie data.
We query our MongoDB database by calling db.<name of collection>.find(). If we call find() without any arguments, all items in our collection will be returned. If we call find() with an argument, as we've done above, it will return results with keys and values that match our argument. The find() method returns a Cursor object, which we can extract the results of our query from.
Next, we need to create an authentication function decorator, which will restrict parts of our application to logged-in users. Add the following code below the definition of the context function:
# Authentication decorator
def authenticated(f):
    @wraps(f)
    def decorated_function(*args, **kwargs):

        if "email" not in session:
            flash("Permission denied.", "warning")
            return redirect(url_for("index"))

        return f(*args, **kwargs)

    return decorated_function
The code in the second function may look a bit strange if you haven't written your own decorators before. Here's how it works: authenticated is the name of our decorator. You can think of decorators as functions that take other functions as arguments. (The two code snippets below are for illustration and not part of our program.) Therefore, if we write the following:
@authenticated
def authenticated_function():
    return f"Hello logged-in user!"

authenticated_function()
It will be roughly equivalent to:
def authenticated_function():
    return f"Hello logged-in user!"

authenticated(authenticated_function)
So whenever authenticated_function gets called, the code we've defined in decorated_function will execute before anything we define in authenticated_function. This means we don't have to include the same authentication checking code in every piece of authenticated functionality. As per the code, if a non-logged-in user attempts to access restricted functionality, our app will flash a warning message and redirect them to the home page.
Next, we'll add code to serve our home page and start our application:
# Routes
@app.route("/")
def index():
    return render_template("index.html", **context())

app.run(host='0.0.0.0', port=8080)
This code will serve a Jinja template, which we will create now in a separate file. In your repl's filepane, create a directory named templates, and inside that directory, a file named index.html. Add the following code to index.html:
<!DOCTYPE html>
<html>
    <head>
        <title>News Digest</title>
    </head>
    <body>
        {% with messages = get_flashed_messages() %}
            {% if messages %}
                <ul class=flashes>
                {% for message in messages %}
                <li>{{ message }}</li>
                {% endfor %}
                </ul>
            {% endif %}
        {% endwith %}

        {% if user_email == None %}
        <p>Please enter your email to sign up/log in:</p>
        <form action="/login" method="post">
            <input type="text" name="email">
            <input type="submit" value="Login">
        </form>
        {% else %}
        <p>Logged in as {{ user_email }}.</p>
        <h1>Subscriptions</h1>
        <ul>
        {% for subscription in user_subscriptions %}
            <li>
                <a href="{{ subscription.url }}">{{ subscription.title }}</a>
                <form action="/unsubscribe" method="post" style="display: inline">
                    <input type="hidden" name="feed_url" value="{{subscription.url}}">
                    <input type="submit" value="Unsubscribe">
                </form>
            </li>
        {% endfor %}
        </ul>

        <p>Add a new subscription:</p>
        <form action="/subscribe" method="post">
            <input type="text" name="feed_url">
            <input type="submit" value="Subscribe">
        </form>

        <p>Send digest to your email now:</p>
        <form action="/send-digest" method="post">
            <input type="submit" value="Send digest">
        </form>

        <p>Choose a time to send your daily digest (must be UTC):</p>
        <form action="/schedule-digest" method="post">
            <input type="time" name="digest_time">
            <input type="submit" value="Schedule digest">
        </form>
        {% endif %}

    </body>
</html>
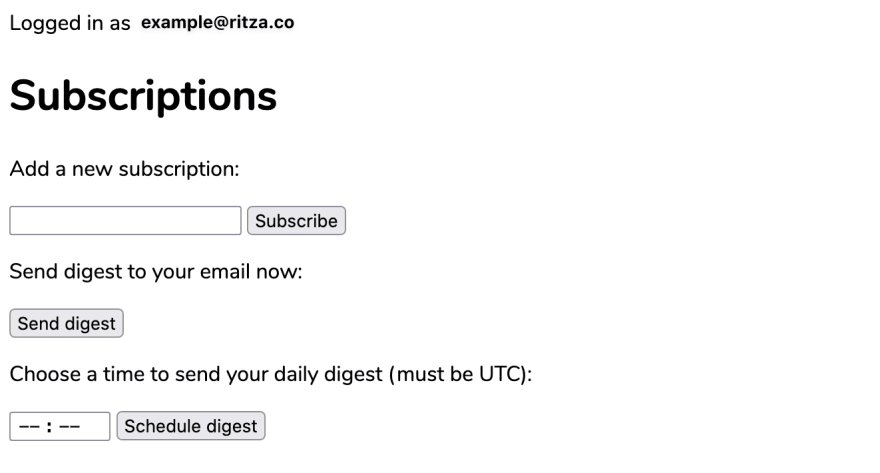
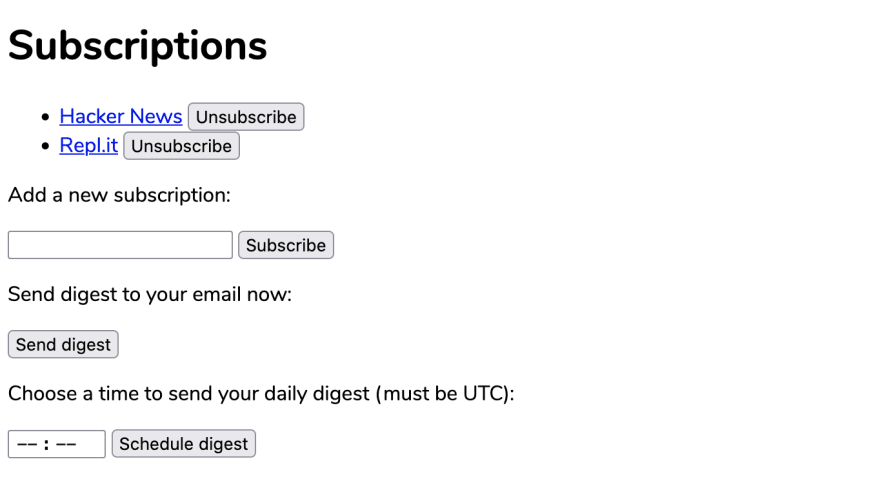
As this will be our application's only page, it contains a lot of functionality. From top to bottom:
- We've included code to display flashed messages at the top of the page. This allows us to show users the results of their actions without creating additional pages.
- If the current user is not logged in, we display a login form.
- If the current user is logged in, we display:
- A list of their current subscriptions, with an unsubscribe button next to each one.
- A form for adding new subscriptions.
- A button to send an email digest immediately.
- A form for sending email digests at a specific time each day.
To start our application when our repl runs, we must add an additional line to the bottom of start.sh:
# Run Flask app
python main.py
Once that's done, run your repl. You should see a login form.

Adding user login
We will implement user login by sending a single-use login link to the email address provided in the login form. This provides a number of benefits:
- We can use the code we've already written for sending emails.
- We don't need to implement user registration separately.
- We can avoid worrying about user passwords.
To send login emails asynchronously, we'll set up a Celery task.
In main.py, add the following code for the /login route below the definition of index:
# Login
@app.route("/login", methods=['POST'])
def login():
    email = request.form['email']
    tasks.send_login_email.delay(email)
    flash("Check your email for a magic login link!")

    return redirect(url_for("index"))
In this function, we get the user's email, and pass it to a function we will define in lib/tasks.py. As this function will be a Celery task rather than a conventional function, we must call it with .delay(), a function in Celery's task-calling API.
Let's implement this task now. Open lib/tasks.py and modify it as follows:
import requests, os
import random, string # NEW IMPORTS
from celery import Celery # NEW IMPORT
from celery.schedules import crontab # NEW IMPORT
from datetime import datetime # NEW IMPORT

import lib.scraper as scraper # NEW IMPORT
from lib.db import connect_to_db # NEW IMPORT

# NEW LINE BELOW
REPL_URL = f"https://{os.environ['REPL_SLUG']}.{os.environ['REPL_OWNER']}.repl.co"

# NEW LINES BELOW
# Celery configuration
CELERY_BROKER_URL = "redis://127.0.0.1:6379/0"
CELERY_BACKEND_URL = "redis://127.0.0.1:6379/0"

celery = Celery("tasks", broker=CELERY_BROKER_URL, backed=CELERY_BACKEND_URL)

celery.conf.enable_utc = True

# Mailgun config
MAILGUN_APIKEY = os.environ["MAILGUN_APIKEY"]
MAILGUN_DOMAIN = os.environ["MAILGUN_DOMAIN"]

# NEW FUNCTION DECORATOR
@celery.task
def send_test_email(to_address):
    res = requests.post(
        f"https://api.mailgun.net/v3/{MAILGUN_DOMAIN}/messages",
        auth=("api", MAILGUN_APIKEY),
        data={"from": f"News Digest <digest@{MAILGUN_DOMAIN}>",
              "to": [to_address],
              "subject": "Testing Mailgun",
              "text": "Hello world!"})

    print(res)

# COMMENT OUT THE TESTING LINE
# send_test_email("YOUR-EMAIL-ADDRESS-HERE")
We've added the following:
- Additional imports for Celery and our other local files.
- A
REPL_URLvariable containing our repl's URL, which we construct using environment variables defined in every repl. - Instantiation of a Celery object, configured to use Redis as a message broker and data backend, and the UTC timezone.
- A function decorator which converts our
send_test_emailfunction into a Celery task.
Next, we'll define a function to generate unique IDs for our login links. Add the following code below the send_test_email function definition:
def generate_login_id():
    return ''.join(random.SystemRandom().choice(string.ascii_uppercase + string.digits) for _ in range(30))
This code is largely similar to the code we used to generate our secret key.
Next, we'll create the task we called in main.py: send_login_email. Add the following code below the definition of generate_login_id:
@celery.task
def send_login_email(to_address):

    # Generate ID
    login_id = generate_login_id()

    # Set up email
    login_url = f"{REPL_URL}/confirm-login/{login_id}"

    text = f"""
    Click this link to log in:

    {login_url}
    """

    html = f"""
    <p>Click this link to log in:</p>

    <p><a href={login_url}>{login_url}</a></p>
    """

    # Send email
    res = requests.post(
        f"https://api.mailgun.net/v3/{MAILGUN_DOMAIN}/messages",
        auth=("api", MAILGUN_APIKEY),
        data={"from": f"News Digest <digest@{MAILGUN_DOMAIN}>",
              "to": [to_address],
              "subject": "News Digest Login Link",
              "text": text,
              "html": html })

    # Add to user_sessions collection if email sent successfully
    if res.ok:
        db = connect_to_db()
        db.user_sessions.insert_one({"login_id": login_id, "email": to_address})

        print(f"Sent login email to {to_address}")
    else:
        print("Failed to send login email.")
This code will generate a login ID, construct an email containing a /confirm-login link containing that ID, and then send the email. If the email is sent successfully, it will add a document to our MongoDB containing the email address and login ID.
Now we can return to main.py and create the /confirm-login route. Add the following code below the login function definition:
@app.route("/confirm-login/<login_id>")
def confirm_login(login_id):
    login = db.user_sessions.find_one({"login_id": login_id})

    if login:
        session["email"] = login["email"]
        db.user_sessions.delete_one({"login_id": login_id}) # prevent reuse
    else:
        flash("Invalid or expired login link.")

    return redirect(url_for("index"))
When a user clicks the login link in their email, they will be directed to this route. If a matching login ID is found in the database, they will be logged in, and the login ID will be deleted so it can't be reused.
We've implemented all of the code we need for user login. The last thing we need to do to get it working is to configure our repl to start a Celery worker. When we invoke a task with .delay(), this worker will execute the task.
In start.sh, add the following between the line that starts Redis and the line that starts our web application:
# Run Celery worker
celery -A lib.tasks.celery worker -P processes --loglevel=info &
This will start a Celery worker, configured with the following flags:
-
-A lib.tasks.celery: This tells Celery to run tasks associated with theceleryobject intasks.py. -
-P processes: This tells Celery to start new processes for individual tasks. -
--loglevel=info: This ensures we'll have detailed Celery logs to help us debug problems.
We use & to run the worker in the background – this is a part of Bash's syntax rather than a program-specific backgrounding flag like we used for MongoDB and Redis.
Run your repl now, and you should see the worker start up with the rest of our application's components. Once the web application is started, open it in a new tab. Then try logging in with your email address – remember to check your spam box for your login email.

If everything's working correctly, you should see a page like this after clicking your login link:
Adding and removing subscriptions
Now that we can log in, let's add the routes that handle subscribing to and unsubscribing from news feeds. These routes will only be available to logged-in users, so we'll use our authenticated decorator on them. Add the following code below the confirm_login function definition in main.py:
# Subscriptions
@authenticated
@app.route("/subscribe", methods=['POST'])
def subscribe(): # new feed
    feed_url = request.form["feed_url"]

    # Test feed
    try:
        items = scraper.get_items(feed_url, None)
    except Exception as e:
        print(e)
        flash("Invalid feed URL.")
        return redirect(url_for("index"))

    if items == []:
        flash("Invalid feed URL")
        return redirect(url_for("index"))

    # Get feed title
    time.sleep(1)
    feed_title = scraper.get_title(feed_url)
This code will validate feed URLs by attempting to fetch their contents. Note that we are passing None as the argument for since in scraper.get_items – this will fetch the whole feed, not just the last day's content. If it fails for any reason, or returns an empty list, an error message will be shown to the user and the subscription will not be added.
Once we're sure that the feed is valid, we sleep for one second and then fetch the title. The sleep is necessary to prevent rate-limiting by some websites.
Now that we've validated the feed and have its title, we can add it to our MongoDB. Add the following code to the bottom of the function:
    # Add subscription to Mongodb
    try:
        db.subscriptions.insert_one({"email": session["email"], "url": feed_url, "title": feed_title})
    except pymongo.errors.DuplicateKeyError:
        flash("You're already subscribed to that feed.")
        return redirect(url_for("index"))
    except Exception:
        flash("An unknown error occured.")
        return redirect(url_for("index"))

    # Create unique index if it doesn't exist
    db.subscriptions.create_index([("email", 1), ("url", 1)], unique=True)

    flash("Feed added!")
    return redirect(url_for("index"))
Here, we populate a new document with our subscription details and insert it into our "subscriptions" collection. To prevent duplicate subscriptions, we use create_index to create a unique compound index on the "email" and "url" fields. As create_index will only create an index that doesn't already exist, we can safely call it on every invocation of this function.
Next, we'll create the code for unsubscribing from feeds. Add the following function definition below the one above:
@authenticated
@app.route("/unsubscribe", methods=['POST'])
def unsubscribe(): # remove feed

    feed_url = request.form["feed_url"]
    deleted = db.subscriptions.delete_one({"email": session["email"], "url": feed_url})

    flash("Unsubscribed!")
    return redirect(url_for("index"))
Run your repl, and try subscribing and unsubscribing from some feeds. You can use the following URLs to test:
- Hacker News feed: https://news.ycombinator.com/rss
- /r/replit on Reddit feed: https://www.reddit.com/r/replit.rss
Sending digests
Once you've added some subscriptions, we can implement the /send-digest route. Add the following code below the definition of unsubscribe in main.py:
# Digest
@authenticated
@app.route("/send-digest", methods=['POST'])
def send_digest():

    tasks.send_digest_email.delay(session["email"])

    flash("Digest email sent! Check your inbox.")
    return redirect(url_for("index"))
Then, in tasks.py, add the following new Celery task:
@celery.task
def send_digest_email(to_address):

    # Get subscriptions from Mongodb
    db = connect_to_db()
    cursor = db.subscriptions.find({"email": to_address})
    subscriptions = [subscription for subscription in cursor]

    # Scrape RSS feeds
    items = {}
    for subscription in subscriptions:
        items[subscription["title"]] = scraper.get_items(subscription["url"])
First, we connect to the MongoDB and find all subscriptions created by the user we're sending to. We then construct a dictionary of scraped items for each feed URL.
Once that's done, it's time to create the email content. Add the following code to the bottom of send_digest_email function:
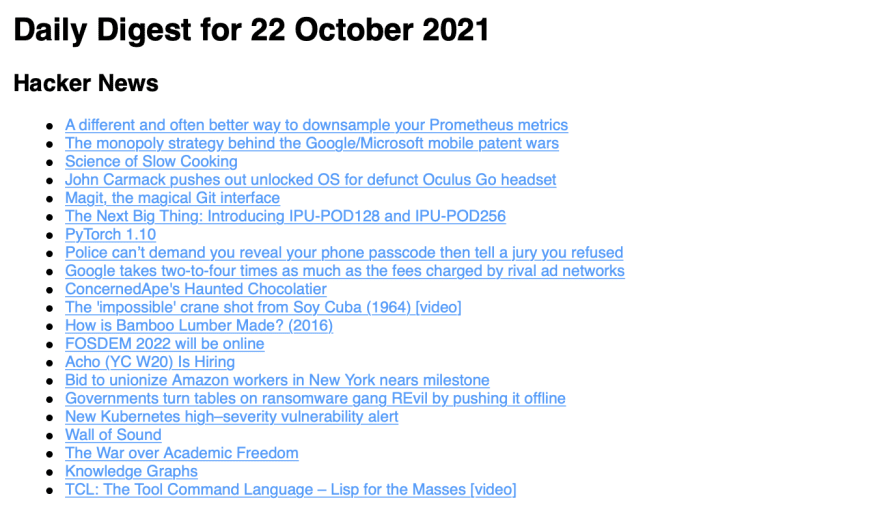
    # Build email digest
    today_date = datetime.today().strftime("%d %B %Y")

    html = f"<h1>Daily Digest for {today_date}</h1>"

    for site_title, feed_items in items.items():
        if not feed_items: # empty list
            continue

        section = f"<h2>{site_title}</h2>"
        section += "<ul>"

        for item in feed_items:
            section += f"<li><a href={item['link']}>{item['title']}</a></li>"

        section += "</ul>"
        html += section
In this code, we construct an HTML email with a heading and bullet list of linked items for each feed. If any of our feeds have no items for the last day, we leave them out of the digest. We use strftime to format today's date in a human-readable manner.
After that, we can send the email. Add the following code to the bottom of the function:
    # Send email
    res = requests.post(
        f"https://api.mailgun.net/v3/{MAILGUN_DOMAIN}/messages",
        auth=("api", MAILGUN_APIKEY),
        data={"from": f"News Digest <digest@{MAILGUN_DOMAIN}>",
              "to": [to_address],
              "subject": f"News Digest for {today_date}",
              "text": html,
              "html": html })

    if res.ok:
        print(f"Sent digest email to {to_address}")
    else:
        print("Failed to send digest email.")
Run your repl, and click on the Send digest button. You should receive an email digest with today's items from each of your subscriptions within a few minutes. Remember to check your spam!
Scheduling digests
The last thing we need to implement is scheduled digests, to allow our application to send users a digest every day at a specified time.
In main.py, add the following code below the send_digest function definition:
@authenticated
@app.route("/schedule-digest", methods=['POST'])
def schedule_digest():

    # Get time from form
    hour, minute = request.form["digest_time"].split(":")

    tasks.schedule_digest(session["email"], int(hour), int(minute))

    flash(f"Your digest will be sent daily at {hour}:{minute} UTC")
    return redirect(url_for("index"))
This function retrieves the requested digest time from the user and calls tasks.schedule_digest. As schedule_digest will be a regular function that schedules a task rather than a task itself, we can call it directly.
Celery supports scheduling tasks through its beat functionality. This will require us to run an additional Celery process, which will be a beat rather than a worker.
By default, Celery does not support dynamic addition and alteration of scheduled tasks, which we need in order to allow users to set and change their digest schedules arbitrarily. So we'll need a custom scheduler that supports this.
Many custom Celery scheduler packages are available on PyPI, but as of October 2021, none of these packages have been added to Nixpkgs. Therefore, we'll need to create a custom derivation for the scheduler we choose. Let's do that in replit.nix now. Open the file, and add the let ... in block below:
{ pkgs }:
let
    redisbeat = pkgs.python39Packages.buildPythonPackage rec {
        pname = "redisbeat";
        version = "1.2.4";

        src = pkgs.python39Packages.fetchPypi {
            inherit pname version;
            sha256 = "0b800c6c20168780442b575d583d82d83d7e9326831ffe35f763289ebcd8b4f6";
        };

        propagatedBuildInputs = with pkgs.python39Packages; [
            jsonpickle
            celery
            redis
        ];

        postPatch = ''
            sed -i "s/jsonpickle==1.2/jsonpickle/" setup.py
        '';
    };
in
{
    deps = [
        pkgs.python39
        pkgs.python39Packages.flask
        pkgs.python39Packages.celery
        pkgs.python39Packages.pymongo
        pkgs.python39Packages.requests
        pkgs.python39Packages.redis
        pkgs.python39Packages.feedparser
        pkgs.python39Packages.dateutil
        pkgs.mongodb
        pkgs.redis
        redisbeat # <-- ALSO ADD THIS LINE
    ];
}
We've chosen to use redisbeat, as it is small, simple and uses Redis as a backend. We construct a custom derivation for it using the buildPythonPackage function, to which we pass the following information:
- The package's
nameandversion. -
src: Where to find the package's source code (in this case, from PyPI, but we could also use GitHub, or a generic URL). -
propagatedBuildInputs: The package's dependencies (all of which are available from Nixpkgs). -
postPatch: Actions to take before installing the package. For this package, we remove the version specification for dependencyjsonpickleinsetup.py. This will forceredisbeatto use the latest version ofjsonpickle, which is available from Nixpkgs and, as a bonus, does not contain this critical vulnerability.
You can learn more about using Python with Nixpkgs in this section of the official documentation.
To actually install redisbeat, we must also add it to our deps list. Once you've done that, run your repl. Building custom Nix derivations like this one often takes some time, so you may have to wait a while before your repl finishes loading the Nix environment.
While we wait, let's import redisbeat in lib/tasks.py and create our schedule_digest function. Add the following code to the bottom of lib/tasks.py:
from redisbeat.scheduler import RedisScheduler

scheduler = RedisScheduler(app=celery)

def schedule_digest(email, hour, minute):

    scheduler.add(**{
        "name": "digest-" + email,
        "task": "lib.tasks.send_digest_email",
        "kwargs": {"to_address": email },
        "schedule": crontab(minute=minute, hour=hour)
    })
This code uses redisbeat's RedisScheduler to schedule the execution of our send_digest_email task. Note that we've used the task's full path, with lib included: this is necessary when scheduling.
We've used Celery's crontab schedule type, which is highly suited to managing tasks that run at a certain time each day.
If a task with the same name already exists in the schedule, scheduler.add will update it rather than adding a new task. This means our users can change their digest time at will.
Now that our code is in place, we can add a new Celery beat process to start.sh. Add the following line just after the line that starts the Celery worker:
celery -A lib.tasks.celery beat -S redisbeat.RedisScheduler --loglevel=debug &
Now run your repl. You can test this functionality out now by scheduling your digest about ten minutes in the future. If you want to receive regular digests, you will need to enable Always-on in your repl. Also, remember that all times must be specified in the UTC timezone.
Where next?
We've built a useful multi-component application, but its functionality is fairly rudimentary. If you'd like to keep working on this project, here are some ideas for next steps:
- Set up a custom domain with Mailgun to help keep your digest emails out of spam.
- Feed scraper optimization. Currently, we fetch the whole feed twice when adding a new subscription and have to sleep to avoid rate-limiting. The scraper could be optimized to fetch feed contents only once.
- Intelligent digest caching. If multiple users subscribe to the same feed and schedule their digests for the same time, we will unnecessarily fetch the same content for each one.
- Multiple digests per user. Users could configure different digests with different contents at different times.
- Allow users to schedule digests in their local timezones.
- Styling of both website and email content with CSS.
- A production WSGI and web server to improve the web application's performance, like we used in our previous tutorial on building with Nix.


Latest comments (0)