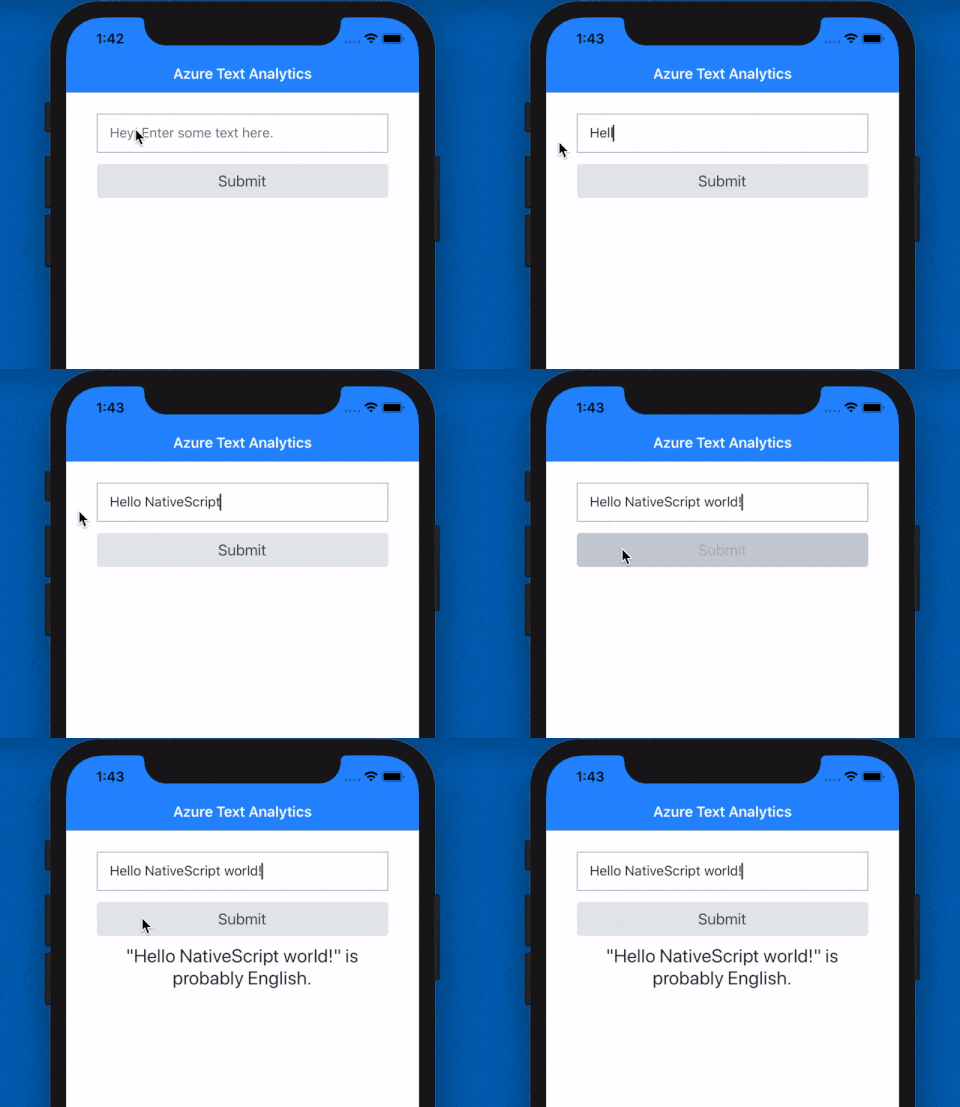
Ever have the need to determine the language of a text input in your mobile app? While this may seem like a niche bit of functionality, if you think about it, there are numerous use cases for language detection:
- Providing a customized experience based on language, not location;
- Identifying and translating text between languages;
- Routing questions to a person with the appropriate language knowledge.
Thankfully we can look to the cloud for an easy solution to this problem. Specifically, Microsoft Azure.
Azure provides a variety of "cognitive services" that allow your apps to interact with AI-powered algorithms in the cloud. You can enable your app to use some of its "human" senses by seeing, hearing, speaking, and interpreting input via traditional communication methods.
Let's take a look at how we can tap into just one of these Azure Cognitive Services APIs today: Text Analytics.
NOTE: Before you continue, if you don't already have a free Azure account, create one now. You'll need your subscription key and remote endpoint address to actually do anything!
Create an Azure Cognitive Services Resource
NOTE: I'll be using NativeScript for this example, but everything you see here can just as easily be done with a web app!
We need the all-important subscription key and remote endpoint to authenticate our NativeScript app with Azure. So first, you'll need to create a new Azure Cognitive Services resource using either the Azure Portal or the Azure CLI. This resource will enable access to the Text Analytics APIs.
TIP: No need to replicate the docs! Microsoft provides some simple instructions on how to do this via the Azure portal or the Azure CLI.
With this step complete, you should have a remote endpoint that looks something like this:
https://myservicename.cognitiveservices.azure.com
...and a subscription key for authentication with Azure, looking something like this:
8hj3jks686l98098jhkhhu678686adfe
Don't try using either of the above, they won't work 😉.
English, Bulgarian, or...Esperanto?
With your key and endpoint in-hand, we can get to the code. The sample app I create today is going to be awfully simple. It's going to include:
- A
TextFieldUI component for, well, text input; - A
Buttoncomponent for the user to tap (stop me of this is getting too complicated); - A
Labelcomponent to display Azure's best guess at a language of the inputted text.
Here is my basic UI layer:
<Page
    xmlns="http://schemas.nativescript.org/tns.xsd"
    navigatingTo="navigatingTo"
    class="page">

    <Page.actionBar>
        <ActionBar title="Azure Text Analytics" class="action-bar"></ActionBar>
    </Page.actionBar>

    <StackLayout class="p-20">
        <TextField hint="Hey! Enter some text here." text="{{ theText }}" returnKeyType="done" />
        <Button text="Submit" tap="{{ onTap }}" class="-primary -rounded-sm" />
        <Label id="lblLanguage" class="h2 text-center" textWrap="true"/>
    </StackLayout>

</Page>
With a sassy sprinkling of SASS in my app.scss file to give my app a "Bootstrap" kind of look and feel:
$base-theme: Bootstrap;
$skin-name: Bootstrap;
$swatch-name: Bootstrap;
$border-radius: 0.25rem;
$accent: #007bff;
$secondary: #e4e7eb;
$info: #17a2b8;
$success: #28a745;
$warning: #ffc107;
$error: #dc3545;
$body-bg: #ffffff;
$body-color: #292b2c;
$component-bg: #ffffff;
$component-color: #292b2c;
$card-cap-bg: #f7f7f9;
$card-cap-color: #292b2c;
$series-a: #0275d8;
$series-b: #5bc0de;
$series-c: #5cb85c;
$series-d: #f0ad4e;
$series-e: #e67d4a;
$series-f: #d9534f;

@import '~nativescript-theme-core/index';
TIP: If you're new to NativeScript, my favorite resources include the NativeScript Playground tutorials and nslayouts.com to learn about native user interface layouts.
Next I want to wire up my UI layer to Azure. I don't need any fancy Azure SDK for this in particular - though there is a JavaScript SDK should you need to use one in the future.
import { Observable } from 'tns-core-modules/data/observable';
import { request } from 'tns-core-modules/http';
const topmost = require('tns-core-modules/ui/frame').topmost;

export class HelloWorldModel extends Observable {
    theText: string;

    onTap() {
        const page = topmost().currentPage;
        const key = '[insert your key]';
        const endpoint = '[insert your endpoint]';
        const path = '/text/analytics/v2.1/languages';

        let docs = { documents: [{ id: '1', text: this.theText }] };

        let getLanguage = function(d) {
            let body = JSON.stringify(d);

            request({
                url: endpoint + path,
                method: 'POST',
                headers: {
                    'Content-Type': 'application/json',
                    'Ocp-Apim-Subscription-Key': key
                },
                content: body
            }).then(
                response => {
                    let res = response.content.toJSON();
                    let lblLanguage = page.getViewById('lblLanguage');
                    lblLanguage.text = '"' + d.documents[0].text + '" is probably ' + res.documents[0].detectedLanguages[0].name + '.';
                },
                e => {
                    console.log(e); // error
                }
            );
        };

        getLanguage(docs);
    }
}
NOTE: This example is using "core" NativeScript (the plain vanilla JavaScript/TypeScript flavor). You can also use Angular or Vue.js of course.
Let's walk through this code:
- My
onTapmethod responds to a user tapping on the button. - The
getLanguagemethod inserts the entered text into an array ofdocumentsthat Azure is anticipating. - With the cross-platform HTTP
requestmodule, we canPOSTour data and receive a response from Azure!
Easy peasy!
The resulting JSON response from the above request is going to look something like this:
{
   "documents": [
      {
         "id": "1",
         "detectedLanguages": [
            {
               "name": "English",
               "iso6391Name": "en",
               "score": 1.0
            }
         ]
      }
   ]
}
You can see in the detectedLanguages node that we've identified "English" as the most probable language. Try it for yourself with some other languages:
- Español: "Hola Mundo"
- Simplified Chinese: "你好,世界"
- Bulgarian: "Здравей свят"
- Esperanto: "Saluton mondo"
At this point your app logic can take over and direct the user's experience based on the language detected!


Top comments (0)