In this blog, I will show you how to deploy a simple Django Rest Framework (DRF) app using/Servers > PM2. I will be using Postgres for a database, though you can use any other database that is supported by Django with very minimal changes.
We'll also be using PM2 as a process manager for running the app.PM2 is a production-grade process manager that makes management of background processes easy. In the Python world we could compare PM2 to Supervisord or Circus.
If you are coming from the NodeJS world, you probably already know about PM2 - it is the de facto runner for NodeJS apps. However, PM2 is language agnostic and is equally capable of deploying other kinds of apps including Ruby and Python. The only caveat is that it needs NodeJS to be installed on the server. Our app might also have some JS assets that need to be built, so having NodeJS could be one less dependency to worry about.
We will perform the following tasks as we move along this process:
- Ensure that prerequisites are fulfilled.
- Add a Postgres database.
- Create a site that would be your actual app.
- Configure repository and build settings.
- Add deployment hooks.
- Deploy.
Prerequisites
In order to continue, it is necessary to create a Cleavr account and set up a server. To illustrate the process, I will be utilizing the Postgres database server but feel free to select any database (compatible with Django) that you prefer, or none at all if it's not necessary.
Add a database
If your app depends on a database, in my case a Postgres database, you need to add the database first:
Before adding a database, we need to add the database service first. For this example, I will be installing PostgreSQL 13. Similarly, you can install a database service of your choice.
To do so, we need to go to Servers > Databases and then click on Install Service
Now, to add a new database to our system:
Lets go to Servers > Databases and then click on Add new Database button
Add a Site
It's time to create a site now. Cleavr doesn't support deploying a Python app right out of the box. You can start by creating a generic port app and then install a few dependencies manually.
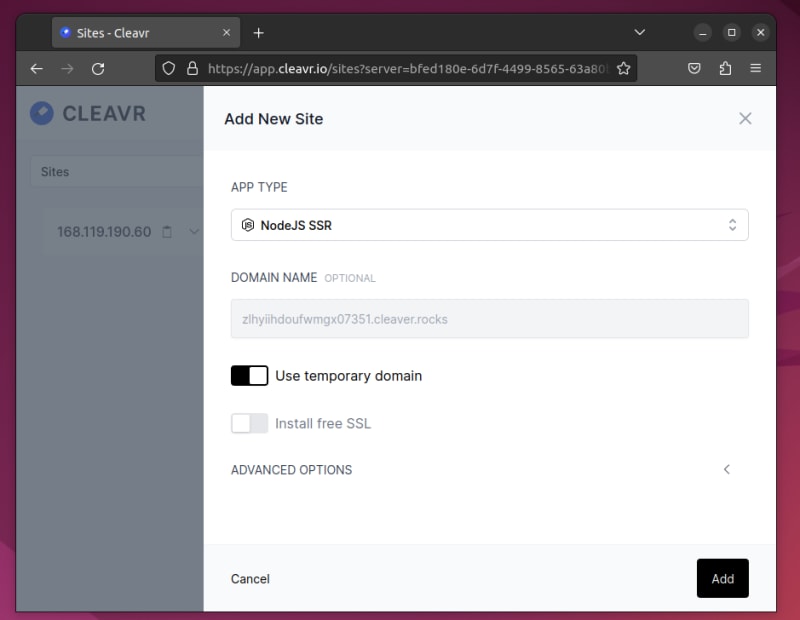
However, if you don't want to do that manually, you can start by creating a NodeJS app and then start from there. This will ensure all the dependencies and configurations are installed and generated so we don't have to spend time manually doing this. Also, since we will be using PM2 as a process manager, and as I mentioned before, we need to install NodeJS anyway.
Now, to add a site,
Let's go to Servers > Sites and then click on Add Site
Connect your GitHub repository
Now, we have configured our database and site. After this, we need to connect our repository with our site. So, whenever we push to our main branch, our deployment workflow automatically gets triggered.
For this project, I am deploying a simple django-test project that has just one endpoint. You can find the source code for this app on GitHub.
First, we need to configure our deployment workflow setting. We are first going to connect to our repository and then configure our PM2 ecosystem .config.js file via Cleavr.
Let's now go to
Deployments > Settings and click on Code Repository tab.
After, you configure your repository and select the branch to deploy,
click on Update.
Configure your build settings
Now, comes our build settings. This is where we will configure PM2's ecosystem.config.js to run our python web application ( In our case, django application).
To update our build settings, go to Deployments > Settings and click on Build tab.
By default, PM2's default interpreter is Node. But since we are deploying a python project, we have changed our interpreter as follows:
interpreter: "/usr/bin/python3"
I am running my python web application in port 7488, so, I am using:
scripts: "manage.py runserver"
args: "7488"
My domain is:
name: "e8ky5n0mrmghaqff7351.cleaver.rocks"
module.exports = {
  name: "e8ky5n0mrmghaqff7351.cleaver.rocks",
  script: "manage.py runserver",
  args: "7488",
  log\_type: "json",
  cwd: "/home/cleavr/e8ky5n0mrmghaqff7351.cleaver.rocks/current",
  interpreter : "/usr/bin/python3",
  env: {
    PORT: 7488,
    CI: 1
  }
}
Update your domain, port, scripts, and args depending on your project.
Configure your environment settings
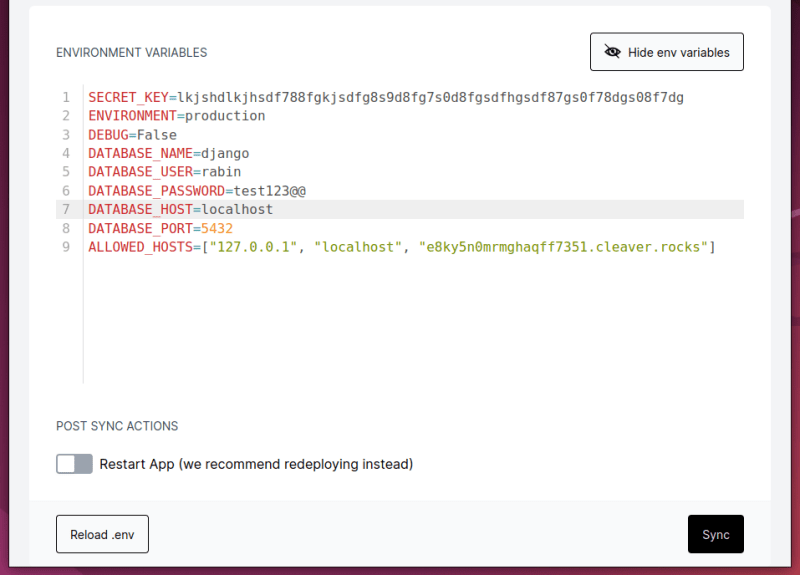
We need to pass some environment variables to our app. And Cleavr provides an easy way to update the .env file right from within the app.
Let's add environment variables via Cleavr. To do so,
Let's go to Deployment > Environment
and add the following environment variable in the editor section.
SECRET_KEY='lkjshdlkjhsdf788fgkjsdfg8s9d8fg7s0d8fgsdfhgsdf87gs0f78dgs08f7dg6'
ENVIRONMENT='production'
DEBUG=False
ALLOWED_HOSTS=['127.0.0.1','localhost','e8ky5n0mrmghaqff7351.cleaver.rocks']
DATABASE_NAME='django'
DATABASE_USER='rabin'
DATABASE_PASSWORD='test123'
DATABASE_HOST='localhost'
In my case, I am using a .env file to connect to my postgres database. You can add your environment variable according to your needs.
Add Deployment Hooks
We are almost there. One last thing we need to do before we can deploy and check that our site is working or not, is to add a custom hook that would install our app requirements.
Cleavr doesn't know what your requirements are, so we need to do this manually but it is really easy to create a custom hook where you could add your own scripts. We'll add 2 hooks, one for installing our project dependencies and another for migrating the database.
Let's go to Deployment > Deployment Hooks
-
First thing, we don't need to install npm packages since we don't have any, so let's disable both Install NPM packages and Build Assets hooks.
-
Add a hook to install your project requirements. To do so, click on the Add Hook button.
Install your project requirements.
pip install -r requirements.txtI have used pip and installed project dependencies from requirements.txt.In your case, if you are using Pipenv and Poetry, you can install project requirements accordingly.
-
My project depends on the Postgres database. So, to make database migrations, we need to add another hook.
python3 manage.py migrateJust a reminder, deployment hooks are executed in the order they are placed. So, make sure your hooks are in the correct order. In my case, I need to make sure I install project dependencies before migrating my database.
Deploy your site
Now, we are finally ready to deploy our app. To do so, let's go to
Deployment and click on Deploy Now 🚀.
You can now browse the free temporary domain provided by
Cleavr to check the result.
To get more information about your recent deployments, you can go to
Deployments > Recent Deployments
Final Remarks
While deploying the API server, we haven't used a virtual environment and we are directly using runserver instead of using Gunicorn(Uvicorn) to run the server.
Although we were able to run our python web application, it's not yet production ready. I will soon come up with a blog stating all the issues with this approach and at the same providing a better python deployment workflow. Stay tuned for my next blog.


Top comments (0)