
Why choose a Figma editor?
The designer's tool should have wide functionality and at the same time be accessible and understandable. Figma is the perfect option! Its main advantages:
- Speed of work. The service maintains a decent speed even with large amounts of data.
- Extensive functionality of the free version. At first, you should not spend on a paid version of the program, as the free version already includes wide opportunities, which are quite enough to work.
- Automatic saving. All projects are automatically saved on Figma servers. Even if the light is turned off, there is an apocalypse or your laptop suddenly orders you to live for a long time, the project will not disappear.
- Teamwork. You can work on the project together and share comments in the free version. If you want to attract more colleagues, you will have to buy a paid one.
- Components. One of the best features of Figma is to create component databases. How it works: you create a component database - for example, buttons; then copy elements from it; and when you change the main component, all copied versions will also be updated. This saves a lot of time and makes it very easy to work.
- Interactive prototypes. The ability to create clickable prototypes will allow you to demonstrate the idea of the project to the customer.
Now that we've seen that Figma is worth studying, it's time to get started!
Getting started with Figma
Step 1. Registration:
- go to figma.com;
- press the Sign up button;
- register through a Google account or email.
All you have to do is download the desktop version of the application.
Step 2. Downloading the Figma application:
- go to figma.com;
- in the Figma Downloads section, find the Desktop App;
- download the distribution for your operating system;
- additionally download fonts from the Font Installers section;
- run both installation files;
- additionally download the free Figma Mirror application (Android or iOS) - it will allow you to evaluate how your design will look on your phone.
Yay! Now we're ready to get started. Start the application and log in through your browser (in the same way as you registered) and start the first lesson.
First lesson on interface elements
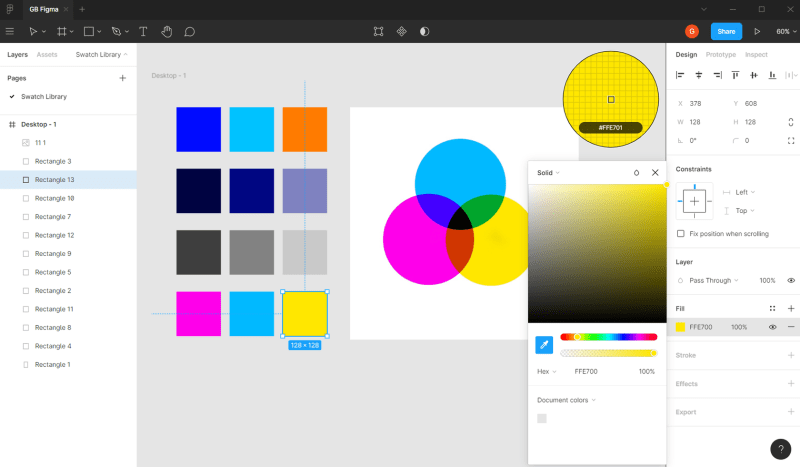
First of all, let's look at the work of Swatch Library, a color library. We will learn how to create it, set it up correctly, choose colors and start working with it.
Earlier we installed and launched the Figma application. Here's what we have to see:

We create a new project by clicking on the plus sign in the upper left corner, and immediately give it a convenient name. Next, expand the list of pages in the upper left corner and name the first page of Swatch Library. The main principle of using pages in Figma is to divide the project into functional parts. But we'll post a separate task on each page.
Figma tools
Frames
The tool we'll need today is frames.

Frame is the main element of design in Figma. This is a complete document that can be a page of the site or a mobile application screen that combines objects.
You can set the frame size yourself or select the ready-made screen sizes of popular devices in the toolbar on the right.
Vector forms
Another tool we'll use today is vector forms. Create vector objects with the Shape Tool tool. It can be used to draw interface elements - in the form of rectangles, lines, triangles, arrows, circles, stars.

Where to start working on the project
So, let's get started. Create a Desktop 1440x1024 frame, add a 128x128 rectangle shape, adjust the shade and transparency in the toolbar on the right.

We create our own color palette by duplicating the first form with Cmd+D/Ctrl+D.

Choose colors arbitrarily or with a pipette to get the best combination of shades.
When the entire palette is ready, we save the resulting colors - we can use them later.

To do this, click on the Style icon on the toolbar and save our colors with the names you understand through +. The first part of the name will indicate the color category, and the second part, after the slash, will be his name. We give names to each color group and get a library.

Now with the help of the library we can quickly create a shape or text of the color we need.

Let's imagine a new task: the client liked the colors in some picture and we need to repeat them. Easy! Insert the picture with Cmd+Shift+K/Ctrl+Shift+K, create the shapes to which we will pass the colors, and use the pipette to identify them.
Let's complicate the task: add a gradient. Create another row of shapes, open the color palette and select the type of Linear fill. Next, select the top and bottom edges of the gradient with the pipette and adjust 100% transparency from both edges.

Gradients, like ordinary colors, can be added to the library. If you want to change the gradient direction, just adjust the position of the guideline.
We created our first color library, learned how to make gradients and add them to the library. The beginning is set! Follow my Github <3


Top comments (0)