Part 2 - Developing your Browser Extension
If you are coming here for the first time, please do start with the first Part, as it will get you started with Quasar and a BEX project.
This article series has 3 parts:
- Part 1 - Introduction
- Part 2 - Developing your Browser Extension(You are here now)
- Part 3 - Building and Publishing your Extension
Before we begin, if you want to just dive into the code of our example Todo extension yourself, you may do so by cloning the project's repo.
In the last part, we got you going with BEX mode, however, you might be rightfully wondering: How do I see it in the browser? For that, and for the sake of brevity, I'd like to refer you back to the BEX mode docs. They are clear in what steps to take to get your BEX code running as an extension in either Chrome or Firefox.
Configuring BEX
The configuration of a BEX is majorly important, as without the configuration done right, your new and shiny browser extension simply won't run correctly.
To configure the BEX, there is one main file we need to be aware of.
The manifest JSON file
Manifest JSON
This file tells the browser how to set up the BEX internally. Without it, all you have is a bunch of code doing nothing.
Let's have a look at our To-do BEX's manifest.json file.
Let's go over quickly what the different fields are all about. Note where *** is added, these fields are required for the manifest to work.
-
name***,descriptionandversion***: This is your area to describe your app via name and description and to set its version number. As you can see, we've done this for the todo BEX. You can alter this area as you wish, just be sure to keep the requirednameandversionsections. -
manifest_version***: Important here is that it stays on "2". It tells the browser the type of manifest spec the file is using. -
icons: This tells the browser what icons to use and where they are. As a minimum, you should provide a 128x128 pixel icon. It's recommended to also add a 16x16 and 48x48 pixel icons too. Again, if you need some automation with creating icons for any Quasar app, please check out our IconGenie. For the BEX mode, after you've installed IconGenie you need an icon file (png) as source in your source folder and then...$ icongenie generate -m bex --icon /path/to/icon/source.png...and voila, your icons are all created for you. -
browser_action: This field holds information about what will happen with the button icon added to the top right of the browser. (Here, in our example, the Quasar logo). As you can see, we've only added the app name and this ends up being a tooltip under the icon button. This field can define more, like for instance the popup html file to be used to hold more commands (like a whole Quasar app), when the button is left-clicked by the user. Something else you can do with this field is define a badge, like for indicating a number of notifications. -
background: This field is where you register your different background scripts, which in turn are the observers of browser events. We'll cover this in more detail below. -
content_scripts: Content scripts are files that run in the context of web pages. They are the files that basically interact with the current webpage being "influenced." We'll go a bit into these in more detail below too. -
permissions: To use most chrome.* APIs, your extension must declare its intent in the "permissions" field of the manifest. In other words, in order to access any particular API, the API's type must be declared here. In our case, we are requiring access to all URLs, storage, tabs and active tabs APIs. -
web_accessible_resources: This is an array of strings specifying the paths of packaged resources that are expected to be usable in the context of a web page. The defintions should point to the files that should run in the browser extension, as here, for our todo app. -
content_security_policy: This defines the Content Security Policy of your extension, basically maintaining the minimum interaction between it and the browser from a communication's security standpoint. The added options should only allow what is absolutely necessary for the extension to work.
That describes everything we've added to our todo BEX's manifest.json file. There is a whole lot more to understand and learn, which you can do in the Chrome documentation.
If you started your project from scratch with the BEX mode switch (-m bex) for quasar dev, you'll notice this file was added for you automatically with the basic entries needed to get going.
Again, you'll need to do more studying about this file for more advanced browser extensions. We've only scratched the surface with our little app and the explanations above.
Extension Communication
Before you dig into the world of extensions, one important aspect of how they work is their ability to "communicate" between the browser, the webpage DOM and all the relavent APIs. In order to help make this communication clear, have a look at the diagram below.
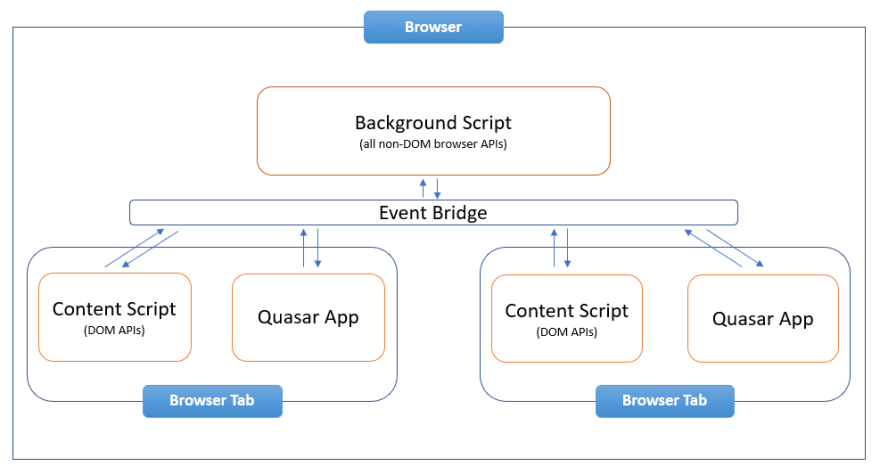
With the Quasar BEX mode, you have an events system which "bridges the gap" between the code necessary to manipulate the browser or a web page and your code in your Quasar app. In the diagram above, we are showing you how to interact with a web page.
Notice in the above diagram, we are showing web tabs. You only need content-script.js or related files for the usage of tabs and interacting with the DOM.
Important to note: The app and content scripts are all duplicated for every tab created and the extension used. Keep this in mind while writing your app extension to make sure it is as explicit as possible as to what web content it wants to interact with.
In the next image below, you'll notice the content script is no longer available, since we are working with the dev tools and/ or a popup. The popup is the one that would show up, when the extension button top right is clicked by the user.
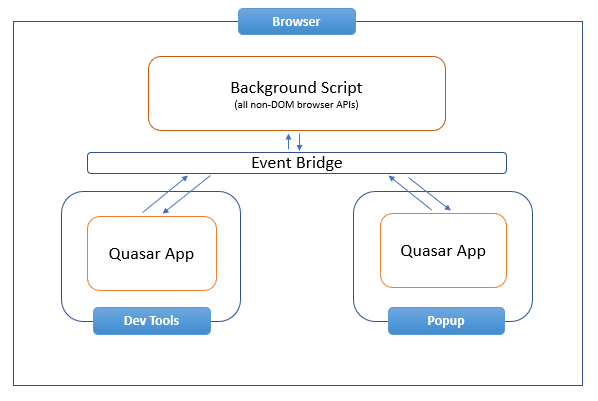
We've split up the diagrams between tabs and dev tools and the popup. If you wanted, your BEX could handle/ use all of them at the same time.
If you are familiar with Vuex, the "Event Bridge" code might seem somewhat familiar too, as it is this bridge which forms a communication plane between Quasar and the browser, where the browser is a form of "backend". You'll understand this much better, once we explain the "hooks" files.
The Bridge
The Bridge object offered to you in a BEX mode Quasar app is very simple, yet powerful, as it abstracts out a number of event listening systems into three easy methods. This is the API of the bridge.
- on('event-name', functionName(payLoad)) - Sets up the event listener. It takes the event name as a string and a function which will be called when that event is triggered. The payLoad from the
send()method below is passed into this function. - off('event-name', functionName) - Removes the event listener. The
functionNamemust match the one declared in its relative.on(). When you callon(), it holds a reference in memory to the function it's registered, off needs that same function so it can decouple the event. - send('event-name', payload) - Sends a payload of any JavaScript type to an event registered with the same name using the
.on()method above.
The Background Script and Hooks Files
As you saw from the diagram above, the "background script" is the heart of your extension. In our manifest.json file, you noticed how we have the following section.
  "background": {
    "scripts": [
      "www/bex-background.js",
      "js/background.js"
    ],
    "persistent": true
  },
In the Quasar BEX mode, Quasar offers its "connectivity" to the background script via the hooks file. So, instead of writing your core extension code inside background.js, you should use the background-hooks.js file (or bring in your code via modules into this file). This file is then automatically built during the quasar dev and quasar build commands into the bex-background.js file.
Let's have a look at our background-hooks.js file and what it does.
So, what are we looking at?
In...
- lines 1-19, we are setting up the "storage.get" event via the
bridge.onmethod. This is how we retrieve our browser store persisted todos. - lines 21-26, we have our code for setting or actually saving the todo in the store.
- lines 28-34, we have our code to remove a todo from the store.
- lines 36-38, we are sending a message to Quasar to toggle the toolbar which, in essence, brings our Quasar app to life or hides it in the background.
It is all quite straight forward, once you understand the communication has to be done via the event bridge Quasar's BEX mode offers.
The Content Script and Hooks Files
Content scripts are used when you need to interact or interface with the current web page (in a tab). In other words, these files are ran in the context of a web page. Via the standard DOM APIs, content scripts can make changes to the pages "on the fly".
Similarly to the background-hooks.js file, Quasar's BEX mode offers a content-hooks.js file, which is called and transpiles to the www/bex-content-script.js file, which is also defined in our manifest.json file.
Let's have a look at our content-hooks-js file.
Two main things are happening. We are setting up the iframe for our Quasar app and we are also setting up the todo buttons in the search results and firing off the events accordingly when they are clicked.
Let's look at the code in more detail.
In....
- lines 1-21, we are putting the iframe and any functionality around it together.
- lines 23-44, we are connecting our iframe functionality to the rest of the extension via the brige via the
bridge.onmethod. - lines 43-71, we have a function for setting up our buttons and we also have some styling defaults for the iframe, so it will be seamless. Note the code for finding the proper links in the Google search results.
- lines 73-93, we have an IIFE, which will get our browser extension code into the page at load time. Important to note is the
clickFnfunction, which also uses theBridge.sendmethod to add a todo in ourbackground-hooks.jsfile via thebex.add.todoevent. It also pulls content from the page to fill in the values of the todo (i.e. text from the link and the link itself.)
Again, fairly straight forward code.
Bringing it all together - The Quasar App
So, now you are hopefully asking, how does my App fit in? Or how does the todo app work inside the browser?
Well, there are two files we need to look at in our Todo app. The MainLayout.vue and the services/db.js file.
Let's look at the code in the MainLayout.vue file. We'll only be pulling out the code of interest for the sake of brevity.
At the end of the file, we have this section of code.
  created () {
    this.$q.bex.on('bex.toggle.toolbar', this.toggleToolbar)
    this.$q.bex.on('bex.add.todo', this.addRemoteTodo)

    this.loadTodos()
  },

  beforeDestroy () {
    this.$q.bex.off('bex.toggle.toolbar', this.toggleToolbar)
    this.$q.bex.off('bex.add.todo', this.addRemoteTodo)
  }
These are our Vue component lifecycle hooks and this is where the toggle.toolbar and add.todo (for personal todos) events are created. They are also destroyed before the component is destroyed.
IMPORTANT!!! Make sure you always remove the events listeners you create. If you don't, you might end up out of memory!
The next bit of code that is of interest in the MainLayout.vue file is this code below, which is our component's methods.
  methods: {
    toggleToolbar (payload, onlyOpen = false) {
      if (onlyOpen === false || (onlyOpen && this.uiVisible === false)) {
        this.uiVisible = !this.uiVisible
        return this.$q.bex.send('bex.toggle.iframe', {
          open: this.uiVisible
        })
      }
    },

    resetTodo () {
      this.todo.id = uid()
      this.todo.text = ''
      this.todo.link = ''
      this.todo.status = 0
    },

    loadTodos () {
      dbService.getAll('todo').then(todos => {
        this.todos = todos
      })
    },

    addTodo () {
      dbService.save(`todo.${this.todo.id}`, this.todo)
      this.resetTodo()
      this.loadTodos()
    },

    removeTodo (id) {
      console.log('deleting', id)
      dbService.delete('todo', id)
      this.resetTodo()
      this.loadTodos()
    },

    addRemoteTodo (payload) {
      const data = payload.data
      this.todo.id = uid()
      this.todo.text = data.text
      this.todo.link = data.link
      this.addTodo()

      // once the toolbar has been opened, notify the user.
      this.toggleToolbar(null, true)
      this.$q.notify({
        message: 'Todo has been added for ' + data.text,
        color: 'positive'
      })
    }
  },
If you've noticed, most of the actions revert to the dbService object. This is code offered in the services/db.js file and forms the "connection" to our backend-hooks.js file. Let's have a look in the service/db.js file.
This code is fairly transparent. We have the save, delete, get and getAll methods, which in turn fire off the events in our bridge, with lines like...
 return window.QBexBridge.send('storage.get', {
      key: useKey
    }).then(event => {
      return event.data
    })
Notice we are "sending" an event with the name storage.get and a payload. This corresponds to our first bridge.on listener in our background-hooks.js file.
bridge.on('storage.get', event => {
    const payload = event.data
    if (payload.key === null) {
      chrome.storage.local.get(null, r => {
        const result = []

        // Group the items up into an array to take advantage of the bridge's chunk splitting.
        for (const itemKey in r) {
          result.push(r[itemKey])
        }
        bridge.send(event.eventResponseKey, result)
      })
    } else {
      chrome.storage.local.get([payload.key], r => {
        bridge.send(event.eventResponseKey, r[payload.key])
      })
    }
  })
This pattern is the same for all the other "db" calls.
So, as you can see, the "bridge" is the key to making it all happen. It is completely agnostic to what you need to get done. All you have to do is create the listener and then "send" your actions to be carried out by either the background scripts (background-hooks.js) or the content scripts (content-hooks.js) or vice versa.
Hopefully now you have fair understanding of how a Quasar app in BEX mode can be developed. Let us know in the comments about what you think of this architecture. Do you see yourself building the next great browser extension with Quasar?
In the last part, we'll be going over how to build and publish your browser extension.
For more Info:

Top comments (6)
Thanks for posting this whole tutorial! It is helping me understand how to develop a BEX project using Quasar. There is one concern, however. When I tried to run this application, the background-hooks script is sending multiple messages when I try to toggle the toolbar, which in turn make the app not toggle properly. I facing this issue in developing my own BEX as well.
I still can't figure out how do I disable the default behavior of the quasar icon at the top right corner,
It still opens up a new tab every time and also loads the iframe, I am confused how did you disable it
Wow this is super nice, I'll try it out, quasar is amazing!
Small notice, the first two files are messed up / inverted
Thanks. Can you clarify what you mean about the files? I'm not sure what you mean. :)
Scott
Oh weird, the other day I saw the manifest (the first file) swapped with the background-hooks.js
All seems fine, maybe I was just too tired :D
My background hook.js is loading twice, because of which multiple add listener are being executed its something weird I just copied the exact same code